
|
If there's one thing that I never get tired of, it's textured crochet stitches. Ribbing, ridges, popcorns, puffs. . . the squishier, the better! It's hard to choose (they're all just so lovely), but I think that my favorite textured stitch would have to be the bean stitch. The bean stitch is no stranger to this blog; It's been the star of more than one pattern in the last couple of years. So when I was thinking about making a textured pumpkin, of course I had to use the bean stitch! For those of you who are looking to upgrade your basic crocheted pumpkin, this cute bean stitch pumpkin is sure to fit the bill. 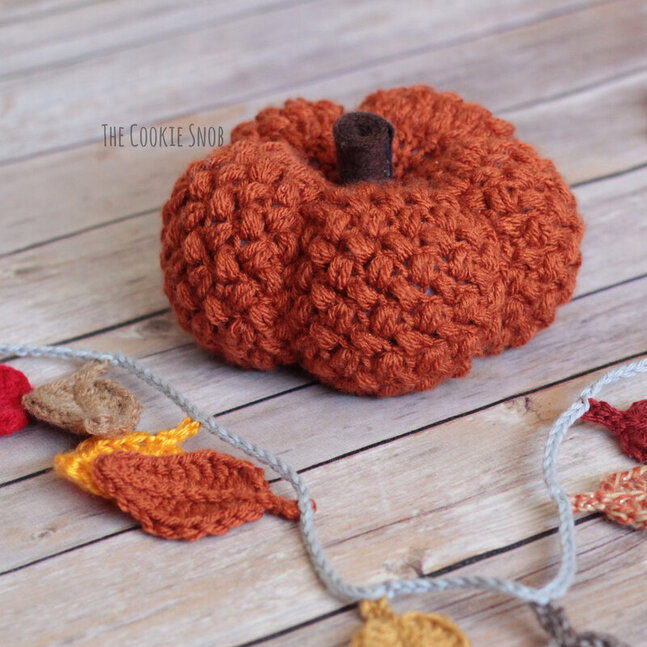 I made this pumpkin in just one size, but you can adapt the pattern fairly easily to make smaller or larger pumpkins (feel free to contact me if you have questions about how to do so). As written, my pumpkin turned out to be about 6" in diameter. Gauge isn't crucial for this pattern, but your pumpkin will most likely end up a different size if your gauge differs and you may need more or less yarn to pull it off. A small amount of gaping between stitches is inevitable because of the nature of the bean stitch, but try to make sure your stitches are tight enough to keep too much stuffing from showing through.. 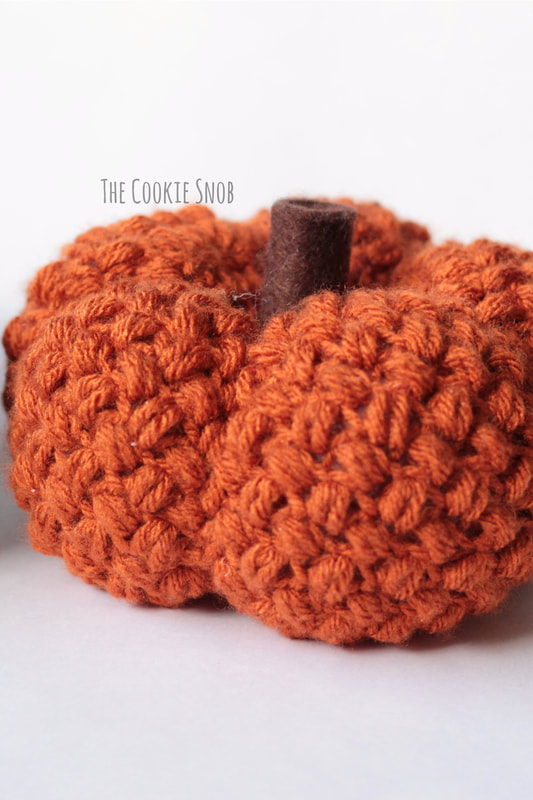 If you'd like an ad-free printable PDF version of this pattern, you can find one on Ravelry. Thank you to everyone who supports this blog and keeps it up and running! You rock! Stitch Glossary: st(s) = stitch(es) ch = chain ss = slip stitch sc = single crochet inc = sc increase (work 2 sc in the same st) dec = sc decrease (decrease over 2 sc) RS = right side WS = wrong side bean st = bean stitch (see note below) Note: To make the bean st: Insert the hook into your desired stitch. Yarn over and pull up a loop. [Yarn over, insert the hook into the same st, and pull up a loop ] twice. Yarn over and insert the hook into the same st once more and pull up another loop. You should now have 6 loops on your hook. Yarn over one last time and pull the yarn through all 6 loops on the hook. Ch 1 to finish off the bean st. (You can find a step by step photo tutorial for this stitch here.) Materials:
Gauge: For a pumpkin about 6" in diameter: 2" = 4 bean sts 2" = 6 rows of bean st Pumpkin Base: Round 1: (RS) Make a magic circle and work 6 sc into the circle, ss to first sc to join and pull taut to close (6) Round 2: (RS) ch 1, inc around, ss to join (12) Round 3: (RS) ch 1, [inc, sc] 6 times, ss to join (18) Round 4: (RS) ch 1, [inc, sc in the next 2 sts] 6 times, ss to join (24) Round 5: (RS) ch 1, [inc, sc in the next 3 sts] 6 times, ss to join (30) Round 6: (RS) ch 1, [inc, sc in the next 4 sts] 6 times, ss to join (36) Round 7: (RS) ch 1, [inc, sc in the next 5 sts] 6 times, ss to join (42) Round 8: (RS) ch 1, [inc, sc in the next 6 sts] 6 times, ss to join (48) Round 9: (RS) ch 1, [inc, sc in the next 7 sts] 6 times, ss to join (54) Round 10: (RS) ch 1, [inc, sc in the next 8 sts] 6 times, ss to join (60) 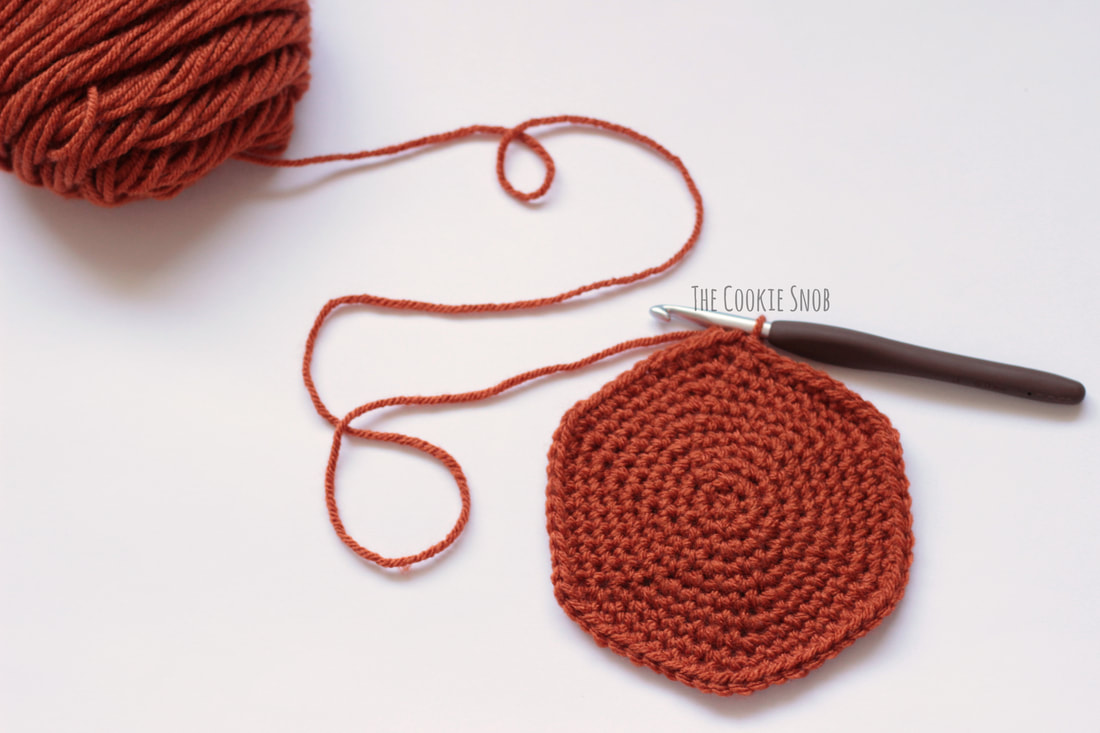 Round 11: (RS) ch 3, bean st in the next st (marked with an arrow below)... 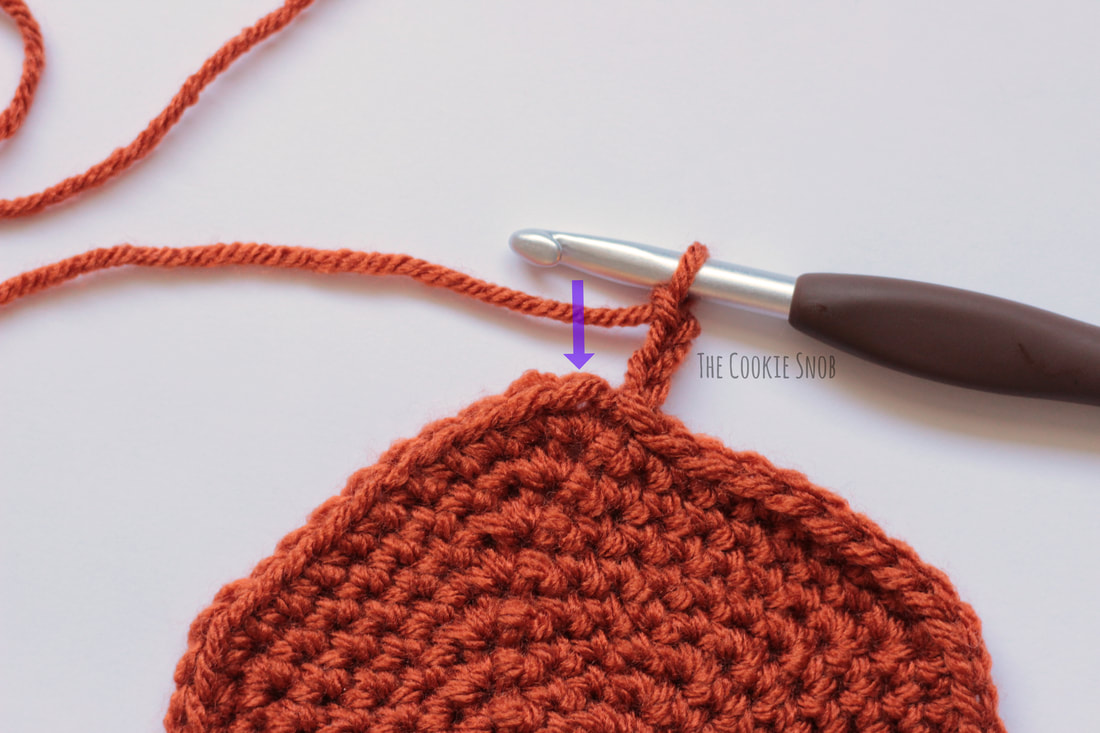 ...skip the next st and then bean st in the next st (the spot for the next bean st is marked with an arrow below)... 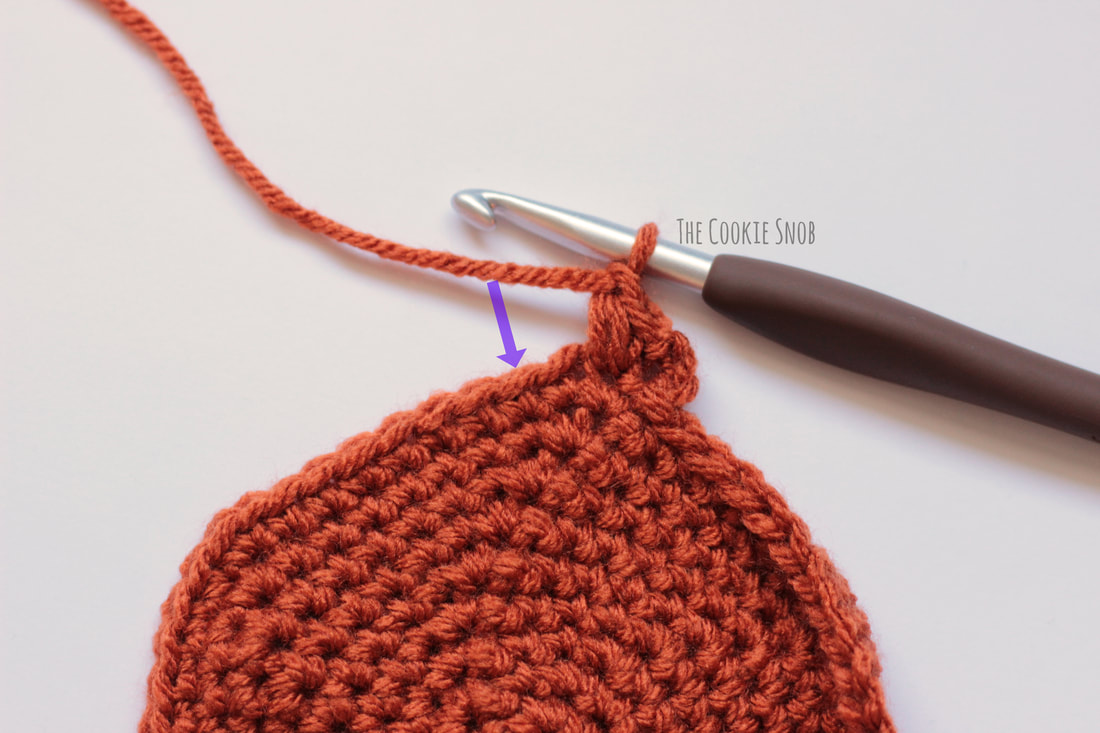 ...[skip the next st, bean st] around, ss to top of first bean st (marked with an arrow) to join, turn (30 bean st) 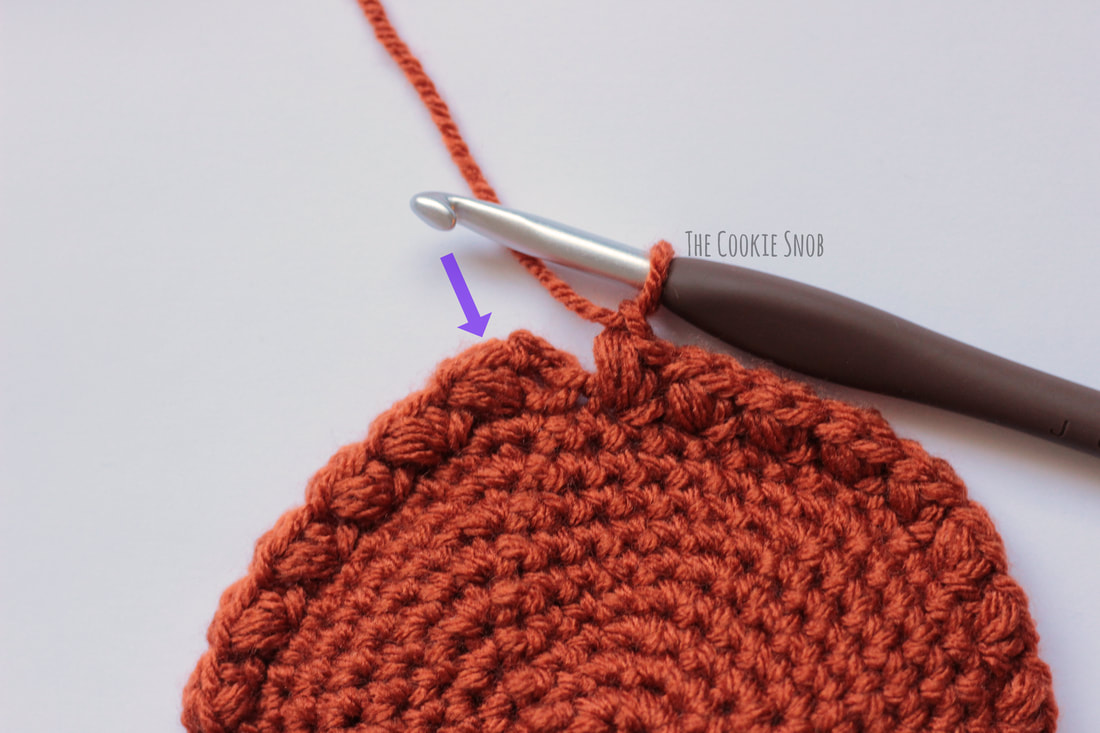 Round 12: (WS) ch 3, skip the first st, bean st in the next st (shown with an arrow below), [skip the next st, bean st in the next st] around, ss to the first bean st to join, turn (30 bean st) 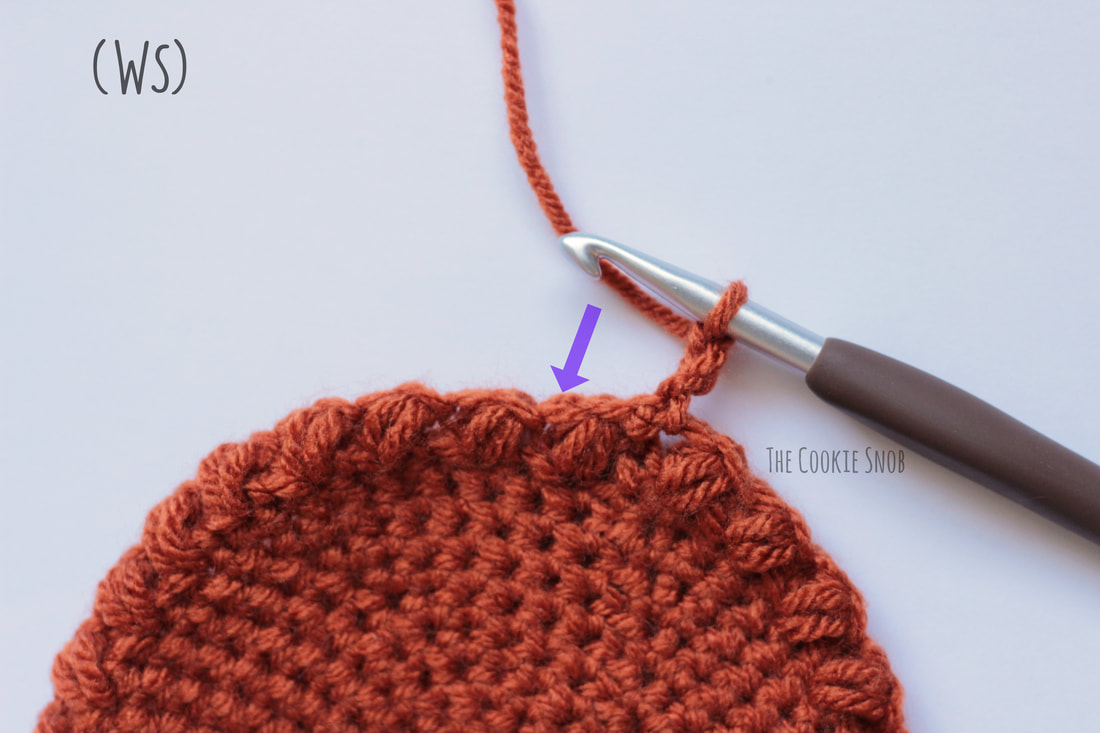 Rounds 13-22: Repeat round 12, alternating RS and WS 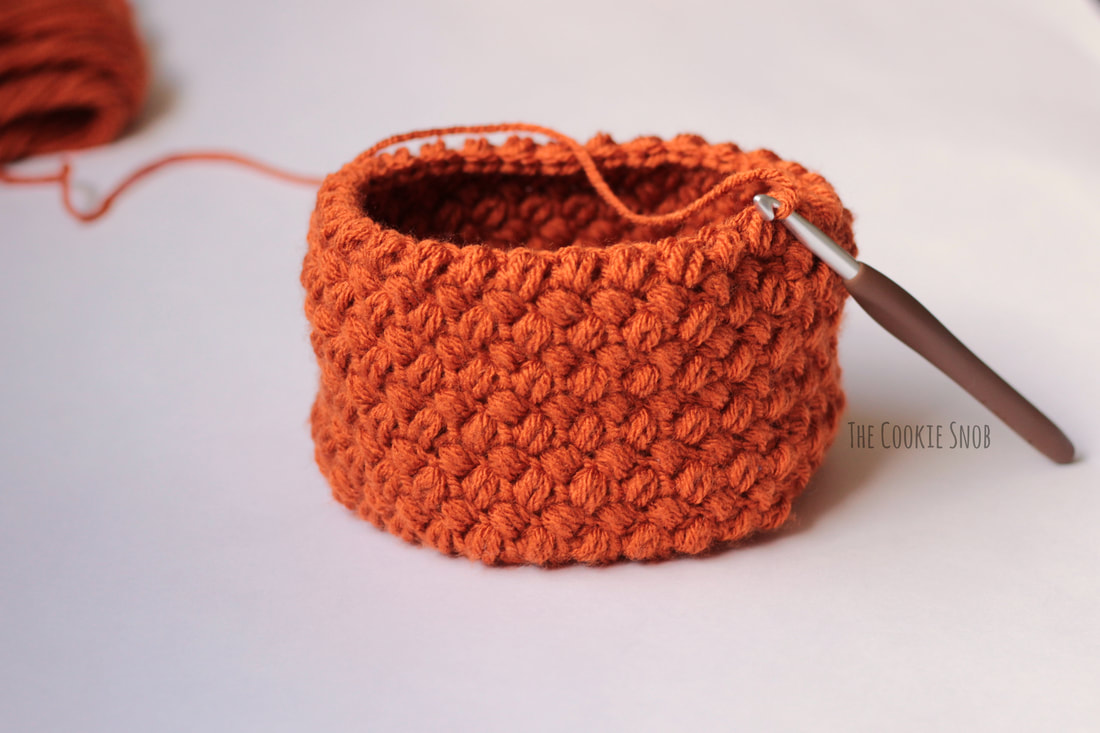 Round 23: (RS) ch 1, skip the first st, sc in the next st, [skip the next st, sc in the next st] around (30 sc) 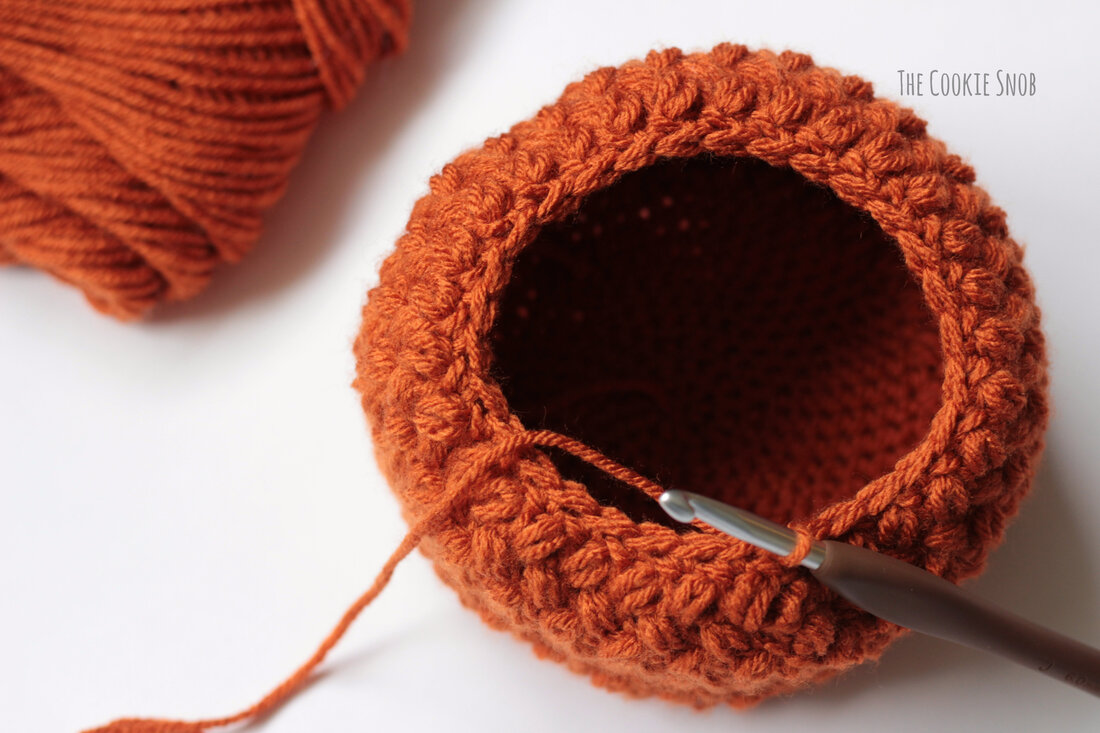 Round 24: (RS) [dec, sc in the next 3 sts] 6 times, ss to join (24) Round 25: (RS) [dec, sc in the next 2 sts] 6 times, ss to join (18) Begin stuffing. Continue to stuff as you go Round 26: (RS) [dec, sc] 6 times, ss to join (12) Round 27: (RS) dec around, ss to join (6) Fasten off, leaving an extra long yarn tail. Using the tapestry needle, weave the yarn tail through the front loops of the remaining sts and pull taut to close. 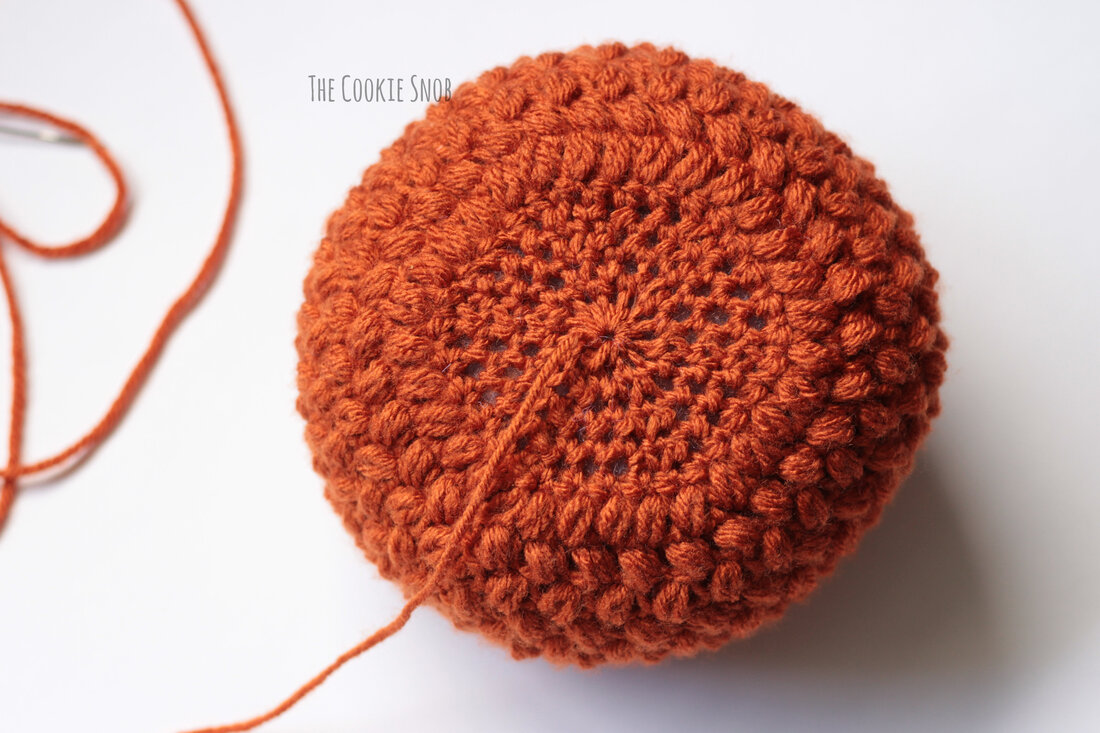 Now we're going to shape the pumpkin using the tapestry needle and the yarn tail. Insert the needle into the center of Round 1 and back out through the top of the last round. Pull taut to create an indentation, as shown. 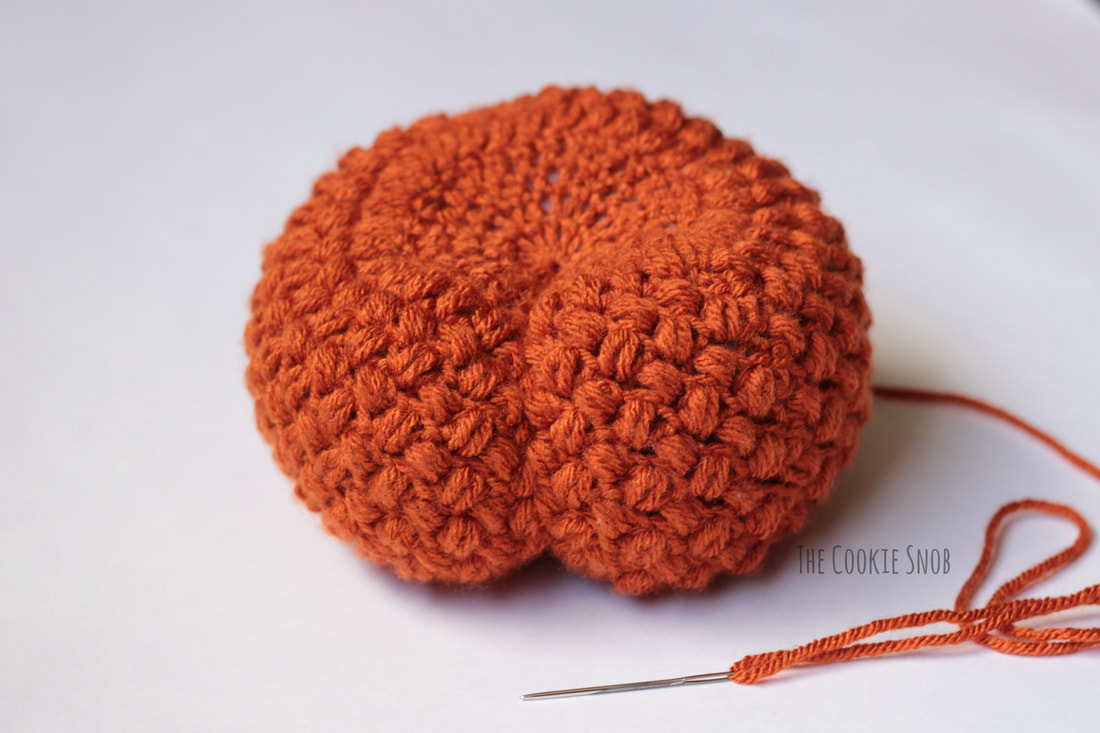 Repeat 4 more times around the pumpkin until you have 5 evenly spaced indentations. Tie off and weave in ends. 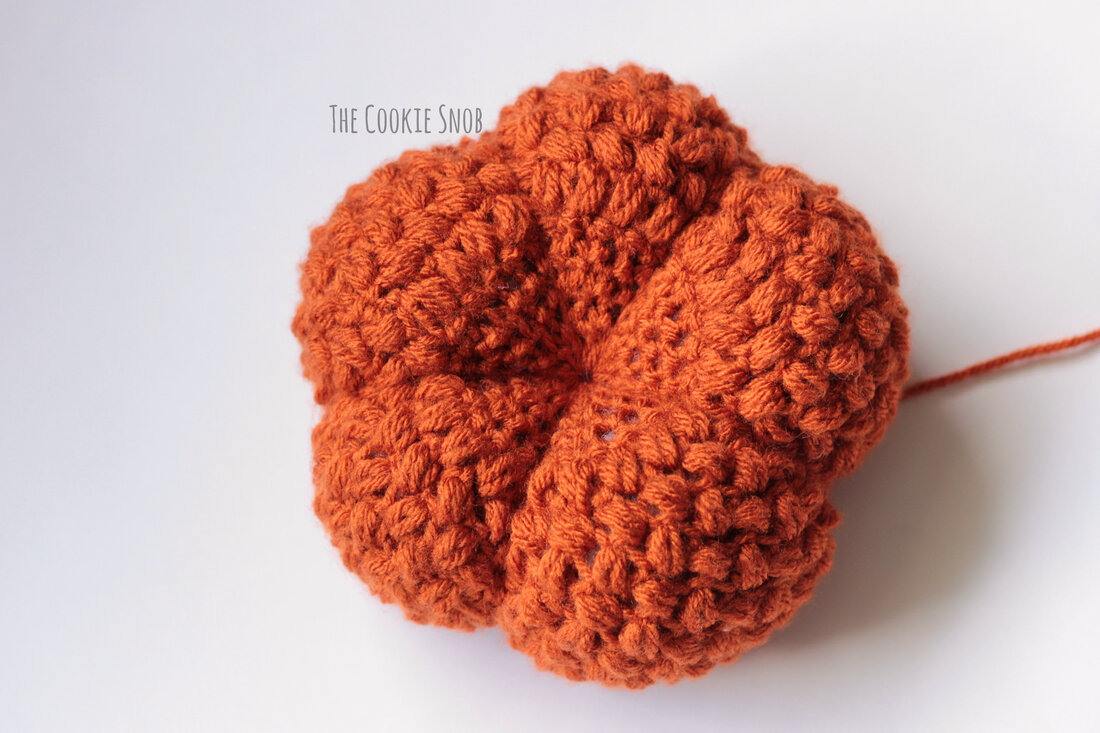 Stem: Cut your brown felt into a 1.5" by 10" rectangle. Starting on the short side, roll up the rectangle tightly into a log shape. Use hot glue to fasten off and hold the rolled shape. 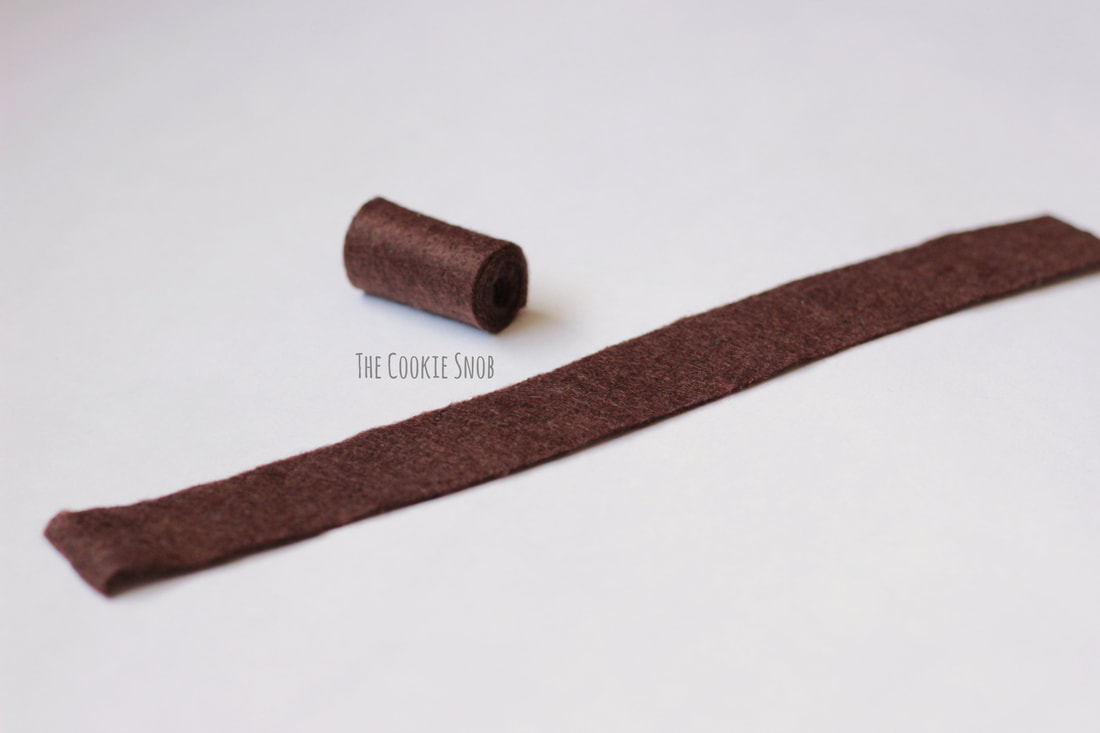 Using a dab of hot glue, attach the stem to the center of the top of the pumpkin. OR, if you'd rather use a cinnamon stick stem, you can find instructions in this pumpkin pattern. 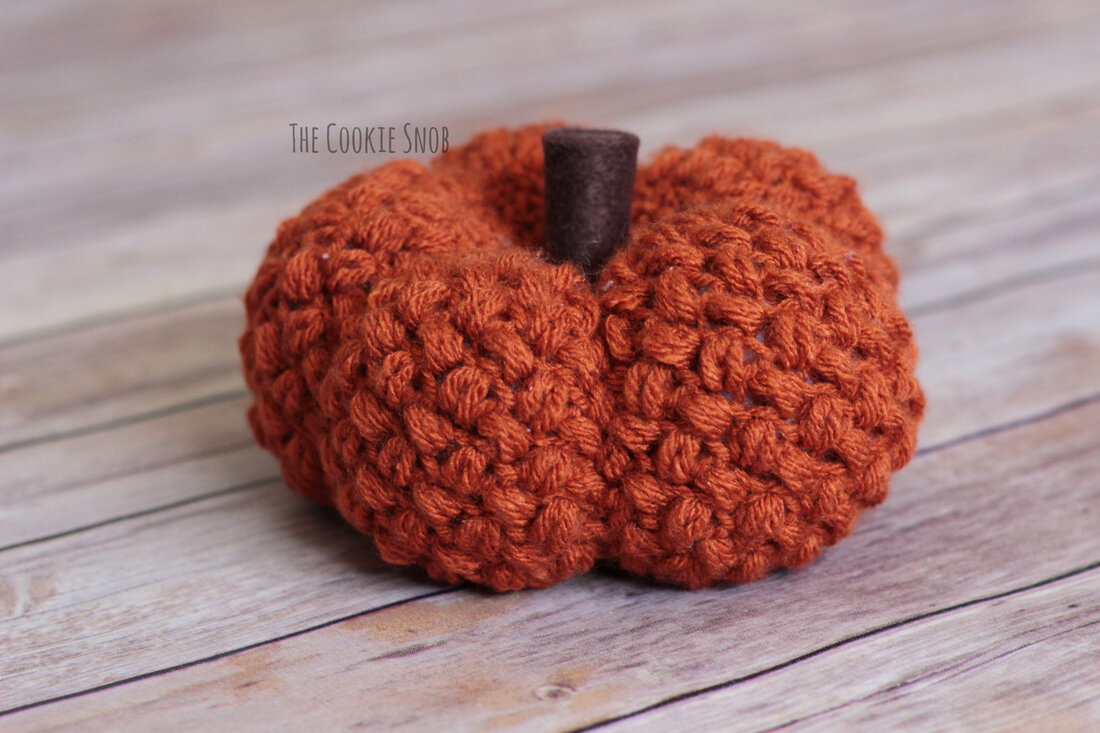 Congratulations on finishing your pumpkin! If you have any comments or questions about this pattern, you can reach me in the comments section below, by email, or on social media. Please share a picture if you end up making one! I love seeing your beautiful crocheting. Happy hooking! Want to make sure you don't miss out on any future blog posts? Join my mailing list! (Spam free, I promise!)  ***You're welcome to do whatever you'd like to with finished products made from this pattern but if you do sell them, I ask that you link back to my page. You may not copy this pattern, repost it anywhere (either altered or in its original form), or claim it as your own. You may not use any photos on this site for your own use. ***
0 Comments
Leave a Reply. |
Welcome!Thank you for stopping by to visit my own personal corner of the web! Feel free to take a look around and check out what I've been crafting, crocheting, or baking. Hopefully you'll find something to inspire your own creativity!   
Archives
March 2024
|
 RSS Feed