
|
After I finished making my Bean Stitch Cowl, I found myself with some extra yarn left over. It wasn't enough for a giant project, but it looked like the perfect amount for a hat. So why not design a matching beanie? I'm so glad that I went for it, because I love how this hat turned out. With squishy stitches and a double brim, this hat is extra cozy and perfect for the cold weather.  I used Lion Brand Ice Cream Yarn for mine (you'll need less than 1 skein to make the hat). You're welcome to substitute another yarn if something else in your stash is calling to you, but I highly recommend sticking to a light weight yarn so that it doesn't get too bulky and maintains a nice soft drape. 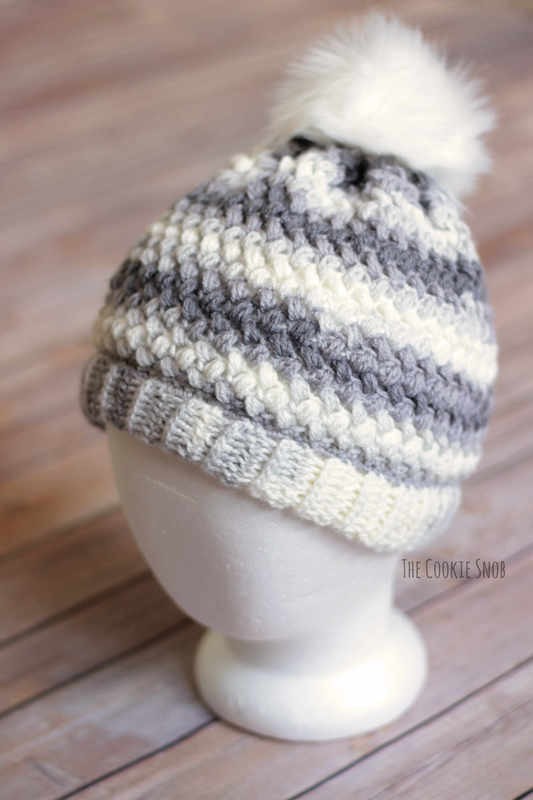 The construction on this one is pretty straightforward. First you'll make a brim, then crochet the bean stitch directly onto the brim, and then seam up the hat. I made mine a tighter fitting beanie, but you can easily give it more a slouchy look by increasing the number of stitches/rows. So feel free to personalize it to make the hat of your textured stitch dreams! 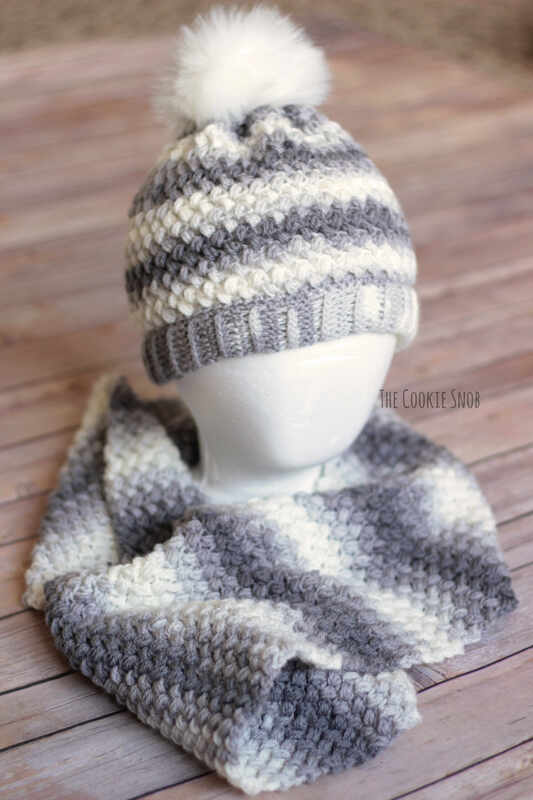 Note: If you're not familiar with the bean stitch, I recommend checking out my Legume Lagoon Blanket, which includes a step-by-step photo tutorial for the bean stitch. Note: The brim of the hat is made by working into the "third loop." If you're not familiar with this stitch placement, you can find a tutorial here. An ad free, printable PDF version of this pattern is available on Ravelry. Materials:
Stitch Glossary: st(s) = stitch(es) ch = chain ss = slip stitch sc = single crochet hdc = half double crochet bean st = bean stitch (see note below) To make the bean st: Insert the hook into your desired stitch. Yarn over and pull up a loop. [Yarn over, insert the hook into the same st, and pull up a loop ] twice. Yarn over and insert the hook into the same st once more and pull up another loop. You should now have 6 loops on your hook. Yarn over one last time and pull the yarn through all 6 loops on the hook. Ch 1 to finish off the bean st. (Remember, you can find a step by step photo tutorial for this stitch here.) Gauge: For an 8” tall beanie with a 21” circumference: 4" = 8 bean st, 4" = 13 rows of bean st Brim: Using the I hook, ch 16 Row 1: hdc in the 2nd ch from the hook and in each hdc across, turn (15) Row 2: ch 1, hdc in the 3rd loop across, turn (15) Repeat row 2 until the brim is your desired length. I made mine 22" when lightly stretched. Make it as long as you need to fit comfortably on your head, but please keep in mind that the brim will stretch a tiny bit with use over time.  Fasten off, leaving a yarn tail for sewing. Place the two short ends of the brim together and sew them into a loop using your tapestry needle and the yarn tail. I like to use the mattress stitch. Fasten off tightly, but don't worry about weaving in the ends. We're going to be sneaky and just hide them inside the brim (shhh, don't tell). 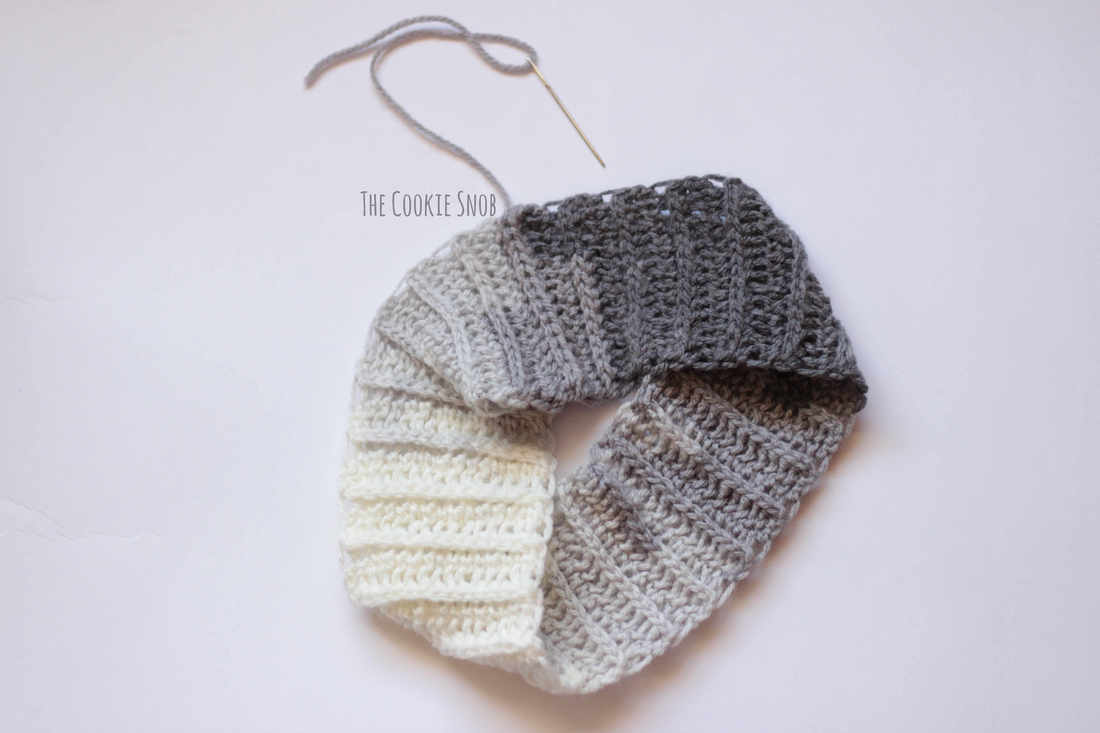 Fold the brim in half length-wise. Tuck your yarn ends inside of the fold. I recommend using stitch markers to hold the folded ends together in place. I prefer to use 4 stitch markers to divide the brim into 4 equal sections, since it makes the next step easier (but it's not required). 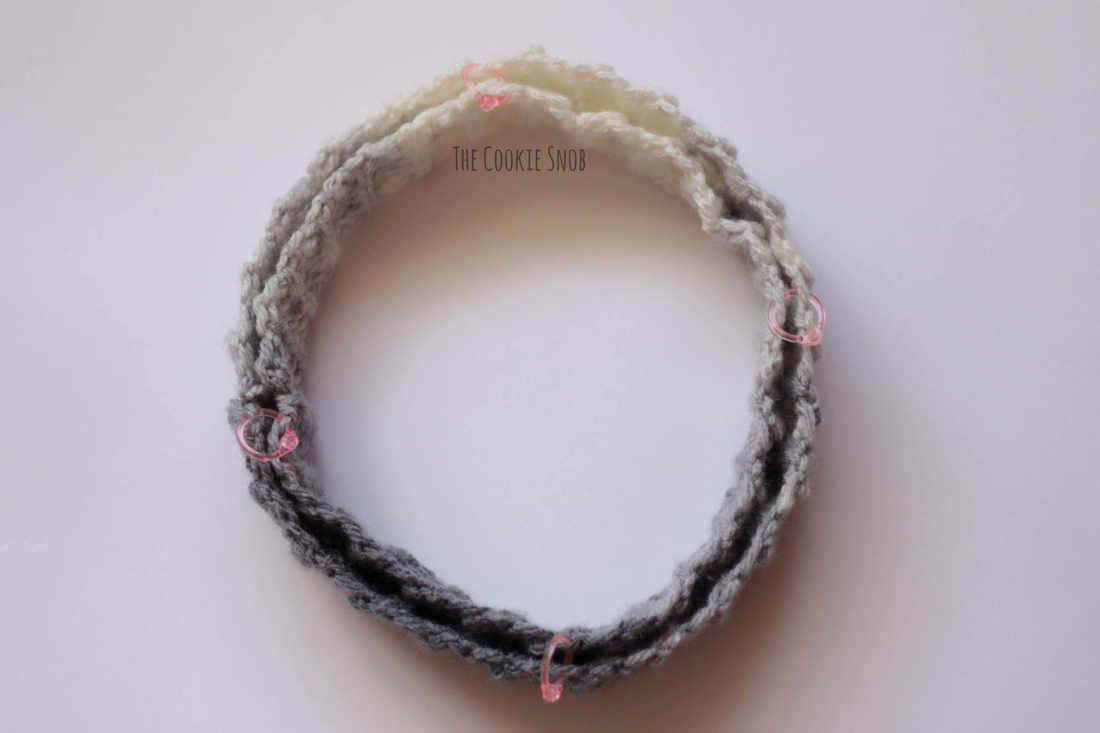 Body of the Hat: Switch to the J hook Round 1: Inserting the hook through both ends of the folded brim, work 80 sc evenly across the top, with the right side facing out. This will close it off, leaving a double brim. If you've divided your brim into 4 sections, you can evenly work 20 sc into each section. Join to the first sc with a ss. (80) Or, if you want to make the circumference of the hat larger, you can increase the number of stitches over the top of the brim (just be sure that it's an even number of stitches). If you're not a fellow member of the "Tiny Adult Head" club, you'll probably want to increase the number of stitches at least a little bit. 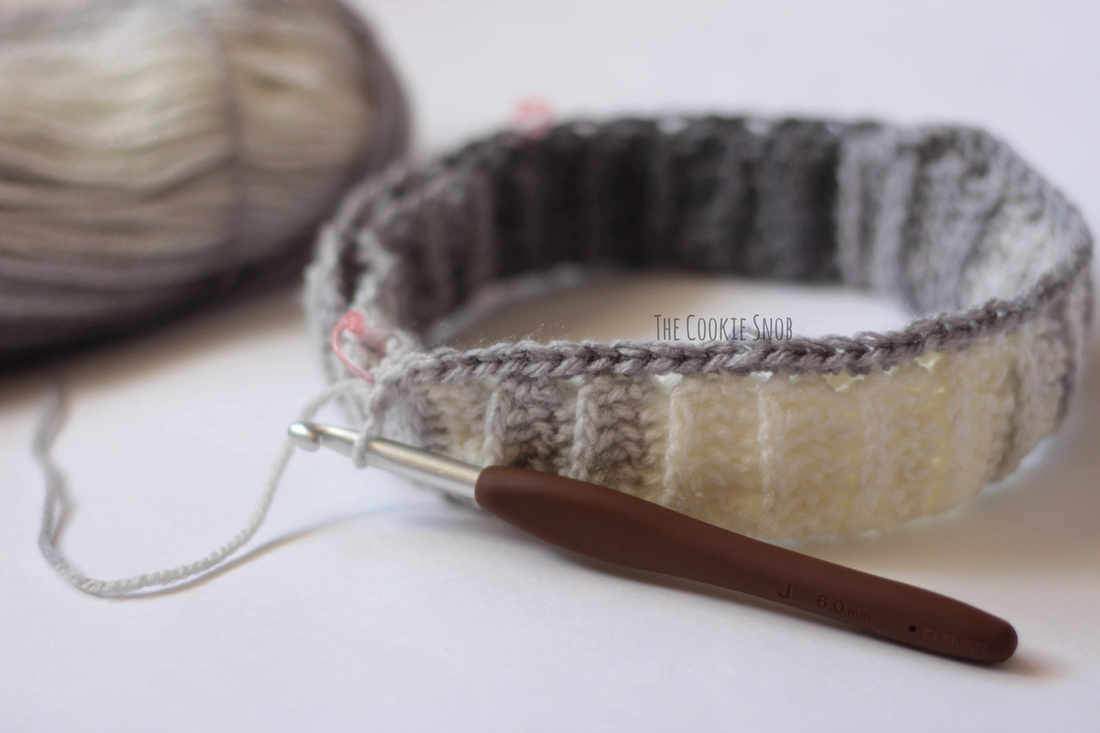 Round 2: ch 1, sc around, ss to join (80 sc) Round 3: ch 3, bean st in the first st, skip the next st, [bean st in the next st, skip the next st] around, ss to the first bean st to join, turn (40 bean st) Round 4: ch 3, skip the first st, bean st in the next st, [skip the next st, bean st in the next st] around, ss to the first bean st to join, turn (40 bean st) Repeat round 4 until your hat is your desired length. I made mine about 8". Or you can make it about 10" for a slouchy look. Round 5: ch 1, [sc in the next st, skip the next st] around, ss to join (40 sc) Note: Don't ch 1 in between your sc in round 5. The goal is to decrease the circumference of the hat. 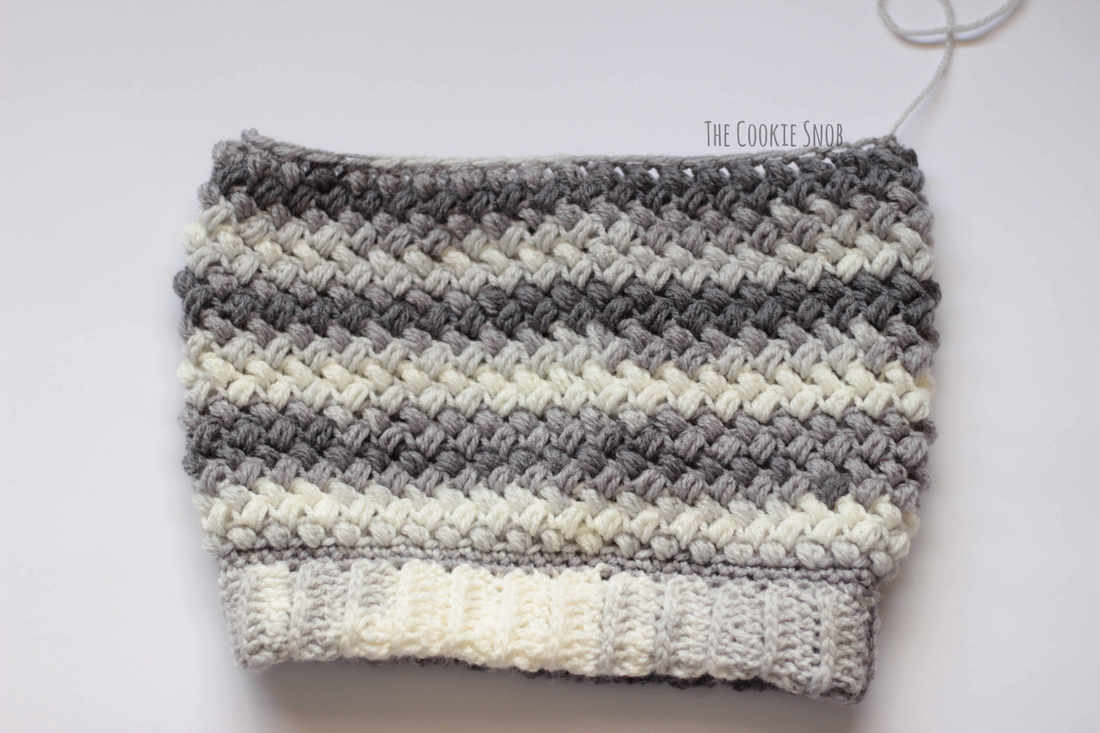 Fasten off, leaving a long yarn tail. Using the tapestry needle, weave the yarn tail through the front loop of each stitch from the last round. Pull taut to close. You'll probably find that you still have a small hole, but don't sweat it. Just use the rest of the yarn tail to stitch it shut.  Optional: Stitch the pom pom to the top of the hat. I used pom poms that snap on and off for easy washing, so I just sewed the bottom of the snap to mine and then had fun snapping different colored pom poms into place until I picked my favorite look. 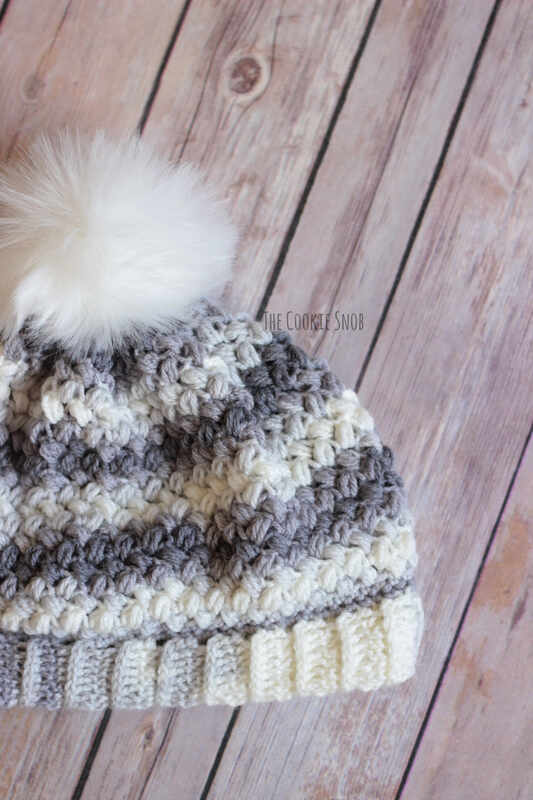 Ta dah! Now your Bean Stitch Cowl has a new BFF! I hope that you have fun with this cozy hat pattern. Remember that you can find a printable, ad-free version of this pattern on Ravelry if you'd like one. If you have any comments or questions about it, you can reach me in the comments section below or on social media. Happy hooking! Want to make sure you don't miss any future blog posts? Join my mailing list: 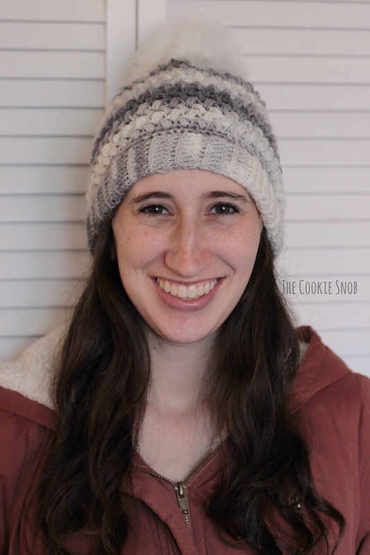 ***You're welcome to do whatever you'd like to with finished products made from this pattern but if you do sell them, I ask that you link back to my page. You may not copy this pattern, repost it anywhere (either altered or in its original form), or claim it as your own. You may not use any photos on this site for your own use. ***
15 Comments
Patty
11/17/2018 11:33:57 am
LOVE these patterns!! You have very nice things to make with crochet. This bean stitch is fun!!
Erin
11/17/2018 02:23:28 pm
Thanks so much, Patty! You just made my day :) I'm glad you're enjoying the patterns!
Patti C
11/28/2018 03:40:14 pm
Hi! Your Bean Stitch Beanie and it’s best friend, Bean Stitch Cowl, are beautiful. I saw Beanie first and she just sounded fun. Or is that you peeking through your writing? ;). It seemed so fun that I went out to look at the Cowl and, yep, fun again. And I just happen to have some LionBrand Ice Cream lying around. Well, I’ve still got projects for Christmas unfinished, but soon, very soon.
Erin
12/3/2018 12:37:46 pm
Thanks, Patti! I'm glad you like the look of these patterns and I'm excited for you to try them out once you finish your Christmas projects (which reminds me that I should get started on mine...haha). I hope they turn out well for you and feel free to contact me if you run into any questions as you go.
Linda
12/4/2018 05:55:20 am
I love your hat I can't wait to start it. Where do you find removable pompoms ?
Erin
12/4/2018 11:08:36 am
Thank you! I hope your hat turns out well!
Melanie
12/24/2018 08:31:02 am
Hi.. I need opinion.. I’m needing to make a guy hat.. is that hat considered unisex?
Erin
12/24/2018 12:07:30 pm
Hi Melanie! After consulting with my husband, we came to the conclusion that this hat could work as a unisex hat without the pompom and possibly in a solid color. You may need to increase the size a little, since men tend to have slightly larger heads (on average). If you're still not sold on that option, I think that the 3.2mL beanie pattern makes a great men's hat (or the 3mL slouchy if you prefer the slouchy look). You can find them both for free on my blog ;)
EJ
3/9/2019 06:53:28 am
Love this hat and am working on making one for a friend. Queation: my brim doesn't have the same ribbing pattern yours does though I'm also using a hdc. Should I be doing something different?
Erin
3/12/2019 07:54:29 pm
My best guess is that you're probably working normal hdc instead of hdc in the third loop. Inserting the hook into the third loop when you're making the stitches will create the ribbing on the brim. I have a tutorial on the third loop on my blog if you're not familiar with the method. Hopefully that helps! :)
Jess
5/17/2023 09:57:56 pm
It took me a bit of time, but eventually realized "third loop" is referring to crocheting back loop (BLO). Hoping this (very delayed) comment may be helpful to someone in the future!
Mona
11/10/2023 04:35:42 pm
Just in case anyone is following the thread, hdc in the 3rd loop is NOT the same as the back loop. Hdc stitches create a third loop - so there are your regular front and back loop on top of the stitch (the two strands you would go under for a normal stitch) and in front of those is another loop - the 3rd loop. The raised stitches will show on the opposite side of the project, whereas they would show up on the side facing you when crocheting into the back loop.
tina hill
11/23/2019 07:08:48 pm
Loved the pattern ! Made a hat for my great nephew ! It turned out GREAT ! thank you so very much !!! and i gave credit to you for the awesome pattern in the Information note ( fiber content and washing info ) I include with every gift !
Erin
12/6/2019 09:53:20 am
Hi Tina! I'm so glad you enjoyed the pattern! Thanks for sharing :)
jody
8/28/2021 04:51:08 pm
i want to make this for a 7 y.o. i'm afraid to do it with out a pattern Leave a Reply. |
Welcome!Thank you for stopping by to visit my own personal corner of the web! Feel free to take a look around and check out what I've been crafting, crocheting, or baking. Hopefully you'll find something to inspire your own creativity!   
Archives
March 2024
|
 RSS Feed