
|
By now, I'm sure you've probably at least dabbled in C2C crocheting using the diagonal box stitch. But did you know that you can work other crochet stitches from corner to corner (C2C)? It's no secret that the moss stitch is one of my favorites, especially for variegated yarn. So when I learned that you can work the moss stitch c2c, I was ALL over it. Now, there are already video tutorials out there, so if that's your thing, then google away. Personally, I'm all about the photo tutorials. I couldn't find one that I liked, so of course I had to make my own! (Note: I am in no way claiming to have invented this stitch; this is just a tutorial. Full credit for this stitch goes to whoever invented it. Edit: I'm told that Polly Plum is the one to thank for it, so be sure to go check out her site and send some crochet kudos her way!) 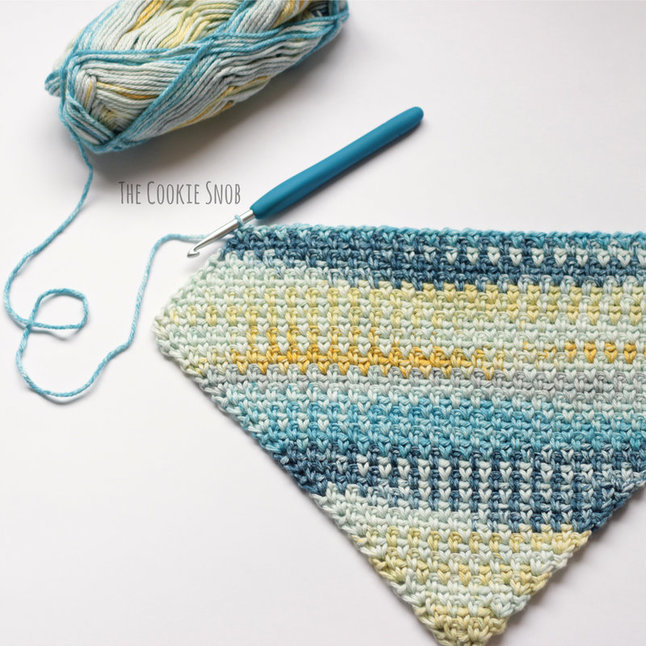 Since I'm all about hands-on crochet experience, this tutorial will also show you how to make a nifty washcloth while you learn! The c2c moss stitch is perfect for a washcloth because it has a nice texture and is fairly solid while still being stretchy (and it has a nice drape). One small note: A few of the pictures at the beginning of the photo tutorial don't quite match the others. To make a long story short, I discovered an issue with a couple of the photos while I was editing them, so to make sure they weren't confusing, I reshot those few after I had finished. So don't let that throw you off! The stitches are still the same. Besides, I'm all about letting go of perfectionism lately, so it's all good, right? Now on to the tutorial! 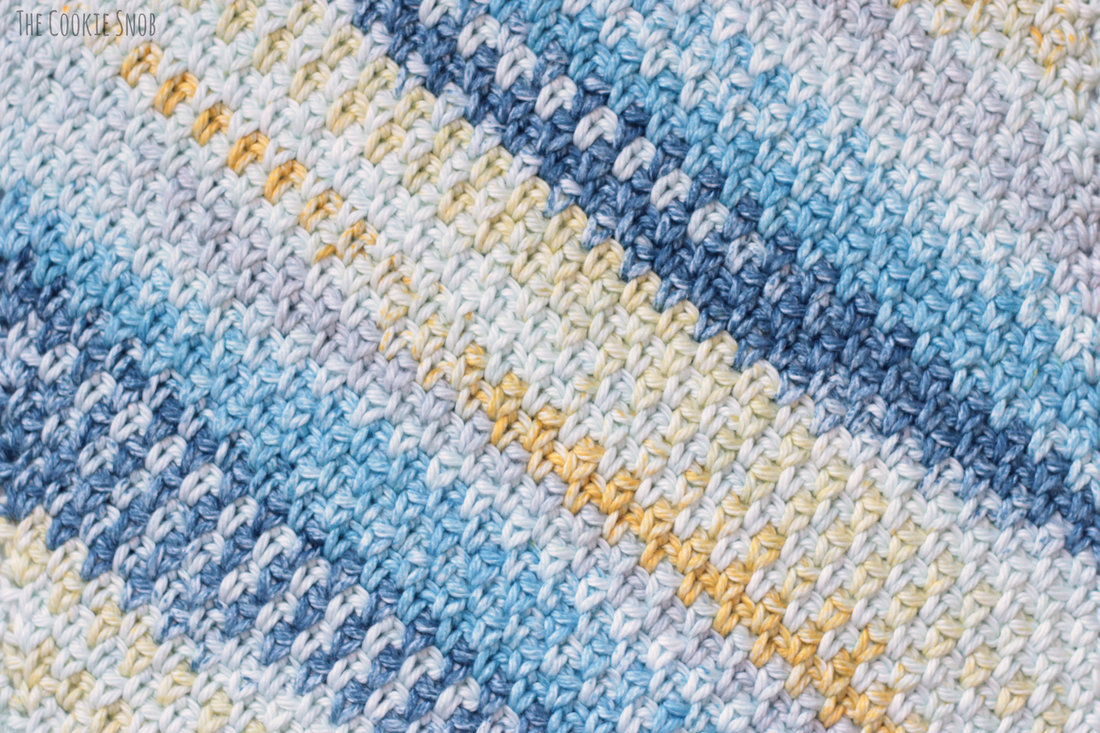 This stitch can work at just about any gauge. But if you're following along with the washcloth tutorial, I made mine using:
Stitch Glossary: st(s) = stitch(es) ch = chain sc = single crochet hdc = half double crochet Here we go! Ch 3. Pay attention to the 1st chain you made (shown with an arrow below), because that's where we're going to get started. 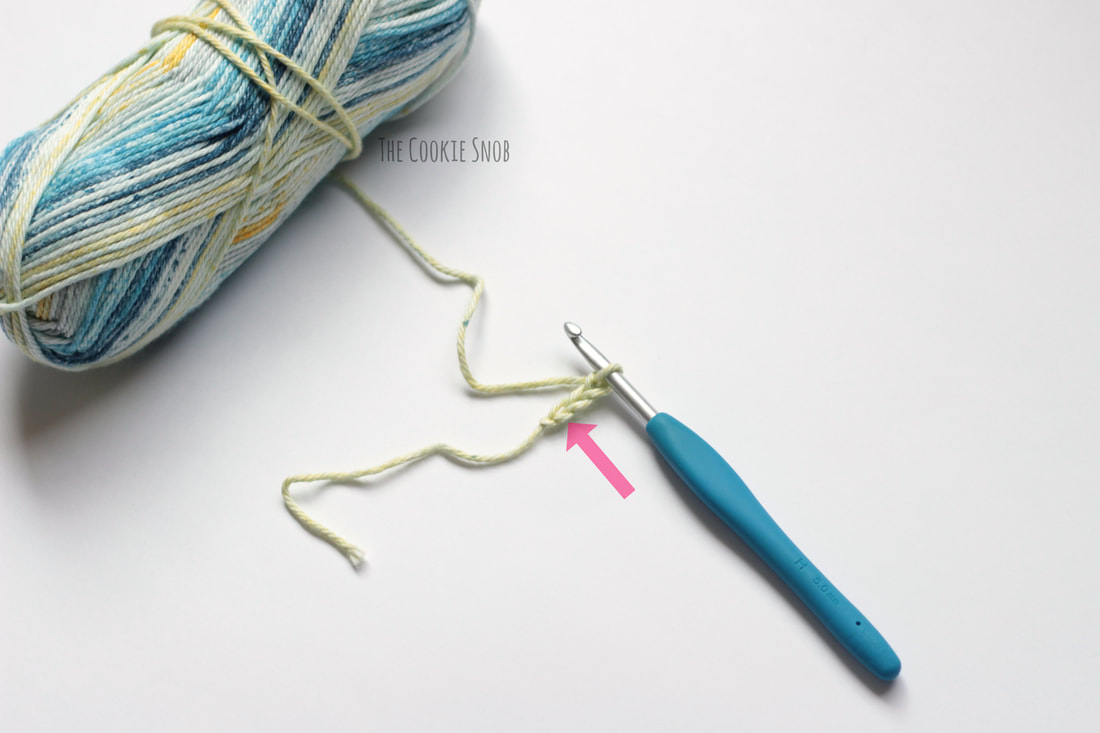 Sc in the 3rd st from the hook . Turn and ch 3. Now take a look at the ch 3 space leftover from the previous row, because that's where we're going next. 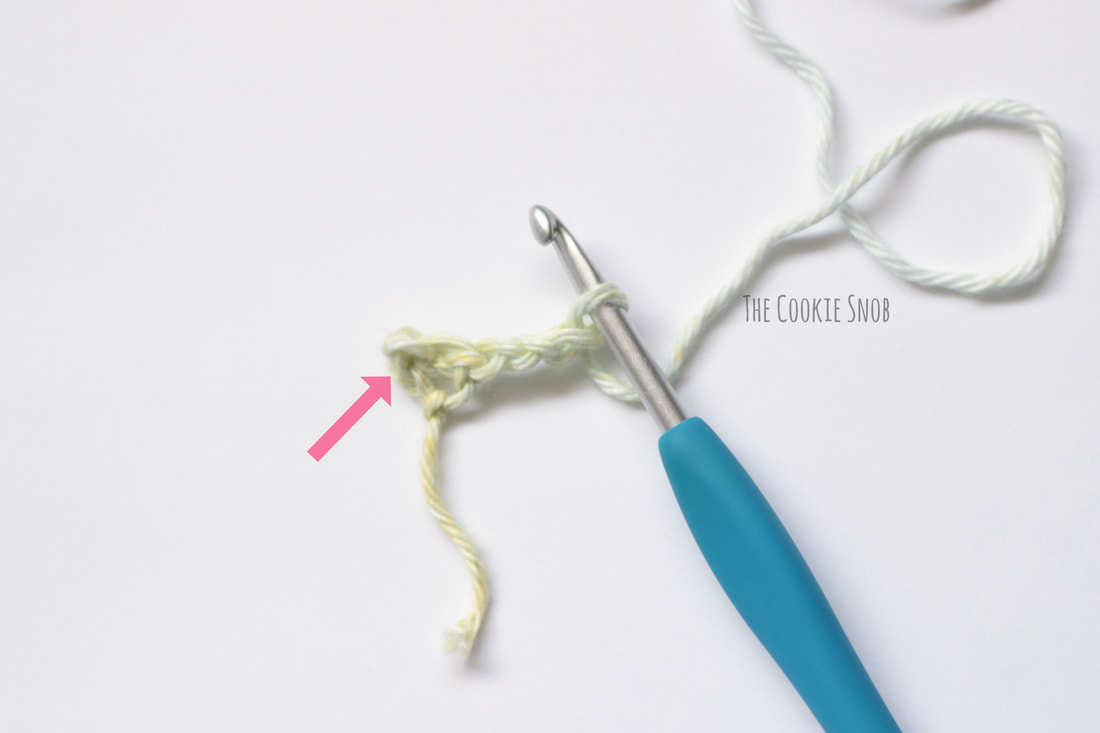 In the ch 3 space work a sc, then ch 1 and work another sc in the same spot. Turn and ch 3. When you look at the row you've just finished, pay special attention to the ch 1 space (shown with the arrow below). See how it's right between the "v"s of the sc stitches? From here on out, all of the increase rows will start by working into that space, so you'll get really good at recognizing it. 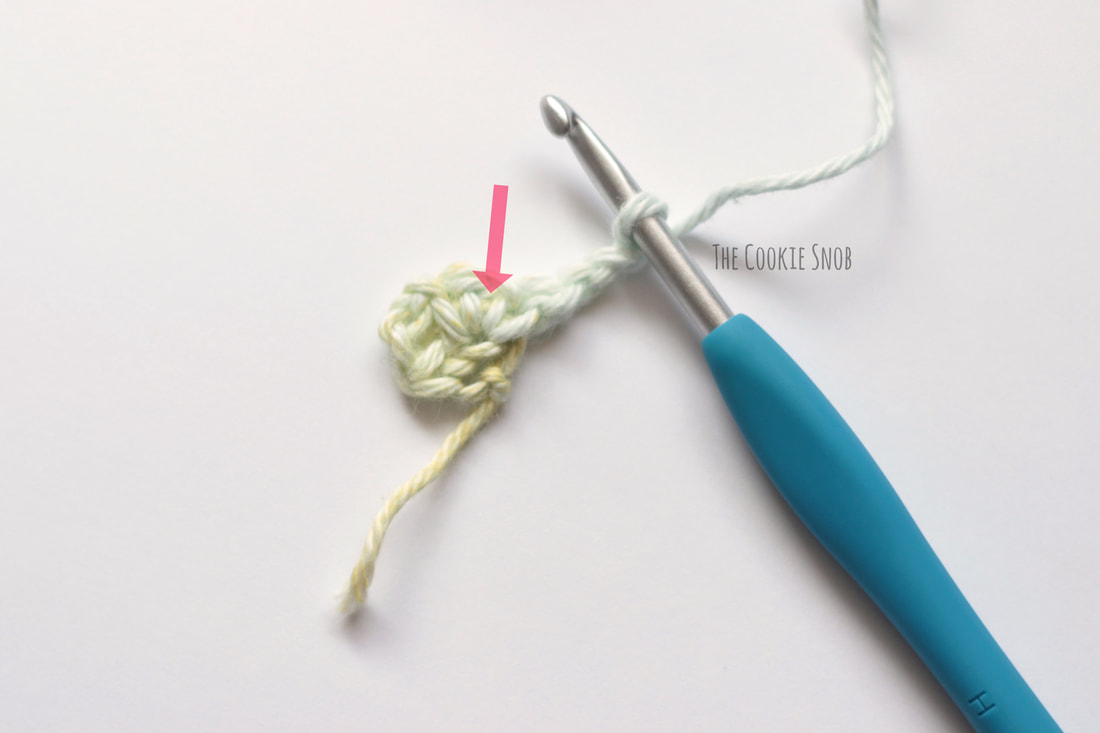 Sc in the first ch 1 space, then ch 1. [Sc, ch 1, sc] in the ch 3 space, just like you did in the previous row. Turn and ch 3. You're going to continue this basic pattern of working a [sc, ch 1] in each ch 1 space as you continue increasing, ending each increase row with a [sc, ch 1, sc]. In case that sounds confusing I've marked the spots where you'll be working stitches for the next row in the picture below. Or, if writing it out is more helpful for you, after the ch 3, you'll sc in the first ch 1 space from the previous row, ch 1, sc in the next ch 1 space, ch 1, [sc, ch 1, sc] in the ch 3 space at the end. I've highlighted the "v"s of the single crochet stitches below to help you get a better visual for where the ch 1 spaces are. 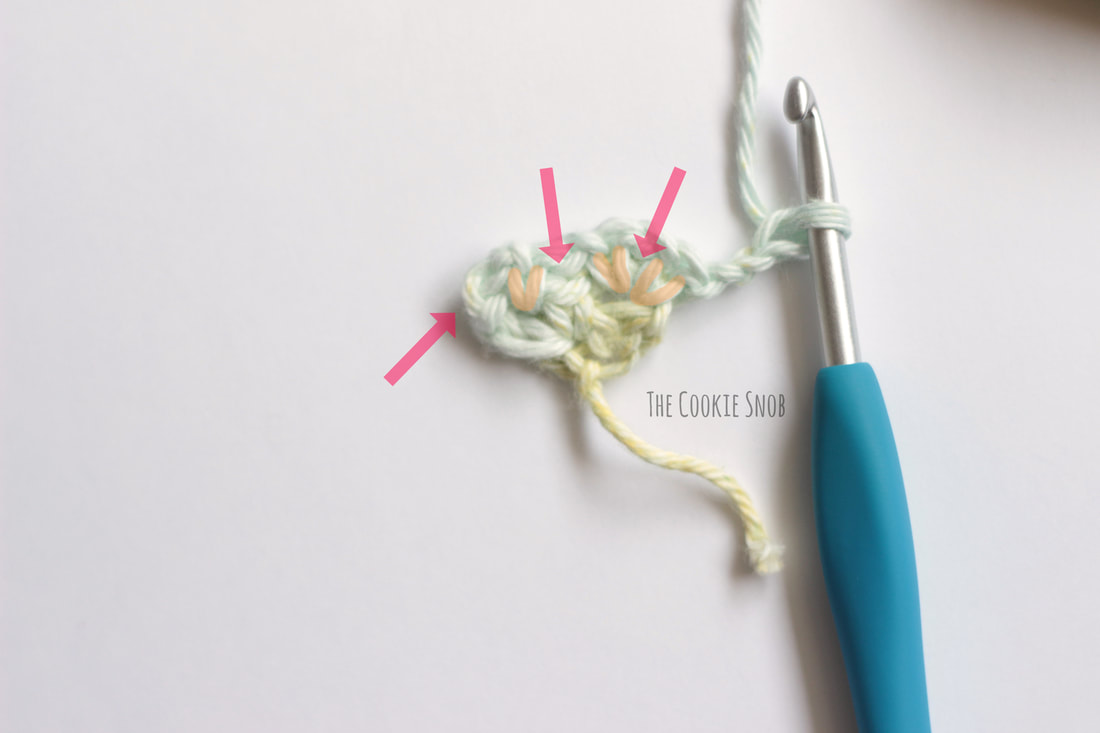 Like I said, you're going to continue the same increase pattern as your piece continues to grow. Here it is, written out one more time: Ch 3, sc in the first ch 1 space, ch 1, [sc, ch 1] in each remaining ch 1 space, [sc, ch 1, sc] in the ch 3 space. 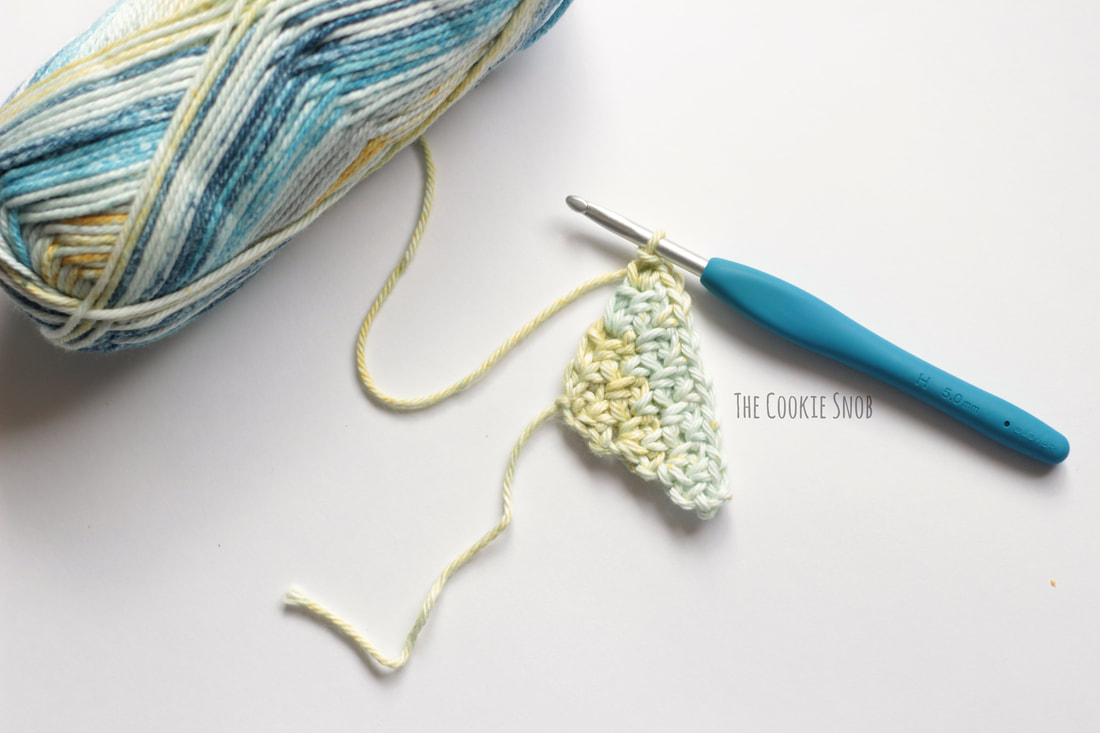 Continue increasing until the piece is the length/width you want. For a washcloth, I recommend increasing until it's 9" wide. Once you've reached this point, you're going to end the last increase row a little bit differently. 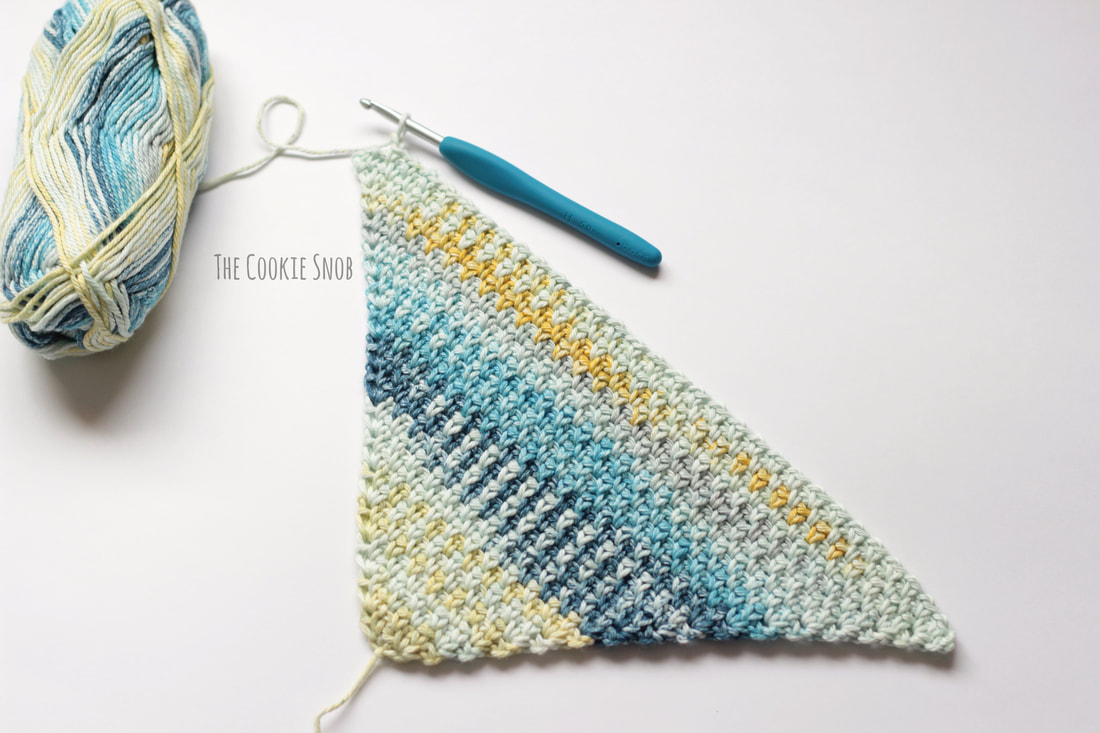 Instead of the usual [sc, ch 1, sc] in the ch 3 space, you'll work a [sc, hdc] (NO ch 1 space). This will create a cleaner corner 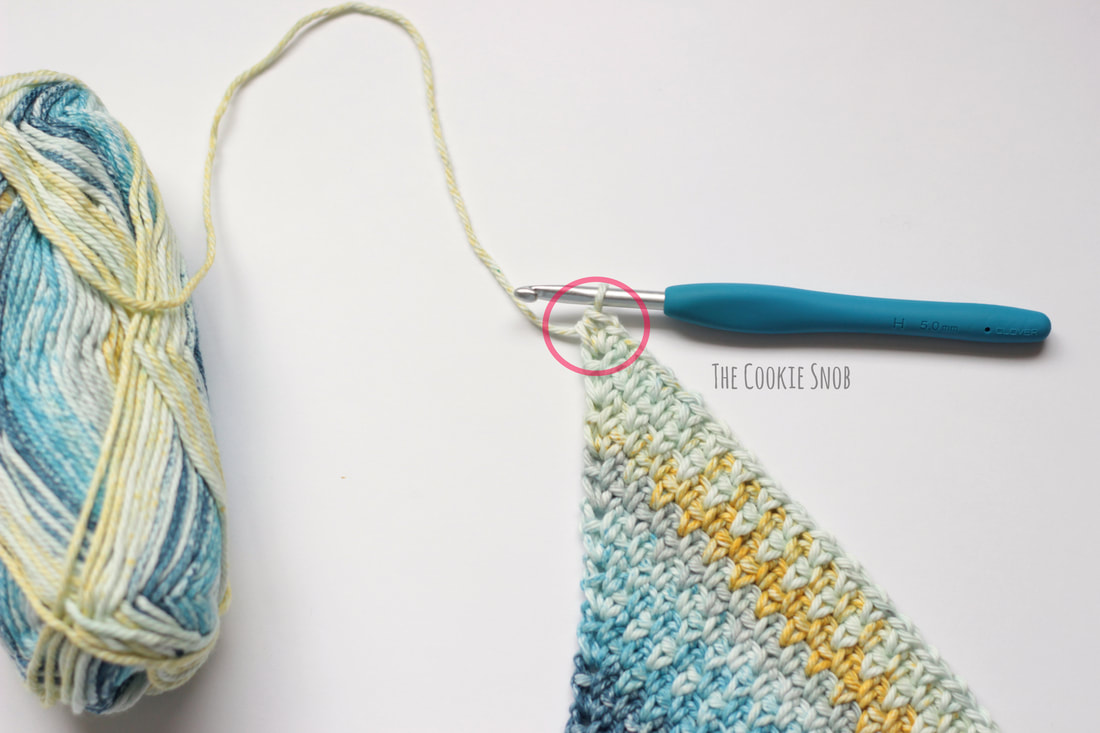 Now we're going to start decreasing, so it'll be a bit different from the increase rows. Begin with a ch 2. Skip the sc and hdc and work a [sc, ch 1] into the first ch 1 space (indicated with an arrow). Technically speaking, this is basically the same as the increase rows in that you're starting in the first ch 1 space, but because there are 2 stitches before it, it'll look a little different. 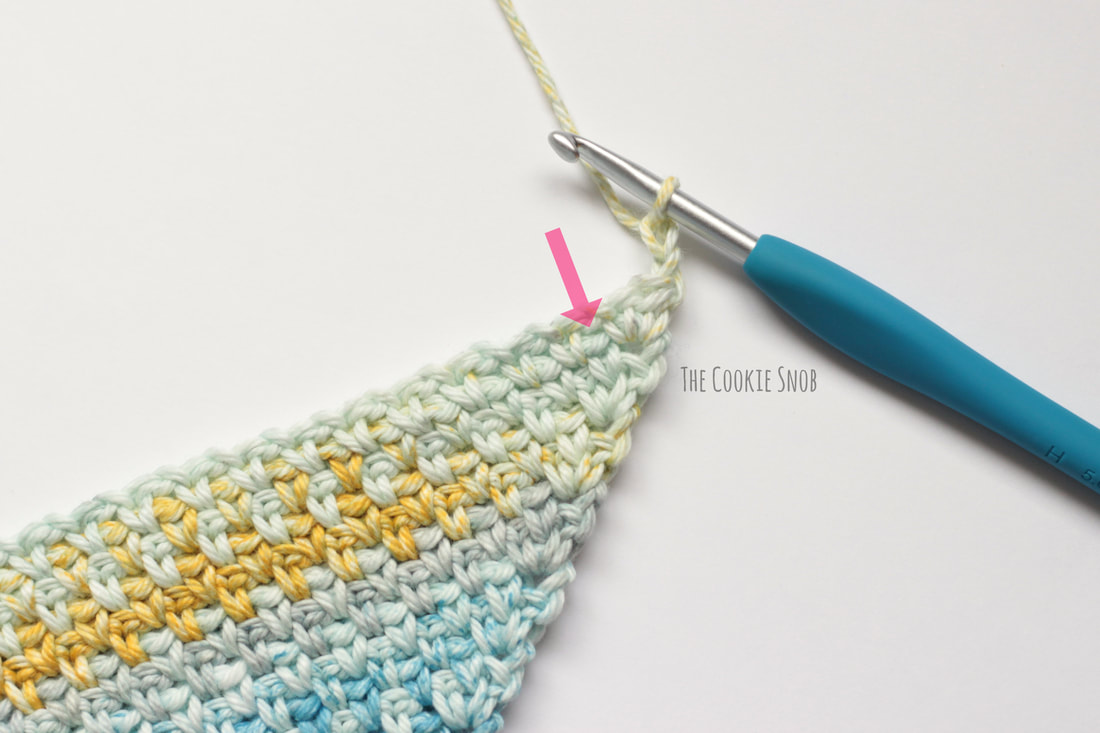 Continue to work [sc, ch 1] in the ch 1 spaces across the row. 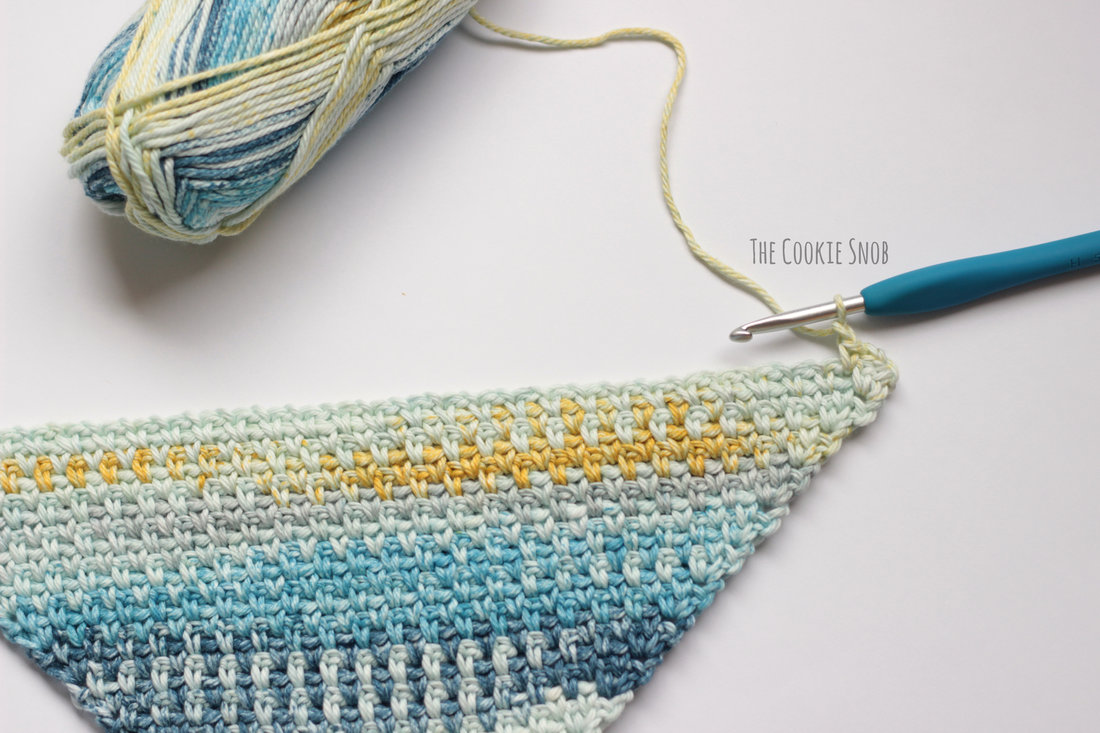 When you get to the second to last ch 1 space, do NOT ch 1 after the sc. 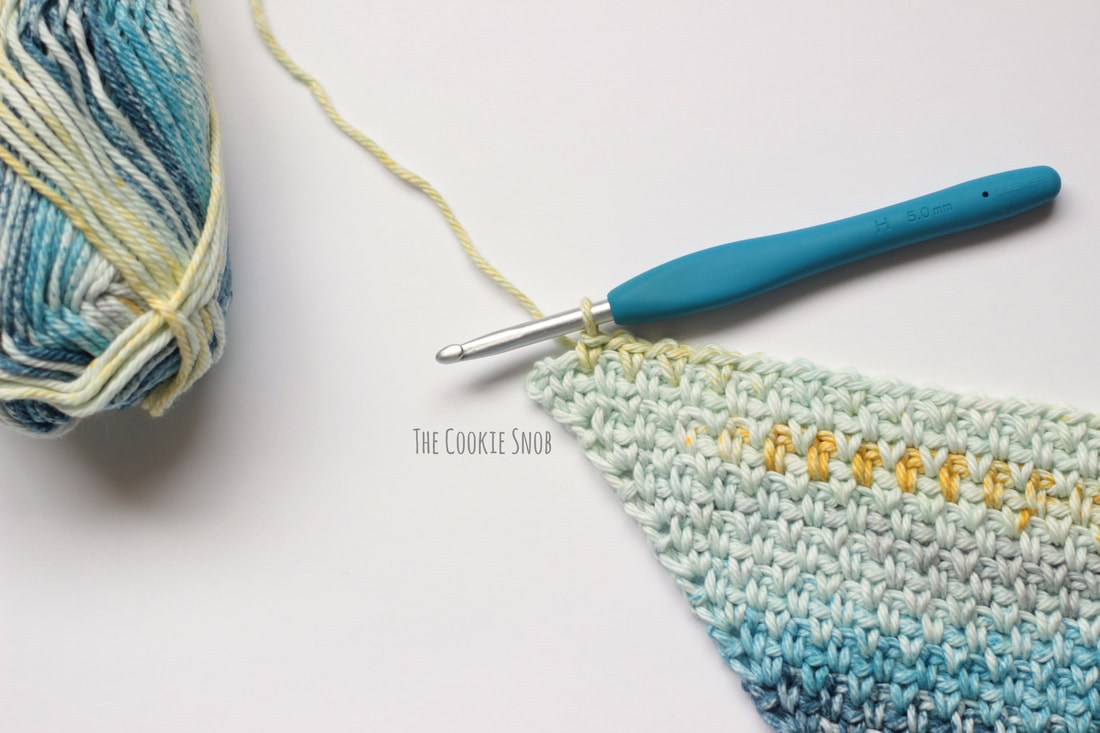 Instead, immediately work a sc into the ch 3 space.  Turn and ch 2. As with the previous row, skip the first 2 sts and work the first [sc, ch 1] into the ch 1 space. [sc, ch 1] in each ch 1 space until the end. Sc in the final ch 1 space, do NOT ch 1, and sc in the ch 2 space. 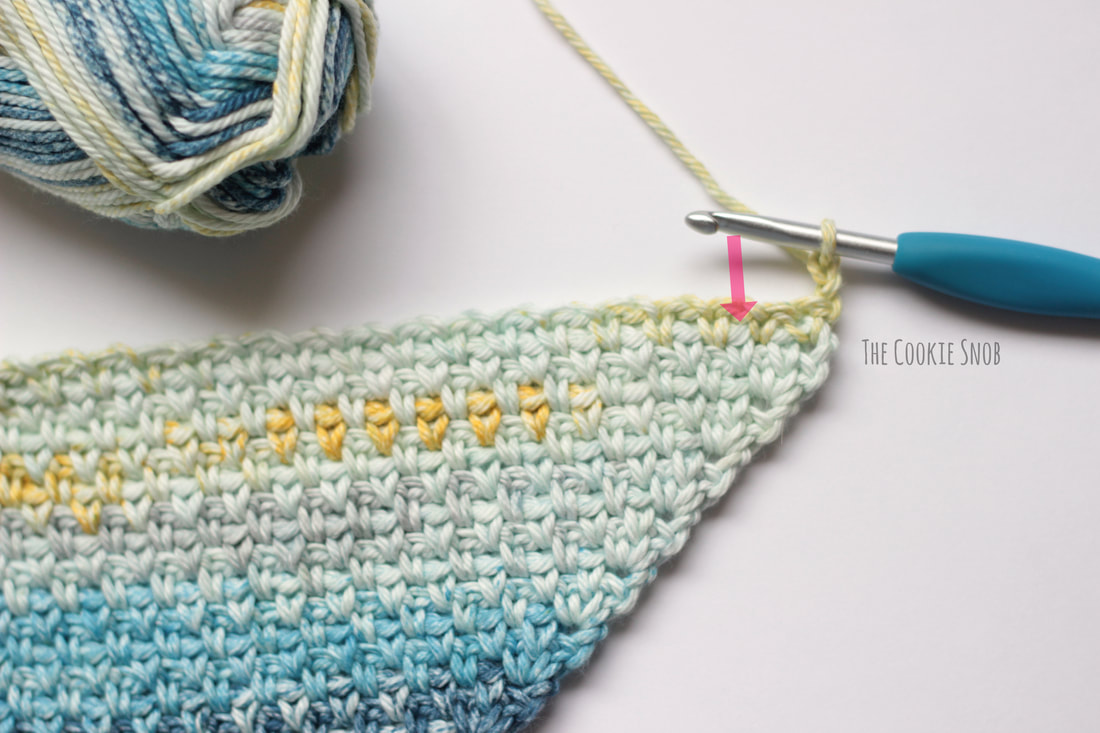 Repeat the same decrease pattern. See how the other corners are forming? 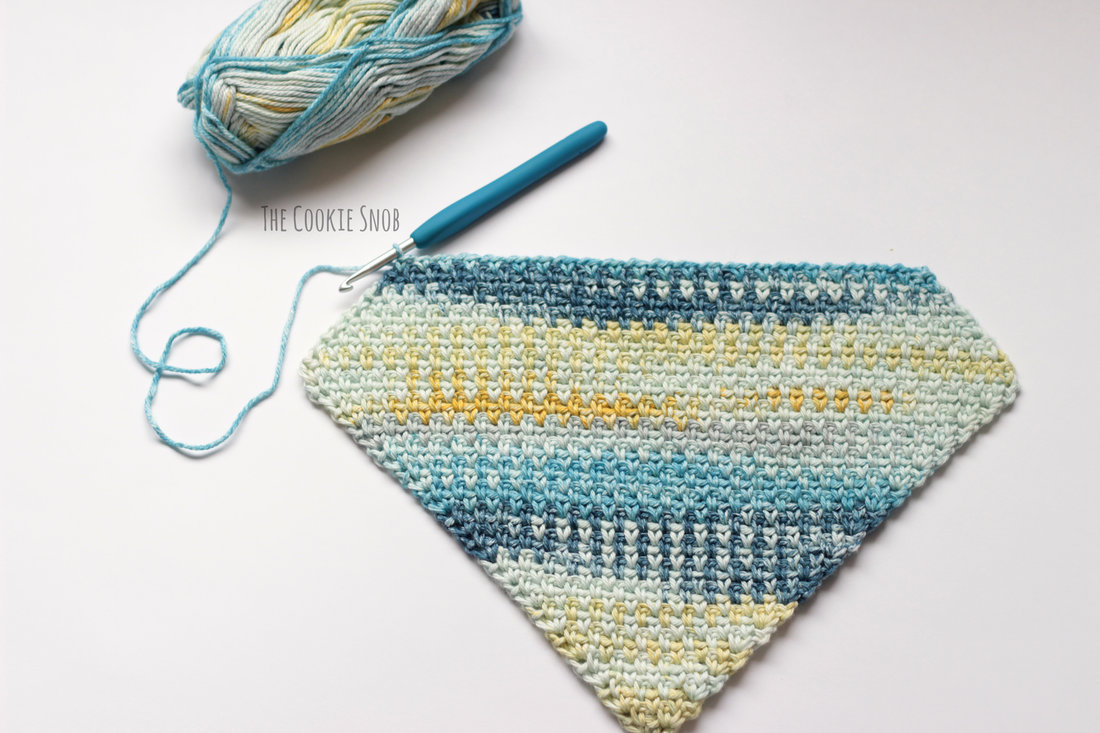 The same decrease pattern continues until the last row, with one fewer sc in each row. 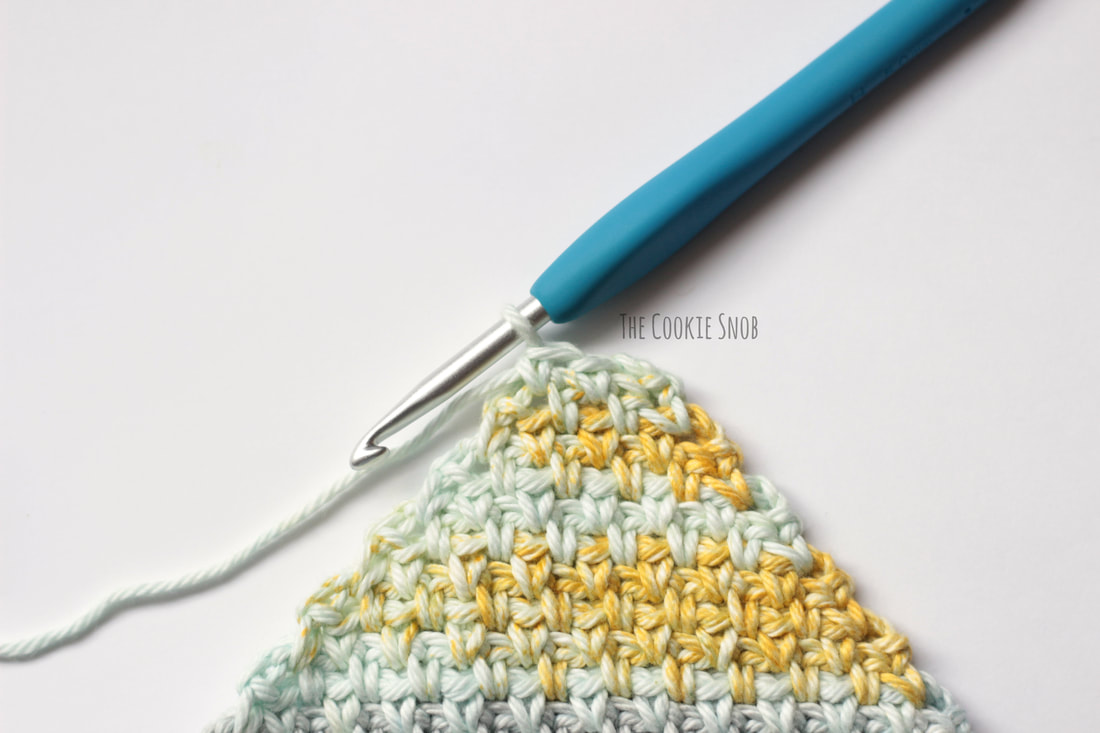 For the second to last row (when there are only 3 sc), you'll ch2, work a sc in the first ch 1 space (as before), then sc in the ch 2 space (do NOT ch 1 in between). 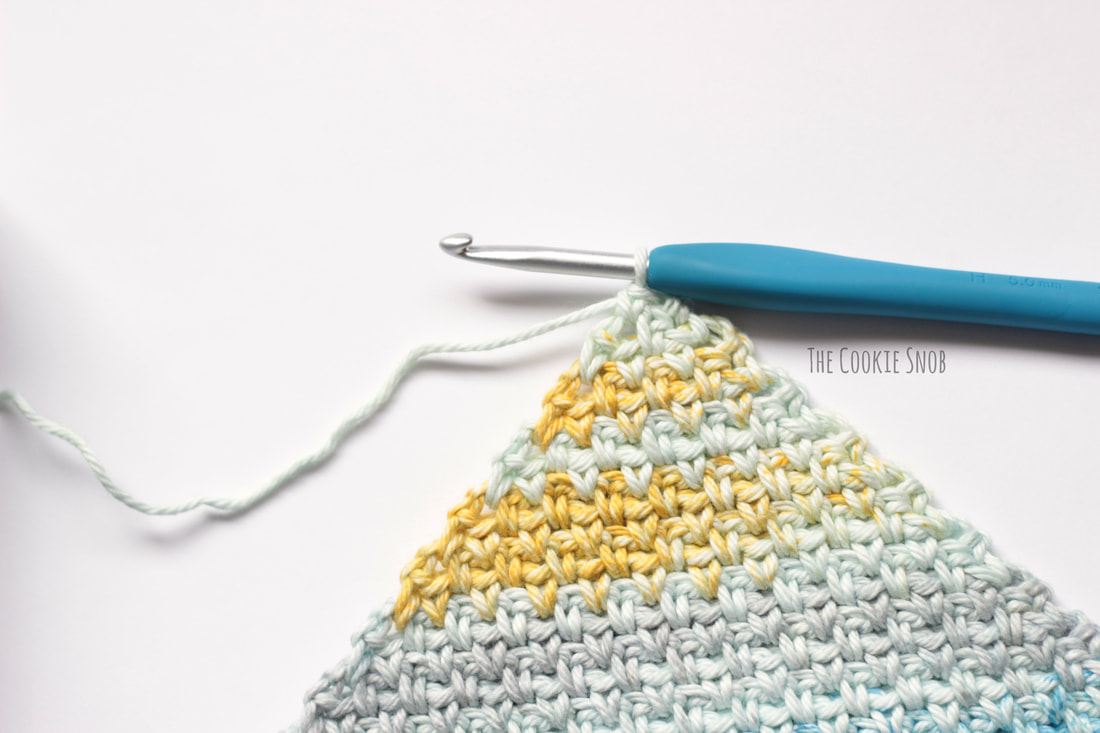 For the final row, turn, ch 1, and sc in the ch 2 space. Ta dah! 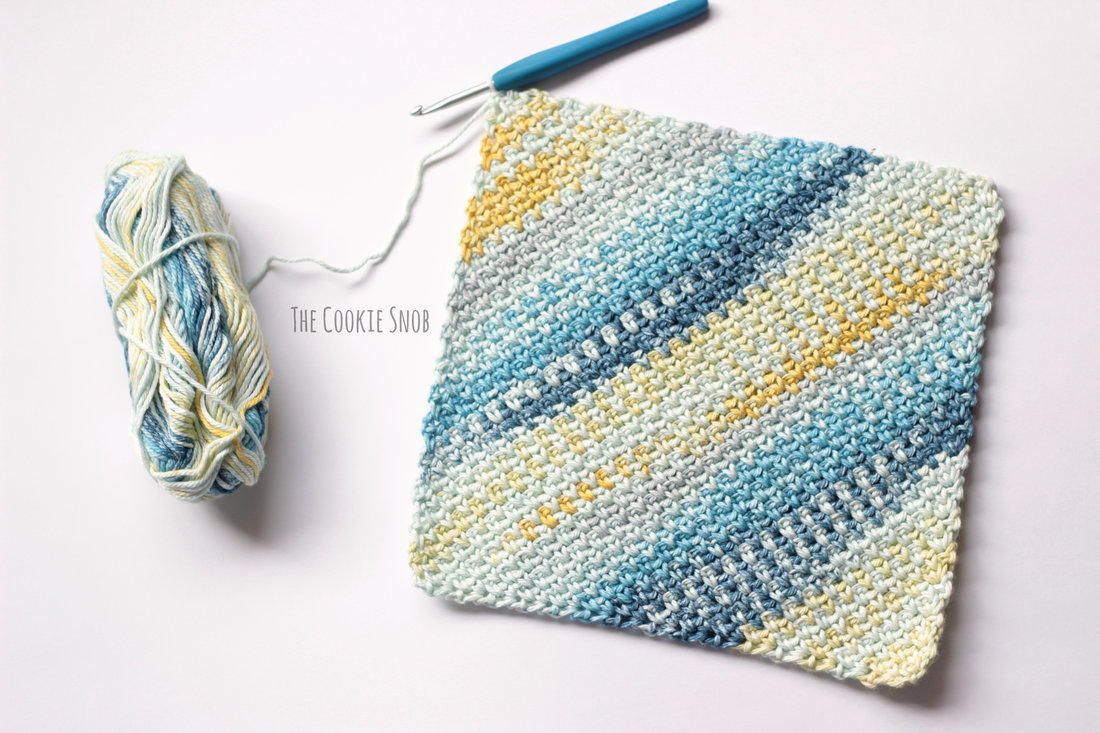 You can fasten it off and leave your square as is, or if you want a cleaner edge, sc around the border first. Then fasten off and weave in ends. Pretty, right? 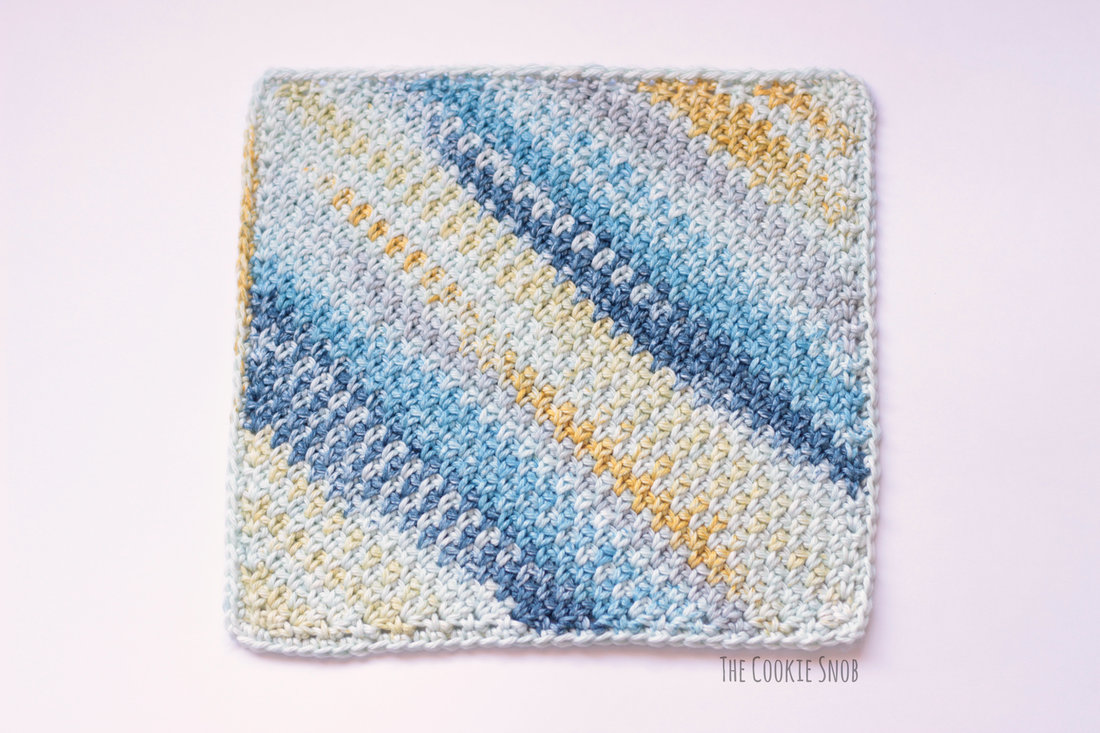 Like other c2c methods, the c2c moss stitch can also be used to make a rectangle. It's basically a variation on the square. Essentially, when one side is your desired length, you'll decrease on that side while continuing to increase on the other side. I wanted to keep things simple so I didn't add it to this tutorial, but if there's any interest in a tutorial for it, just let me know! Edit: You can now find a photo tutorial for the rectangle here. 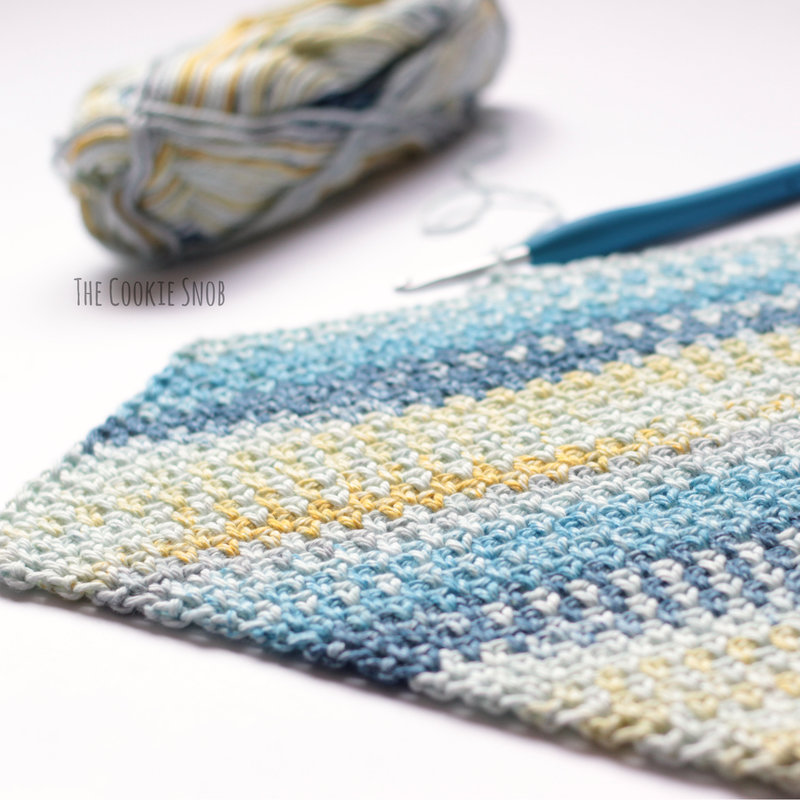 I hope this was helpful! I tried to explain it the way I would if you were all right here next to me crocheting (how cool would that be?), so hopefully it makes sense. If you have any questions, feel free to contact me in the comments section below or on social media. Happy hooking! Want to make sure you don't miss out on any future blog updates? Join my mailing list! ***You may not use any photos on this site for your own use or repost the text of this post as your own. ***
88 Comments
Lindsay
3/13/2018 10:14:14 pm
Name that yarn please!
Erin
3/13/2018 10:19:38 pm
Hi Lindsay! I listed it in the post, but it's easy to miss in all of the text. It's I Love This Cotton! Yarn (a Hobby Lobby brand yarn) in a colorway called Paris in June.
Gladys W Wallace
3/17/2018 12:19:31 am
I would like to make a C2C rectangular afghan. Your direrction to begin decreading on the side that is the length you want while continuing to increase on the opposite side seems do-able. I will try that.
Erin
3/17/2018 07:38:21 pm
I think it's awesome that you're making an afghan! I didn't really give many details about it in the post (but can put together a separate photo tutorial for it if there's interest), so if you want more info I would recommend googling it. There are other c2c moss stitch tutorials out there that should be helpful for rectangles. I haven't seen any other step-by-step photo tutorials, which is why I made this one, but I know there are others that have videos or have the steps all written out. Good luck with your blanket!
Nancy Spoolman
4/3/2018 09:33:37 pm
Love it! A new stitch! I've only been crocheting about 4 years now, with the help of two friends they started me on afghan's and I soon stepped out of my comfort zone and tried anything and everything. I will have to try this moss stitch.
Erin
4/9/2018 08:13:48 pm
Good for you! It's always exciting to learn new stitches. Crochet is so versatile and the more you know, the more you can create! :)
Lois
4/4/2018 02:53:16 pm
Thank you for the photo tutorial. I hope you don't mind but I like to print them out and scribble notes on them while I am crocheting. I love to make washcloths out of this yarn so I am looking forward to learning something new at the same time!
Erin
4/9/2018 08:12:10 pm
Sounds good to me! This stitch is perfect for washcloths. I hope yours turn out well! :)
Crystal Jackman
4/4/2018 02:58:59 pm
💯yes on a tutorial 🤗
Kati
4/7/2018 07:30:04 pm
I love this stitch! I want to try it on a baby lovie blanket. Thanks for sharing!
Erin
4/9/2018 08:11:06 pm
I'm glad you like it! I hope you enjoy making it and that your lovey turns out well! :)
Beth
4/9/2018 03:12:36 pm
It would *really* help to have this in a video tutorial, even if just to get people started. Reading through the explanation & checking the photos doesn't make it as clear as a video would.
Erin
4/9/2018 08:10:22 pm
Hi Beth,
Jacquie
4/11/2018 02:08:02 pm
Many thanks for the tutorial . I've been searching for a crochet pattern for a thinner wash/dish cloth and I have finally found it.
Janet Bissell
5/11/2018 07:17:20 pm
Thank you for this very clear photo tutorial! My favorite way of learning new stitches and patterns. I have never made a C2C anything, so making a washcloth is a wonderful way to learn.
Kay Rubin
5/18/2018 05:22:44 am
Thanks for the very clear tutorial. It's the best way to learn a new stitch. I have been crocheting for many, many years and love making the c2c baby blankets so this will be a nice one to try. I make baby blankets of all kinds and sell or give them as gifts so this will make it into my collection of stitches. Thank you again for the very clear tutorial. And for the record I love using the "I love this yarn" brand yarn from Hobby Lobby. It makes up a very soft baby blanket!
Cheryl Dunn Davis
5/21/2018 07:53:03 pm
I'm on Facebook as Cheryl Dunn Davis.... And I have another Facebook page that's called Cheryl Dunn Davis, Handmade.
Jean Krause
6/2/2018 10:22:19 pm
I have just become acquainted with your site and am looking forward to new patterns and stitches. This c2c moss stitch is so pretty and will be my next challenge. Thanks very much.
Tammy
6/4/2018 10:08:24 pm
I am a little confused with the transition row and the beginning of decreasing. I understand the ‘sc, hdc, ch2 then turn and skip the first 2’. I cant get why you wouldn’t repeat that at the end of that row? It seems like the corners will look different if I only do that the first corner but then when I get to the end of that row it says to do ‘sc, ch2, turn then skip first 2 stitches’ why wouldn’t I repeat the hdc in just that row that forms the corner? I hope my question makes sense.
Tammy
6/4/2018 10:14:11 pm
Sorry, forgot to check the notify me box for comments 😊
Erin
6/5/2018 02:24:04 pm
No problem! I didn't invent this stitch, so I can't be 100% sure what the original intent for the transition row is, but just based on my experience crocheting, I would say that it's because you need the extra height of the hdc to keep the corner even. That last hdc kind of compensates for the missing ch 1 stitch so that the corner doesn't pull down slightly (as I assume it would if you finished off the row with a sc).
Tammy
6/5/2018 02:37:17 pm
Perfect! That makes sense, thanks for the response and this tutorial was very helpful!
Carolyn
6/6/2018 04:48:35 pm
Is there a video or utube video showing this? That is the easiest way for me to learn. I love the stitch and the dishcloth!
Teresa Johnson
7/1/2018 07:04:57 pm
I am so happy I ran across your C2C Moss Stitch tutorial! I love this stitch and want to to a C2C blanket using the new cake yarns! The Moss Stitch is a great stitch that disguises the transition from one color to the next so when it happens in the middle of a row it does not stick out like a sore thumb! I can wait to try this! Do you by chance have instructions for C2C rectangle in the Moss Stitch? Step by step tutorial is not necessary for me as I am an experienced crocheter, but C2C will be a new challenge for me.
Teresa Johnson
7/4/2018 05:24:43 pm
Another Teresa Johnson - and you spell your name correctly! ;)
Erin
7/6/2018 10:33:39 am
Hi Teresa! I'm glad you like the tutorial. Moss stitch is always one of my favorites for variegated/striped yarn too.
sarah
7/1/2018 08:58:56 pm
How do you decrease for a rectangle blanket?
Erin
7/6/2018 10:35:37 am
Hi Sarah,
Ella Glazer
7/5/2018 10:48:48 pm
How can we apply this stitch to one of the c2c patterns?
Erin
7/6/2018 10:38:24 am
Great question! I'm assuming that you're referring to the diagonal box stitch that's been so popular for c2c the past few years. I wouldn't recommend substituting the c2c moss stitch for c2c diagonal box stitch simply because they're very different in size, shape, and placement. So this stitch wouldn't work for pixel graphs, for example. It would be better to find/make patterns specifically for the c2c moss stitch.
ruth
7/7/2018 04:49:01 pm
Thank you so much for this wonderful tutorial. I've only done c2c once using the basic pattern for that. I'm definitely going to be trying this. I love picture tutorials and find them to be so much better than videos.
Erin
7/8/2018 02:52:52 pm
Hi Ruth! I'm actually working on a photo tutorial for the rectangle. It should be up next week, so keep an eye out for it :) And congratulations on all of your wonderful grandchildren! I'm sure they love the things that you make them.
Mardell
7/9/2018 10:57:35 pm
Love it!,Are there written instructions? Love that yarn too.
Shauns
8/8/2018 12:04:07 am
Thanks so much for this. I've been wanting to make a few moss stitch cloths, and since I'm a massive fan of anything NOT involving starting chains, I'll be using this. Since my crochet time is limited, I'd much rather spend it stitching than figuring out, or winging it. So again, thank you, for doing the work for us.
Sascha De Zeeuw
9/29/2018 12:18:27 pm
Hey! I love this stitch and your tutorial so much. I have been doing this stitch for charity squares. Half and half. So 2 different yarns. Looks really good especially with melange yarns.
Brenda
10/26/2018 10:32:26 am
I have done 2 square blankets from Mama In A Stitch with the moss stitch which i absolutely love - have never done a c2c - would love to try it - can you tell me how if i am making a receiving blanket size? like 35x35 or 40x40?
Aida
11/5/2018 09:30:31 pm
Really clear & concise directions! Photos are very helpful. Glad I found your post!
Rachel
12/1/2018 06:32:25 am
Thanks for this tutorial!!
Wendy Lavender
12/10/2018 08:03:09 pm
This is the best c2c moss/linen stitch tutorial I’ve had the pleasure of following. Your precise photos are brilliant. I always get messed up starting out but this has helped tremendously. Many thx.
Lesley
1/3/2019 04:56:23 pm
How many rows in total please
Linnea
3/12/2019 01:14:18 am
How ever many rows it takes you to get to 9" or width you want. I crocheted 24 rows then began decreasing. Total rows including decrease rows totaled 48. My cloth is 9.75" x 9.75" with the SC border I added for a finished look.
Linnea
3/12/2019 01:09:52 am
Great tutorial! For once C2C makes sense to me. The written out portions (pattern style) were most helpful for me. I finished my cloth in 70 minutes including the SC border. Now on to the rectangle C2C tutorial. :) 4/28/2019 01:02:29 pm
Thank you for this tutorial. It was easy to follow and I've just used it to make my first ever washcloth
Ruth
5/13/2019 12:38:35 pm
Erin, I'm with you on that... I like picture tutorials much better than videos so thank you so much for this one. It's a beautiful stitch which would make a perfect dish or wash cloth and I'm going to try it with blanket yarn and see how it works for a blanket made with the Bernat blanket...Might be too dense but we'll see. Either way I'm going to be using this pattrn and tutorial many times
Aubrey
7/9/2019 10:06:05 pm
Thank you for your lovely photo tutorial. I am in the middle of a wreck of a project, and needed some pointers on how to create a C2C moss stitch triangle, but it's going haywire on me.
Erin
7/10/2019 11:00:24 am
Hi Aubrey!
Aubrey
7/15/2019 01:28:58 pm
For the love of... after everything I read, and looking at your other pattern, I realized what I was doing wrong.
Karen
7/15/2019 10:28:09 am
So happy I discovered your picture tutorial for moss stitch C2C! I've been crocheting for what seems like forever - mom started teaching me when I was about 6, and I'll soon be 65. C2C is one thing I've not tried, have recently been searching for photo tutorial. I learn best with written rather than visual. Your written directions are among the easiest to grasp that I've seen; having pictures to illustrate makes this tutorial even better! Thank for the time and effort you put into making it.
Sarah Goldstein
10/7/2019 06:56:36 pm
I wish you also would have charted the pattern out. I get so less confused that way.
Mary
10/19/2019 09:36:39 pm
If I want to change colors how do you re omens I do that, This is lovely and your explanations are so clear -thank you!
Erin
12/6/2019 09:36:32 am
Hi Mary! Apologies for super delayed response. To change colors in order to create stripes, etc, I recommend switching yarns right before you ch 3. I like make the first part of the last sc in the row with the first color and then finish the stitch with the new color. That way the color change is extra neat. Hopefully that makes sense. Let me know if you have any more questions about this.
Linda Duensing
11/12/2019 04:33:33 pm
Is there a printable instruction? I know there are others but I like yours better.
Erin
12/6/2019 09:37:36 am
Hi Linda,
wendy
11/29/2019 07:03:42 pm
I will crochet this dish cloths for myself ! I must try this c2c stitch as I used up my scraps in moss stitch earlier today. I see that Linda also likes this pattern. Thank you for the picture tutorial.
Jeannette
12/1/2019 09:51:25 am
Is there a video. I need one!
Erin
12/6/2019 09:39:19 am
Hi Jeannette,
Loretta
3/12/2020 03:12:44 pm
Is there a pdf for this pattern so I can work on this offline.
Lynne
6/2/2020 03:01:31 pm
May I sell items I make with this pattern? If so, how would you like me to list your information?
Erin
6/3/2020 09:29:03 pm
Hi Lynne! Yes, absolutely! You're welcome to sell your hard work. I just ask that if you're posting it digitally (on etsy or something) that you link back to my page for the pattern if possible. Thanks for asking! :)
Lydia Kay
6/13/2020 02:41:48 pm
Is there a way to print out the pattern? I would love to try the c2c miss stitch, but I like having a pattern in front of me.
George
7/30/2020 08:21:50 am
Your photos of decreasing doesn’t match your instructions. You state to skip the 2 sts at the end and go straight into the first ch1, yet your photos show different. By following your written instructions mine buckle. Also you have the HDC then it’s omittted. Is this just for the the straight before the decreasing?
Erin
7/31/2020 02:40:07 pm
Hi George,
Rebecca
8/18/2020 12:46:04 pm
I absolutely love the idea of this stitch and have tried it many times, but can't tell what I'm doing wrong! I can never seem to get a nice square with 90° corners. It ultimately turns into a diamond shape every time that I have to pull and tug and block into a proper square. Any ideas where I'm going wrong?
Erin
8/20/2020 10:51:42 pm
Hi Rebecca!
lisa
12/17/2020 01:51:07 pm
I absolutely love this pattern, it works up fast, and the stitch is awesome. thank you so much!
Marjorie
1/19/2021 10:34:48 am
I NEVER comment but had to let you know how clear and helpful this post was. C2C is so confusing for me and I forced the issue to make myself learn by volunteering to be a pattern tester—doing moss/linen stitch instead of DC!! Instead of spending days stressing out and frogging, I think I have a good understanding of what to do in less than ten minutes. You’ve got a follower for life. Thank you!
Erin
1/26/2021 09:37:40 pm
Thanks so much, Marjorie! You just made my day with your nice comment :) I'm glad that this tutorial has been helpful for you and I hope you enjoy the rest of the blog!
Cayla
11/5/2021 08:52:09 pm
I love this pattern, but am having some trouble. I finished the pattern, and my piece looks like a diamond instead of a square. Any idea what I missed in the pattern?
Cayla
11/5/2021 09:23:59 pm
For some reason, my phone won’t let me hit the response box. I love this stitch and pattern! I feel like I am missing something as my first attempt ended up a diamond shape instead of a square. I started another one and about 10 rows in, placed it on a book and I can’t get this at a good 90degree angle. The one side of it is slanted. Any ideas where I went wrong?
Ann
12/19/2021 09:45:43 pm
I tried this but my square was lopsided and I restarted and it was still crooked. Any tips? Am I making a mistake in the increase or decrease? Is it because I’m misplacing my hook in the beginning of the row?
Lori Smanski
12/22/2021 10:02:47 pm
Oh but I love this. Thank you for sharing. I am brand new at crochet. Is this a beginner pattern?
Terri L Cane
12/24/2021 07:37:27 am
Hello,
Colleen
1/14/2022 04:57:40 pm
really good tutorial. Thank you!
Katy
5/9/2022 01:55:44 am
Thank you, thank you, thank you for helping to enlighten people about C2C being a process and NOT a stitch. I too have been trying to let other crocheters know that you don't have to just use the slanting box stitch to do C2C. Also thank you for showing how to do C2C in Moss Stitch I will try it soon.
Anna
9/11/2022 12:55:00 am
I'm obsessed with this pattern! Do you have a reddit account? That way I can link you when I post the finished washcloth (I'll also link this website!). Also may I please sell the items I make with this pattern?
Tracy
11/29/2022 01:01:44 pm
Thank you so much for this, it’s just perfect for the Dishie Multi variegated yarn in Summer James that I just got from crochet.com. Wow that yarn is bright! But it looks great in Moss Stitch and this is the perfect variation for the dish cloths I’ve been making. I’m a sucker for details and I love the perfect corners this pattern makes, and that it looks great both with or without a border. On my way to make a big rectangular dish towel to match!
April
1/10/2023 02:22:40 am
Thank you so much for the pic tutorial! For me it's not so much the fact that I learn better this way but that I am so easily distracted sometimes. If there is something that I can't figure out then I go to the video tutorials. But this one is great so far but I'm just reaching the middle. And if there is a problem I have no doubt It's me. Lol.
Judy
1/30/2023 07:40:53 pm
Just curious what happens if you only increase on one side rather than both ends of this pattern.
Tracy
2/11/2024 06:18:21 pm
Thank you so much for this! I made a great dish cloth first with this - it’s perfect for variegated yarn! I just love the edging that the ch3 makes. Now I’m jumping into the deep end and making a huge throw. I tried other stitch patterns to bring out the best in the variegated yarn I’m working with, but this is the best. Bonus points for being nice and easy. Thanks again!
Jodi
4/6/2024 06:51:35 pm
Love this pattern. I’ve used it so many times for baby blankets. I love the automatic border that is created with this pattern.
Carolyn
4/30/2024 03:09:33 pm
I’m working on this for a toddler blanket. I’m having issues with the work staying straight. It’s curving even with smaller hooks. Any advice?
Erin
5/20/2024 04:05:49 pm
Sorry it's giving you a hard time! It's tricky for me to pinpoint the exact issue without seeing your work in person, but my best guess is that you might be dropping or adding stitches somewhere, which can make it curve. It can be easy to miss the last stitch, especially when you're working the decreases. If it looks like that's the issue, I would recommend using a stitch marker to mark the last stitch in each row so you can't skip it.
Pam
5/16/2024 01:35:30 pm
Is it possible to get this pattern without pictures? I would like to print it out but do not need pictures. Love this pattern.
Erin
5/20/2024 04:07:07 pm
Hi, Pam! Great question. I don't have a PDF version of this pattern at the moment, but it's definitely something I could make in the future. It'd have to wait until after we finishing moving, since it's kinda hectic right now, but I can add it to the list of future projects :) Leave a Reply. |
Welcome!Thank you for stopping by to visit my own personal corner of the web! Feel free to take a look around and check out what I've been crafting, crocheting, or baking. Hopefully you'll find something to inspire your own creativity!   
Archives
March 2024
|
 RSS Feed