
|
Baby #3's arrival is fast approaching and that means it's time for another blanket. I mean, on the one hand, we definitely don't need any more baby blankets. We are more than set in that department. But on the other hand, I can't help but imagine #3 complaining someday that she never got her own blanket when her brothers both had handmade blankets...and the mom guilt kicks in. So another blanket it is! But as we've discussed before, I have the worst attention span when it comes to making blankets. So I wanted to come up with a new design to challenge myself. Something non-traditional looking. And I think I hit the mark with this modern geometric look. 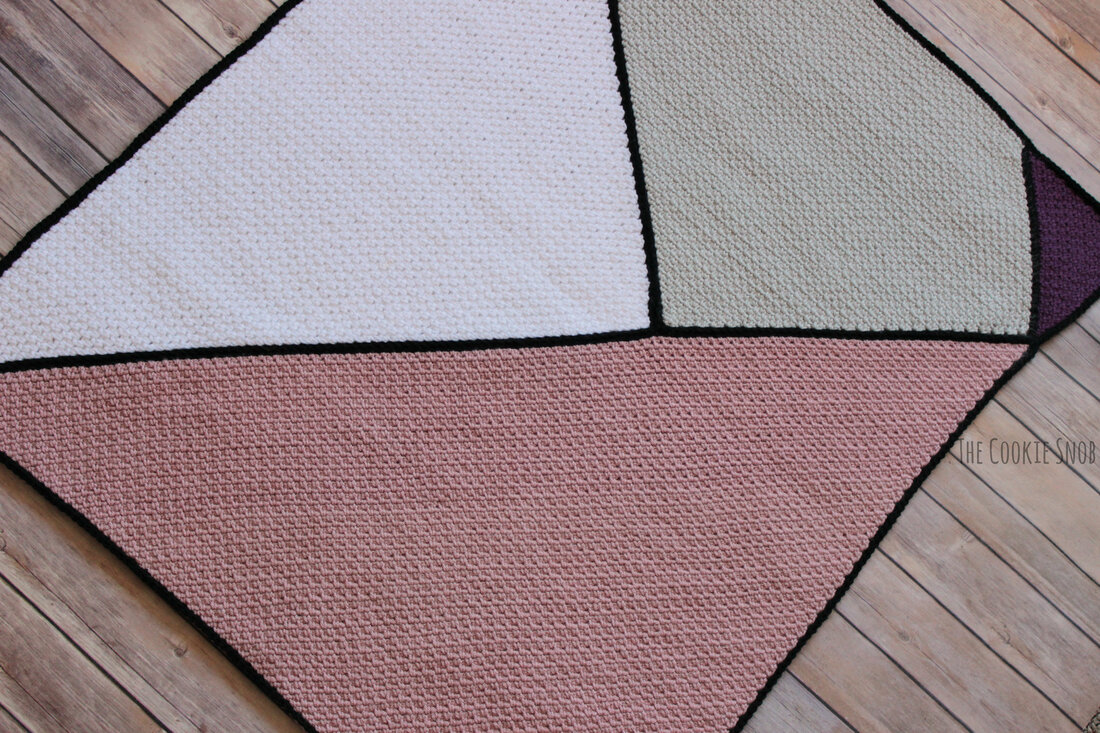 This design is part blanket, part puzzle. But don't worry, I already did the puzzling part for you, so all you'll have to do is follow along. The design is totally gender neutral and could be worked up in any combination of colors. And you can also easily adjust the yarn weight or size of the finished blanket. (Feel free to contact me if you have any questions about how to make that work.) 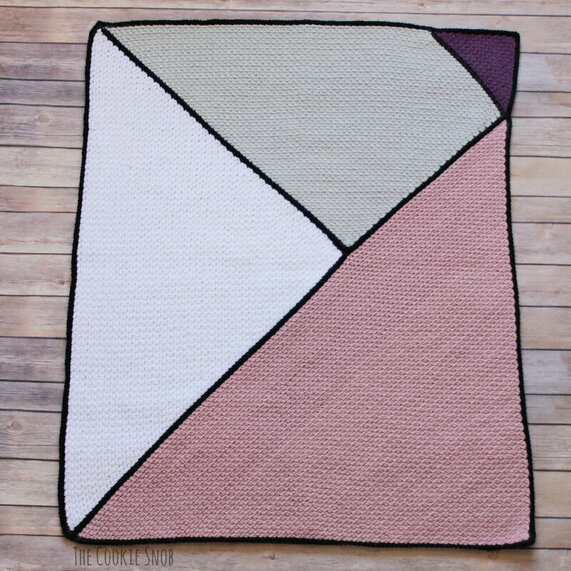 You also have some flexibility in how you join the pieces of this blanket together. I couldn't bring myself to make 3 full blankets (because that would be crazy, even for me), but I made up some swatches to show you 3 different joining methods and to give you an idea for how they'd look so you can pick your favorite. You can weigh the pros and cons (discussed in the assembly section of the pattern) and pick your own favorite method.  The different sections of this blanket are made using the c2c moss stitch. If you're not already familiar with it, I recommend looking through this tutorial first. It's always good to make a practice swatch before you get started on a big project like this. Now for the pattern! If you'd like an ad-free printable PDF of the pattern, you can find one on Ravelry. Materials:
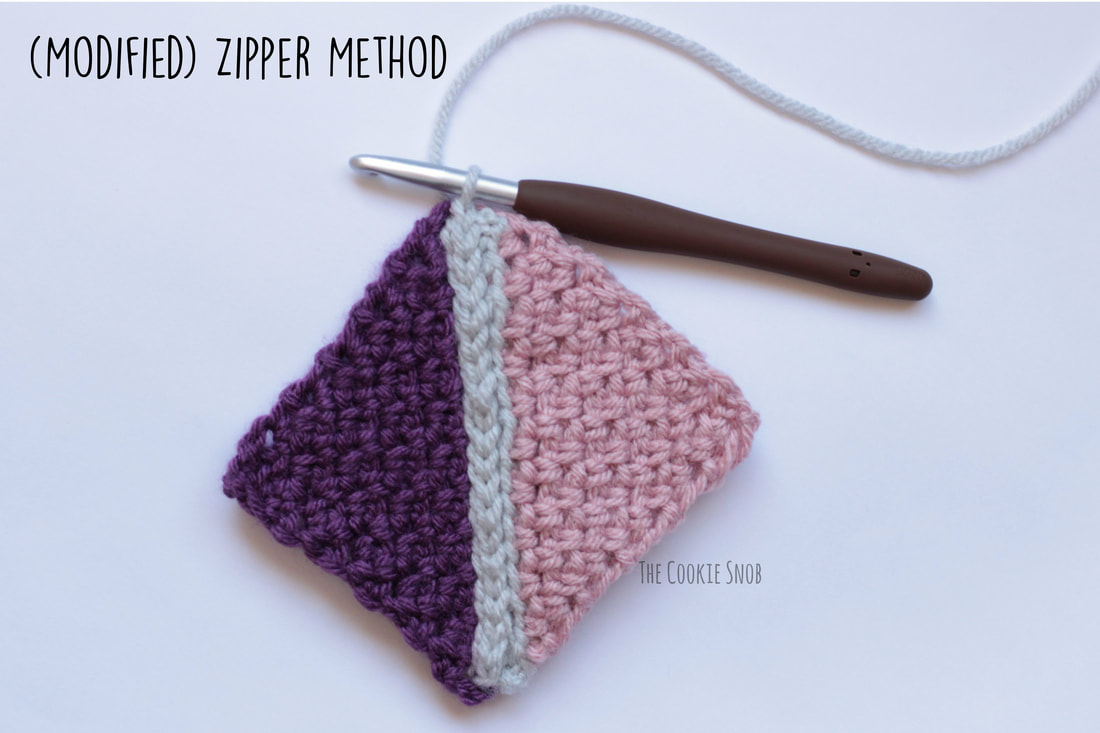
Stitch Glossary: st(s) = stitch(es) ch = chain sc = single crochet hdc = half double crochet Gauge: 2" = 5 sc, 4 ch-1 spaces (moss st) 2" = 8 rows of moss st Section A: We're going to start with the largest triangle; you'll be increasing until the short sides are 30" (or the width you want the blanket to be). Ch 3 Row 1: sc in the third ch from the hook, turn Row 2: ch 3, [sc, ch 1, sc] in the ch-3 space from the previous row, turn Row 3: ch 3, sc in the first ch-1 space, ch 1, [sc, ch 1, sc] in the ch-3 space, turn Row 4: ch 3, sc in the first ch-1 space, ch 1, [sc, ch 1] in each ch-1 space across, [sc, ch 1, sc] in the ch-3 space, turn Repeat Row 4 until the short sides measure 30". Optional: When you get to your final row, end the row with a [sc, hdc] in the ch-3 space instead of the usual [sc, ch 1, sc] to help even it off. Fasten off. 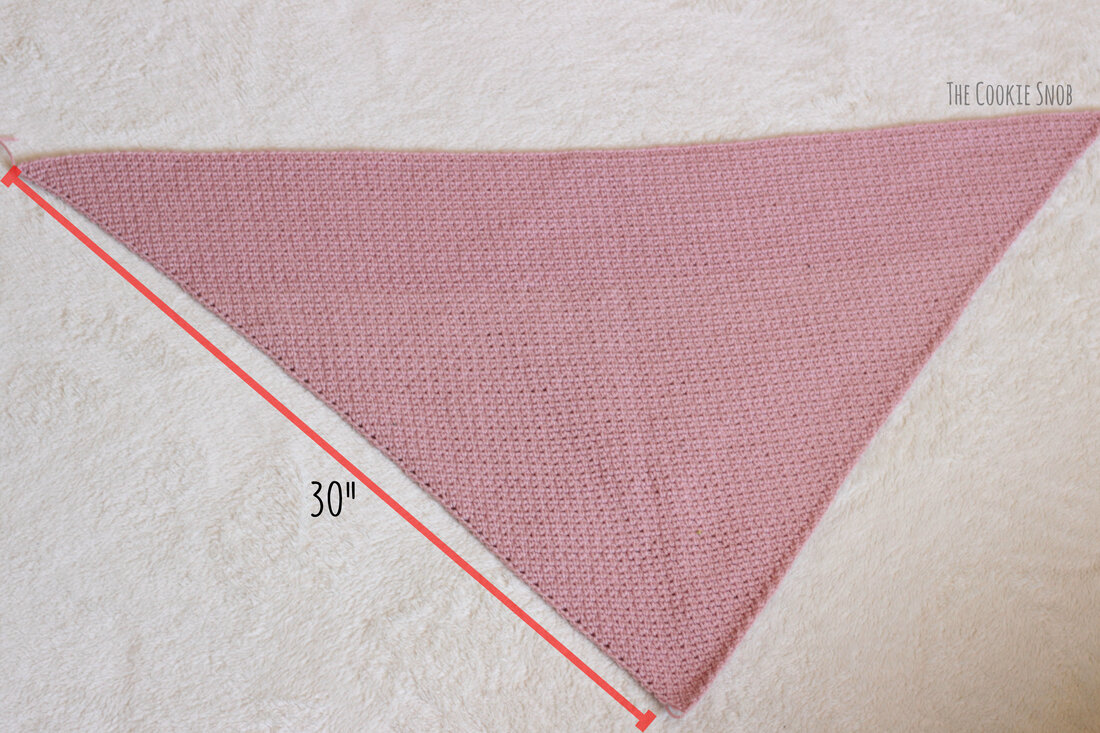 Section B: Now we're going to make with the next largest triangle; you'll be increasing until the hypotenuse (the longest side) is 36" (or the length you want the blanket to be). Ch 3 Row 1: sc in the third ch from the hook, turn Row 2: ch 3, [sc, ch 1, sc] in the ch-3 space from Row 1, turn Row 3: ch 3, sc in the first ch-1 space, ch 1, [sc, ch 1, sc] in the ch-3 space, turn Row 4: ch 3, sc in the first ch-1 space, ch 1, [sc, ch 1] in each ch-1 space across, [sc, ch 1, sc] in the ch-3 space, turn Repeat Row 4 until the longest side measures 36". Optional: When you get to your final row, end the row with a [sc, hdc] in the ch-3 space instead of the usual [sc, ch 1, sc] to help even it off. Fasten off. 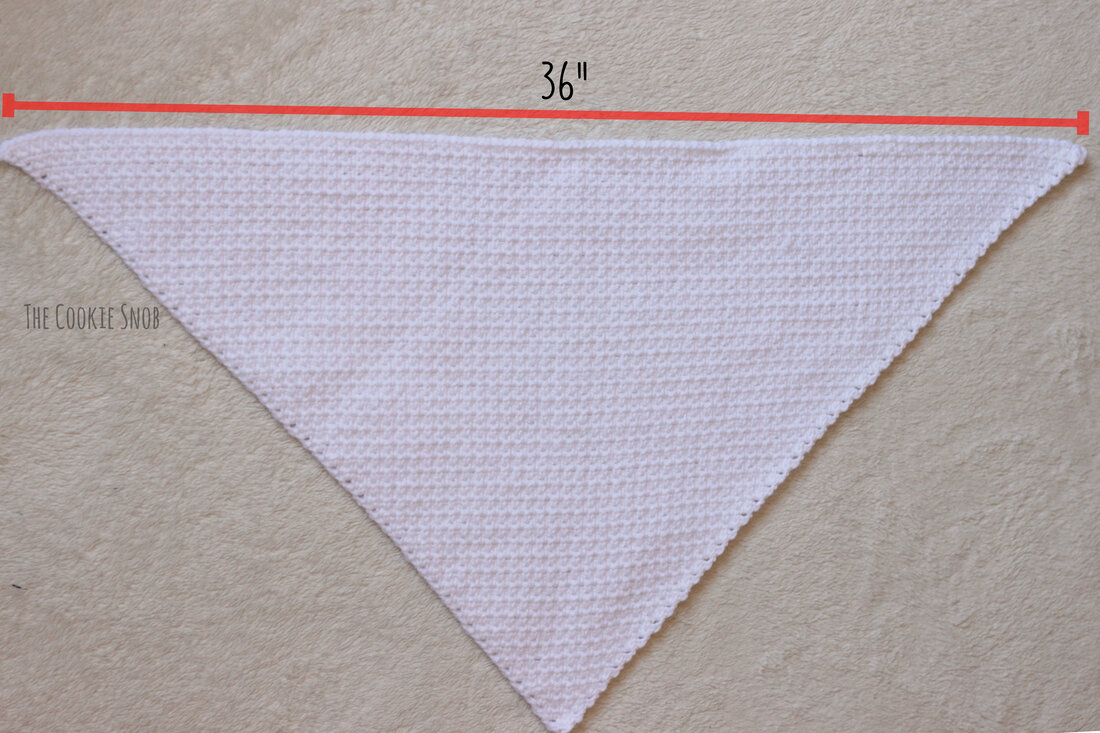 Section C: Next we'll make the smallest triangle; you'll be increasing until the short sides are 6" (or the difference between the longest side of Section B and the short sides of Section A). The short sides of A and C together should be equivalent to the length of the long side of B. Ch 3 Row 1: sc in the third ch from the hook, turn Row 2: ch 3, [sc, ch 1, sc] in the ch-3 space from Row 1, turn Row 3: ch 3, sc in the first ch-1 space, ch 1, [sc, ch 1, sc] in the ch-3 space, turn Row 4: ch 3, sc in the first ch-1 space, ch 1, [sc, ch 1] in each ch-1 space across, [sc, ch 1, sc] in the ch-3 space, turn Repeat Row 4 until the short sides measure 6". Optional: When you get to your final row, end the row with a [sc, hdc] in the ch-3 space instead of the usual [sc, ch 1, sc] to help even it off. Fasten off. 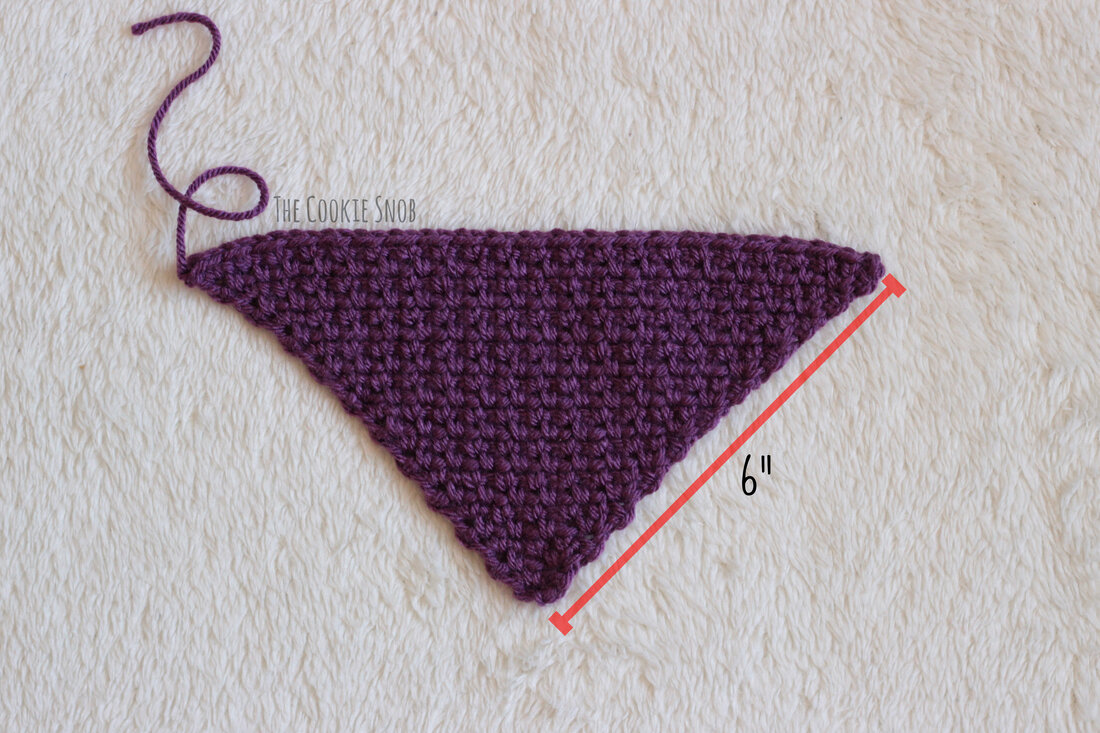 Section D: The last section is the trickiest, since it'll require some decreasing (but only on one side) to get the trapezoidal shape. First you'll increase until the short sides measure 15.5" (or the difference between the longest side of Section A and the short side of Section B). Then you'll decrease on one side while increasing on the other until the shortest side of the trapezoid measures 8.5" (or the length of the long side of Section C). I recommend using a stitch marker as a visible reminder to help you remember which side you'll be decreasing on. Ch 3 Row 1: sc in the third ch from the hook, turn Row 2: ch 3, [sc, ch 1, sc] in the ch-3 space from Row 1, turn Row 3: ch 3, sc in the first ch-1 space, ch 1, [sc, ch 1, sc] in the ch-3 space, turn Row 4: ch 3, sc in the first ch-1 space, ch 1, [sc, ch 1] in each ch-1 space across, [sc, ch 1, sc] in the ch-3 space, turn Repeat Row 4 until the short sides measure 15.5". Row 5: ch 3, sc in the first ch-1 space, [ch 1, sc] in each ch-1 space across, sc in the ch-3 space, turn Row 6: ch 2, skip the first 2 sts, sc in the first ch-1 space, ch 1, [sc, ch 1] in each ch-1 space across, [sc, ch 1, sc] in the ch-3 space, turn Row 7: ch 3, sc in the first ch-1 space, [ch 1, sc] in each ch-1 space across, sc in the ch-2 space, turn Repeat Rows 6-7 until the shortest side of the trapezoid measures 8.5" Fasten off. 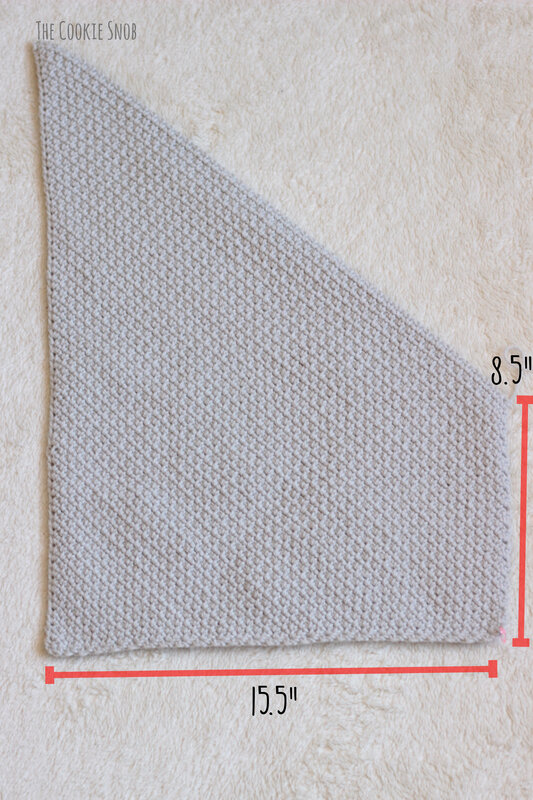 Assembly: Triangles assemble! Now that you have all your sections, it's time to put them together to make a complete rectangle. Arrange the pieces as shown below. I labeled the beginning corner (where you started with Row 1) for each section to help you orient the pieces more easily. 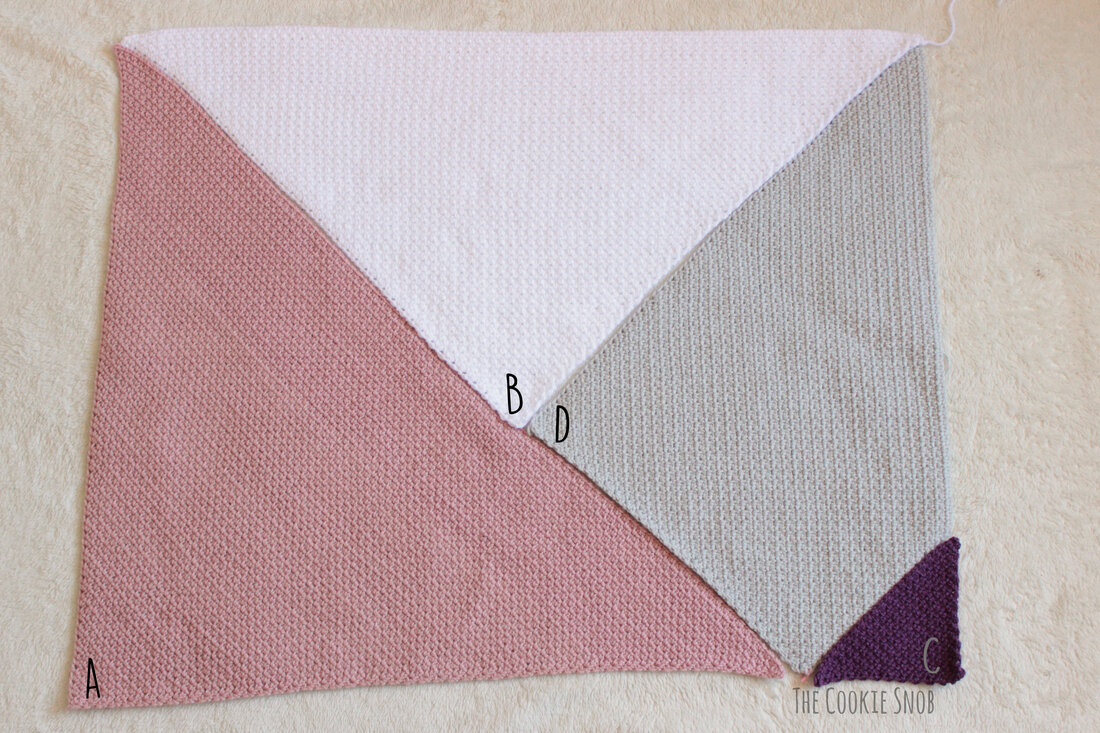 Now it's time to decide how you want to join your pieces. I used black yarn to join mine, but to make it easier to see the stitches for the pictures, I used gray yarn in the swatches below. Here's a look at three options that I think would work the best, but you can also try out another joining technique if it tickles your fancy. Option 1: Modified Zipper Method The method I used for joining is the (modified) zipper method. The zipper method is essentially using surface crochet to join two pieces. But I added an extra step in this instance. Because some of the sections are being joined in different orientations and the stitches won't match up precisely, I first surface crocheted along the edges of the piece that I wanted to join (not around the entire triangle, just the side that I was about to connect). I tried to makes sure that I had about the same number of surface crochet stitches on each side I was about to join. Then I used the zipper method, meaning I surface crocheted into the back loops (aka "inside loops") of the surface crochet to connect the pieces. If you've never used the zipper method before, here's a link to a great tutorial from Look at What I Made. Pros:
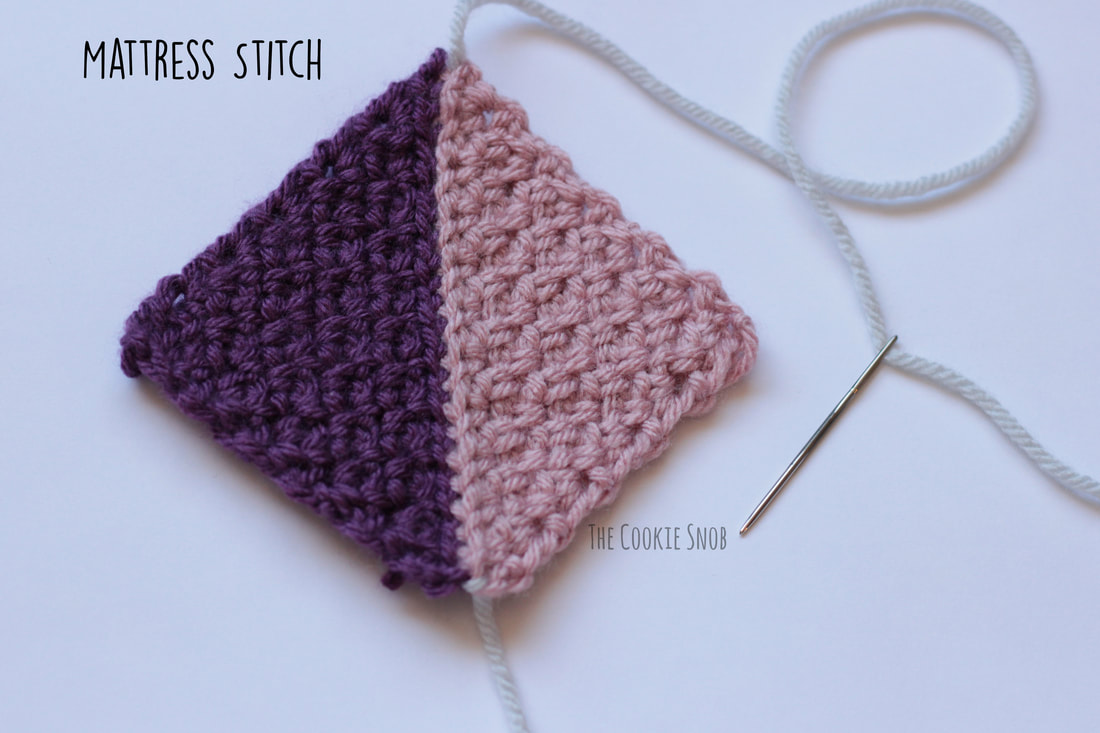
 Option 2: Mattress Stitch If you'd rather use your tapestry needle than your crochet hook, you can seam it using the mattress stitch. Since the seam will be basically invisible, this will give your blanket a different look. If you're not familiar with this seaming method, you can find a photo/video tutorial on Moogly. But there is one caveat: Since not all sides you'll be joining will be facing the same direction, the stitches won't all match up exactly and you'll have to eyeball it a bit. Pros:
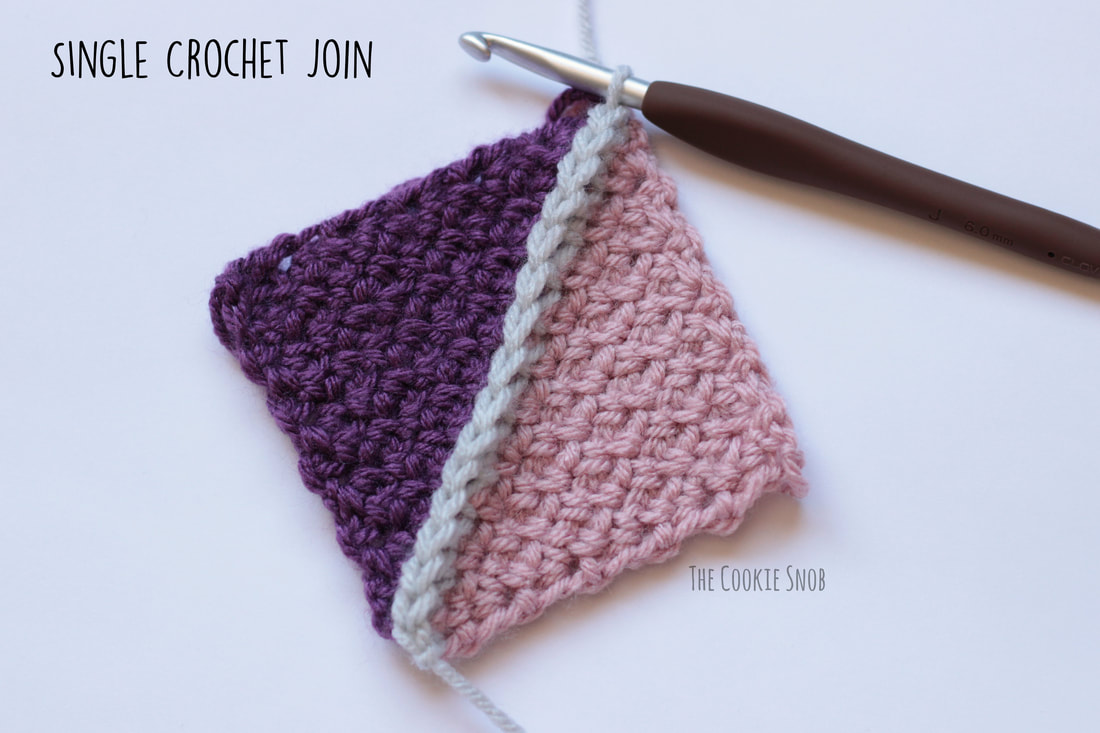
 Option 3: Single Crochet Join If you want to crochet your seams, but don't want to bother with the zipper method, you can try the sc join. Essentially, you'll hold the sides that you want to join together and then sc through both pieces to create a seam. You can find another excellent tutorial over on Moogly if you're new to the technique. But, as before, not all of the sides will be joined in the same orientation so you'll have to eyeball it at times to compensate for the stitches not matching up perfectly. Pros:
 Once your sections are seamed together using your joining method of choice, you'll need to decide how/if you want to add a border. For my border, I decided to surface crochet around the entire edge of the rectangle and then sc around in the back loops only of the surface crochet. But if you want something simpler, you can just directly sc around the edge of the rectangle; just be sure to try to work your stitches evenly since (again) not all of the sections are oriented in the same direction. Or substitute your own favorite border. Personally, I'd stick with something simple rather than going for a complicated border style, but if you love it then I say go for it! Once you're finished, I HIGHLY recommend blocking the blanket. I know, I know. No one likes to bother with extra steps. BUT it really is worth the effort. Your blanket will be that much more lovely and even looking. 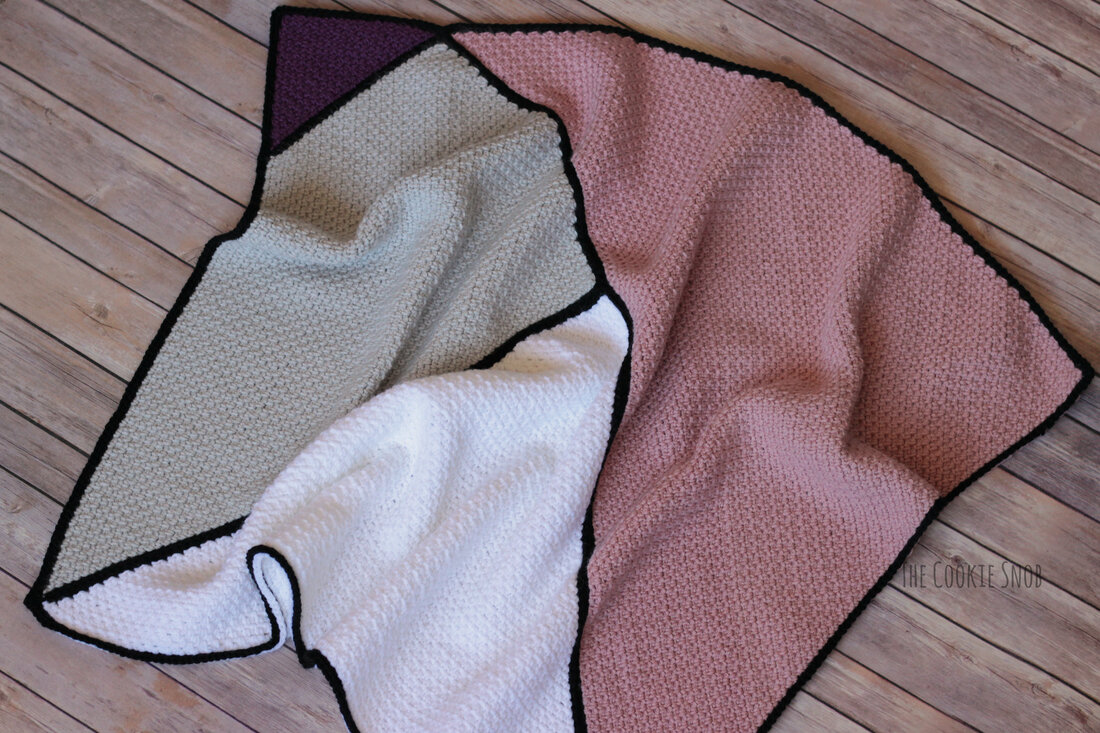 And there you have it: The Bold Lines blanket! I hope you enjoy this somewhat non-traditional baby blanket design. There's so much potential for customizing this one (So many color combinations! And sizes! And yarn weights!), so feel free to play around with it and make it completely your own. If you have any questions or comments about this pattern, you can reach me in the comments section below or on social media. And if you end up making one, please do share a picture! Happy hooking! 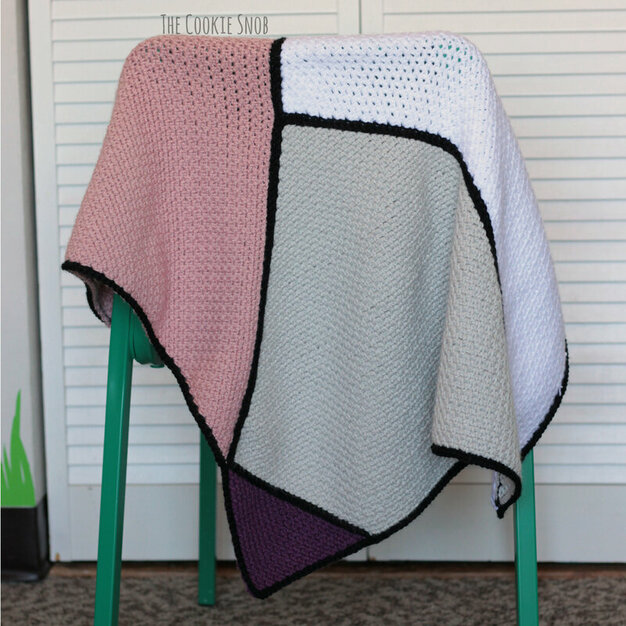 Want to make sure you don't miss any future blog posts? Join my mailing list:  ***You're welcome to do whatever you'd like to with finished products made from this pattern but if you do sell them, I ask that you link back to my page. You may not copy this pattern, repost it anywhere (either altered or in its original form), or claim it as your own. You may not use any photos on this site for your own use. ***
4 Comments
Lou | mallooknits
4/4/2019 07:32:18 am
Wow! That is such a genious technique! Great pattern! Thanks for sharing!
Susan
10/29/2022 01:59:09 am
I really love this blanket! Blankets are not my favorite thing to make, but I think I'm going to have to try it. I do appreciate geometry. Anyhow, you advise to block when finished. Any tips on how to block a blanket? I'm used to blocking doilies, and an entire blanket is hard for me to imagine doing!
Erin
11/13/2022 04:07:28 pm
Hi, Susan! When I need to block something large like a blanket, I usually use foam mats. I have some interlocking squares (that my kids play with) and I just set them up to be the size I need, then pin it to the squares when it's wet (or pin it when it's dry and then spritz it with a spray bottle). I've also used yoga mats before. I've heard of people just pinning it directly to the carpet, but with kids and a dog running around, that isn't really an option at my house, so I'm not sure how well it works. Hopefully this helps! Good luck! Leave a Reply. |
Welcome!Thank you for stopping by to visit my own personal corner of the web! Feel free to take a look around and check out what I've been crafting, crocheting, or baking. Hopefully you'll find something to inspire your own creativity!   
Archives
March 2024
|
 RSS Feed