
|
My son is still obsessed with the Christmas Zebra I made for him last month. He named the zebra Zozee and now Zozee goes everywhere with us. Luckily we haven't lost him yet (I'm keeping my fingers crossed on this one). Zozee is quite the adventurous zebra; he flies through space, he rescues other animals, and he apparently loves to watch Octonauts. It probably goes without saying that I was strictly banned from packing Zozee up with the other Christmas things. Since it looks like Zozee's definitely the favorite toy at the moment, I couldn't resist my son's request to make Zozee a friend. But instead of making a zebra, I figured I'd tweak the pattern just a bit and make something a little different: a unicorn! 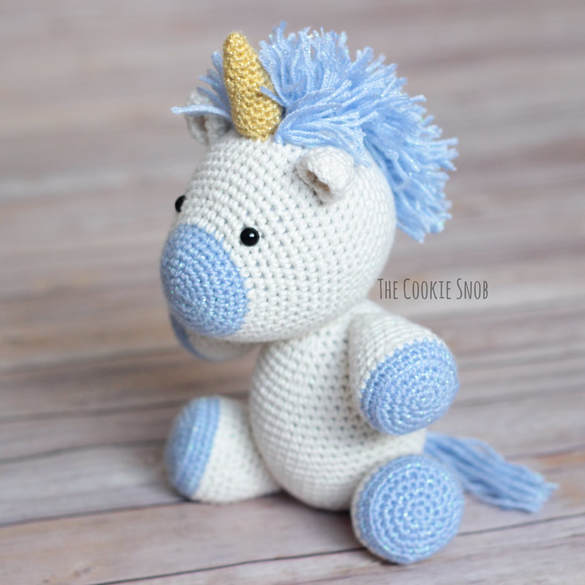 I suppose it's not terribly novel. Sometimes it feels like just about every crochet designer has some type of unicorn pattern. So, I present to you: Yet Another Unicorn. It's hardly a new concept, but I think it's pretty cute. This unicorn has the same construction as my Christmas Zebra, although it's a bit simpler because it doesn't have any striping or color changes to keep track of. 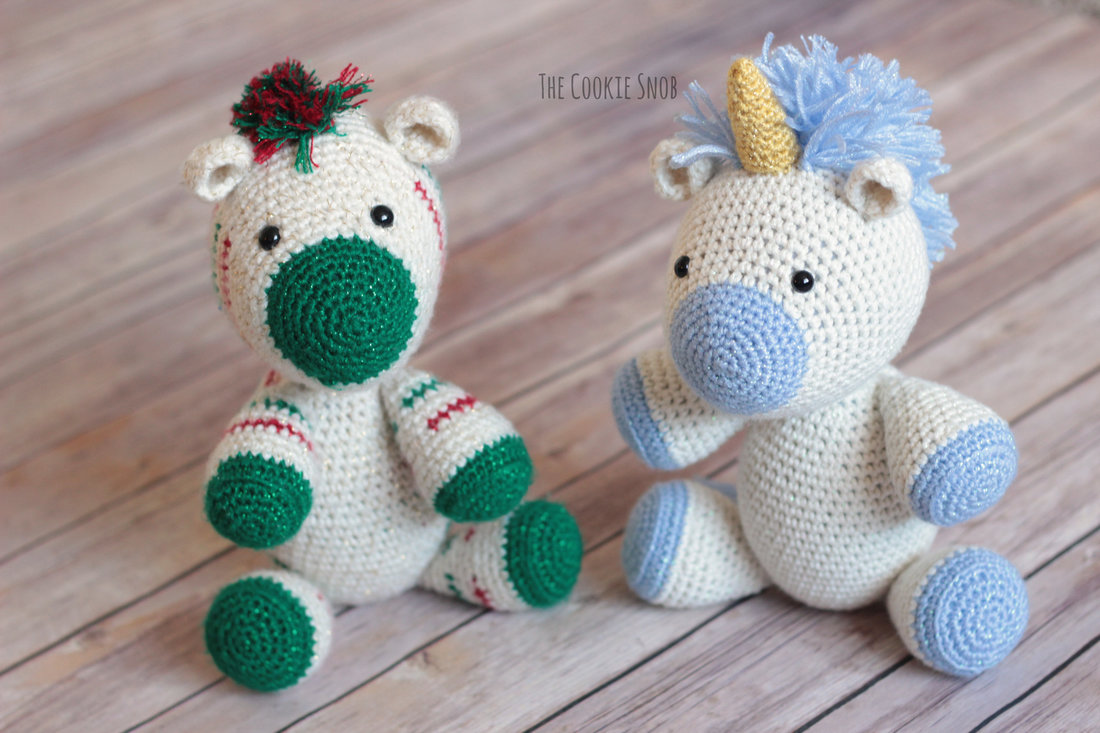 To keep it simple, I limited the numbers of colors I used, but feel free to branch out and personalize the colors to get the look you want. And, of course, I couldn't resist using sparkly yarn. But you can substitute another worsted weight yarn if needed. I made mine using an F (3.75mm) crochet hook, but I would highly recommend sizing down a hook to help keep the stitches tight (I crochet pretty tightly). 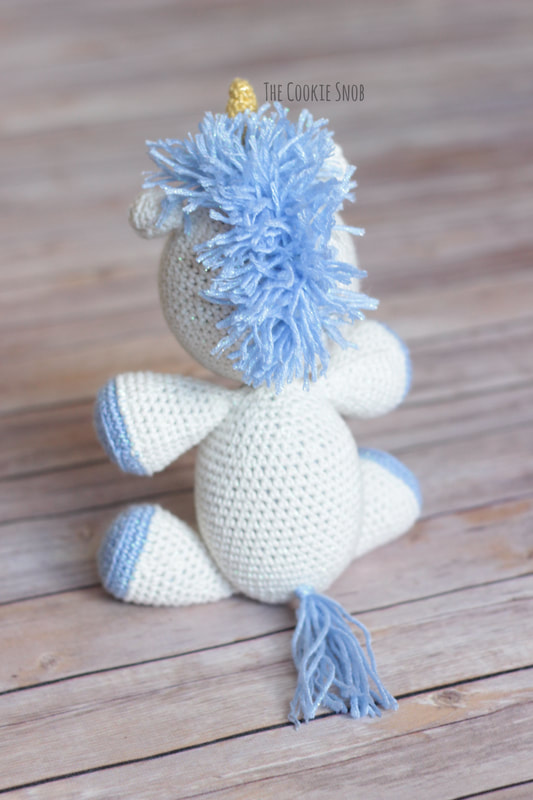 Now on to the pattern! If you'd like an ad-free printable PDF version, you can find one on Ravelry. Materials:
Stitch Glossary: st(s) = stitch(es) ch = chain ss = slip stitch sc = single crochet inc = sc increase (work 2 sc in the same st) dec = sc decrease (I prefer to use the invisible decrease stitch) sc3tog = decrease across 3 sc Note: The majority of this pattern is worked in the round (meaning the stitches are worked in a continuous spiral). I recommend using a stitch marker and moving it after every round to help you keep track of which round you're working on. Head: Start with the accent color Round 1: Make a magic circle and work 6 sc into the magic circle (6) Round 2: inc around (12) Round 3: [inc, sc] around (18) Round 4: [sc, inc, sc] around (24) Round 5: [inc, sc in the next 3 sts] around (30) Rounds 6-8: sc around (30) Switch to main color yarn Round 9: [sc in the next 2 sts, inc, sc in the next 2 sts] around (36) Round 10: sc around (36) Round 11: sc in the next 12 sts, [inc, sc in the next 5 sts] 3 times, sc in the last 6 sts (39) Round 12: sc in the next 12 sts, [sc in the next 3 sts, inc, sc in the next 3 sts] 3 times, sc in the last 6 sts (42) Round 13: sc in the next 12 sts, [inc, sc in the next 7 sts] 3 times, sc in the last 6 sts (45) Round 14: sc in the next 12 sts, [sc in the next 4 sts, inc, sc in the next 4 sts] 3 times, sc in the last 6 sts (48) Round 15: sc in the next 12 sts, [inc, sc in the next 9 sts] 3 times, sc in the last 6 sts (51) Round 16: sc in the next 12 sts, [sc in the next 5 sts, inc, sc in the next 5 sts] 3 times, sc in the last 6 sts (54) Round 17: sc in the next 12 sts, [inc, sc in the next 11 sts] 3 times, sc in the last 6 sts (57) Round 18: sc in the next 12 sts, [sc in the next 6 sts, inc, sc in the next 6 sts] 3 times, sc in the last 6 sts (60) Rounds 19-22: sc around (60) 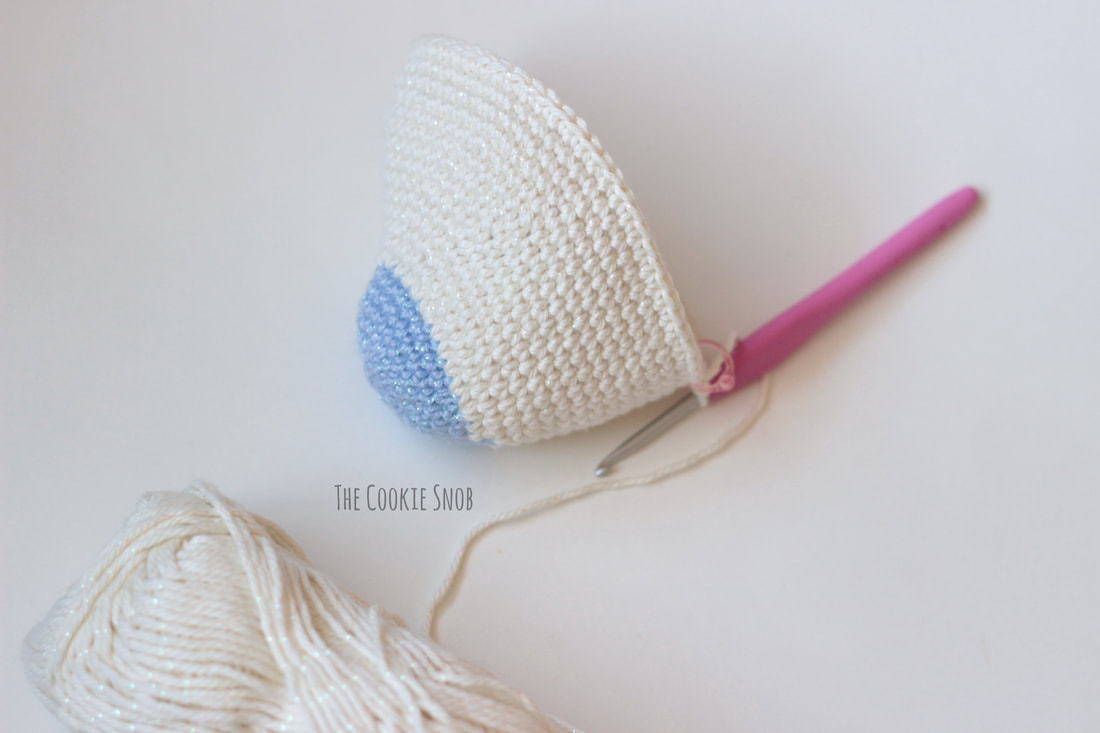 Round 23: [sc in the next 4 sts, dec, sc in the next 4 sts] around (54) Round 24: sc around (54) Round 25: [dec, sc in the next 7 sts] around (48) Round 26: sc around (48) Pause crocheting for a moment and add the safety eyes on the top half of the head between rounds 11 and 12, about 8 sts apart, as shown (or feel free to use your own placement or stitch on eyes, if you prefer.) If you'd like to stitch on a mouth or nostrils, now is a good time to do so. I didn't add any to mine, but feel free to personalize yours. 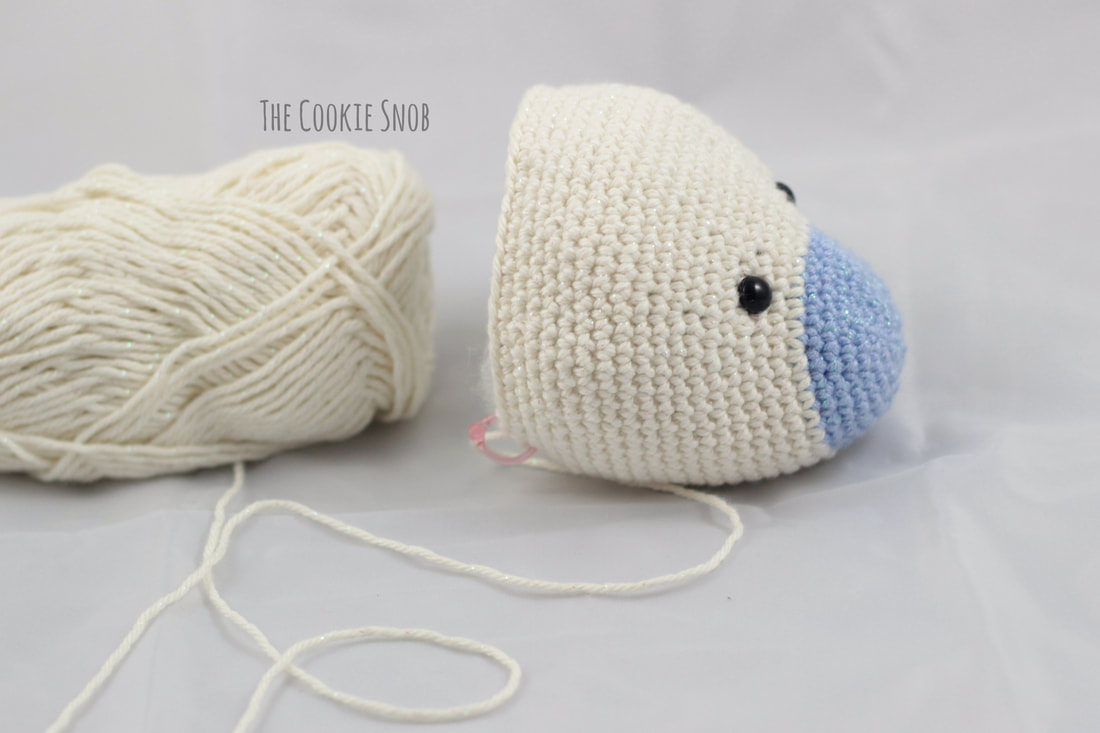 Round 27: [sc in the next 3 sts, dec, sc in the next 3 sts] around (42) Round 28: [dec, sc in the next 5 sts] around (36) Round 29: sc around (36) Round 30: [sc in the next 2 sts, dec, sc in the next 2 sts] around (30) Round 31: [dec, sc in the next 3 sts] around (24) Begin stuffing the head. Continue to stuff as you go. Round 32: [sc, dec, sc] around (18) Round 33: [dec, sc] around (12) Round 34: dec around (6) Finish stuffing. Fasten off, leaving a yarn tail. Using a tapestry needle, weave the yarn tail through the front loop of the remaining sts and pull taut to close. 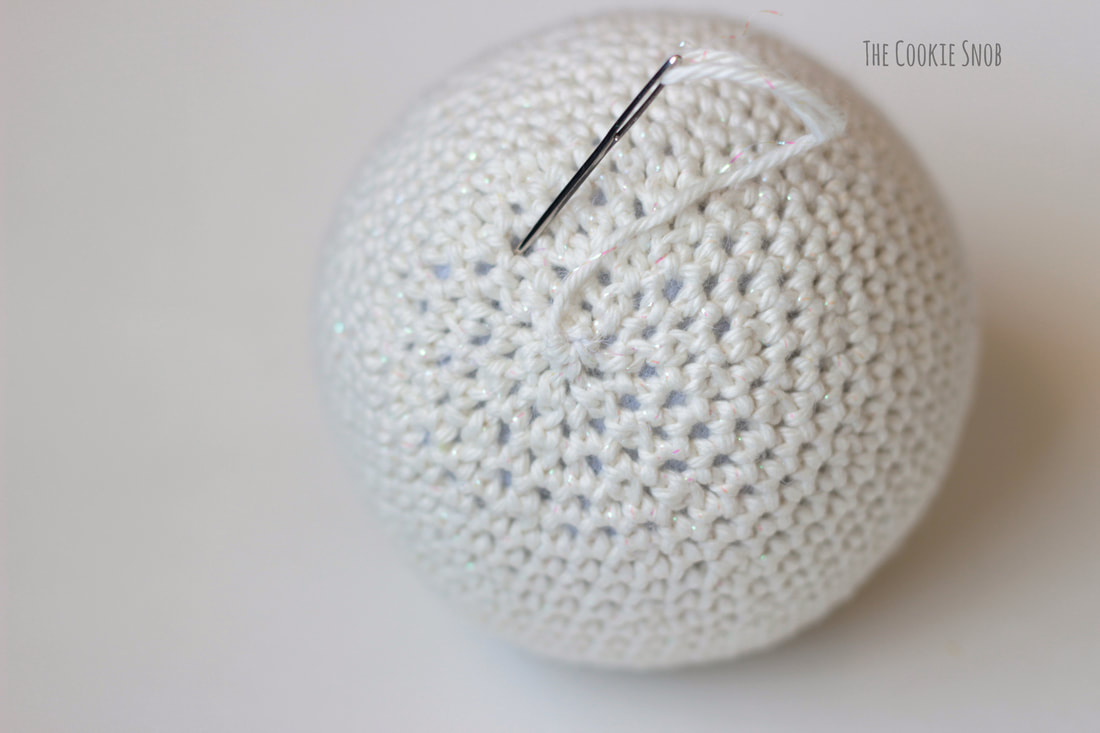 Horn Using the gold yarn: Round 1: Make a magic circle and work 6 sc into the magic circle (6) Rounds 2-3: sc around (6) Round 4: [inc, sc] around (9) Rounds 5-6: sc around (9) Round 7: [inc, sc in the next 2 sts] around (12) Rounds 8-11: sc around (12) Round 12: [inc, sc in the next 3 sts] around (15) Rounds 13-14: sc around (15) Fasten off, leaving a long yarn tail for sewing.  Ear (Make 2): With main color yarn, ch 10 Row 1: sc in the 2nd ch from the hook and in each remaining st across, turn (9) Rows 2-3: ch 1, sc across, turn (9) Row 4: ch 1, dec, sc in the next 5 sts, dec, turn (7) Row 5: ch 1, dec, sc in the next 3 sts, dec, turn (5) Row 6: ch 1, dec, sc, dec, turn (3) Row 7: ch 1, sc3tog (1) Optional: ss around the entire ear to create a clean edge Fasten off, leaving a long yarn tail for sewing  To shape the ear, pinch the corners of the flat bottom edge of the ear (row 1) together and stitch shut using the tapestry needle and yarn tail. 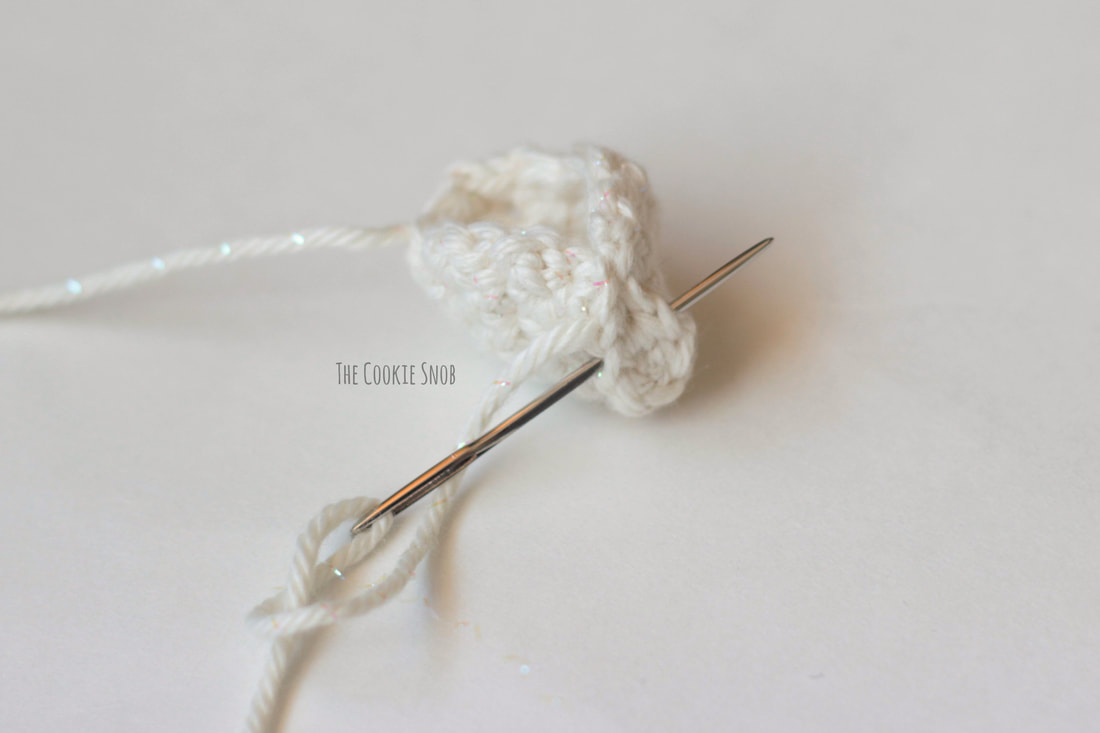 Body With main color yarn: Round 1: Make a magic circle and work 6 sc into the magic circle (6) Round 2: inc around (12) Round 3: [inc, sc] around (18) Round 4: [sc, inc, sc] around (24) Round 5: [inc, sc in the next 3 sts] around (30) Round 6: sc around (30) Round 7: [sc in the next 2 sts, inc, sc in the next 2 sts] around (36) Round 8: sc around (36) Round 9: [inc, sc in the next 5 sts] around (42) Rounds 10-23: sc around (42) Round 24: [dec, sc in the next 5 sts] around (36) Round 25: sc around (36) Round 26: [sc in the next 2 sts, dec, sc in the next 2 sts] around (30) Round 27: sc around (30) Begin stuffing the body. Continue to stuff as you go. Round 28: [dec, sc in the next 3 sts] around (24) Round 29: [sc, dec, sc] around (18) Round 30: [dec, sc] around (12) Round 31: dec around (6) Finish stuffing. Fasten off, leaving a long yarn tail for sewing. Using a tapestry needle, weave the yarn tail through the front loop of the remaining sts and pull taut to close. 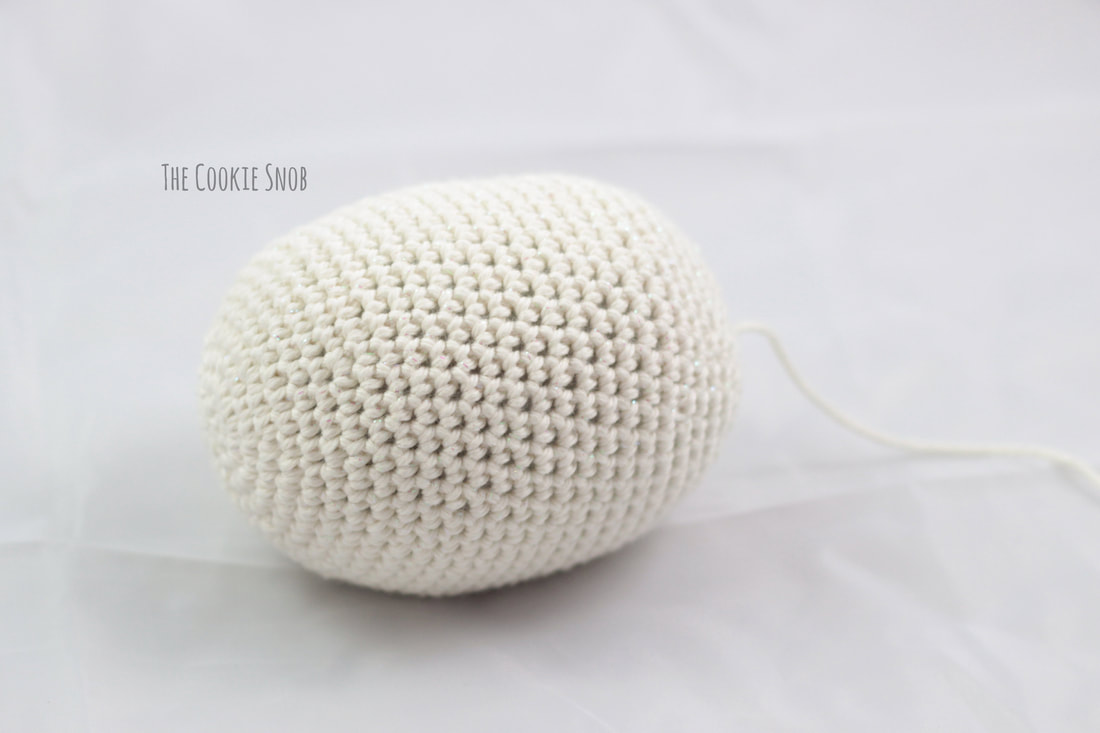 Leg (Make 4): Note: As written, the legs are designed in joined rounds to keep the color change cleaner; as a result, it creates a small seam. If you prefer, you can work these legs in a continuous round instead to avoid the seam. Start with the accent color yarn Round 1: Make a magic circle and work 6 sc into the magic circle, ss to join (6) Round 2: ch 1, inc around, ss to join (12) Round 3: ch 1, [inc, sc] around, ss to join (18) Round 4: ch 1, [sc, inc, sc] around, ss to join (24) Round 5: ch 1, [inc, sc in the next 3 sts] around, ss to join (30) Round 6: ch 1, sc around in the back loop only, ss to join (30) Round 7: ch 1, sc around, ss to join (30) Switch to main color yarn Round 8: ch 1, sc around, ss to join (30) Round 9: ch 1, [dec, sc in the next 3 sts] around, ss to join (24) Rounds 10-11: ch 1, sc around, ss to join (24) Round 12: ch 1, [sc, dec, sc] around, ss to join (18) Rounds 13-14: ch 1, sc around, ss to join (18) Begin stuffing. Continue to stuff as you go. Round 15: ch 1, [dec, sc] around, ss to join (12) Rounds 16-17: ch 1, sc around, ss to join (12) Round 18: ch 1, dec around, ss to join (6) Finish stuffing. Fasten off, leaving a long yarn tail for sewing. 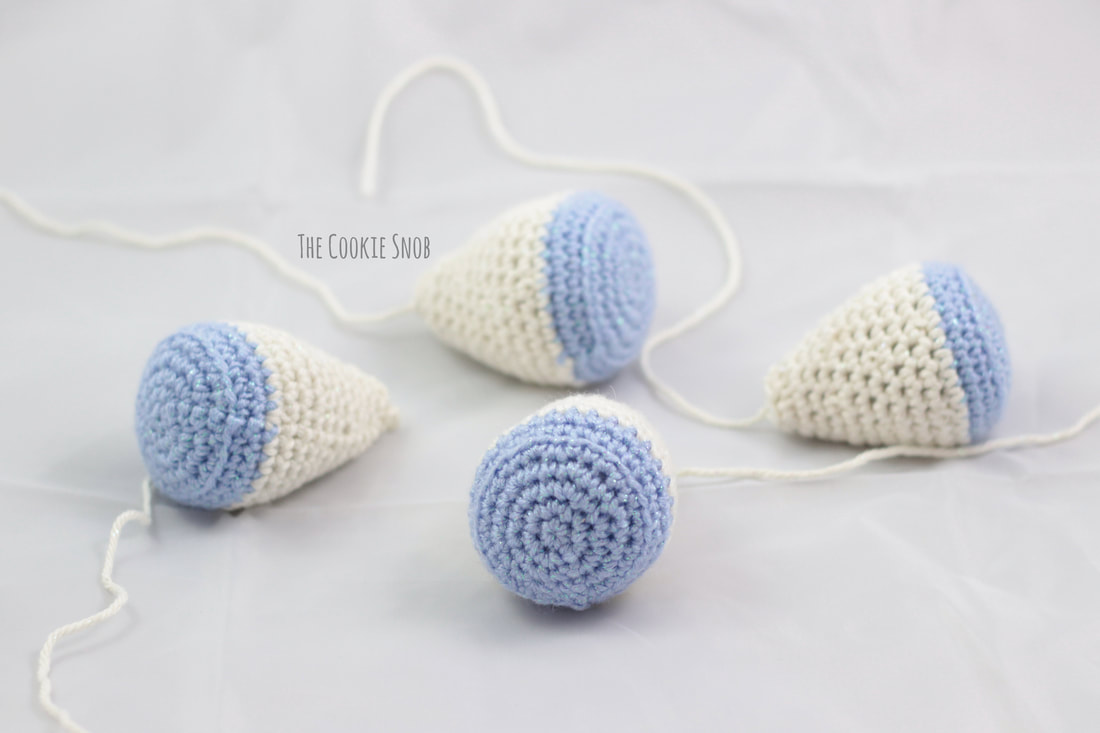 Assembly: Using the long yarn tails and the tapestry needle, sew the ears onto the head as shown, with the flat sides attached to the head. Lightly stuff the horn and sew in between the ears. 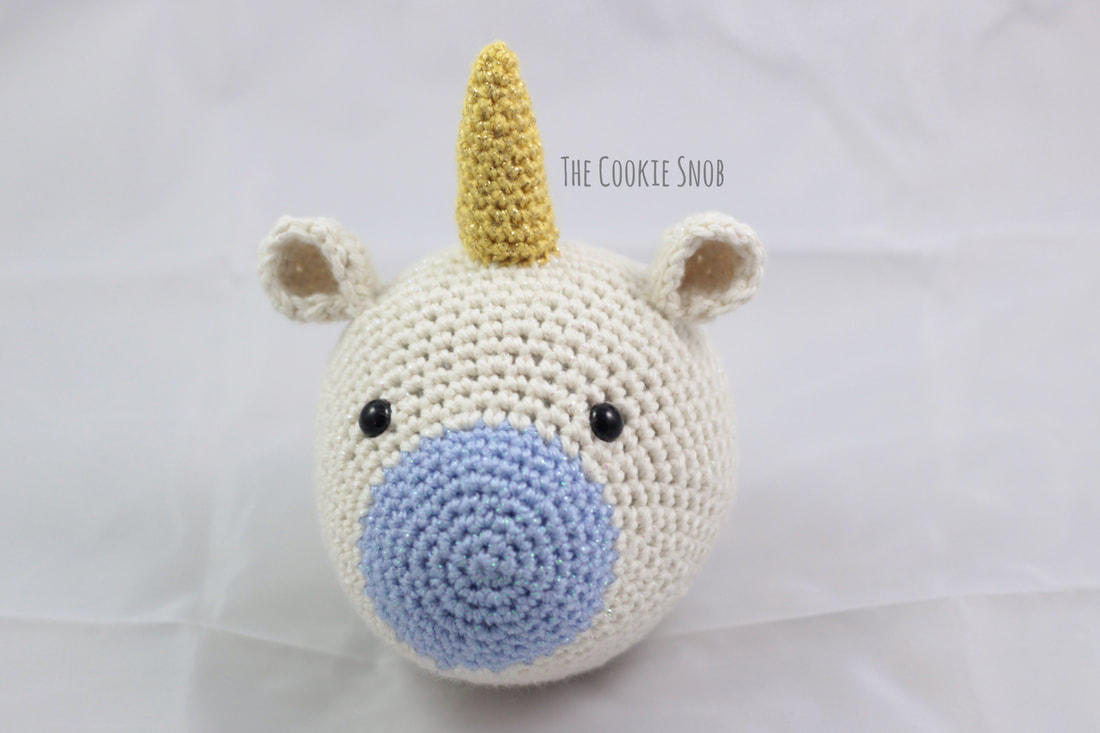 Using the long yarn tails and the tapestry needles, sew the head onto the body. (Tip: If you find that the head is too wobbly, make sure that you're stitching the body and head together at multiple points all the way around the "neck" rather than just stitching in one place.) Then sew the legs onto the body as shown. 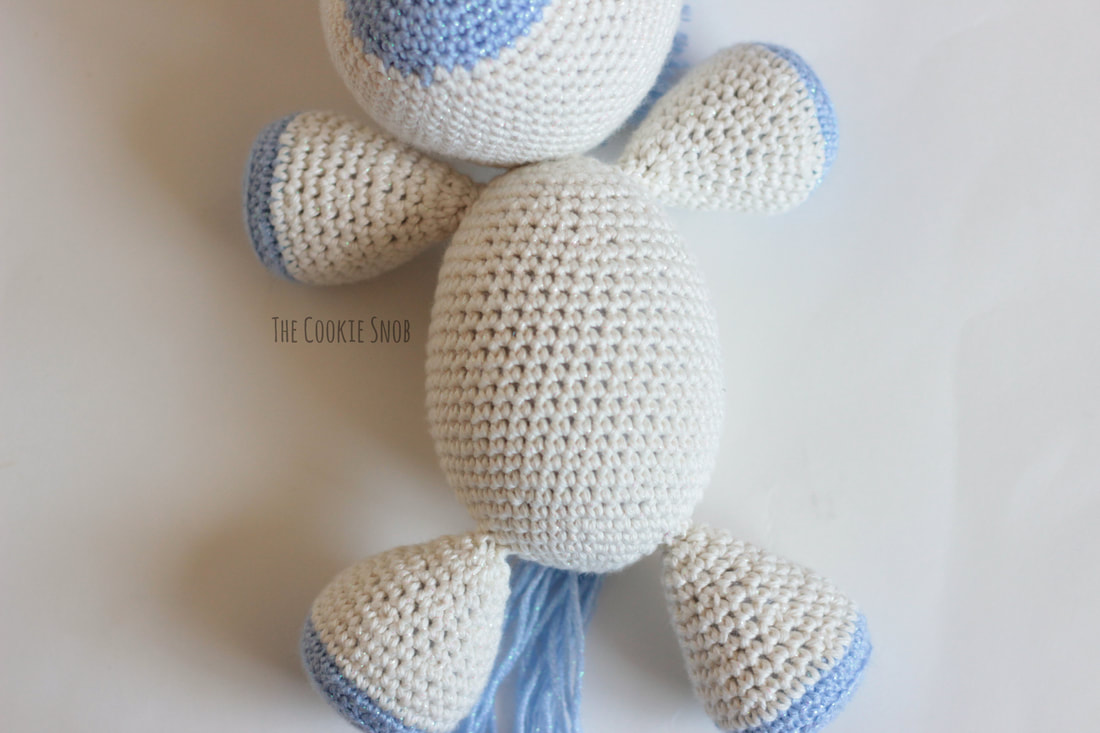 To create the mane, cut pieces of accent color yarn into 6" lengths. Hold 3 strands together. Insert your hook through the stitch where you want to attach the hair and pull the yarn strands partway through the stitch from the center until a loop forms. Pull the loose strands on the other end through the yarn loop you just made and pull taut to fasten in place. (I find that this last step is best done with your fingers rather than the hook). Repeat until the mane is as full/long as you'd like it to be. I began mine in between the ears and continued down to the back of the head. I made my mane with alternating rows of 4 sts wide and 3 sts wide. Once the yarn is all attached, trim the mane to an even height. I trimmed mine until it was about 1-1/2" long. 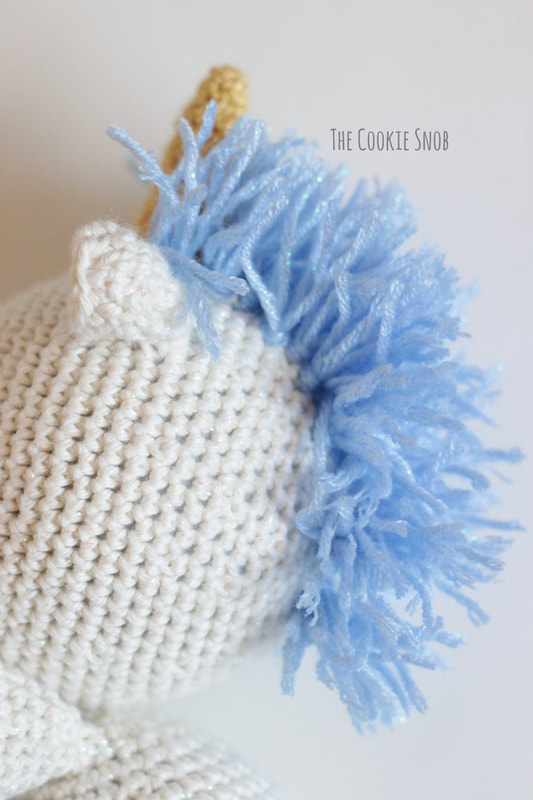 For the tail, cut ten 12" strands of accent color yarn. Insert your hook through the stitch on the back of the zebra where you want to attach the tail (I placed mine on Round 38) and attach the 10 strands the same way you attached the mane. Trim to an even height. I trimmed mine to be about 4" long. 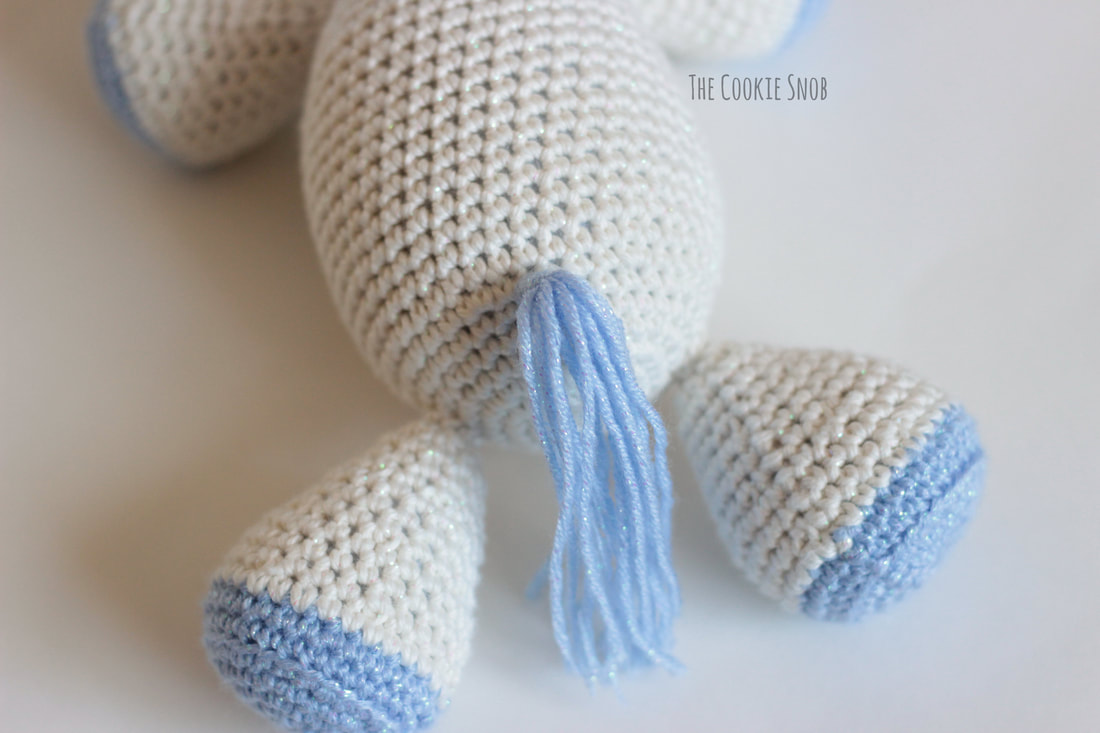 Weave in any remaining ends. You've now finished your very own cuddly unicorn! I hope that you've enjoyed this pattern! If you like it, I hope you'll consider supporting my blog by purchasing your own ad-free printable, PDF version on Ravelry. Your support allows me to make more of my patterns available for free. If you make one, please share a picture! I'd love to see how it turns out. And if you have any questions or comments, you can reach me in the comments section below or on social media. Happy hooking! Want to make sure you don't miss any future blog posts? Join my mailing list! 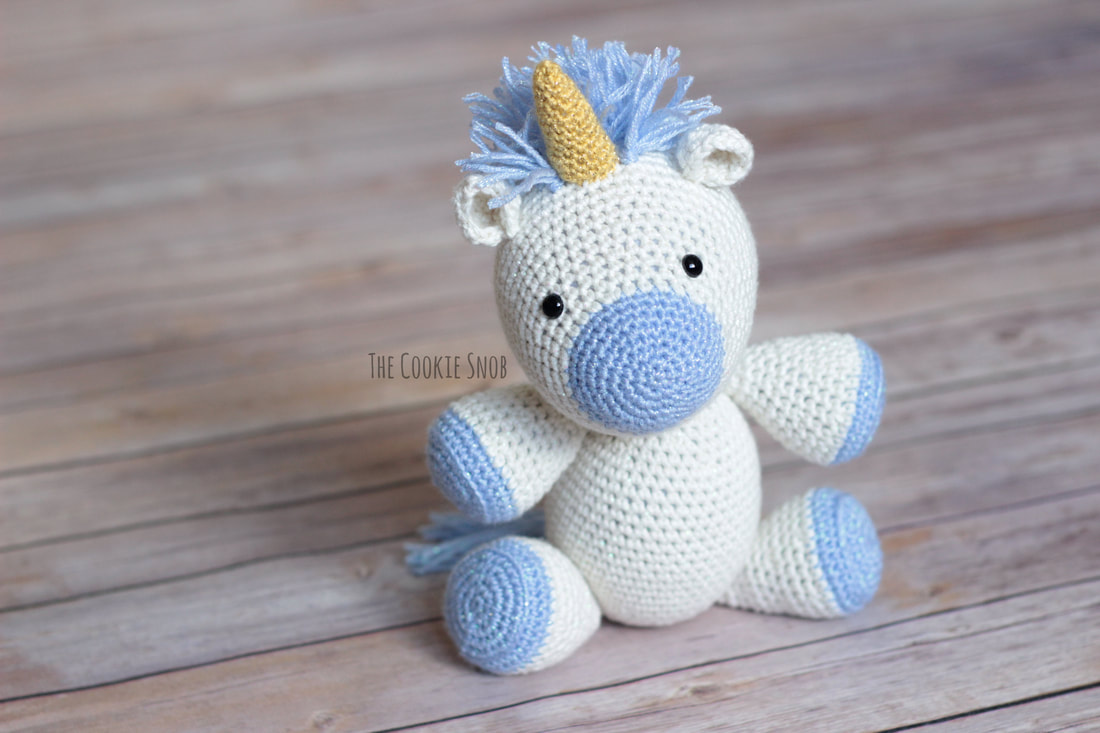 ***You're welcome to do whatever you'd like to with finished products made from this pattern but if you do sell them, I ask that you link back to my page. You may not copy this pattern, repost it anywhere (either altered or in its original form), or claim it as your own. You may not use any photos on this site for your own use. ***
26 Comments
1/17/2018 08:56:47 am
There may be a lot of mermaids out there... but their mane is so hard to nail and I love his! Also love the sparkly yarn!! 1/18/2018 01:33:49 pm
Never enough unicorn patterns especially when you are offering them as a free gift. 2/7/2018 09:09:50 am
Ok, now I have to made 3 of them!
Erin
2/10/2018 01:21:20 pm
Thanks! I'm glad you like the pattern! If you actually want to make a translation, feel free to send me an email and we can figure out the details :) My email is cookiesnobcrochet(at)gmail(dot)com (or you can find a direct link on the contact page)
Habets Marie-Josée
2/10/2018 04:26:39 pm
Est-il possible d'avoir la traduction en français s.v.pl.
Erin
3/16/2018 07:18:06 pm
Sorry, but I don't speak French at all! If any French speakers are interested in working on a translation for this pattern, feel free to contact me :)
Clare
2/11/2018 11:29:03 am
I've never tried amigurumi, the smaller hooks and intricate patterns are just too small for my arthritic hands. After reading your instructions and looking at your excellent pictures I just may try this one. Thanks!
Shiy
8/29/2019 10:26:48 pm
Hi Clare. I, too, have arthritis and struggle with my crochet projects often but this pattern is easy and doesn't require much momentum in the way if wrist turns and finger bends. I hope you've given it a shot since your posted comment. I'm almost finished with my unicorn and cant wait to show it off! 2/13/2018 03:50:46 pm
Love this unicorn! So easy to made! I listed on my website with a link to it. Great work
Sandi
3/13/2018 09:24:52 pm
Love love love Zozee! I' be making 4 at least! How tall is Zozee? Thank you for this darling pattern!
Erin
3/14/2018 07:23:24 pm
Thank you! I'm so glad you like the pattern! When sitting down, the unicorn I made is approximately 9.5" tall (excluding the horn). I wanted it to be larger so that it would be huggable. One heads up: I tend to crochet tightly, so you'll probably want to size down at least one hook so that it doesn't turn out enormous. Unless that's what you want, in which case, more power to you! :) Good luck with the pattern! Let me know if you have any questions as you go.
Araceli
3/15/2018 03:39:53 pm
Esta super hermoso!!! Tiene traduccion en español? Porfavor
Erin
3/16/2018 07:16:25 pm
Gracias! Lo siento, pero no hay una traduccion en español ahora. Aunque hablo un poquito de español, no estoy familiarizada con la terminología de ganchillo. Pero si hay alguien que quiere traducirlo, podríamos trabajar juntos :) (Espero que este comentario tiene sentido jaja....hace mucho tiempo que no hablo español)
Dianne
2/7/2019 06:53:58 am
Remove his horn and you have a horse 😊
Erin
2/8/2019 03:50:05 pm
Love it! I've seen a couple people make horses using this pattern, so great minds must think alike! :) I always love to see people getting creative with patterns.
Della
3/13/2019 02:26:00 am
Love this unicorn! Must do!
Erin
4/16/2019 03:09:41 pm
Hi Paola!
Janet
5/3/2019 04:50:03 am
Can't wait to make this. So cute! Thank you!
Rose Lorenzen
6/24/2019 11:30:18 pm
Row 4 and row 9 seem to be off..row 4 should be 2 sc, inc 2 sc, and not sure about row 9? 3 sc inc? But still get 37??
Erin
6/25/2019 09:09:43 am
Hi Rose,
Brenda
9/6/2019 04:50:31 pm
Thank you for this pattern. I will do this one next. I'm currently in the middle of a red panda toy and four different blankets. But Christmas is coming, so it's the time to start! Leave a Reply. |
Welcome!Thank you for stopping by to visit my own personal corner of the web! Feel free to take a look around and check out what I've been crafting, crocheting, or baking. Hopefully you'll find something to inspire your own creativity!   
Archives
March 2024
|
 RSS Feed