
|
I don't know about you, but I could really use an extra dose of adorable right now. Luckily, I have another super cute Cookie Pal pattern to share with you all! And she's got an extra spring-y outfit, in honor of today being the first official day of spring. Meet Penny the Pig! 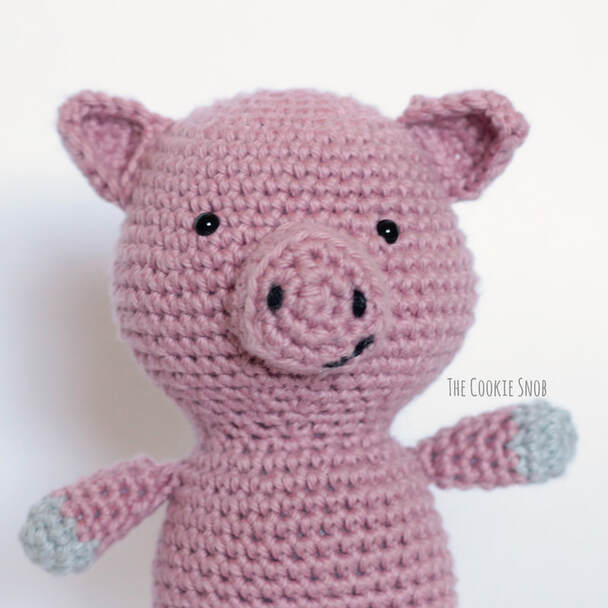 Penny may be a pig, but she's not one to wallow in the mud (figuratively, of course; mud is excellent for the skin). She loves to be up and out, having adventures, meeting new people, and trying new things. Ever the optimist, she doesn't let life get her down when things go wrong. Penny is an expert at finding silver linings. And she is an excellent hugger. So if you're feeling down, just give Penny a call! She'll be sure to brighten your day. 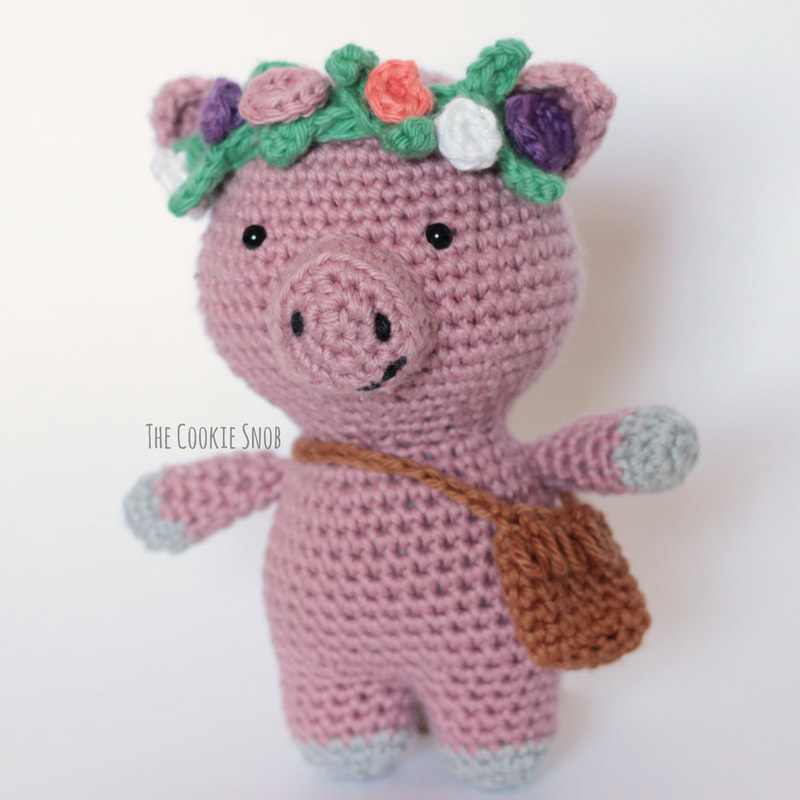 Isn't she just the sweetest? And I'm slightly envious of her bag...that's totally normal, right? Anyway, if you want to make your own cuddly pig pal, you can just follow along with this pattern. By now you know the drill: the body has the same basic construction as Beverly the Bear (with a few small differences that will be explained as we go), meaning that the head, body, and legs are all worked in one piece. So make sure to check out the pattern for Beverly, which has step-by-step photos to help you out. Now let's look at Penny's pattern! 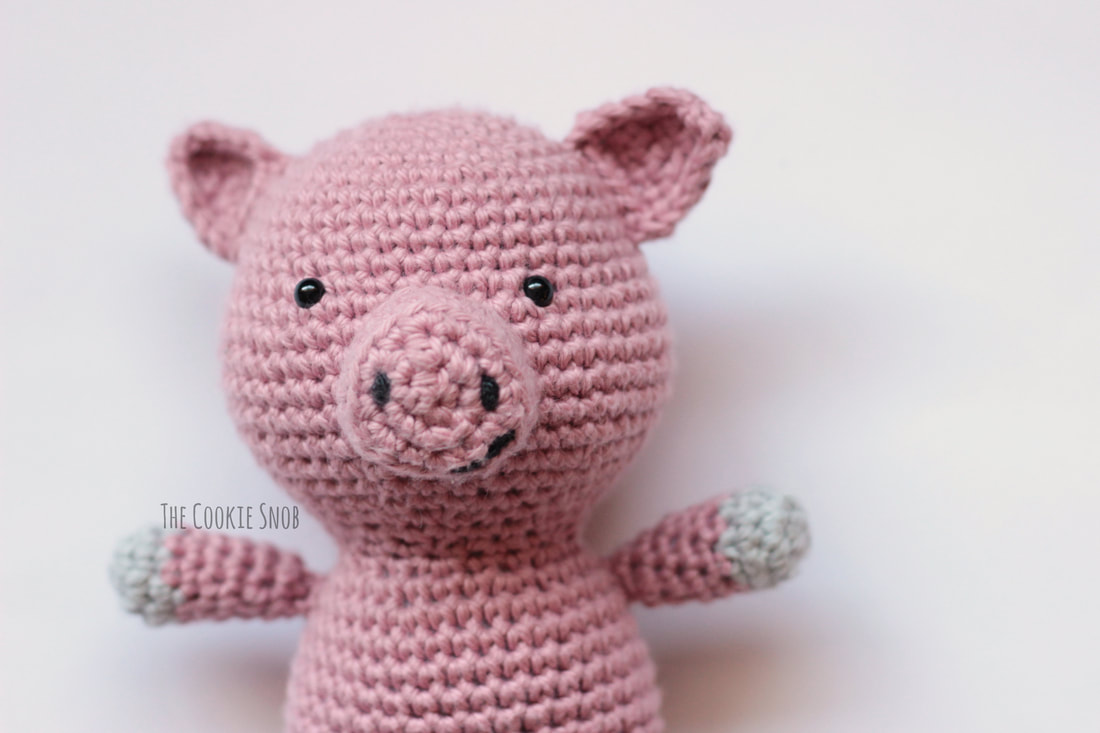 If you'd like an ad-free printable PDF version of this pattern (along with all of the other 10 Cookie Pal patterns), you can find one on Ravelry. It includes both a step-by-step photo version and a text only version of the pattern for simpler printing. You can find the accessory patterns here. Stitch Glossary: st(s) = stitch(es) ch = chain ss = slip stitch sc = single crochet inc = sc increase (work 2 sc in the same st) dec = sc decrease (decrease over 2 sc sts) sc3tog = sc 3 together (decrease over 3 sc sts) hdc = half double crochet hdc inc = half double crochet increase (work 2 hdc in the same st) Materials:
Gauge: 2" = 10 sc sts 2" = 10.5 rows of sc Note: Unless otherwise specified, this pattern is worked in continuous rounds without joining or turning. I recommend using a stitch marker and moving it after each round to help you keep your place. Snout: Using the main color: Round 1: Make a magic circle and sc twice, hdc twice, sc twice into the circle, pull taut to close, ss to first sc to close (6) Round 2: ch 1, inc 2 times, (sc, hdc) in the next st, (hdc, sc) in the next st, inc 2 times, ss to join (12) Round 3: ch 1, sc, hdc inc, [sc, inc] 3 times, sc, hdc inc, sc, inc, ss to join (18) Round 4: ch 1, sc around in back loop only, ss to join (18) Round 5: ch 1, sc around, ss to join (18) Fasten off, leaving a long yarn tail for sewing. Using a bit of black yarn, stitch the nostrils and smile onto the front of the snout. I stitched the smile between rounds 3 and 4 and the nostrils between rounds 2 and 3. Body: Using the main body color: Round 1: Make a magic circle and work 6 sc into the circle, pull taut to close (6) Round 2: inc 6 times (12) Round 3: [inc, sc] 6 times (18) Round 4: [sc, inc, sc] 6 times (24) Round 5: [inc, sc in the next 3 sts] 6 times (30) Round 6: [sc in the next 2 sts, inc, sc in the next 2 sts] 6 times (36) Round 7: [inc, sc in the next 5 sts] 6 times (42) Rounds 8-11: sc around (42) Round 12: [sc in the next 3 sts, inc, sc in the next 3 sts] 3 times, sc in the next 21 sts (45) Round 13: [inc, sc in the next 7 sts] 3 times, sc in the next 21 sts (48) Round 14: [sc in the next 4 sts, inc, sc in the next 4 sts] 3 times, sc in the next 21 sts (51) Rounds 15-17: sc around (51) Round 18: [sc in the next 4 sts, dec, sc in the next 4 sts] 3 times, sc in the next 21 sts (48) Round 19: [dec, sc in the next 7 sts] 3 times, sc in the next 21 sts (45) Round 20: [sc in the next 3 sts, dec, sc in the next 3 sts] 3 times, sc in the next 21 sts (42) Round 21: [dec, sc in the next 5 sts] 6 times, (36) Let's pause crocheting here and add on the face. You'll notice that rounds 12-20 have created a head that protrudes slightly on one side; this is the front of the head where you’ll be adding the face. Place a stitch marker through the loop on your hook to hold your place while you decorate. Place the safety eyes between rounds 12 and 13, about 8 sts apart. Stuff the snout and sew in place between the eyes (across rounds 13-18) using the tapestry needle and the long yarn tail. Begin stuffing the head and continue to stuff as you go. Remove the stitch marker and place the yarn loop back on your hook so that you can resume crocheting. 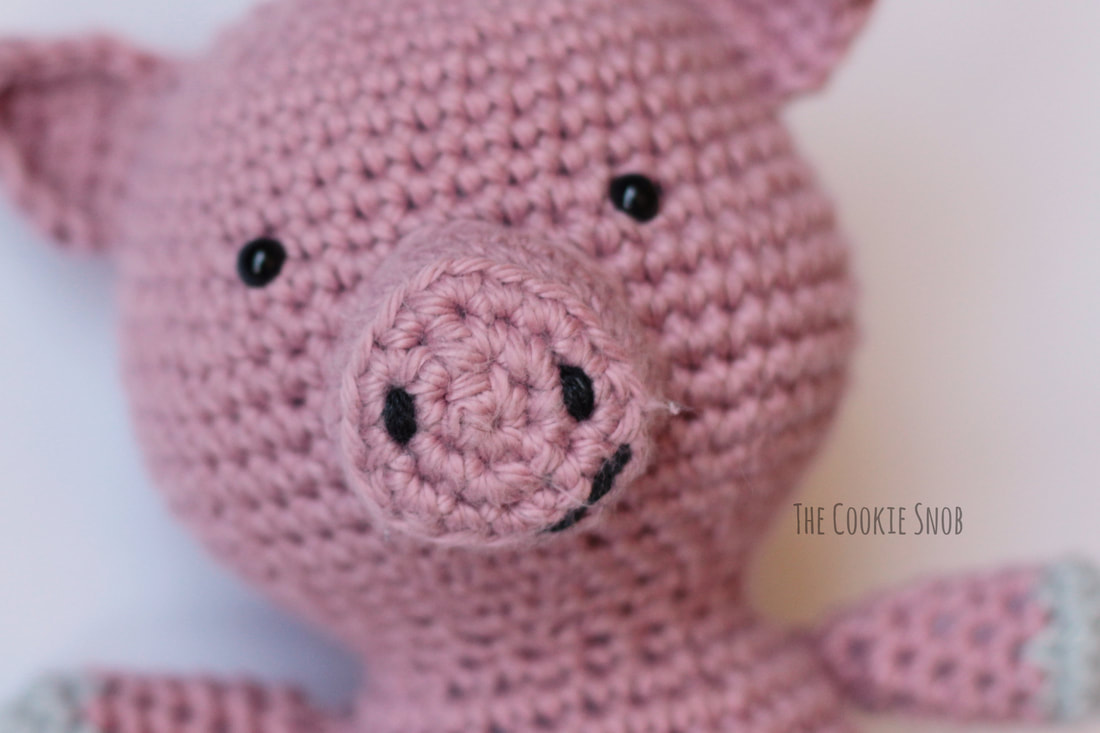 Round 22: [sc in the next 2 sts, dec, sc in the next 2 sts] 6 times (30) Round 23: [dec, sc in the next 3 sts] 6 times (24) Round 24: [sc, dec, sc] 6 times (18) Round 25: [sc, inc, sc] 6 times (24) Round 26: [inc, sc in the next 3 sts] 6 times (30) Round 27: [sc in the next 2 sts, inc, sc in the next 2 sts] 6 times (36) Rounds 28-35: sc around (36) Round 36: [sc in the next 2 sts, dec, sc in the next 2 sts] 6 times (30) Now we’re going to start forming the legs. Please pay careful attention to your stitch count as you go to ensure that both legs end up the same size. Round 37: sc in the next 11 sts, skip the next 15 sts, sc in the last 4 sts (15) Note: Once you finish the first 11 sts, you should be centered in the front of the pig. If you find that the face is slightly more to one side than the other, you can shift the stitches here to compensate (ex: sc in the first 9, skip the next 15, sc in the last 6). If it helps, you can mark the center stitch first. As long as you have 15 sts for each leg, the pattern will work. Rounds 38-40: sc around (15) Switch to accent color Round 41: sc around (15) Round 42: [dec, sc in the next 3 sts] 3 times (12) Round 43: dec 6 times (12) Finish stuffing leg. Fasten off, leaving a yarn tail. Using a tapestry needle, thread the yarn tail through the front loops of the remaining sts and pull taut to close. Now it’s time to make the second leg using the sts we skipped back in round 37. Join the main color yarn (I like to join mine centered on the back side). There are a couple different options for starting the leg. I’m going to walk you through both and you can choose whichever you prefer. First, the easiest option: Leg Round 1: ss, sc in the next 14 sts (make sure you don’t crochet into the side of the first leg; you only want to use the 15 sts you skipped in round 37), sc into the ss you just made (15) You’ll notice that this leaves a small hole between the legs. You can easily sew this shut later with the yarn tail leftover from the end of the leg and no one will ever notice it. Leg Rounds 2-4: sc around (15) Switch to accent color Leg Round 5: sc around (15) Leg Round 6: [dec, sc in the next 3 sts] 3 times (12) Continue to stuff the leg. Leg Round 7: dec 6 times (12) Finish stuffing leg. Fasten off, leaving a yarn tail. Using a tapestry needle, thread the yarn tail through the front loops of the remaining sts and pull taut to close. OR if you’re like me and are determined to sew as little as possible, you can use this second option for making the other leg: Leg Round 1: ss, begin to sc in the next 14 sts. Once you reach the side of the other leg, pick up several loops along the side of the leg by inserting your hook, yarning over, and pulling up a loop. Leave all the loops on your hook. Then insert your hook in the next stitch where you actually want to make a sc, yarn over and pull up a loop, then yarn over and pull through all of the loops on your hook to finish the st. Then sc around in the remaining sts and make your last sc into the ss you made at the beginning of the round (15) This will close up the gap between the legs so that you won’t need to sew it shut later. And the rest of the leg is the same from here: Leg Rounds 2-4: sc around (15) Switch to accent color Leg Round 5: sc around (15) Leg Round 6: [dec, sc in the next 3 sts] 3 times (12) Continue to stuff the leg. Leg Round 7: dec 6 times (6) Finish stuffing leg. Fasten off, leaving a yarn tail. Using a tapestry needle, thread the yarn tail through the front loops of the remaining sts and pull taut to close. Arm (Make 2): Using the accent color: Round 1: Make a magic circle and work 6 sc into the circle, pull taut to close (6) Round 2: inc 6 times (12) Round 3: sc around (12) Switch to main body color Round 4: [dec, sc] 4 times (8) Rounds 5-7: sc around (8) Begin stuffing. Continue to stuff as you go. Round 8: [dec, sc in the next 2 sts] 2 times (6) Round 9: sc around (6) Finish stuffing. Fasten off, leaving a long yarn tail for sewing. Using a tapestry needle, thread the yarn tail through the front loops of the remaining sts and pull taut to close. Then sew one arm to each side of the body somewhere around rounds 25-28. 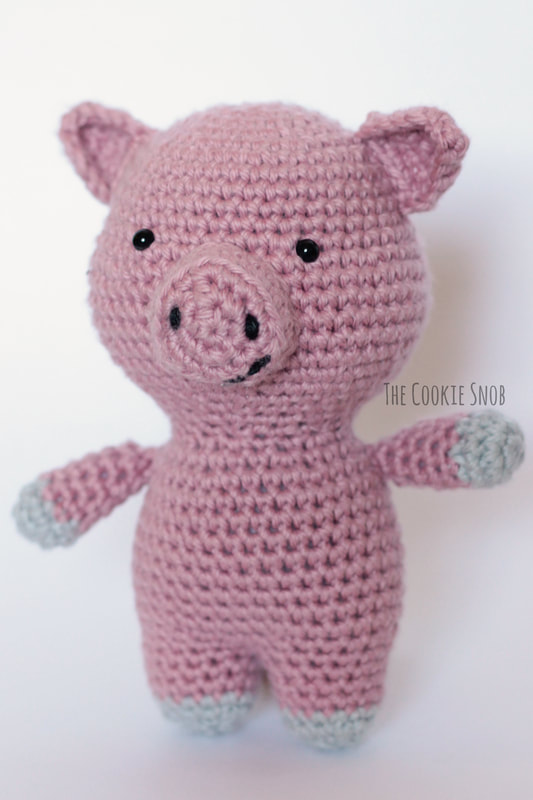 Ear (make 2): Make a slip knot, leave a long yarn tail (8-9”) for sewing later. Ch. 6 Row 1: sc in the 2nd ch from the hook and in each remaining st, turn (5) Row 2: ch 1, dec, sc in the last 3 sts, turn (4) Row 3: ch 1, dec, sc in the last 2 sts, turn (3) Row 4: ch 1, sc across, turn (3) Row 5: ch 1, sc3tog (1) Ch 1 and then sc around the entire triangle to make a neater edge. Ss to join and fasten off. . Sew in place using the tapestry needle and the long yarn tails on both sides of the head across rounds 6-11. Curly Tail: Ch 8 Row 1: inc in the 2nd ch from the hook and in each st across (14) Fasten off, leaving a long yarn tail for sewing Using the tapestry needle and long yarn tail, sew in place (centered on the back of the body across rounds 33-34). Weave in remaining ends. 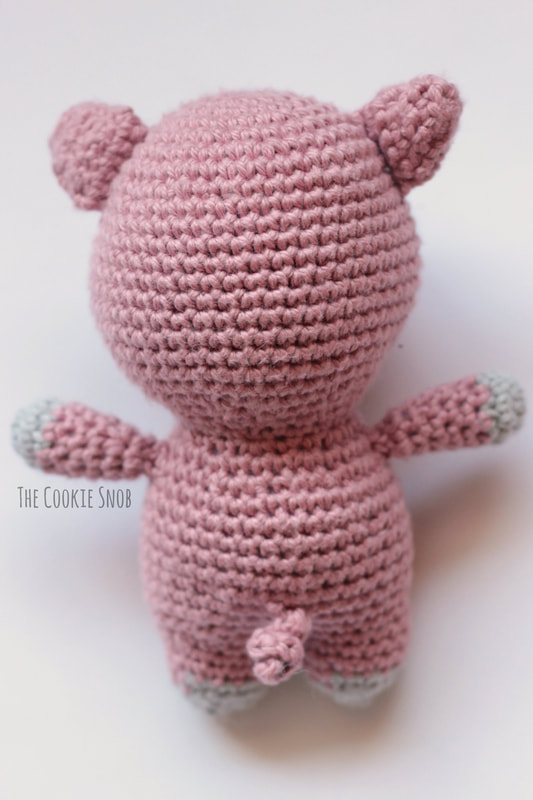 And now you're done! Way to go! I hope that you enjoyed making Penny the PIg. If you have any questions or comments about the pattern, you can reach me in the comments section below, by email, or on social media. If you end up making one, I'd love to see a picture, so please share. And don't forget to check back next week for the next Cookie Pal! (If you don't want to wait, the PDF with all 11 Cookie Pals in one place is available on Ravelry.) Happy Hooking! Want to make sure you don't miss out on any future blog posts? Join my mailing list! (Spam free, I promise!) 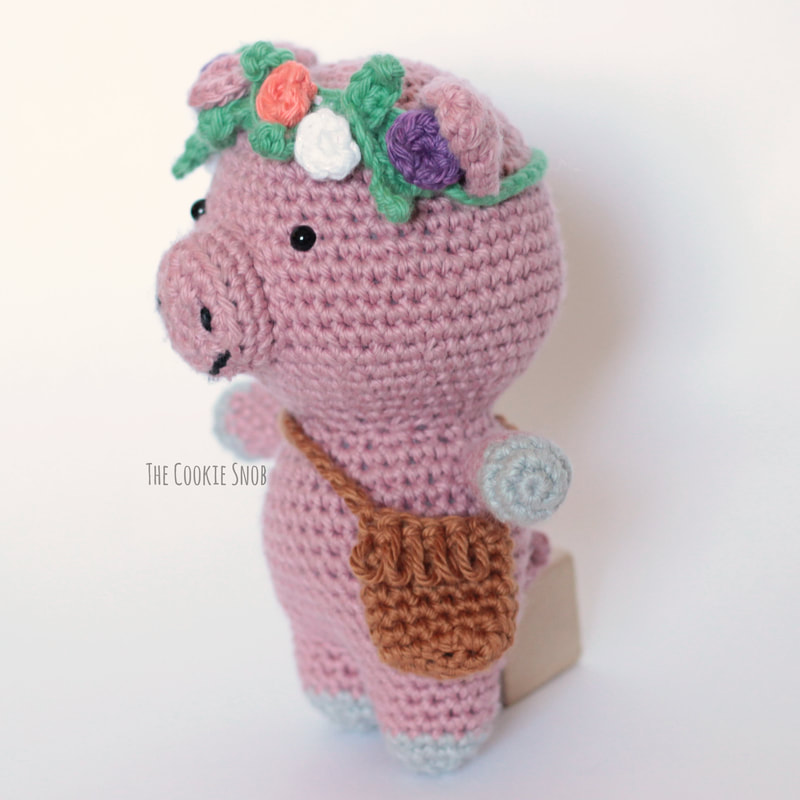 ***You're welcome to do whatever you'd like to with finished products made from this pattern but if you do sell them, I ask that you link back to my page. You may not copy this pattern, repost it anywhere (either altered or in its original form), or claim it as your own. You may not use any photos on this site for your own use. ***
1 Comment
debbie goodwin
3/20/2020 09:04:38 am
firstly thankyou for the amazing patterns, especially as the world is in turmoil. The world could do with some cuteness Leave a Reply. |
Welcome!Thank you for stopping by to visit my own personal corner of the web! Feel free to take a look around and check out what I've been crafting, crocheting, or baking. Hopefully you'll find something to inspire your own creativity!   
Archives
March 2024
|
 RSS Feed