
|
It's time to come clean: I've been holding out on you. I have to confess that I've been holding onto this finished design for way too long. I was hoping to make something seriously impressive (like a blanket) with this pattern, but then everything snowballed and now it's suddenly 2019?!? Since I'm lucky to stay awake long enough to crochet a row or two of anything these days, I think it's only fair that I share this gorgeous square pattern with you all instead of making you wait for something bigger. Because this square right here is way too pretty to keep to myself anymore. So, without further ado, let me introduce you to the Stained Glass Square. 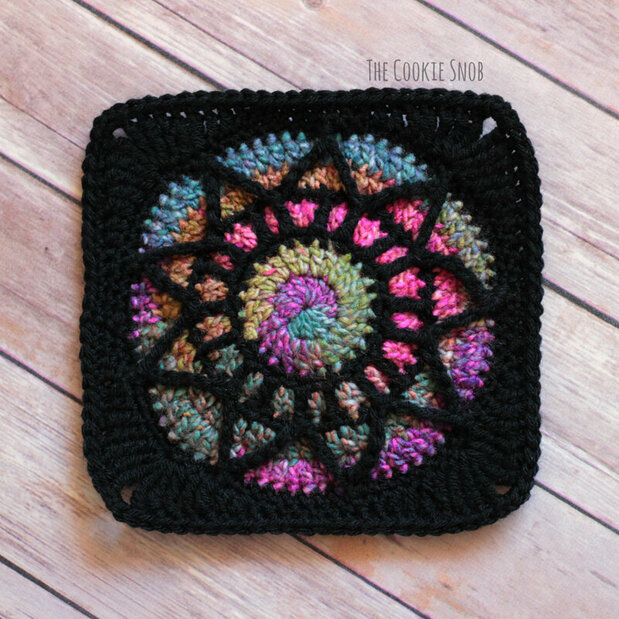 I will admit that this isn't the simplest square pattern around (I'm pretty sure Queen Granny Square will forever hold that title; long may she reign). But it is doable! The key to getting these squares to turn out right is to be as precise as possible. The pattern will list specific locations where you should insert your hook or where you should start a round of stitches; I didn't just add those because I was feeling bored that day. So make sure you follow the pattern carefully! I did my best to illustrate each step with pictures (and arrows if needed) and wrote things out as clearly as I could. But if you're still stuck, don't panic. Feel free to ask questions and I'll do my best to help you out. Once you've got one finished, you'll see that it's not actually very intimidating. I believe in you!  I also have a couple of helpful tips before we begin:
 If you'd like an ad-free printable PDF version of this pattern, you can find one on Ravelry. Edit: I've redesigned Rounds 9 and 10 to help make the lining up of the triangles more foolproof, regardless of your gauge. The finished square still looks the same and has the same dimensions. Materials:
Stitch Glossary: st(s) = stitch(es) ch = chain sc = single crochet inc = sc increase (work 2 sc into the same st) fpsc = front post sc hdc = half double crochet dc = double crochet dc inc= dc increase (work 2 dc into the same st) fpdc = front post dc tr = treble crochet (aka triple crochet)* dtr = double treble crochet* fptrtr= front post triple treble crochet* (the stitch begins by yarning over 4 times) blo = back loop only *Note: if you're not familiar with the taller crochet stitches, I recommend this blog post over on Moogly as a quick reference. Gauge: 4" = 13 dc sts 4" = 8 rows of dc sts Starting with the multicolored yarn: Round 1: Make a magic circle, ch 2, work 12 dc into the circle, ss to the first dc and pull taut to close (12) Round 2: ch 2, dc inc around, ss to join, fasten off (24) 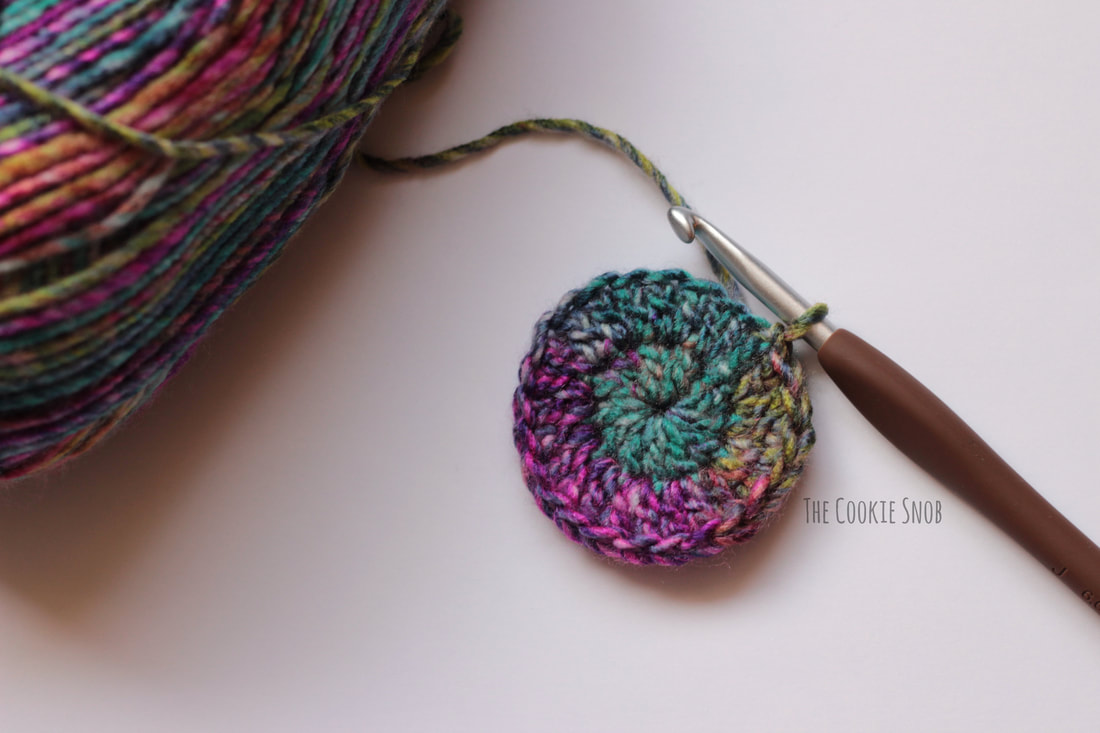 Switch to the black yarn (you can attach it anywhere) Round 3: [inc, sc] around, ss to join (36) Round 4: ch 5, skip the first st, [dc in the next st, ch 2, skip the next st] around, ss to the 3rd ch to join (18 ch-2 spaces) Remove the hook and insert a stitch marker into the working loop to hold it in place. We'll come back to the black yarn in a couple rounds. Pay special attention to the skipped stitch (in the little "windows" you've created), since that's where we'll be working for the next round. I marked it with an arrow in the picture below just in case it's helpful. 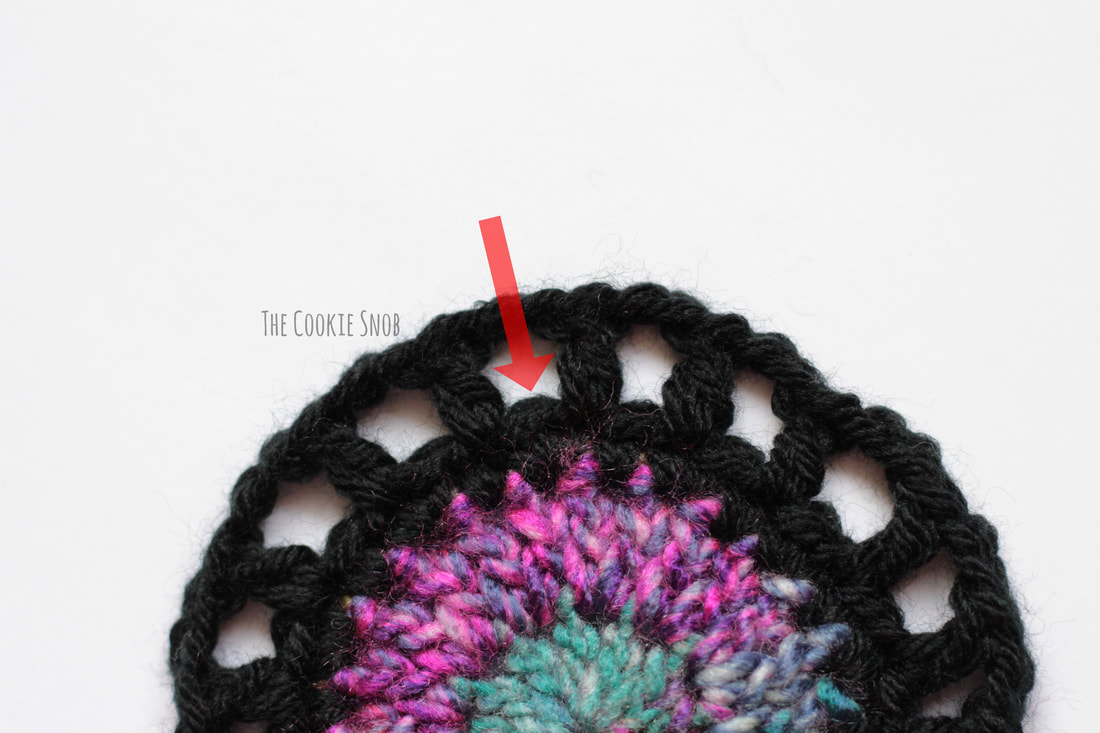 Switch back to the multicolored yarn. You'll be working this round in front of the ch 2 spaces from Round 4 Round 5: Work a standing dc into the blo of one of the skipped sts from Round 4, dc in the same st in the blo, ch 1, [dc inc in the blo of the next skipped st, ch 1] around, ss to join, fasten off (36 dc, 18 ch-1 spaces) At this point you may be thinking, "Hey! What happened to those cool little windows we just made? Why did we cover them up?" Fear not, my friend. they're about to be the MVPs of the next round. 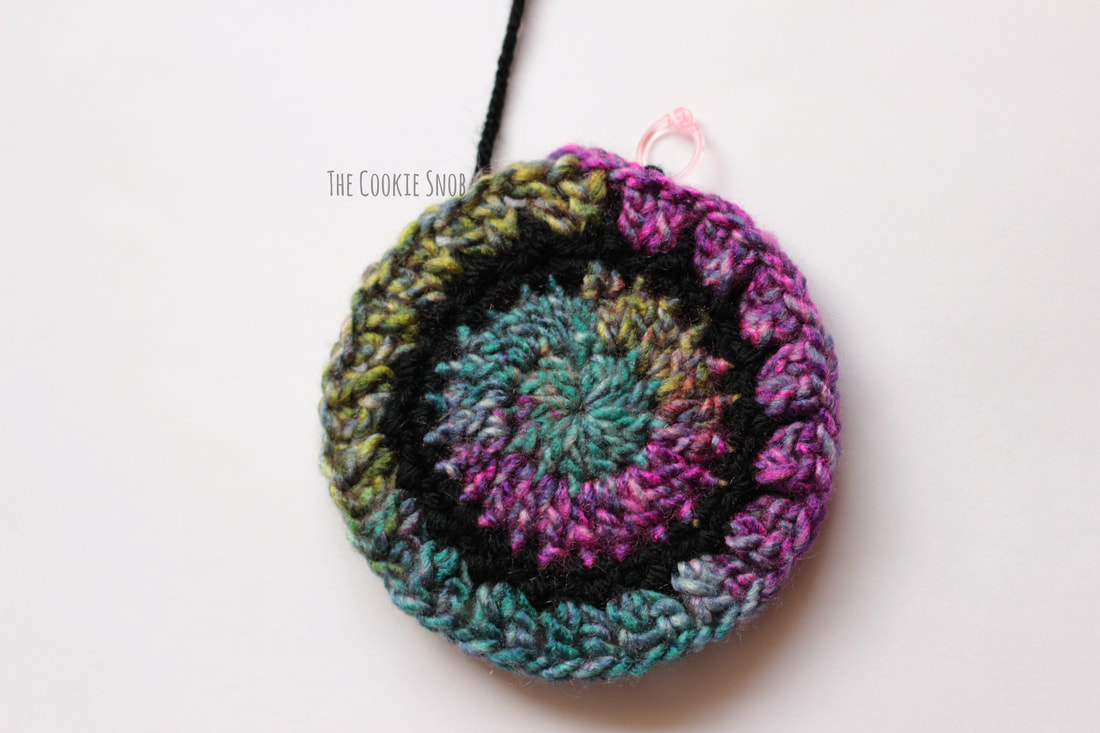 For the next round, you'll be working fpdc stitches around the dc stitches from Round 4 as shown below. This will pull the black dc stitches to the front to set up the cool little rectangles. 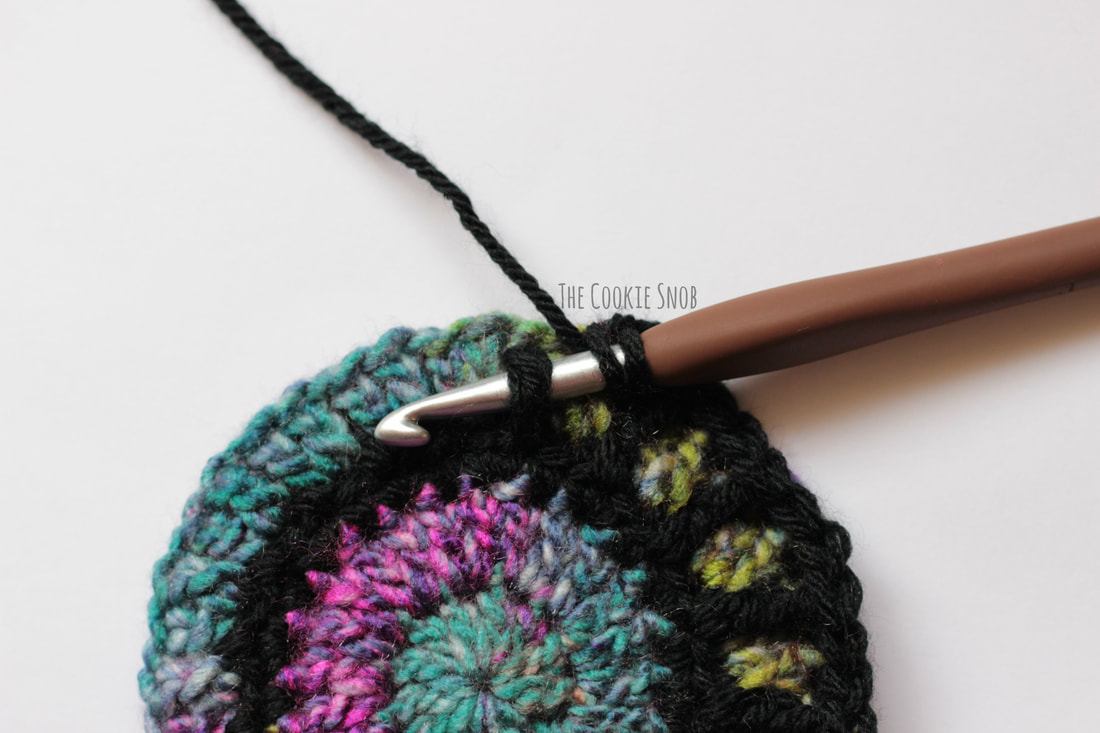 Remove the stitch marker and move your hook back into the black loop to pick up the black yarn again. Round 6: [fpdc around the dc from Round 4, sc in the next 2 sts of Round 5) around, ss to join, fasten off. (54) 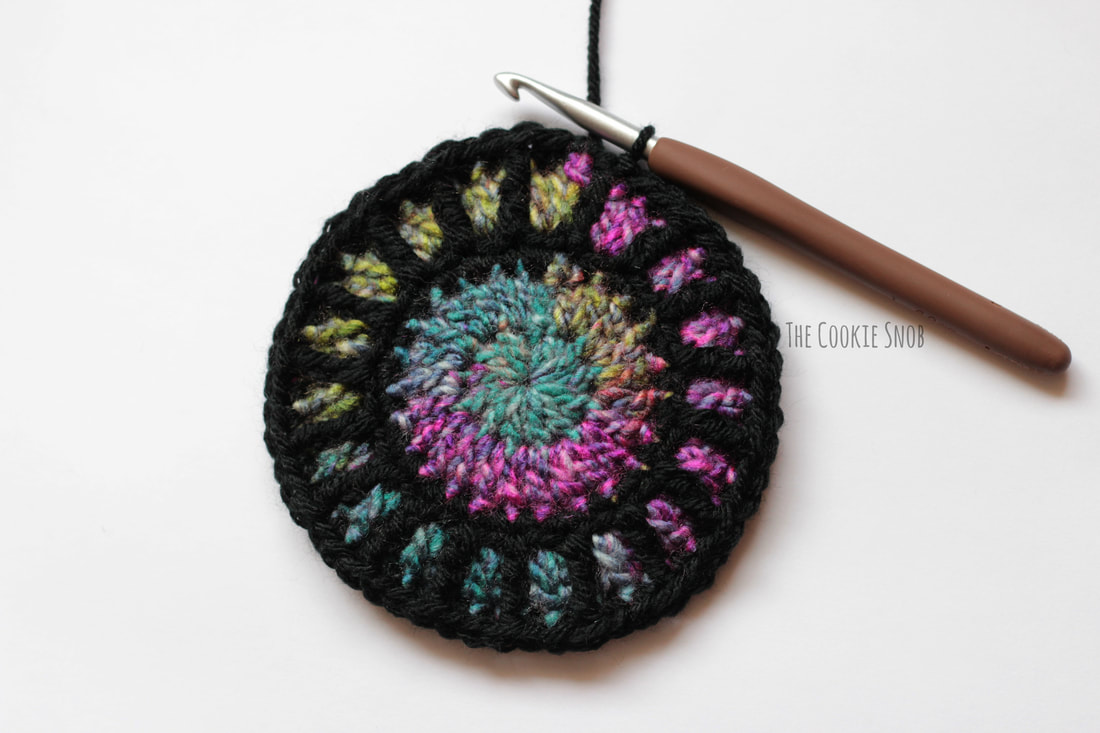 Switch back to the multicolored yarn. Round 7: Work a standing dc into the blo of one of the fpdc stitches from Round 6, dc in the same st in the blo, dc in the next 8 sts in blo, [dc inc in blo of next st, dc in blo of the next 8 sts] around, ss to join (60) 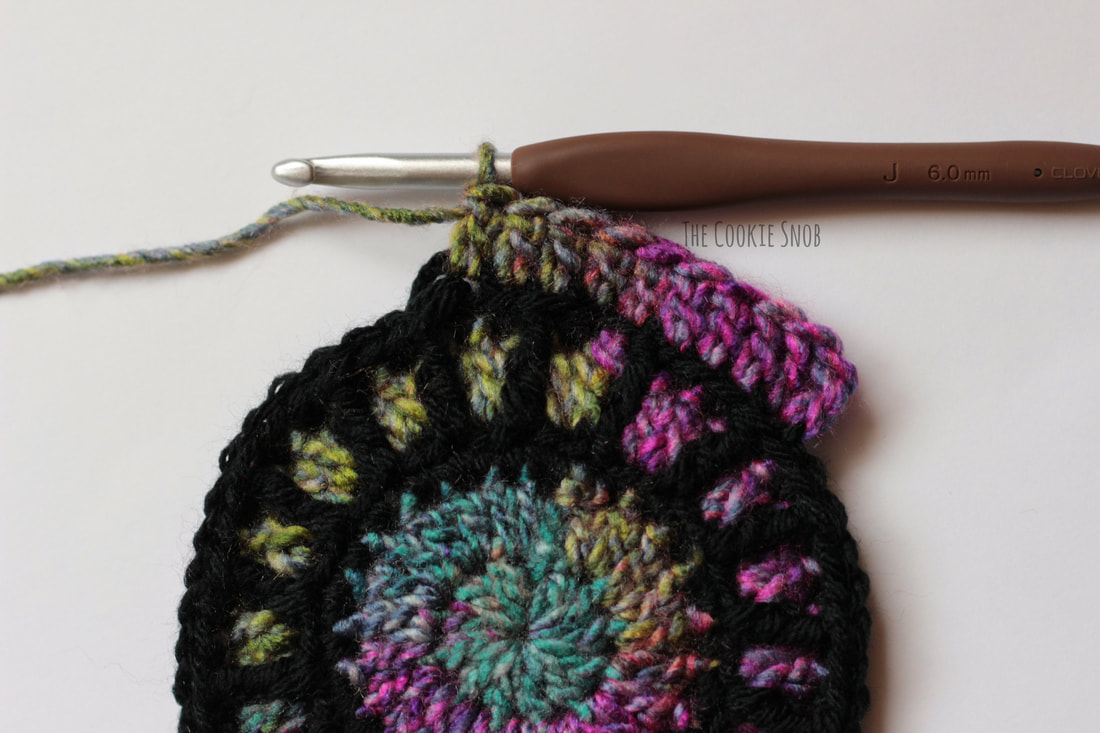 Round 8: ch 2, [dc inc, dc in the next 5 sts] around, ss to join, fasten off (70) 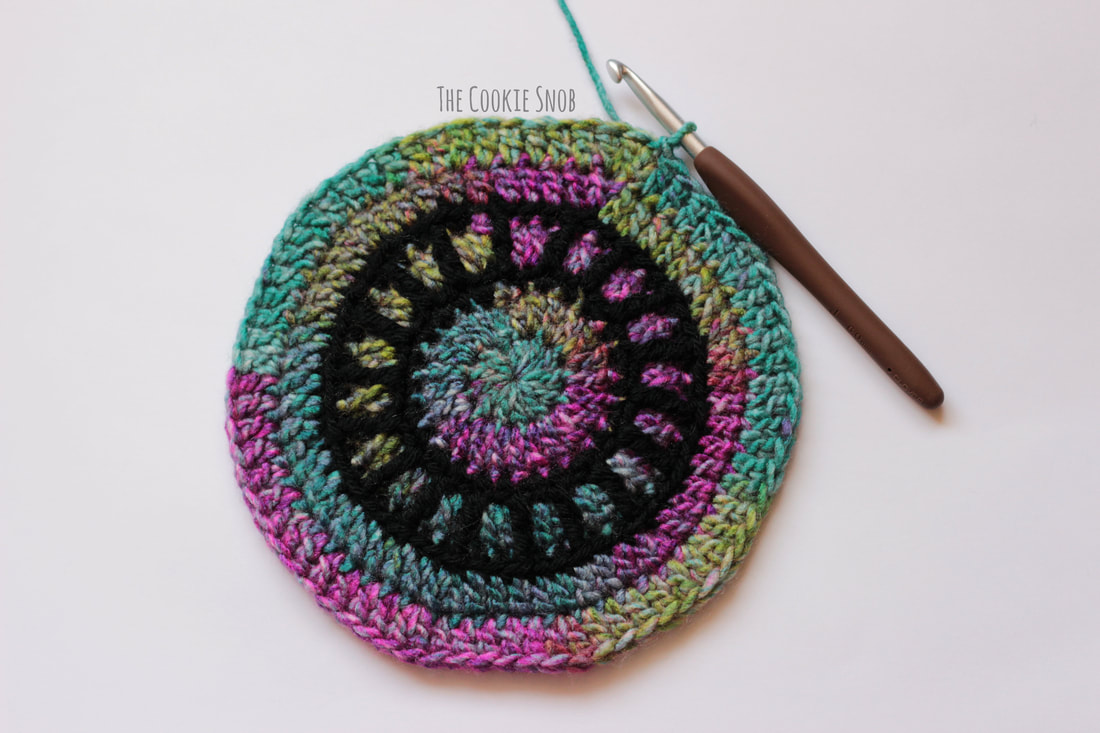 Switch back to the black yarn Round 9: sc in the same st, sc in the next 2 sts, fptrtr into the black posts directly in front of and behind the black post directly beneath your last sc st (the posts you should work into are indicated with arrows in the picture below)... 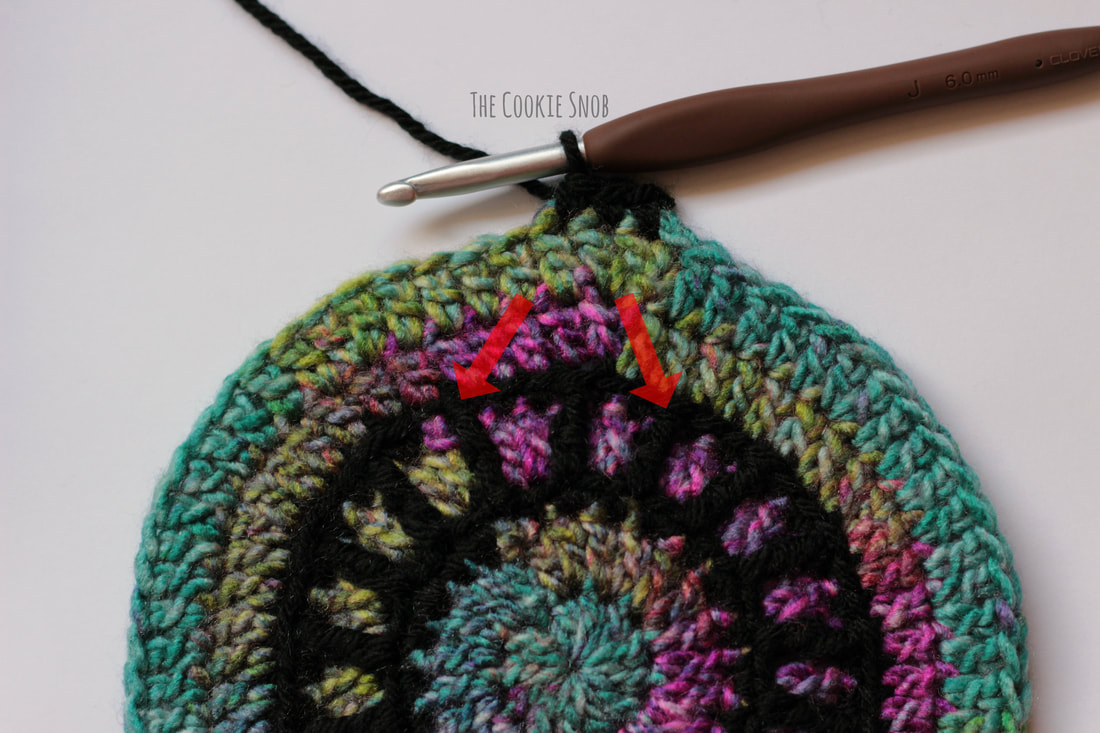 ...then sc in the next 8 sts. This will have created a little black triangle shape. Now you'll repeat the process by working fptrtr into the black posts directly in front of and behind the black post directly beneath your current sc (the black post behind will be the same black post you've already worked into), then sc in the next 8 sts... 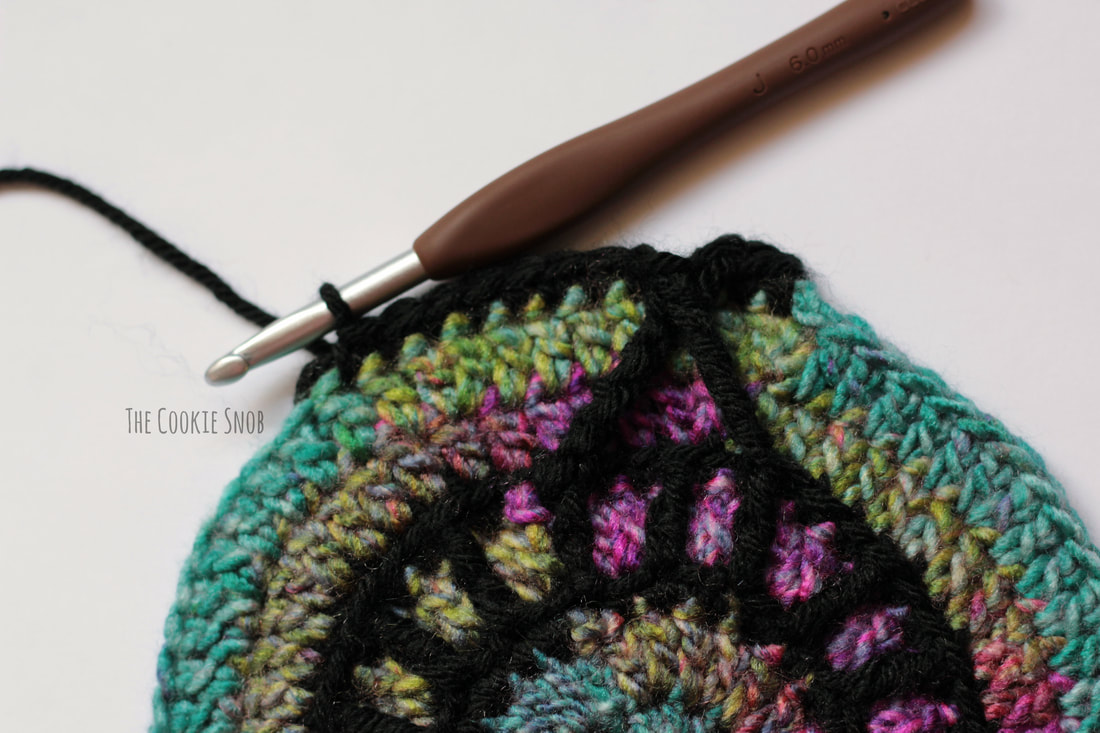 ...continue to [work 2 fptrtr into the black posts in front of and behind the black post directly beneath your last sc, then sc in the next 8 sts around] 1 more time, then work 2 fptrtr into the black posts in front of and behind the black post directly beneath your last sc, then sc in the next 7 sts around, then [work 2 fptrtr into the black posts in front of and behind the black post directly beneath your last sc, then sc in the next 8 sts around] 4 times, then work 2 fptrtr into the last set of front and back black posts, then sc in the last 4 sts, ss to join (9 triangles, 70 sc) So, to recap (with less explanatory text): sc in the same st, sc in the next 2 sts, [work 2 fptrtr into the black posts, sc in the next 8 sts] 3 times, work 2 fptrtr into the black posts, sc in the next 7 sts, [work 2 fptrtr into the black posts, sc in the next 8 sts] 4 times, work 2 fptrtr into the black posts, sc in the next 4 sts, ss to join 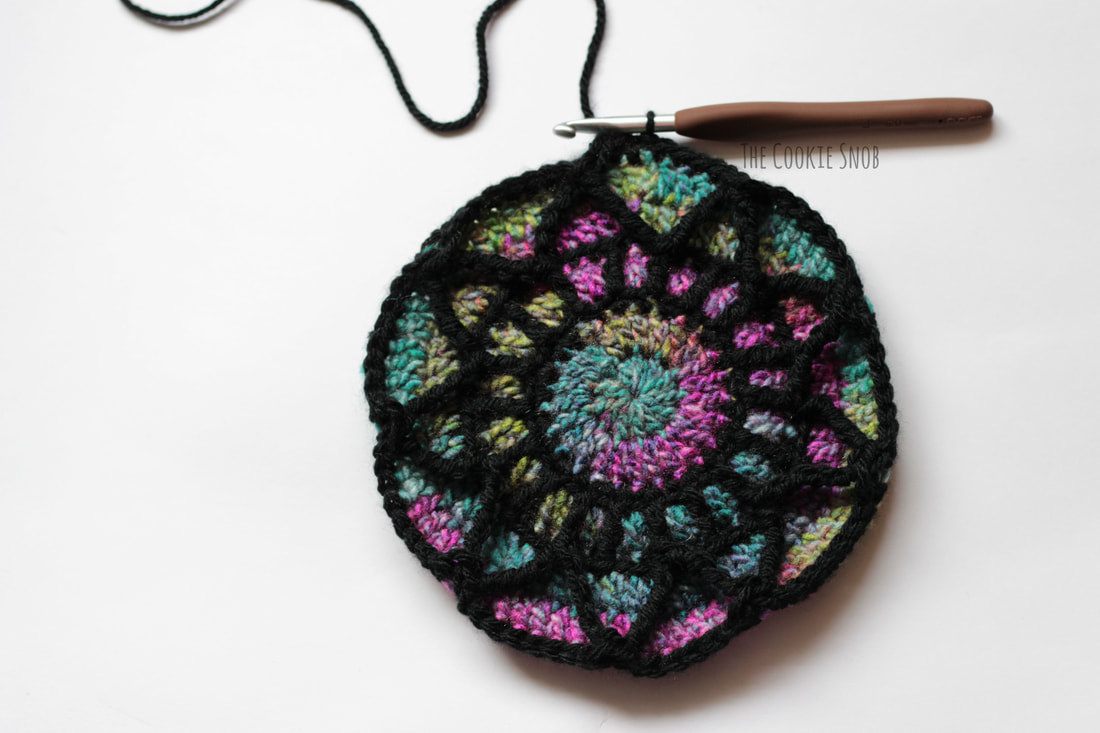 Don't worry if your circle's a little wonky at this point. The fptrtr sts have a tendency to pull toward the center, but we'll straighten them out in the next round by working fpsc around the top point of the fptrtr "triangle" as shown below. 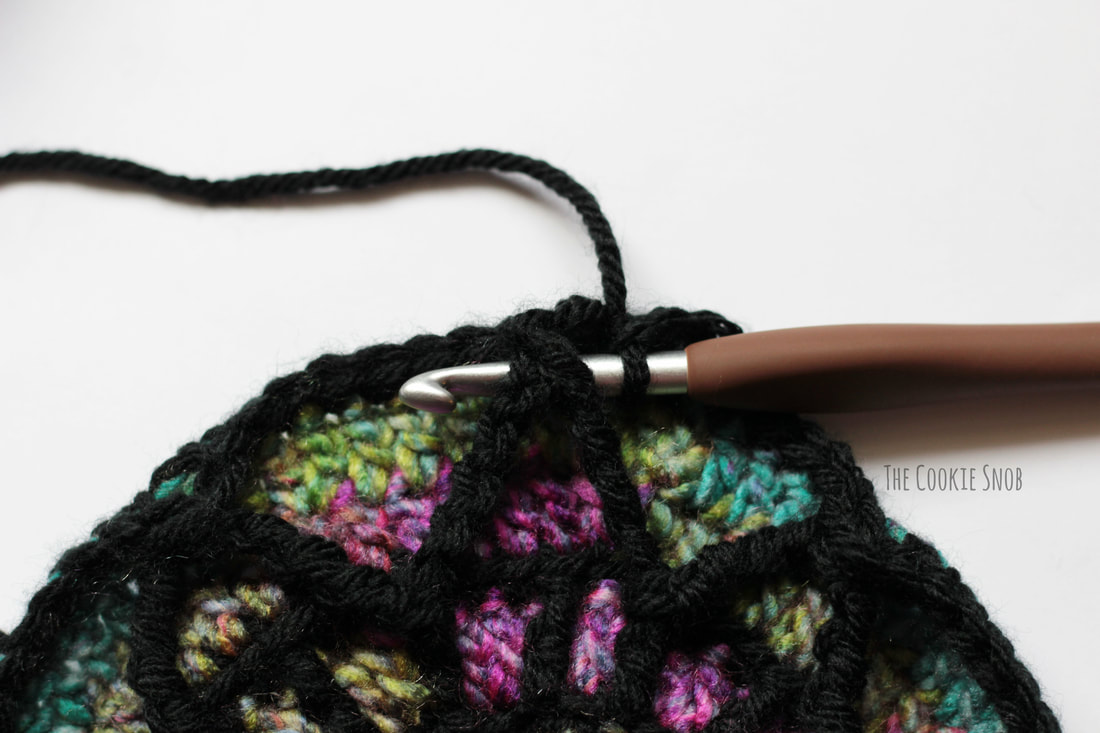 Round 10: ch 1, sc in the next 3 sts, [fpsc around the fptrtr sts from Round 9, sc in the next 8 sts] 3 times, fpsc around the frptrtr sts from Round 9, sc in the next 7 sts, [fpsc around the fptrtr sts from Round 9, sc in the next 8 sts] 4 times, fpsc around the fptrtr sts from Round 9, sc in the next 3 sts, inc, ss to join (80) 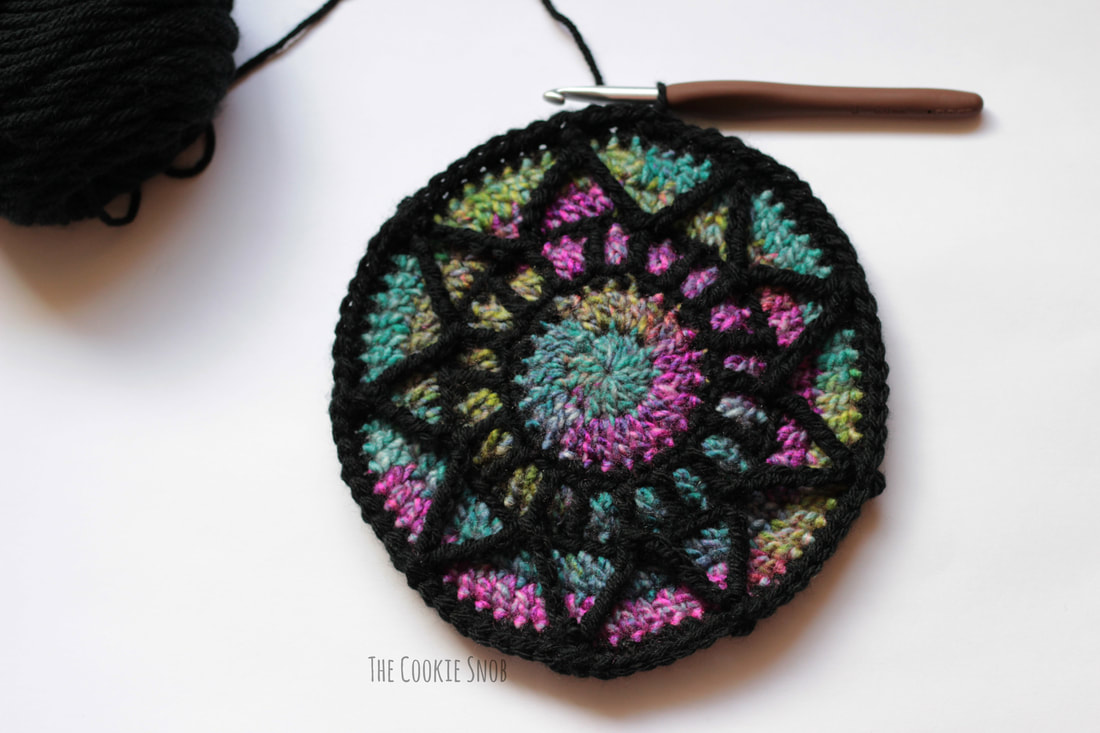 Doesn't that look better? Now we're going to square it off. Round 11: ch 1, sc in the next 2 sts, hdc in the next 2 sts, dc in the next 2 sts, tr in the next 2 sts, dtr, [dtr twice, ch 1, dtr twice] in the next st to create a corner, [dtr, tr in the next 2 sts, dc in the next 2 sts, hdc in the next 2 sts, sc in the next 5 sts, hdc in the next 2 sts, dc in the next 2 sts, tr in the next 2 sts, dtr, {dtr twice, ch 1, dtr twice} in the next st to create a corner] 3 times, dtr, tr in the next 2 sts, dc in the next 2sts, hdc in the next 2 sts, sc in the next 3 sts, ss to join (92, 4 ch-1 spaces) Round 12: ch 1, sc around, working [sc, ch 1, sc] into each corner space, ss to join (100 sc, 4 ch-1 spaces) Fasten off and weave in any remaining ends. 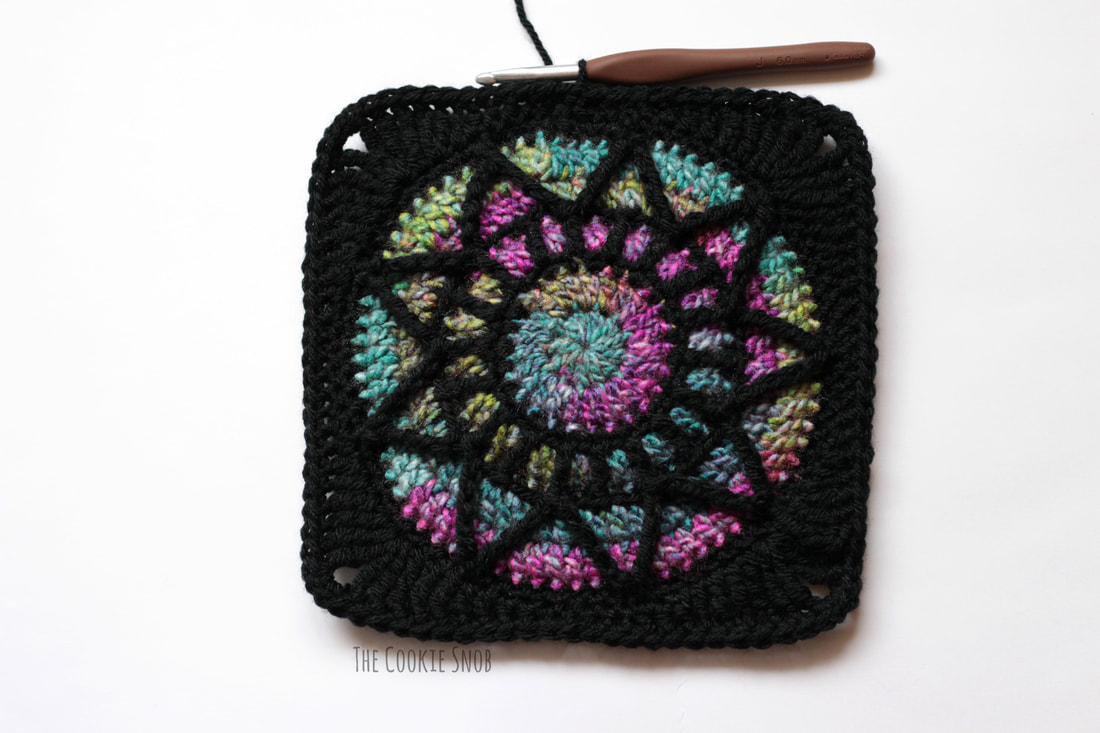 Whew! You did it! Give yourself a pat on the back and take a minute to admire your beautiful square. Well done!  I hope that the pictures and instructions were easy to follow. If you have any additional questions, feel free to comment in the comments section below, send me an email, or contact me on social media. Happy hooking! Want to make sure you don't miss any future blog posts? Join my mailing list: 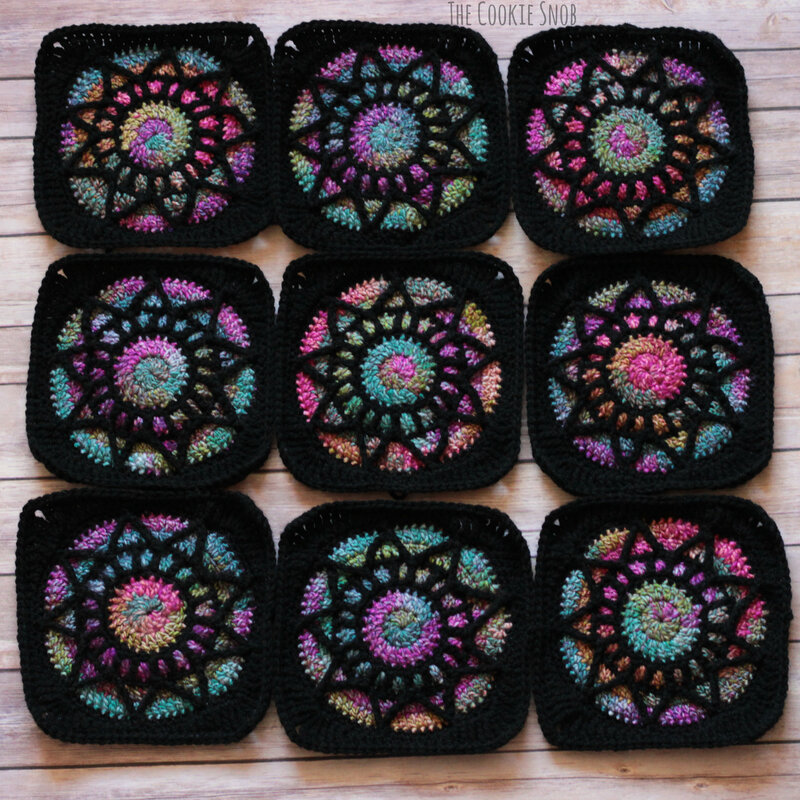 ***You're welcome to do whatever you'd like to with finished products made from this pattern but if you do sell them, I ask that you link back to my page. You may not copy this pattern, repost it anywhere (either altered or in its original form), or claim it as your own. You may not use any photos on this site for your own use. ***
122 Comments
Sharyl
1/12/2019 12:20:36 pm
How can i print this off or buy a written copy. I am in my 70s use a cell phone and i need either youtube video to follow or written instructions. Would like to make this for my self to use on my sofa.
Erin
1/12/2019 01:52:54 pm
Hi Sharyl! You can get a printable version of this pattern on Ravelry. The download includes both a PDF version with the pictures and a PDF version with only the text so you can decide which you'd like to print. Here's the link to the Ravelry page where you can get the PDF: https://www.ravelry.com/patterns/library/stained-glass-square-2
Donna
4/20/2023 01:55:52 am
Where is round 7? I'm hoping it's just a typo 1/12/2019 04:05:39 pm
Hi! I'm confused! This looks like a great project, so I started reading the instructions to see if I can do it, and in round 3 you have 24 stitches, right? So, if you're increasing in every stitch, you should end up with 48 sts at the end of the round, not 36! Math is not my strong suit, but I'm pretty sure you have this printed wrong. Please tell me if I'm misunderstanding this or if i'm losing my mind!
Erin
1/12/2019 04:19:29 pm
Hi Susan! At the end of round 2, you should have 24 sts, like you mentioned. In round 3, you'll be working an [inc, sc] pattern, meaning that you inc in the first st, sc in the next st, then inc in the third st, then sc in the 4th st, etc. That'll give you a total of 12 inc sts in that round, so it'll go from 24 to 36 sts. You'd be correct if you were working just inc sts in that round, but since it's alternating inc and sc sts, the stitch count is correct. Hopefully that helps clear it up! Let me know if you have other questions :)
Tamara Cannon
7/30/2022 03:05:23 pm
But if you start with 24 sets and increase every other st you wind up with 48 sts, not 36. It you so next 2 sts then increase in next you are increasing every third st and you wind up with 36.
Robin Laskowski
6/7/2023 08:20:57 pm
It doesn’t say that though. It says inc, sc. which the direction say 2 sc in each stitch.
Sophie
8/22/2022 09:54:09 am
Tamara: if you start with 24 stitches and increase in every single one, you do get 48. However the increase is in every other one, so you do a total of 12 normal stitches and 12 increases. This totals 36. Hope that helps.
Hanlie marx
5/2/2024 12:29:40 pm
I would like the pattern pleSe
Katrina
9/7/2021 09:56:51 pm
It was increased every other stitch.
Rox
1/15/2019 04:50:12 pm
I cant find the pattern on ravelry. This square is just what i need to make my sisters jacket. Its absolutely beautiful thankyou for sharing it
Erin
1/15/2019 07:14:53 pm
Thanks for your comment! I thought I had already added the link to the Ravelry page, but apparently it didn't update properly. But it's fixed now! You can find the direct link at the very beginning of the pattern in this blog post (right before the materials and stitch glossary). Or, if it's easier, you can just copy and paste the link: https://www.ravelry.com/patterns/library/stained-glass-square-2
J. Anderson
1/17/2019 10:38:47 pm
Row 7 has 60 stitches. In row 8, there is one inc every 6th st. 60/6 = 10 60+10=70 so do I just squeeze in a couple extra stitches someplace to make the 72 you have in ()?
Erin
1/18/2019 09:07:08 am
Good eye! Thanks for catching the typo. Yes, it should be 70. Don't alter the pattern, just make it as written and it should work :) I've corrected the stitch count in the pattern above. Thanks!
J. Anderson
1/18/2019 10:44:16 pm
Sorry to be a bother, but when I use 70, I’m having difficulty getting the next row to work. When I get to the end of row 9, I don’t have 5 st left to sc, only 3 (which I guess makes sense since I started with 2 less), but also my triangles don’t line up evenly with the previous posts. Love all your pics! Your triangles line up so nicely!
Erin
1/21/2019 02:08:13 pm
It's no bother at all. I always appreciate feedback. After fiddling around with it a long while, I'm pretty sure the triangles being off center comes down to differences in gauge. To make the pattern more foolproof for any gauge, I've redesigned rounds 9 and 10. Hopefully that solves all your problems!
Row 8 needs 72 stitches in order for the triangles to line up later (so, not a guage problem, but a math problem), if that is a goal of this pattern. To do that, put 4 (not 5) dc between each dc increase.
Laura
1/18/2019 09:13:34 pm
Thank you. So stunning!
C.
1/21/2019 05:33:18 am
It's a nice pattern, but i've got the same problems in row 8 and row 9, just like J. Anderson.. Do you have a "fix" for this? Thank you for sharing this pattern. Have a nice day, gr. C.
Erin
1/21/2019 02:04:51 pm
Thanks for your feedback! I spent a long testing out different things and my best guess is that it comes down to a gauge issue. I'm a pretty tight crocheter, so even though the stitches were slightly off center at the end of the round, it's not noticeable. But to help solve the issue for every gauge, I redesigned rounds 9 and 10 to make it foolproof. Hopefully that resolves any issues with the look of your square :)
C.
1/21/2019 04:49:47 pm
Thank you so much. Now I can crochet without thinking "what I' am doing wrong". I was only frogging and counting and make it again. (Sorry, mine Englisch is not very good.) Have a nice day . Gr C.
J. Anderson
1/21/2019 08:23:08 pm
Thanks so much for the adjustments! I just gave it a try and am pleased with the results! After inc at the end of Row 10, I did ss to join, and also did ss to join at end of Row 11. (Hope that was right; it worked ok.) 2/6/2019 11:13:54 am
How many skeins of each yarn will I need please...?
Erin
2/8/2019 03:37:37 pm
Hi Jenny! It depends on how many squares you're planning on making. If you're just making one, then you'll need much less than a full skein for each color. If you're aiming to make a lot of squares, it'll depend on what yarn you're using. But if it helps, I was able to make the colored sections for 7 squares from a single 174 yard skein of Yarn Bee Aurora Borealis. I used less than 1 skein of I Love This Yarn! for the black sections of all those squares (those skeins are 355 yards total).
Sandy
2/7/2019 09:49:51 am
This is is beautiful! I can't wait to try it. But I have 4 WIP right now so it'll have to wait til ine ot ore are completed.
Erin
2/8/2019 03:39:27 pm
Thank you! I definitely know the feeling of having too many WIPs at once; I've got some knitting projects that are keeping me from new crochet designs at the moment. But I hope that you enjoy the pattern when you find the time for it! :)
Irene
2/7/2019 01:30:34 pm
I am 81 and would like to give my kids an heirloom item.
Erin
2/8/2019 03:32:16 pm
What a nice idea! You can absolutely use worsted weight yarn. The yarns I used for mine are worsted weight, so you shouldn't have any issues. :)
Gillian McMullen
2/7/2019 10:08:55 pm
Hello, is there a number missing here?
Erin
2/8/2019 03:30:49 pm
Whoops! Looks like you caught a typo. It should say "st" instead of "sts." So just 1 stitch :) Thanks for catching that!
Jaime
2/13/2019 09:23:47 am
Thank you!!! I'm super excited to try this pattern! I've been dying to make a stained glass throw forever but haven't found an easy to read pattern, let alone a free one. You're the best!!
Lidia Ciucianu
2/20/2019 04:10:50 pm
I want to thank you for sharing this square. It is easy and I enjoyed very much.
J. Anderson
3/9/2019 10:21:40 pm
I have finished my squares! I was wondering what joining stitch you used and if you have a pic of your completed afghan?
Erin
3/12/2019 07:57:42 pm
Wonderful! Congrats on finishing your squares! I haven't joined mine yet, but my plan was to use the mattress stitch, since that usually works best for me when I'm joining pieces for afghans. I probably won't have time to come back to these squares until after the baby's born, but once I make a final project with them I'll be sure to share a picture :)
J. Anderson
3/13/2019 03:09:43 am
Thank you for your personal response to my inquiry. I was considering a slipstitch/chain joining; I’d rather crochet than sew with needle! Best wishes for easy labor, happy & healthy baby!!!
Tuyet Phan
5/21/2019 09:53:48 am
I love your granny squares ! I have a question,how do I order online and get my lesson .Thank you !
Erin
5/21/2019 09:59:07 am
Hi Tuyet!
J. Anderson
5/21/2019 08:55:00 pm
Did I tell you I completed my afghan using your Stained Glass pattern?! I received many compliments on it from the ladies at Needles’ Night at which we bring Show and Tell when we complete projects. I would send you pic if I could figure out how to attach!
Erin
5/26/2019 12:54:23 pm
How wonderful! I bet your afghan looks amazing! I'd love to see a picture. You can't attach images to the comment section here, but you can always send me an email or find me on social media :)
Heather
5/28/2019 04:56:01 am
I love this pattern and can’t wait to make it. However I see that this particular Yarn Bee yarn is discontinued. Do you have a recommendation for a substitute? Thanks so much for sharing your talents!
Carol St John
1/23/2024 12:47:00 am
Love the Stain Glass type yarn, butI this particular Yarn Bee yarn is discontinued. Do you have a recommendation for a substitute? Thanks.
Hilda
6/15/2019 09:07:17 am
No sé encuentran el paso a paso en español
Erin
6/21/2019 09:17:30 am
Es porque mi blog no es bilingue. Lo siento!
Pam Swift
7/28/2019 09:37:56 am
How big are the squares and how many are you using to make the Afghan. It is beautiful and I have wanted to make one for a while.
Erin
8/3/2019 03:07:17 pm
Hi Pam, 11/18/2019 05:44:42 am
I am making these squares into an afghan for my 8 yr old grandson and I take it everywhere I go to work on it. I have had so many women literally gasp at the beauty and I thought you should know. Thank you so much for such a lovely pattern.
Shannon
1/21/2020 10:50:15 pm
It’s an awesome pattern! But I wish you had a video on how to make it. I can read a pattern but sometimes it doesn’t make since to me. And visuals help a lot.
Josie
3/24/2020 11:43:30 pm
Do you have a video for this square? This is the most beautiful square I've ever seen
Kim
4/17/2020 08:46:04 am
I am also enthralled with this pattern but have the same problem as Heather from her 5/28/2029 post in that the Aurora Borealis is discounted. Do you have an alternate yarn suggestion? Thanks for share this beautiful project.
Erin
4/20/2020 11:16:05 am
Hi Kim,
Kim
4/20/2020 11:51:58 am
Thanks Erin, one more question though. How short should the color changes be? 6, 12, 15 inches?
Erin
4/24/2020 02:26:02 pm
Hi Kim,
Cerisa
10/7/2021 02:00:45 pm
Hi there! I've been searching for a while for a good yarn sub and I'm not finding anything that jumps out at me. Have you found any specific brands and colorways that look good? Thanks!
Kaitlyn
10/20/2023 11:39:05 pm
3 years later and I’ve just started crocheting recently and found this pattern but I did substitute the Aurora Borealis but I Love This Yarn color #494/Instant Classic from hobby lobby and so far it’s turning out pretty like the original
Franki
4/17/2020 03:45:35 pm
Row 5 after the standing dc and another dc in same stitch the directions in the bracket is dc in blo of next skipped stitch ch 1 Looking at the picture shouldn't it be 2dc in blo of next skipped stitch ch 1
Danatha
4/18/2020 01:14:52 am
Yes i also have this question as well. Looking at the picture it looks like there is 2 dc so im a bit confused and stuck
Franki
4/18/2020 11:51:32 am
reread row five it does say dc inc ch 1 s mu guess is that mean 2dc and ch1 in that skipped stitch around just a different way of saying it
Erin
4/20/2020 11:11:40 am
Hi Danatha,
Erin
4/20/2020 11:10:11 am
Hi Franki!
Juli
5/29/2020 02:05:19 pm
I have made the squares and want to put them together. Do you have a pattern on how to do that?
Erin
6/3/2020 09:24:30 pm
Hi Juli! Sorry for the delayed response; we just moved cross country and it's been crazy. I don't currently have a pattern for joining them, since my squares are still sitting unjoined (terrible, I know). So feel free to use whichever joining method you prefer! A crocheted method might be fastest, but using something like the mattress stitch will be the most seamless looking.
Laurie
7/9/2020 11:26:32 pm
Hi Erin, I am really confused by row 5. Is there a video of this anywhere? As I followed the pattern I was left with dc inc floating in front of the previous row, only held in place by the blo. Is that correct?
Erin
7/10/2020 02:04:39 pm
Hi Laurie! Sorry, but I don't have a video for this (yet). I really need to learn how to make videos someday. But for now, I'll do my best to try to help you with your problem.
Sabrina
7/18/2020 10:37:33 am
Hello..just started this pattern last night. Now I am on round 9. I am stuck and don’t know exactly what to do after the first 3 stitches. I am confused on the Fptrtr’s and how to go back up and make the other stitches after them. Can give me the step by step how to start this round.
Erin
7/24/2020 11:36:29 am
Hi Sabrina,
Mybisl2
8/20/2020 12:17:49 am
I'm so excited to start this! As I plan my materials, approximately how big is a finished square? Thank you!
Erin
8/20/2020 10:59:38 pm
Awesome! I hope you have fun with the pattern! My squares turned out about 8" wide.
Alejandra Jáuregui
8/28/2020 04:11:27 am
Hello, it is really beautiful this motif, I am trying with very thin yarn to make me a blouse. I'm pretty lost on row 9 and I wanted to know, to solve the mystery, if the stitch is reversible. Thank you very much and apologise my English that is not so good.
Mybisl2
8/28/2020 11:32:29 am
I'm not the designer, but this sounds like a beautiful idea! Because this is an uneven number of rows it sounds like it might be on the "wrong" side for the blouse. Perhaps you could add another row of the multi colored yarn and then make the fptr taller by adding extra loops to reach the post stitches below. Then you would be back on the right side for your blouse.
Erin
8/31/2020 06:37:57 pm
Hi Alejandra!
Mariem
9/18/2020 08:39:36 pm
Hey,
Erin
9/25/2020 10:40:56 pm
Hi Mariem! Thanks for your question! Unfortunately, I don't really have a simple solution for you, short of redesigning the pattern, just because of the math involved in making all the stitches line up. If you want to make it smaller, I'd recommend using a smaller hook and thinner yarn. I hope you can find a way to make it work for you! :)
Tig
11/28/2020 01:04:13 pm
Your pattern is beautiful.
Mybisl2
11/28/2020 01:41:41 pm
Hi! I'm not the designer but I made these recently. Do your fptrtr around the back one first (to the right) if you are right handed (the opposite is true if you're a lefty). If you do the left one first, then the right, then you'll be going left again to continue the round and things will get a little twisted.
Tig
11/28/2020 05:28:54 pm
Thanks. That was my thoughts. Will see how I get on.
Barbara
1/4/2021 05:20:53 am
I am having a problem of joining back yarn at round 5, and working out the DC information
Erin
1/26/2021 09:46:10 pm
Hi Barbara,
Sarah Sadek
1/25/2021 06:10:52 am
How can I make a half of a triangle of the same design?
Erin
1/26/2021 10:05:35 pm
Hi Sarah,
Shelley
4/21/2021 03:36:37 pm
This block is very beautiful. I found the pattern easy to follow (though at times tedious) until round 11. Round 11is very confusing to me. Overall not a fun block to make but very beautiful in the end. Thank you for sharing this for free 5/8/2021 05:16:43 am
Your design is beautiful. I made my grandson a "Granny Square" afghan and used black as the contrast color to all the other colors I used. This design looks so beautiful that, like everybody else, I want to also make it!
Rebecca Currie
5/8/2021 05:20:27 am
I'd like to note that all the pictures have your 'watermark' (aka name) still on them. I have not removed any of that. Everything is still yours with your name everywhere :) That way I can point others to your site and patterns / designs. Thanks again, for your consideration. ~R.
Erin
5/9/2021 11:55:59 am
Hi Rebecca! I've responded to your email :) Let me know if it doesn't go through for some reason. 5/11/2021 01:32:14 am
wow, it's splendid. Thank you for the explanations and all the pictures.
Molly
6/18/2021 04:34:26 pm
Hello! I have a really hard time reading instructions but this pattern is EXACTLY what I'm looking for! Would you consider making a YouTube tutorial? I'm dying to make it but I'm not experienced enough to follow these instructions. Really hope you consider it! :)
Marilyn
10/10/2021 06:06:36 pm
I made the square without too much of a problem. The pattern is complicated and a little wordy but I found if I read through each row of instructions a couple of times before I worked it, it wasn't that complicated. My only problem is I'm old and my eye sight isn't that good and working with black is a real pain. Makes it hard to count the stitches.
Christie
11/20/2021 03:01:21 pm
Hi, I am confused on round 11 when it gets to the DTR stitches. I cannot get an end result of 92. I know I’m reading the instructions wrong but cannot figure out how to decipher it to get the correct amount of stitches. I know my stitch count is correct on row 10. The way I am reading 11 is skip the stitch the chain is in and use the next to start the 2 SCs (1 in ea stitch). Then HDC once in the next 2 stitches, DC once in the next 2 stitches, TR once in the next 2, DTR once in the next, then DTR x2 - chain one - DTR x2 in the next stitch. Then (decreasing) DTR once in the next stitch, TR once in the next 2, DC once in the next 2, HDC once in the next 2 and then 5 SC and start over x 3. Please help.
Alex
5/12/2023 12:25:17 am
When you out DTR x2 does that mean , 2 DTR in one sts ? Because I have redo step 11. 15 times and I still can’t figure it out, the last corner starts overlapping the first corner.
Kaitlyn
10/23/2023 01:06:28 am
I am having the exact same problem with the 3rd corner overlapping the first corner and I can’t figure out how to square it off properly and I have frogged it 5 times already. Please tell me you figured it out :’)
Alicka
12/29/2021 02:25:36 pm
Thank you for this pattern it is sooooo ooo pretty and difficult! :D can you maybe carry the yarn somehow not to have so many ends to weave by the end? I am going to make a cardigan with this and despise of sewing ends (well not that much but sewing so many!) thank you :)
MK
9/2/2022 05:06:23 pm
I was thinking this exact thing! Any word on it?
Claire
1/3/2022 10:14:51 am
The pattern was great until row 9!
Liz
3/22/2022 04:42:49 pm
Can you please take a look at this yarn:
Goofis
3/26/2022 04:41:22 pm
I want to Thank You!!! For the beautiful pattern and excellent instructions, my 2nd time doing granny squares. I used Red Heart supper saver favorite stripe and got 16 squares out of 1 skein,I think it is gorgeous would have added picture but didn't know how 🤔
Christine
8/20/2022 02:58:35 am
How do I download this free pattern please? Thank you so much for this amazing pattern!! I recently used it to make my 'Tiffany turtle' (posted on tumblr, Instagram, and pinterest with credit to your stained glass square). I enjoyed your pattern so much that I purchased from your ravelry store. Thanks again and best to you! 🧶🥰❤
Julia McNeil
8/25/2022 06:17:36 pm
This is the first pattern I have attempted that came out perfect the first time. Your instructions and photos are very clear and helpful. I am half way through making up squares for an afghan for my mom. 5 squares across and 8 squares long are making a great throw for her to put across her lap. The only issue I have (and its me not the pattern) is I have trouble keeping tall stitches uniform all the way to the end. The tops of my triangles are quite saggy. So I put a hook behind and pull the loop up a bit before I fpsc around the tip of the triangle. Makes the tips look sharp. Kudos for writing such a lovely pattern and Thanks!
Billie
1/7/2023 11:02:51 am
In round 4, do we switch to the main 2/20/2023 09:47:09 pm
Beautiful pattern, thank you! Occasionally I ended up short a stitch or two, just did an increase and didn't worry about it. It came out beautifully.
Cissi
3/15/2023 07:46:02 pm
Hi, I'm wondering wether the triangle pattern will only be on one side of the square, or am I missing something?
Anne
5/11/2023 12:27:15 am
Thank you.
Gabriela
6/29/2023 08:29:32 am
I am grateful for your pattern. I had been fascinated with the stained glass concept for a while. I completed an afghan of 49 squares. It’s beautiful. Thank you for sharing.
Damien
7/11/2023 06:17:12 am
Delighted to give this a try once I find a good yarn! I'm a sucker for stained glass and this is beautiful. Thanks for sharing!
Kaitlyn
10/23/2023 01:09:33 am
I Love This Yarn #494/Instant Classic was a solid great choice for my stain glass afghan 😀
Anita
7/14/2023 06:43:07 pm
What is the approx finished size of the blocks? 9/23/2023 08:20:09 am
Dear Author,
betflikvip
10/12/2023 11:31:10 am
<a href="https://betflixsupervip.com" rel="dofollow">betflikvip</a> กติกา บาคาร่า และวิธีเล่นเกมไพ่ยอดนิยม เข้าใจง่าย ทำเงินดีที่สุด
Meagan
12/30/2023 02:36:59 pm
Hi so the only yarn brands i can use are red heart, big twist, mainstays and bernat...do you know of any particular colorways in one of those that would resemble yours as close as possible? 2/21/2024 03:06:52 am
I have bookmarked your blog, the articles are way better than other similar blogs. Thanks for a great blog! I tend to work tight stitches and find that I need to start with 4 loops on my hook to get the right height for the stitch. If you're a looser crocheter and find that the extended stitch is too tall, you can decrease its height by starting with 3 loops on your hook instead. The pattern should still work just fine.
林林藥局詐騙事件近期引起了廣泛關注。據報導,一些消費者聲稱在購買林林藥局的產品後遭遇詐騙行為,包括假冒商品、不履行退款承諾等。這些事件嚴重損害了消費者的權益和信任度,也對林林藥局的聲譽造成了負面影響。 如果您正在考慮在林林藥局購買產品,我們建議您慎重考慮並謹慎行事。為了您的安全和利益,建議您在購買前仔細閱讀相關條款和條件,確保您的權益得到保障。此外,您也可以通過訪問我們的<a href="https://91nilnil.com/linlin-pharmacy-fraud/">林林藥局詐騙</a>來獲取更多相關信息和最新更新。 我們非常重視您的反饋和意見,如果您有任何疑問或疑慮,請隨時與我們聯繫。感謝您對我們的支持和理解。 6/9/2024 10:29:22 pm
ts like you read my thoughts! You seem to understand so Leave a Reply. |
Welcome!Thank you for stopping by to visit my own personal corner of the web! Feel free to take a look around and check out what I've been crafting, crocheting, or baking. Hopefully you'll find something to inspire your own creativity!   
Archives
March 2024
|
 RSS Feed