
|
Maybe it's just me, but I am SO done with winter already. I mean, I guess it's technically spring now, but that snow on the ground and the miserable weather (I'm looking at you, freezing death wind) are pretty hard to ignore. To cheer myself up a bit, I decided to just pretend that it's nice out and whip up these fun summery bags! Whether you're California dreamin' like me, or you actually have nice weather right now (you lucky duck, you), you'll definitely want to make one of these shark bags your next project. 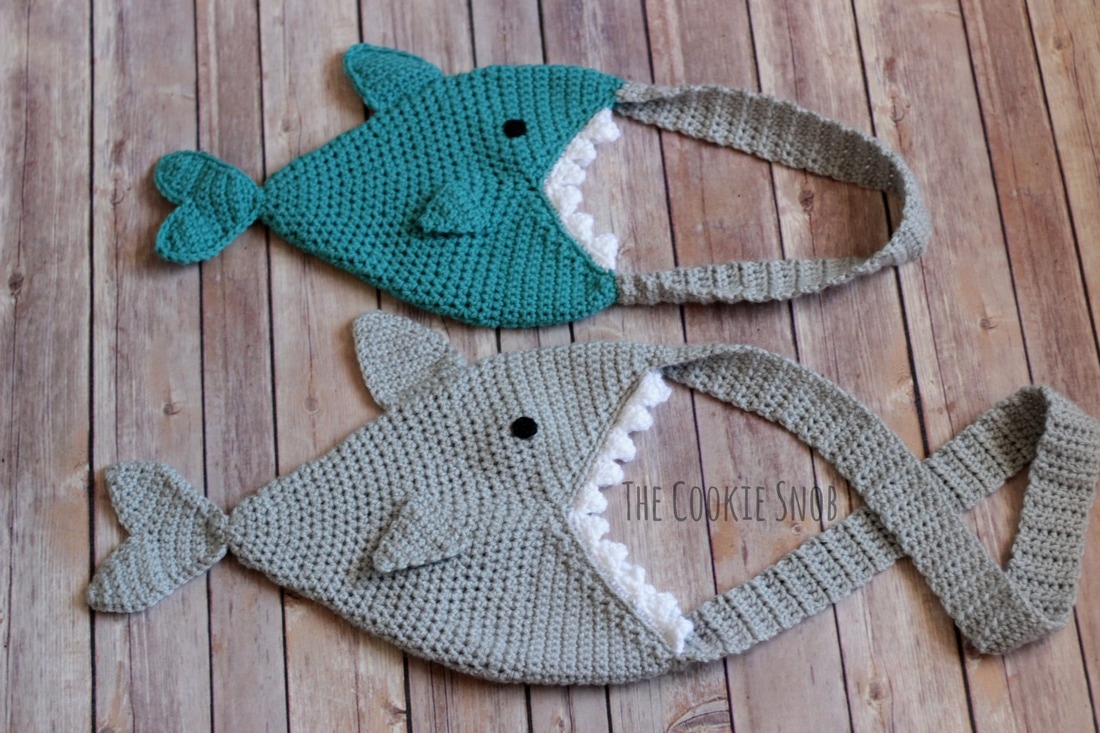 To make this pattern even more fun, I've designed the bags in both an adult and a child size. The pictures for this tutorial feature the child sized bag (the blue shark), but the construction techniques are the same for the adult sized bag (the gray shark) as well. The child instructions are written out first (illustrated with pictures), followed by the adult instructions. So follow along and make your own unique bag! It's guaranteed to be a conversation piece. If you'd like a printer-friendly PDF version of this pattern (or if you just want to help support my blog), it's now available on Ravelry, along with my other paid patterns. 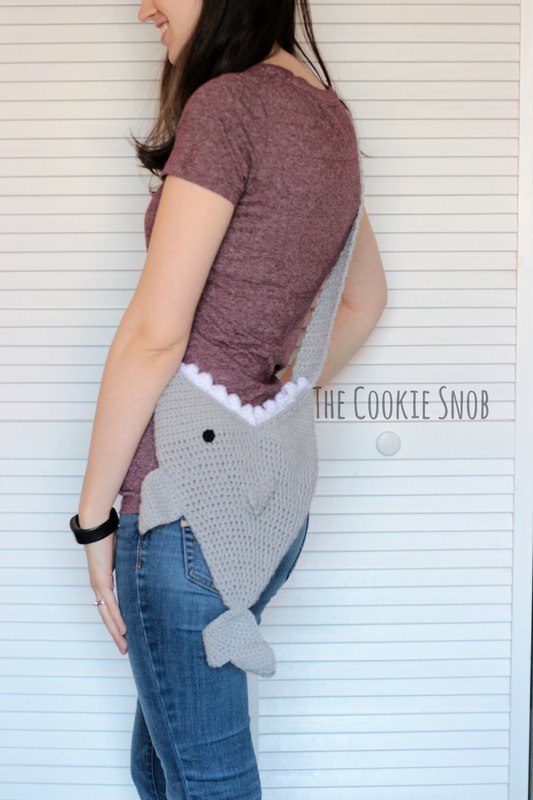 Child Size Materials:
st(s) = stitch(es) ss = slip stitch sc = single crochet inc = work 2 sc in the same st hdc = half double crochet hdc inc = work 2 hdc in the same st dc = double crochet dec = single crochet decrease Body: This section begins in the round (in a continuous spiral without turning or joining) in order to avoid a visible seam. I recommend using a stitch marker to help keep your place. Begin with the size I (5.5mm) crochet hook. Round 1: Make a magic circle, ch 2, and work 8 hdc into the circle (8) Round 2: hdc around (8) Round 3: hdc inc around (16) Rounds 4-5: hdc around (16) Round 6: [hdc inc, hdc in the next st] around (24) Rounds 7-9: hdc around (24) Round 10: [hdc inc, hdc in the next 2 sts] around (32) Rounds 11-13: hdc around (32) Round 14: [hdc inc, hdc in next 3 sts] around (40) Rounds 15-16: hdc around (40) Round 17: [hdc inc, hdc in next 4 sts] around (48) Rounds 18-19: hdc around (48) Round 20: [hdc inc, hdc in next 5 sts] around (56) Rounds 21-22: hdc around (56) Round 23: [hdc inc, hdc in next 6 sts] around (64) Round 24: hdc around (64) Sc then ss to even off the round. Turn.  Row 25: ch 1, sc 32, turn (32) Row 26: ch 1, dec, sc in the next 28 sts, dec, turn (30) Row 27: ch 1, dec, sc in the next 26 sts, dec, turn (28) Row 28: ch 1, dec, sc in the next 24 sts, dec, turn (26) Row 29: ch 1, dec, sc in the next 22 sts, dec, turn (24) Row 30: ch 1, dec, sc in the next 20 sts, dec, turn (22) Row 31: ch 1, dec, sc in the next 18 sts, dec, turn (20) Row 32: ch 1, dec, sc in the next 16 sts, dec, turn (18) Row 33: ch 1, dec, sc in the next 14 sts, dec, turn (16) Row 34: ch 1, dec, sc in the next 12 sts, dec, turn (14) Row 35: ch 1, dec, sc in the next 10 sts, dec, turn (12) Row 36: ch 1, dec, sc in the next 8 sts, dec, turn (10) Row 37: ch 1, dec, sc in the next 6 sts, dec, turn (8) Row 38: ch 1, dec, sc in the next 4 sts, dec, turn (6) 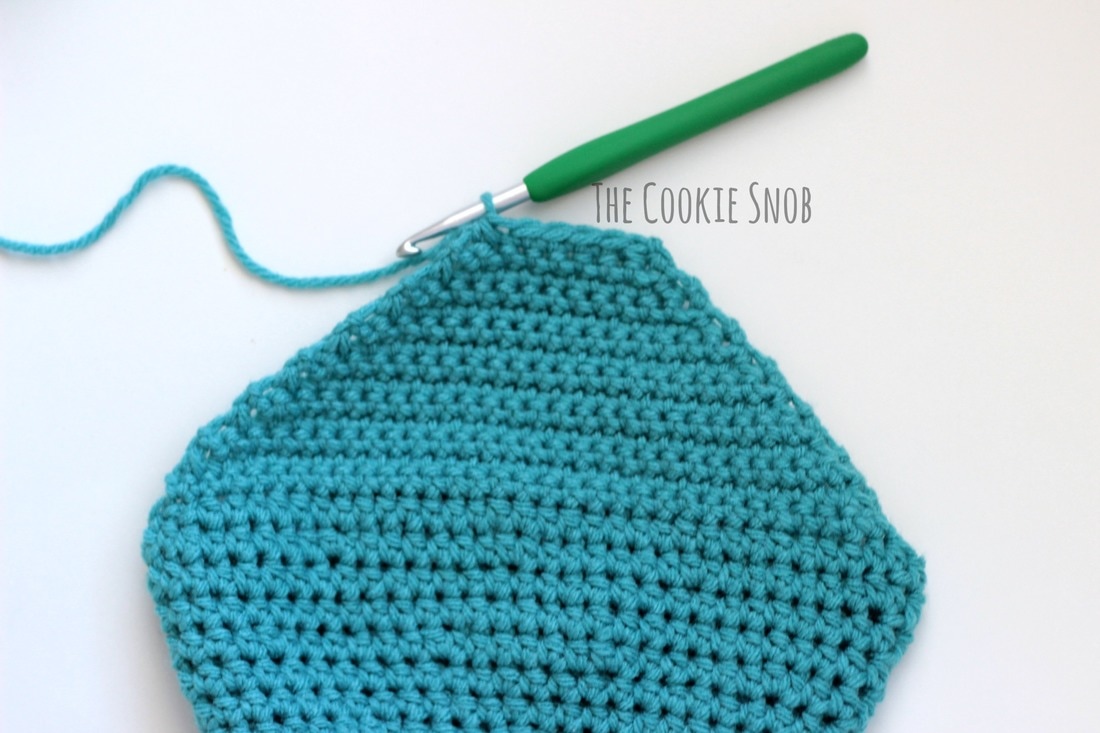 Work 12 sc evenly down the side. Ss to join. 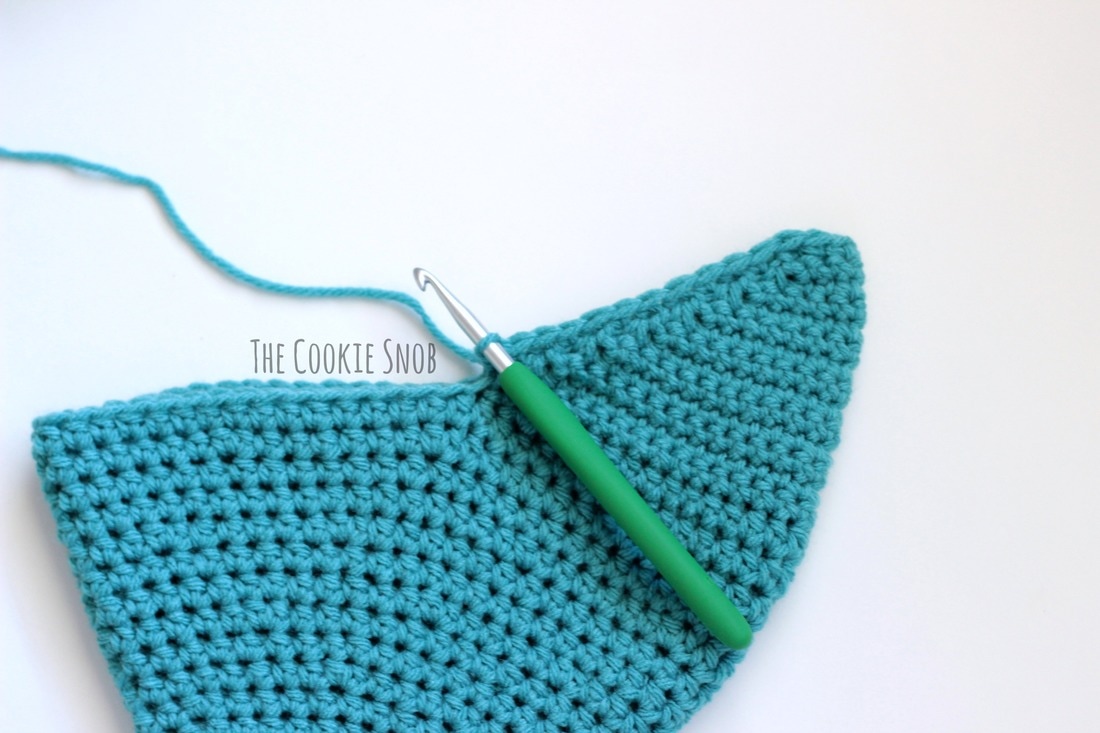 Rows 39-52: repeat rows 25-38 Row 53: ch 1, sc across, (6) Evenly work 12 sc down one side, then another 12 sc up the other side Row 54: ch 1, sc across, turn (6) 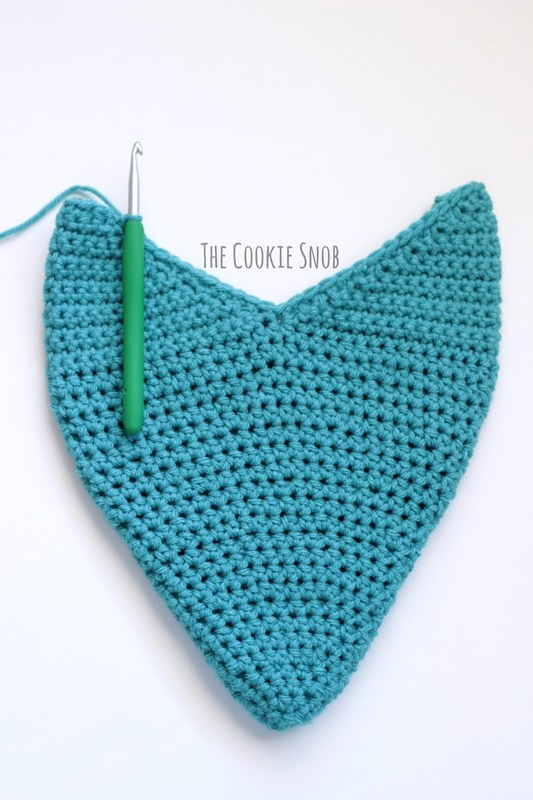 If you want to use a different color for the strap, change colors here. Otherwise continue with the main color. Rows 55-105: ch 2, hdc across (6) Making sure strap isn’t twisted, ss to join to the opposite side. Evenly work 12 sc down last side. Fasten off and weave in ends. Or, if you're using a different color for the strap than the body, fasten off, leaving a long yarn tail and use the tail to sew the strap to the opposite side. Then evenly work 12 sc down the last side using the main body color. Fasten off and weave in ends. 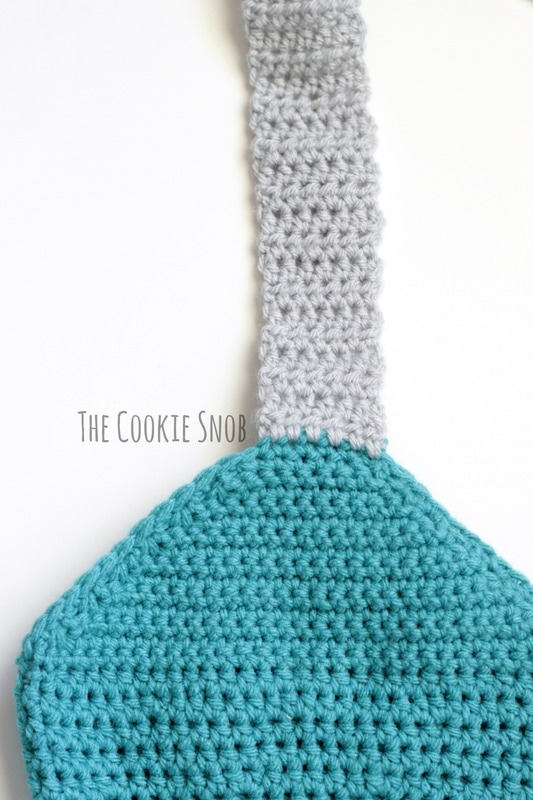 Teeth: Join white yarn. Row 1: Working in back loop only, sc across, turn (24) 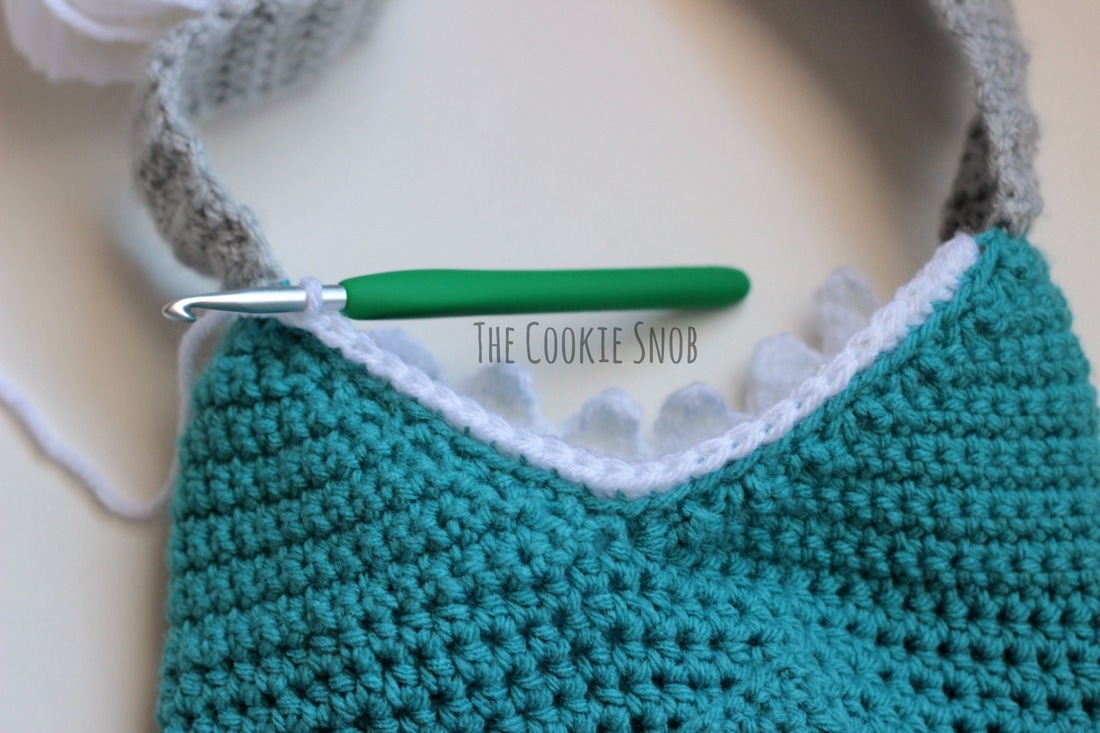 Row 2: [ch 4, sc in the 2nd ch from the hook, then hdc and dc in remaining ch, skip 3 sc and ss to join in the 4th sc] 6 times. Fasten off and weave in ends. Repeat on opposite side of the shark. 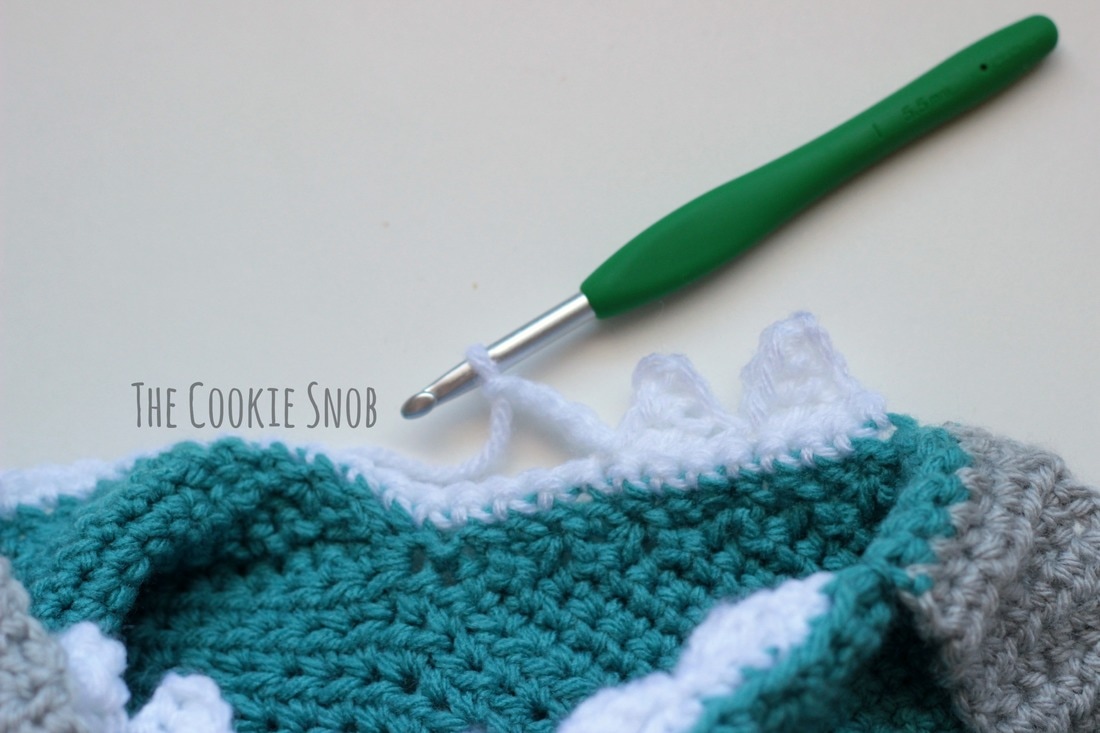 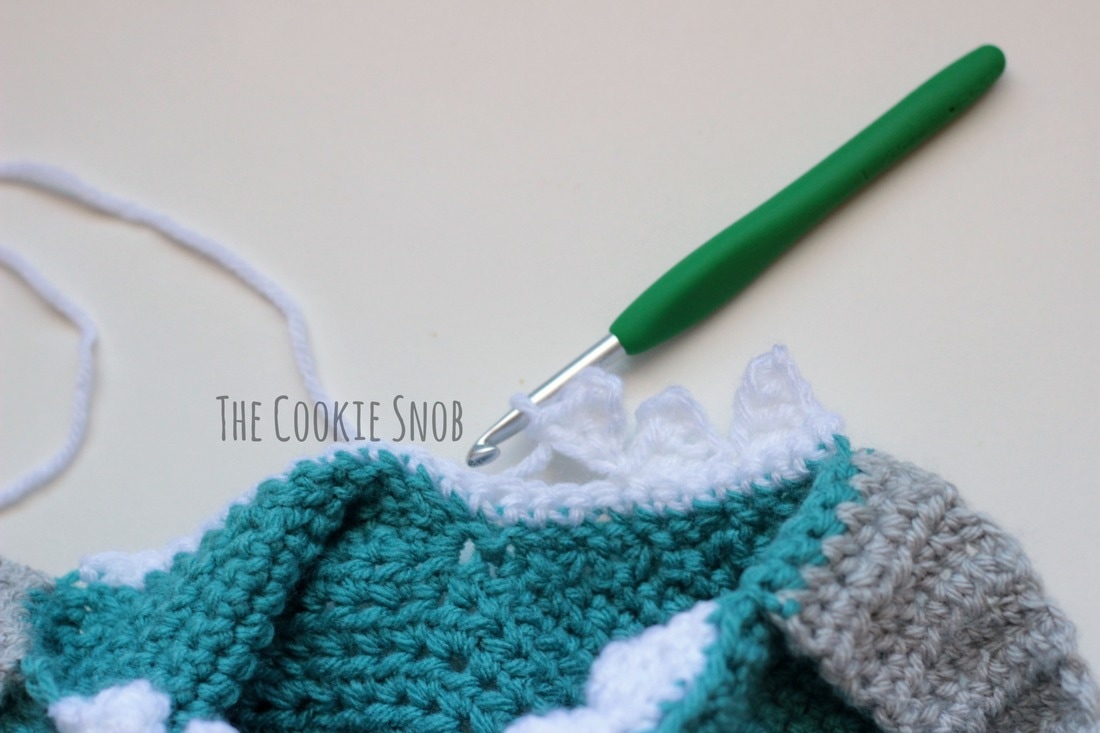 Dorsal fin: Ch 9 Row 1: sc in 2nd ch from the hook and across, turn (8) Row 2: ch 1, sc in the next 6 sts, dec, turn (7) Rows 3: ch 1, sc across, turn (7) Row 4: ch 1, sc in the next 5 sts, dec turn (6) Rows 5: ch 1, sc across, turn (6) Row 6: ch 1, sc in the next 4 sts, dec, turn (5) Row 7: ch 1, dec, sc in the next 3 sts, turn (4) Row 8: ch 1, sc in the next 2 sts, dec, turn (3) Row 9: ch 1, dec, sc, turn (2) Row 10: ch 1, dec (1) Sc evenly around the entire fin, if desired. Fasten off, leaving a long tail for sewing. 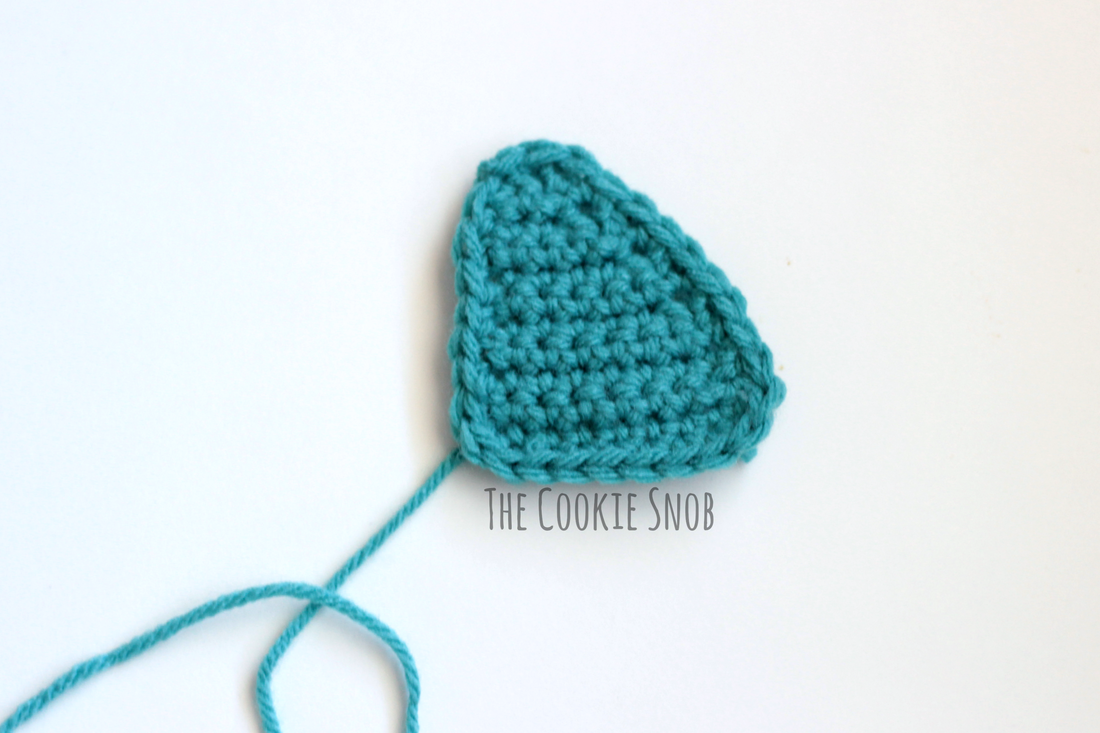 Pectoral fins (make 2): Ch 8 Row 1: sc in the 2nd ch from the hook and in each st across, turn (7) Row 2: ch 1, sc across, turn (7) Row 3: ch 1, dec, sc in the next 3 sts, dec, turn (5) Row 4: ch 1, sc across, turn (5) Row 5: ch 1, dec, sc, dec, turn (3) Row 6: ch 1, sc across, turn (3) Row 7: ch 1, sc3tog (1) Sc evenly around the entire fin, if desired (I left mine unfinished). Fasten off, leaving a long tail for sewing. 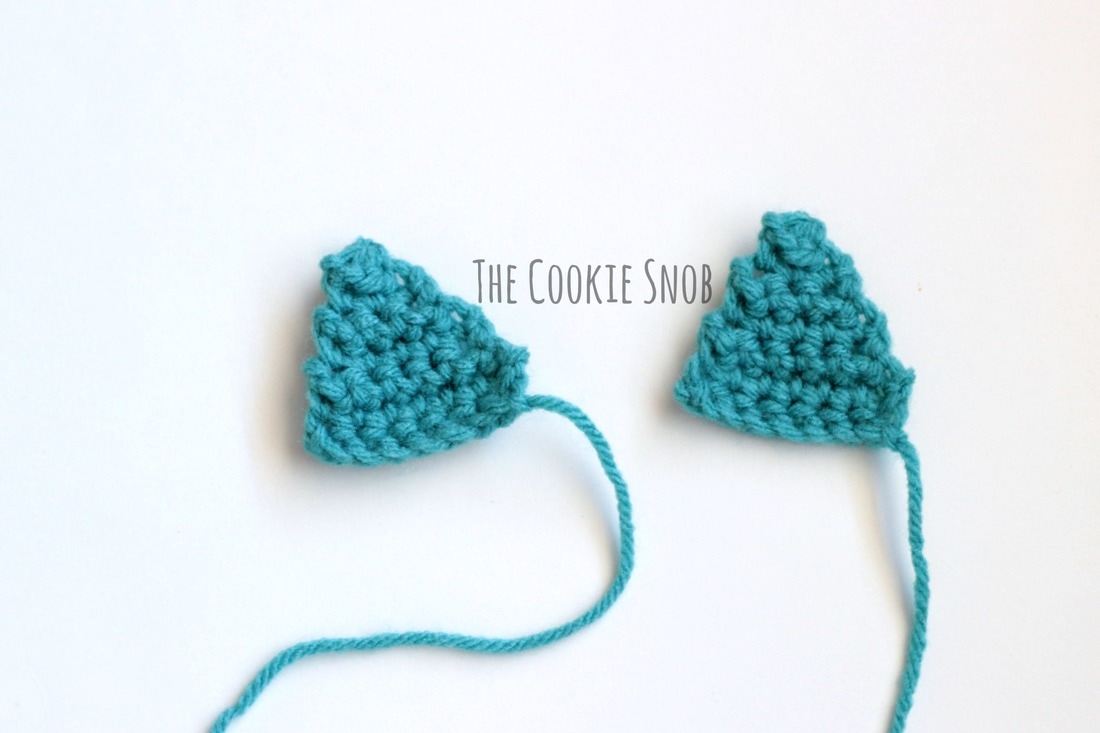 Tail fin: Ch 5 Row 1: sc in 2nd ch from the hook and across, turn (4) Row 2: ch 1, inc, sc in the next 2 sts, inc, turn (6) Row 3: ch 1, sc across, turn (6) Row 4: ch 1, inc, sc in the next 4 sts, inc, turn (8) Row 5: ch 1, sc across, turn (8) Row 6: ch 1, inc, sc in the next 6 sts, inc, turn (10) Row 7: ch 1, sc across, turn (10) Row 8: ch 1, inc, sc in the next 4 sts, turn (6) Row 9: ch 1, sc across, turn (6) Row 10: ch 1, sc in the next 4 sts, dec, turn (5) Row 11: ch 1, sc across, turn (5) Row 12: ch 1, dec, sc in the next st, dec, turn (3) Row 13: ch 1, sc across, turn (3) Row 14: ch 1, sc3tog (1) 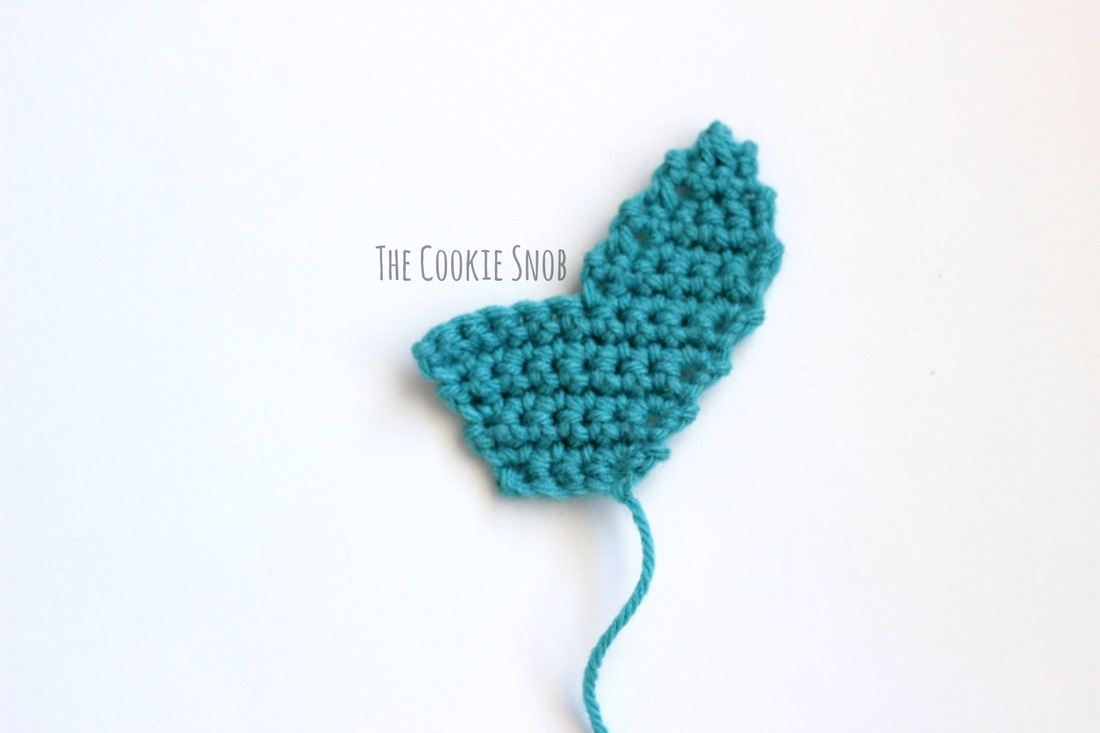 Attach yarn on the unworked side, starting on the far end. Rows 15-21: repeat rows 8-14 in remaining sts, Sc evenly around the entire tail, if desired. Fasten off, leaving a long tail for sewing.  Eye (make 2): Switch to size H (5.0mm) crochet hook: Round 1: Make a magic circle and work 6 sc into the circle. Pull taut to close. Fasten off, leaving a long tail for sewing.  Assembly: Using the long tails of yarn and the tapestry needle, stitch on fins and eyes and shown. Weave in any remaining ends. 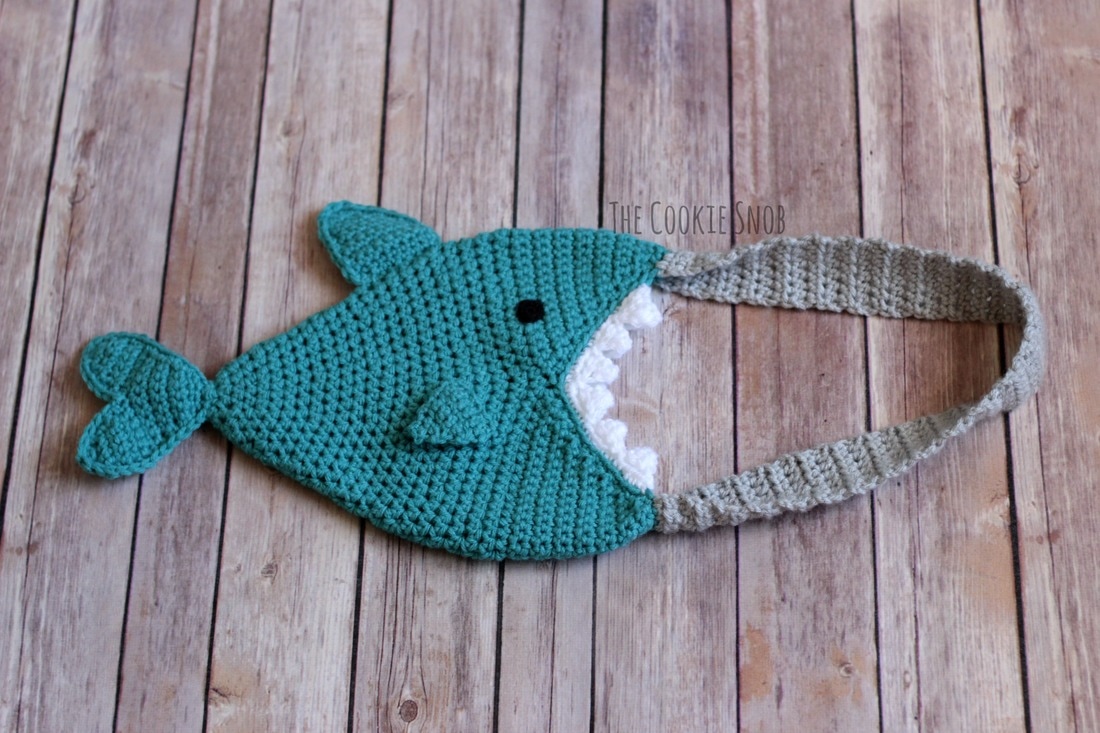 Adult Size Materials:
st(s) = stitch(es) ss = slip stitch sc = single crochet inc = work 2 sc in the same st hdc = half double crochet hdc inc = work 2 hdc in the same st dc = double crochet dec = single crochet decrease Body: This section begins in the round (in a continuous spiral without turning or joining) in order to avoid a visible seam. I recommend using a stitch marker to help keep your place. Round 1: Make a magic circle, ch 2, work 8 hdc into the circle (8) Round 2: hdc around (8) Round 3: hdc inc around (16) Rounds 4-5: hdc around (16) Round 6: [hdc inc, hdc in the next st] around (24) Rounds 7-9: hdc around (24) Round 10: [hdc inc, hdc in the next 2 sts] around (32) Rounds 11-13: hdc around (32) Round 14: [hdc inc, hdc in next 3 sts] around (40) Rounds 15-16: hdc around (40) Round 17: [hdc inc, hdc in next 4 sts] around (48) Rounds 18-19: hdc around (48) Round 20: [hdc inc, hdc in next 5 sts] around (56) Rounds 21-22: hdc around (56) Round 23: [hdc inc, hdc in next 6 sts] around (64) Round 24: hdc around (64) Round 25: [hdc inc, hdc in next 7 sts] around (72) Round 26: hdc around (72) Round 27: [hdc inc, hdc in next 8 sts] around (80) Round 28: hdc around (80) Sc then ss to even off the round. Turn. Row 29: ch 1, sc 40, turn (40) Row 30: ch 1, dec, sc in the next 36 sts, dec, turn (38) Row 31: ch 1, dec, sc in the next 34 sts, dec, turn (36) Row 32: ch 1, dec, sc in the next 32 sts, dec, turn (34) Row 33: ch 1, dec, sc in the next 30 sts, dec, turn (32) Row 34: ch 1, dec, sc in the next 28 sts, dec, turn (30) Row 35: ch 1, dec, sc in the next 26 sts, dec, turn (28) Row 36: ch 1, dec, sc in the next 24 sts, dec, turn (26) Row 37: ch 1, dec, sc in the next 22 sts, dec, turn (24) Row 38: ch 1, dec, sc in the next 20 sts, dec, turn (22) Row 39: ch 1, dec, sc in the next 18 sts, dec, turn (20) Row 40: ch 1, dec, sc in the next 16 sts, dec, turn (18) Row 41: ch 1, dec, sc in the next 14 sts, dec, turn (16) Row 42: ch 1, dec, sc in the next 12 sts, dec, turn (14) Row 43: ch 1, dec, sc in the next 10 sts, dec, turn (12) Row 44: ch 1, dec, sc in the next 8 sts, dec, turn (10) Row 45: ch 1, dec, sc in the next 6 sts, dec, turn (8) Row 46: ch 1, dec, sc in the next 4 sts, dec (6) Evenly work 20 sc down the side Rows 47-64: repeat rows 29-46 Row 65: ch 1, sc across (6) Evenly work 20 sc down one side, then another 20 sc up the other side Row 66: ch 1, sc across, turn (6) Rows 67-161: ch 2, hdc across (6) Making sure strap isn’t twisted, ss to join to the opposite side. Evenly work 20 sc down last side. Fasten off and weave in ends. Or, if you're using a different color for the strap than the body, fasten off, leaving a long yarn tail and use the tail to sew the strap to the opposite side. Then evenly work 20 sc down the last side using the main body color. Fasten off and weave in ends. Teeth: Join white yarn. Row 1: Working in back loop only, sc across, turn (40) Row 2: [ch 4, sc in the 2nd ch from the hook, then hdc and dc in remaining ch, skip 3 sc and ss to join in the 4th sc] 10 times. Fasten off and weave in ends. Repeat on opposite side of the shark. Dorsal fin: Ch 11 Row 1: sc in 2nd ch from the hook and across, turn (10) Row 2: ch 1, sc in the next 8 sts, dec, turn (9) Rows 3-4: ch 1, sc across, turn (9) Row 5: ch 1, dec, sc in the next 7 sts, turn (8) Rows 6-7: ch 1, sc across, turn (8) Row 8: ch 1, sc in the next 6 sts, dec, turn (7) Row 9: ch 1, dec, sc in the next 5 sts, turn (6) Row 10: ch 1, sc in the next 4 sts, dec, turn (5) Row 11: ch 1, dec, sc in the next 3 sts, turn (4) Row 12: ch 1, sc in the next 2 sts, dec, turn (3) Row 13: ch 1, dec, sc, turn (2) Row 14: ch 1, dec (1) Sc evenly around the entire fin, if desired. Fasten off, leaving a long tail for sewing. Pectoral fins (make 2): Ch 10 Row 1: sc in the 2nd ch from the hook and in each st across, turn (9) Row 2: ch 1, sc across, turn (9) Row 3: ch 1, dec, sc in the next 5 sts, dec, turn (7) Rows 4-5: ch 1, sc across, turn (7) Row 6: ch 1, dec, sc in the next 3 sts, dec, turn (5) Rows 7-8: ch 1, sc across, turn (5) Row 9: ch 1, dec, sc, dec, turn (3) Row 10: ch 1, sc across, turn (3) Row 11: ch 1, sc3tog (1) Sc evenly around the entire fin, if desired (I left mine unfinished). Fasten off, leaving a long tail for sewing. Tail fin: Ch 5 Row 1: sc in 2nd ch from the hook and across, turn (4) Row 2: ch 1, inc, sc in the next 2 sts, inc, turn (6) Row 3: ch 1, sc across, turn (6) Row 4: ch 1, inc, sc in the next 4 sts, inc, turn (8) Row 5: ch 1, sc across, turn (8) Row 6: ch 1, inc, sc in the next 6 sts, inc, turn (10) Row 7: ch 1, sc across, turn (10) Row 8: ch 1, inc, sc in the next 8 sts, inc, turn (12) Row 9: ch 1, sc across, turn (12) Row 10: ch 1, inc, sc in the next 5 sts, turn (7) Row 11: ch 1, sc across, turn (7) Row 12: ch 1, sc in the next 5 sts, dec, turn (6) Row 13: ch 1, sc across, turn (6) Row 14: ch 1, dec, sc in the next 2 sts, dec, turn (4) Row 15: ch 1, sc across, turn (4) Row 16: ch 1, dec twice, turn (2) Row 17: ch 1, sc across, turn (2) Row 18: ch 1, dec (1) Attach yarn on the unworked side, starting on the far end. Rows 19-27: repeat rows 10-18 in remaining sts, Sc evenly around the entire tail, if desired. Fasten off, leaving a long tail for sewing. Eye (make 2): Round 1: Make a magic circle and work 6 sc into the circle. Pull taut to close. Fasten off, leaving a long tail for sewing. Assembly: Using the long tails of yarn and the tapestry needle, stitch on fins and eyes and shown. Weave in any remaining ends. 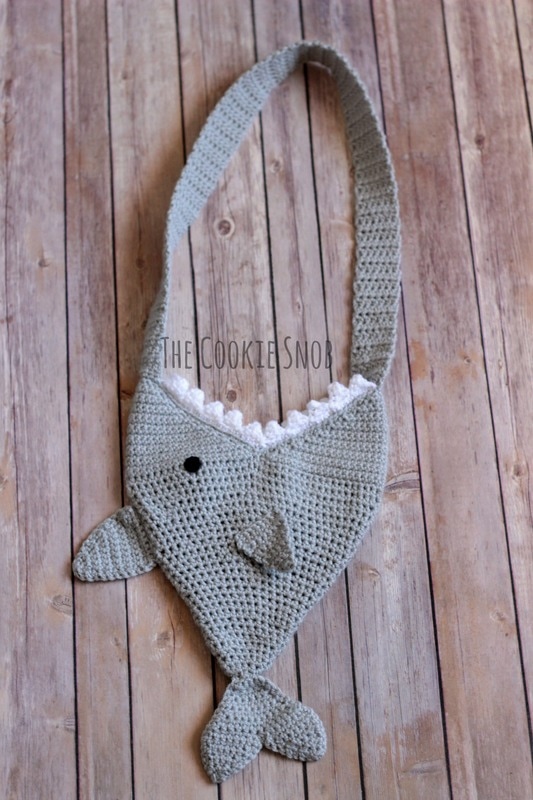 I hope that you enjoy this pattern! If you make a shark bag of your own, I would love to see it. And, as always, if you have any questions or comments about this bag you can reach me in the comments section below or on social media. I do my best to make all my patterns error-free, but there was a lot of copy-pasting on this one because of the two sizes, so if you catch any typos please let me know; you'll get a gold star in my book ;) And remember, if you want a PDF version, you can find it on Ravelry. Happy hooking! 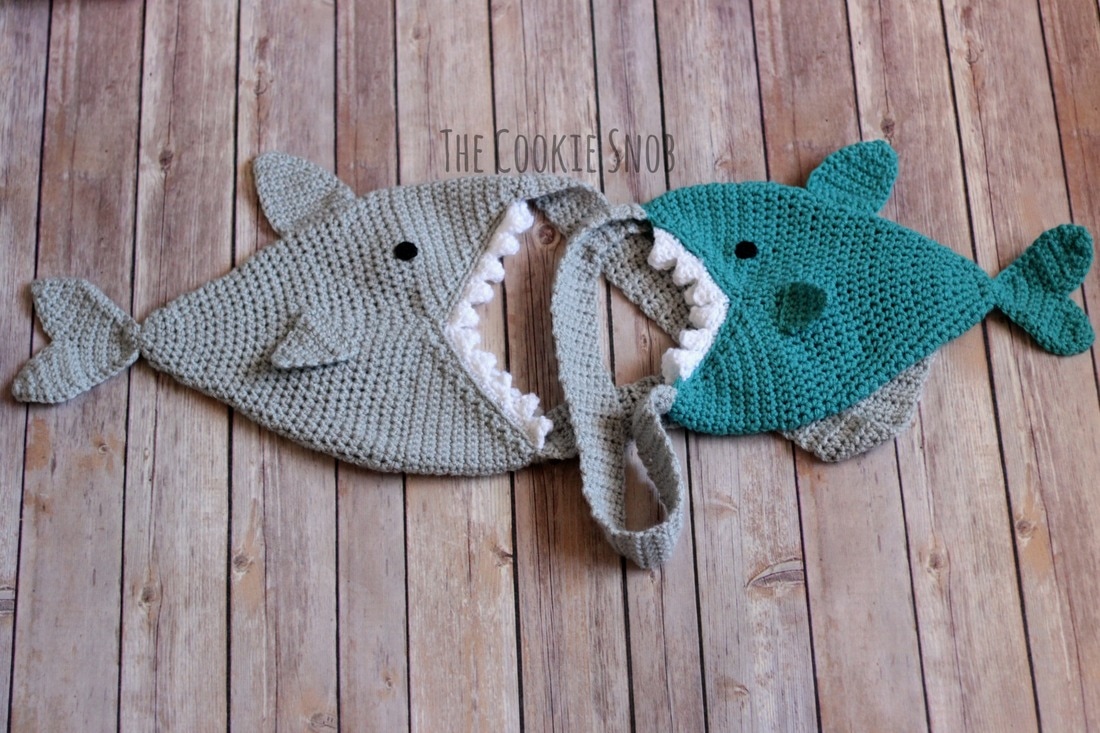 ***You're welcome to do whatever you'd like to with finished products made from this pattern but if you do sell them, I ask that you link back to my page. You may not copy this pattern, repost it anywhere (either altered or in its original form), or claim it as your own. You may not use any photos on this site for your own use. ***
60 Comments
Barb
3/24/2017 10:42:26 am
This is adorable! Thanks for sharing.
Gerda Albasini
3/25/2017 05:54:26 pm
Thank you so much!!!!! Adorable!!!!
Fannah
3/26/2017 01:02:02 pm
Thank you for sharing its Beautiful
Eidilia Thomas
3/30/2017 04:14:50 pm
I made this bag and it came out perfect! Do you have any tips on lining it? I'm having a lit of trouble with that. Thank you!
Erin
3/31/2017 07:38:56 pm
I'm glad it came out well for you! Lining this bag is a little tricker than a normal bag just because of the shape, but definitely doable. Basically you'll need to sew the fabric into a cone sort of shape before attaching it to the bag (or you can make it more like a traditional bag shape, if you're not worried about using the bottom tip of the bag). I haven't had time to line mine yet, so I don't have the exact measurements, but I can post them once I do, in case that's helpful.
Alias Allison
2/20/2020 01:51:26 am
Yes please.
Lori Bittner
4/25/2017 09:59:48 pm
I don't read patterns very well and I have gotten all the way to the teeth and can't figure them out. They don't look right. Can anyone help me?
Erin
4/25/2017 10:23:58 pm
Hi, Lori! I'd be happy to try to help you out. Can you be more specific about where you're getting stuck? Once I have a better idea of where it's confusing, I can try to explain it in a different way :)
Ashley
4/27/2017 11:17:51 am
I am a little confused at the part where you sc and ss evenly. Does that mean you alternate stitches? Sc ss sc ss etc?
Erin
4/27/2017 08:21:00 pm
Hi Ashley. That part is meant to even off the round so that the edge is neat. So all you need to do is sc in the first st, then ss in the next st and then fasten off. That'll give you a more even edge than simply fastening off the piece after the last hdc. 5/3/2017 10:45:19 am
Love the shark, thanks for sharing I know exactly who I will make it for.
Sharlyn
5/3/2017 12:17:09 pm
So cute! Thanks for sharing
Janet
5/4/2017 01:30:36 pm
Very cute pattern! I'm so glad there are creative people like you that are willing to share their skills!
Ruthie
5/7/2017 11:48:56 pm
Thank you for your generous!
Anne
6/4/2017 07:36:00 pm
I have gotten to the part to attach the strap but can not find how to make the strap in the pattern. How many stitches across is it and how long.
Erin
6/5/2017 10:51:41 am
If you look at rows 55-105 in the child size or rows 67-161 in the adult size, it'll tell you exactly how to make the strap. It's not a separate piece; it's worked directly on the body, which is probably how you missed it.
Stephanie
6/20/2017 03:42:03 pm
Im confused when it says. " [hdc inc, hdc in the next 2 sts]". Can you help me
Erin
6/21/2017 08:38:24 pm
Hi Stephanie. The brackets indicate the pattern to be repeated. So for that round, you'll hdc inc in the first st, then hdc in the second st and hdc in the third st as well. Then you'll repeat that pattern until you get back to your stitch marker. So it would be something like: "hdc inc, hdc, hdc, hdc inc, hdc, hdc, hdc inc, hdc, hdc..." and so on. Hopefully that helps!
Sonia
6/29/2017 02:12:53 am
I wish it was in video, I have trouble reading the crochet patterns...I love the purse.
Janet
6/30/2017 03:51:31 pm
I was wondering if you slip stitch at the end of the round? Thanks!
Erin
6/30/2017 10:38:23 pm
I'm assuming you mean at the end of each round? The body of the bag is worked in a continuous spiral, so you will NOT be joining with a ss at the end of each round. There's a note explaining it at the beginning of the pattern, but it can be easy to miss in all the text :)
Janet
7/1/2017 10:00:29 am
Yes the end of each round. Thank you for your quick response! It's going to be a birthday present for my niece, who has an irrational fear of sharks!
Liz Bradshaw
7/4/2017 01:57:30 pm
I just saw this on Ravelry and I think its actually adorable. As a Scuba Diver and a lover of the water I'm definitely going to make this! I'll be sure to share it on Ravelry and like to you.
choisinae
7/6/2017 12:09:22 am
very nice~~
Erin
8/11/2017 07:18:01 pm
The exact dimensions will vary depending on which yarn you use and how tightly you crochet, but the adult bag I made is almost 16" from the top of the mouth to the end of the tail fin.
Kashey
8/27/2017 09:51:59 pm
So I am confused with the teeth. I understand the ch 4, school the 2nd ch from the hook, but exactly how do I then do the he and dc within the tooth?
Erin
8/28/2017 10:01:36 am
The tooth is basically a triangle worked in the ch 4 that you then flip over and join to the row of sc below. So you work the sc in the 2nd ch from the hook, the hdc is in the 3rd ch from the hook, and the dc is in the 4th ch from the hook. Then skip 3 sc from the previous row and ss in the 4th sc to join. Hopefully that helps!
Molly
3/21/2018 05:02:22 pm
I have made this bag the tail came out differently but am happy with the over all effect. Just need to line it and make an eye. Thanks...
Anon
3/26/2018 05:41:13 pm
Exactly one year later I started this! How funny!
Anon
3/26/2018 05:44:08 pm
(just wanted to add) I'm making mine more of a backpack, with 2 straps on what would be the shark's belly. (If that helps visualize)
Erin
3/26/2018 07:59:16 pm
Adding a zipper to this one might be a little tricky, since it wasn't designed with that in mind. But I don't think it's impossible. If I was going to attempt it, I would probably attach a zipper below the teeth (somewhere around round 24 for the child size bag) so that it could just be a simple straight line. The v-shaped part of the mouth would then be above the zipper opening. So only the body of the shark could hold things, but that sounds a lot simpler than trying to sew a zipper along the v shape.
Molly
3/26/2018 06:23:53 pm
Hi Anon
Ashley
6/29/2018 03:27:35 pm
I did this and was able to add a lining to it. I almost gave up on that because I've never sewed before. I would love to send you a picture of the finished bag. How would I do that?
Erin
7/1/2018 07:33:08 pm
Hooray! I'm glad you were able to make it work! I'd love to see a picture. If you're on Facebook, you can share it to the Cookie Snob page or message it to me. If you're on Instagram, you can tag me (@TheCookieSnob). Or, you can just send me an email. You can find my email address on the contact page or by clicking the email icon at the top right of this page. 7/26/2018 01:57:05 am
I've just found this pattern, thank you, I love this shark bag, I am planning to make it for my son :) Sincerely: Alexandra
Manami
7/21/2020 09:19:46 pm
I just finished Row 65 and the 20 stitches down one side. I ended up between the two jaws of the shark. On the next step, it says to do another 20 stitches on the other side of one jaw. But I don’t know how to get there. I’ve already done the same one side of both jaws and I don’t know how I’m supposed to get to the other side of one jaw without doing another 20 stitches on the same side of one jaw. I feel like I did something wrong. If so is there a way to fix this? Can you please help me figure this problem out? Thank you so much!
Erin
7/24/2020 11:31:41 am
It's hard to know exactly where the problem is without seeing it in person, but my best guess is that somewhere along the way you turned the piece at the end of the row when you shouldn't have. The pattern is very specific about when to turn; if it doesn't say "turn," then you should NOT turn the piece. That way everything will be facing the right direction.
Manami
7/26/2020 10:22:35 pm
Thank you so much! I was worried to couldn’t do anything with it anymore, but I eventually figured it out and I was able to make the body of the shark bag. I have a new tiny problem on how to start the teeth. It says to join the white yarn to the project but I don’t know how to do that. I think your supposed to tie it on or something but I’m not sure. Can you please help? Thank you so much!
Erin
7/28/2020 01:16:57 pm
I'm glad you figured it out! There are tons of youtube videos and tutorials and things out there if you're still looking for your favorite joining technique (and they'll probably make more sense than me trying to explain things via text haha). My go-to method is to just insert my hook where I want to join the yarn, pull up a loop with the new yarn and then just go from there. I usually crochet over the yarn tail at the beginning to help secure it (and so that I don't have to weave it in later). Let me know if you have any other questions I can help you with!
Manami
7/28/2020 02:12:32 pm
Thank you so much! I’m almost done with the bag. I love your designs and I’m very thankful that you post them on Pinterest for free. Again thank you so much!❤️❤️❤️
Louise
8/2/2020 07:14:24 am
Hi this is brilliant! I was just wondering im stuck between rows 46 and 47 where you have to sc 12 down the side ? I followed the instructions all the way up till the strap but it didnt look right, it was bowed ? Could you explain a little more in detail please?
Erin
8/6/2020 11:25:21 am
Hi Louise, This pattern is so cute. A friend wants me to teach her how to crochet and wanted to make this pattern. I looked it up and made it to see if it would be easy enough for a beginner. I have not finished but I think it will work. My little great-grand daughter is going to love the shark I am making. I will need to line it because she loves to pick up rocks. This will give her a place to carry them. Thanks for your work.
Mickie
8/4/2022 06:22:41 pm
Thank you so much for posting this pattern, I’m making these for me and my daughters for shark week 😍😍😍
Julia
3/2/2023 10:45:56 pm
I have made it all the way to the tail fin and have understood everything so far. I am totally confused now. I have made the piece that looks like your photo, but do not understand where to start the rest of the fin. It says to attach yarn on unworldly side and repeat rows 8-14. I don’t know where to actually start on the piece I have that matches your picture. Can you post a photo of where to put the first stitch. Thanks.
Julia
3/2/2023 10:51:45 pm
Sorry; meant to say “unworked”
Kait
8/7/2023 10:32:02 pm
Commenting to follow because I’m stuck at the same part! I’m not undertaking the “attach yarn on unworked side, repeat rounds..” !
Erin
9/5/2023 01:11:15 pm
Sorry for the late reply; I don't know how I missed this. But if you're still stuck, hopefully I can help.
Madelynn
7/4/2023 12:06:43 am
I am confused by what you mean by "turn" , do you mean flip the piece inside out? Or something else?
Erin
7/12/2023 01:02:43 pm
"Turning" is standard crochet terminology for flipping your piece over so that you can work across a row (since crochet stitches generally only go in one direction). For example, if you're making a rectangle, when you get to the end of the row, you have to then flip it over so you can crochet the new row). It may seem a little confusing with a non-rectangular shape, but it's the same concept. You just turn it over (don't flip it inside out) so that you can keep going.
Taylor
8/23/2023 11:03:06 am
I dun understand how to work 20 sc down the sides, when we only did 17 rows (46 - 29 = 17 rows)? Pls help :(
Erin
9/5/2023 01:04:33 pm
Hi Taylor, hi!, I’m doing this pattern and is my first time doing crochet, so when I went to buy yarn, they told me to use cotton and not yarn, so I’m using that and I just finish the first step (the cone kinda thing), so I don’t know if I should add some stitches to it because is smaller doing crochet with cotton, and I want to make the adult side, please if someone could tell me, I’ll be very happy <3. (Sorry if my English is bad, I’m from Chile)
Emm
4/22/2024 02:14:07 pm
I absolutely LOVE this pattern. Thanks so much!
elise
6/5/2024 07:40:39 pm
THANK YOU so much for making this absolutley adorable pattern and STILL keeping up with the comments and qeustions. You seem like a truly kind person. Leave a Reply. |
Welcome!Thank you for stopping by to visit my own personal corner of the web! Feel free to take a look around and check out what I've been crafting, crocheting, or baking. Hopefully you'll find something to inspire your own creativity!   
Archives
March 2024
|
 RSS Feed