
|
I've always loved rainbows. I mean, who could resist all those lovely colors? Even though it's a simple matter of light and water droplets, they still seem somewhat magical and mystical. And they make a very fitting symbol of hope, creating beauty after a storm. I'd like to think that they're a quiet reminder that after tragedy, joy is still possible. After some personal ups and downs recently, I found myself contemplating the nature of grief. I won't bore you all with philosophical ramblings; suffice it to say that I kept coming back to the mental image of a rainbow. And I felt like I should crochet a rainbow. A huggable rainbow. 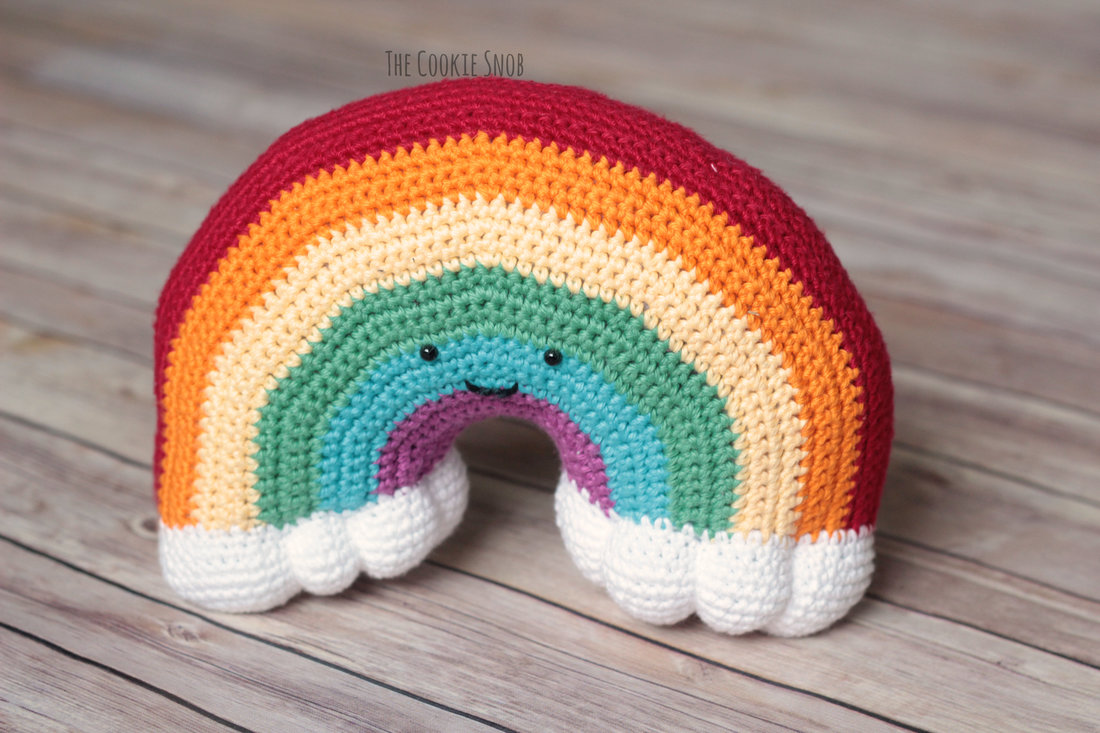 So I'd like to dedicate this pattern to anyone out there who's grieving. I know that a crocheted rainbow can't magically solve all your problems or take away your hurt or loss. But I hope that you'll think of it as my wish to you that you'll find your own healing and peace. Please hang in there, because you matter. And if you ever find yourself in need of an extra hug, well, this rainbow's got your back. 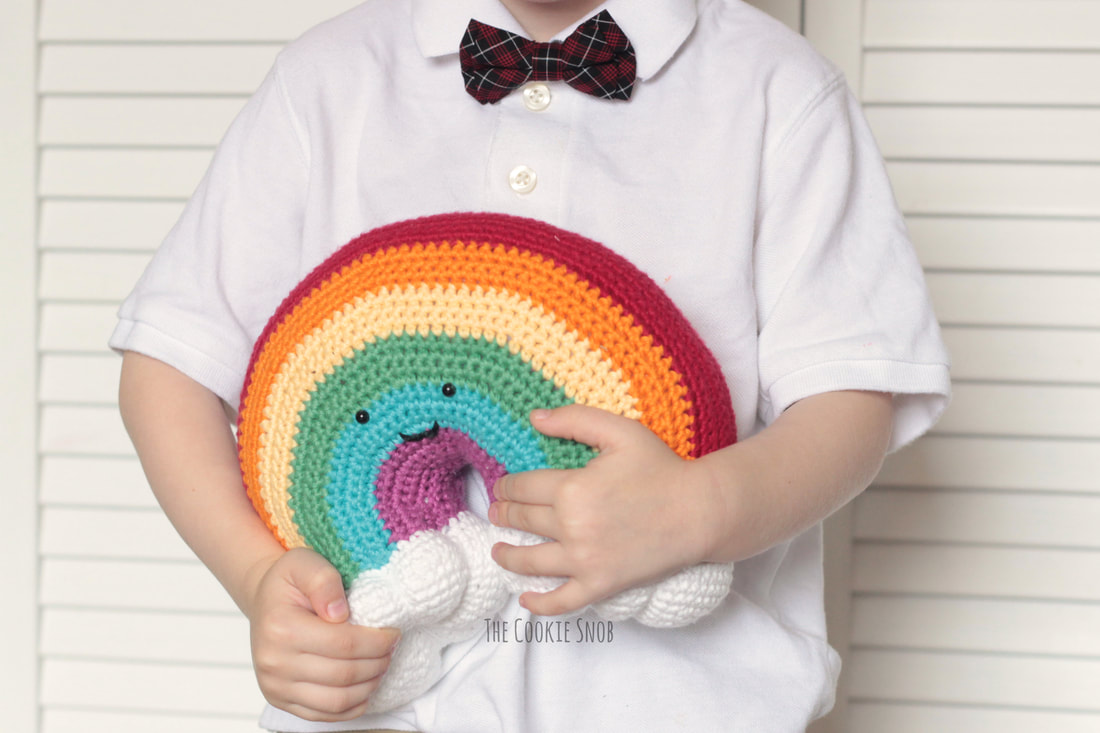 Now for some pattern logistics: the colored section of the rainbow is worked all in one piece (with color changes) and the clouds are crocheted directly onto it. So there's only one tiny bit of sewing involved in this project. And, as an added bonus, you don't need to worry about weaving in the ends from the color changes because you can just tuck them inside with all the stuffing (score!). I added a face to mine, but you're welcome to leave it expressionless for more of a minimalist approach. 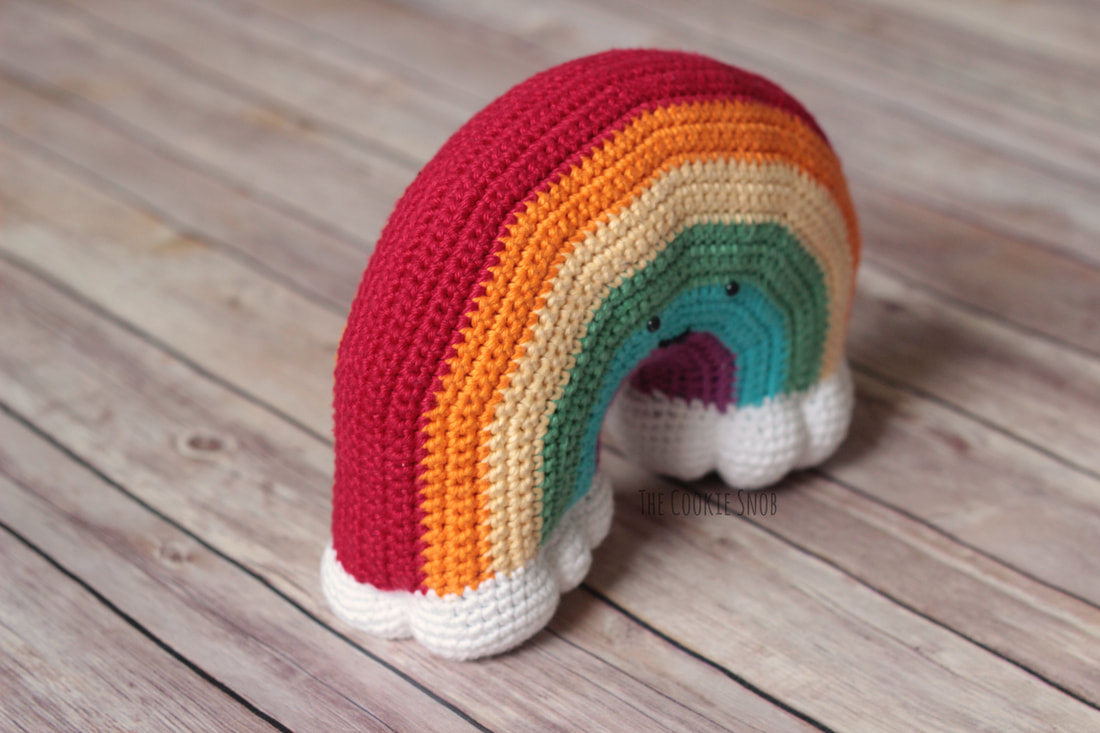 It's pretty simple to adjust the size on this one once you recognize the general pattern for increasing/decreasing (feel free to contact me if you need help with this), but I am going to be fairly insistent about stitch placements. It's still somewhat noticeable just because of the size/color changes in this type of construction, but this is the best method I've found for minimizing "corners" and keep it as round as possible while maintaining symmetry. I tried a lot of different iterations and this approach definitely worked the best while still being easy to replicate. Oh, and if you're a loose crocheter, you should really consider going down a hook size or two, unless you want it to be extra large (I tend to crochet more tightly). 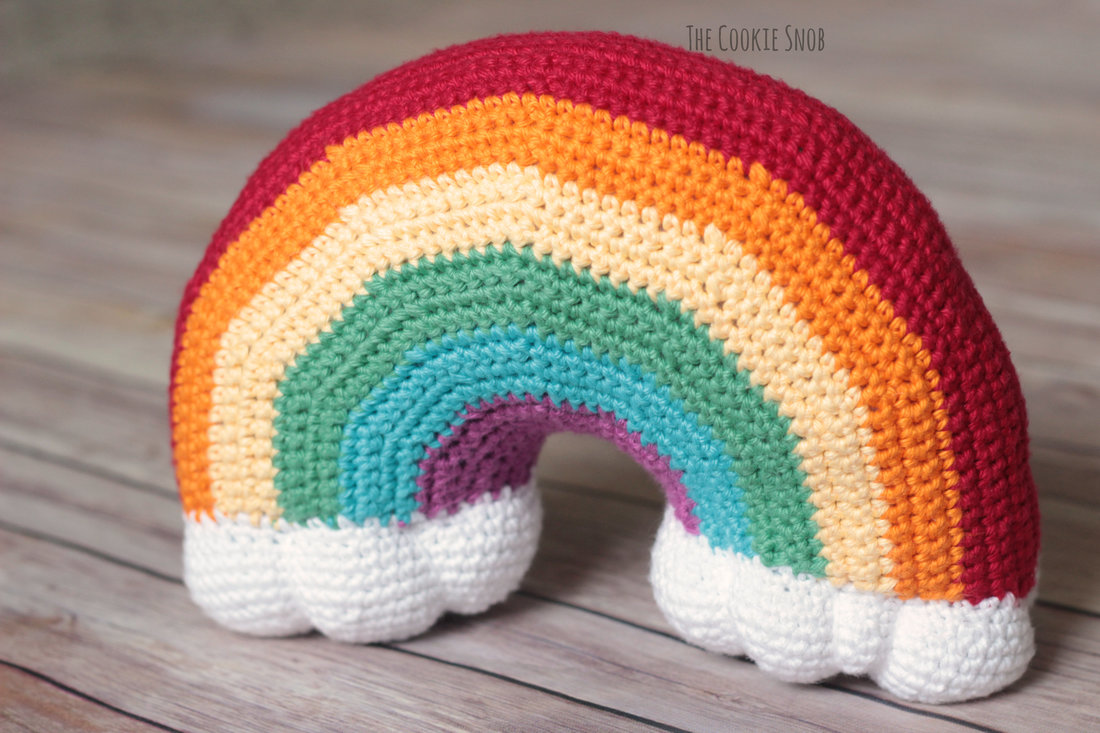 On to the pattern! If you'd like an ad-free printable PDF version, you can find one on Ravelry. Stitch Glossary: st(s) = stitch(es) ch = chain ss = slip stitch sc = single crochet inc = sc increase (work 2 sc into the same st) dec = sc decrease (sc2tog) Materials:
Gauge (for a 10" x 6.5" rainbow): 2" = 11 sc 2" = 10 rows Starting with Hot Orchid: Ch 16 Row 1: sc in the 2nd ch from the hook, sc, inc, sc in the next 2 sts, [sc in the next 2 sts, inc, sc in the next 2 sts] 2 times, turn (18) Row 2: ch 1, [inc, sc in the next 5 sts] 3 times, turn (21) Row 3: ch 1, [sc in the next 3 sts, inc, sc in the next 3 sts] 3 times, turn (24) Row 4: ch 1, [sc in the next 7 sts, inc] 3 times, turn (27) 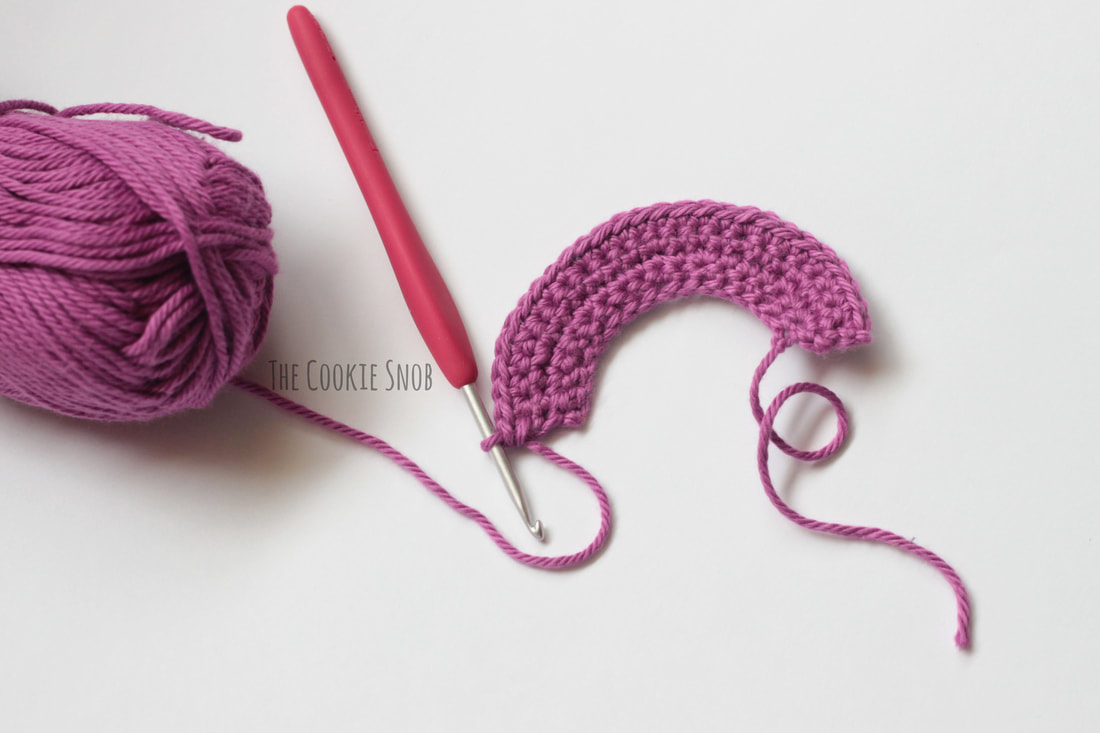 Switch to Turquoise Row 5: ch 1, [sc in the next 4 sts, inc, sc in the next 4 sts] 3 times, turn (30) Row 6: ch 1, [inc, sc in the next 9 sts] 3 times, turn (33) Row 7: ch 1, [sc in the next 5 sts, inc, sc in the next 5 sts] 3 times, turn (36) Row 8: ch 1, [sc in the next 11 sts, inc] 3 times, turn (39) Switch to Apple Green Row 9: ch 1, [sc in the next 6 sts, inc, sc in the next 6 sts] 3 times, turn (42) Row 10: ch 1, [inc, sc in the next 13 sts] 3 times, turn (45) Row 11: ch 1, [sc in the next 7 sts, inc, sc in the next 7 sts] 3 times, turn (48) Row 12: ch 1, [sc in the next 15 sts, inc] 3 times, turn (51) Switch to Banana Row 13: ch 1, [sc in the next 8 sts, inc, sc in the next 8 sts] 3 times, turn (54) Row 14: ch 1, [inc, sc in the next 17 sts] 3 times, turn (57) Row 15: ch 1, [sc in the next 9 sts, inc, sc in the next 9 sts] 3 times, turn (60) Row 16: ch 1, [sc in the next 19 sts, inc] 3 times, turn (63) Switch to Glowing Row 17: ch 1, [sc in the next 10 sts, inc, sc in the next 10 sts] 3 times, turn (66) Row 18: ch 1, [inc, sc in the next 21 sts] 3 times, turn (69) Row 19: ch 1, [sc in the next 11 sts, inc, sc in the next 11 sts] 3 times, turn (72) Row 20: ch 1, [sc in the next 23 sts, inc] 3 times, turn (75) Switch to Red Row 21: ch 1, [sc in the next 12 sts, inc, sc in the next 12 sts] 3 times, turn (78) Row 22: ch 1, [inc, sc in the next 25 sts] 3 times, turn (81) Row 23: ch 1, [sc in the next 13 sts, inc, sc in the next 13 sts] 3 times, turn (84) Row 24: ch 1, [sc in the next 27 sts, inc] 3 times, turn (87) 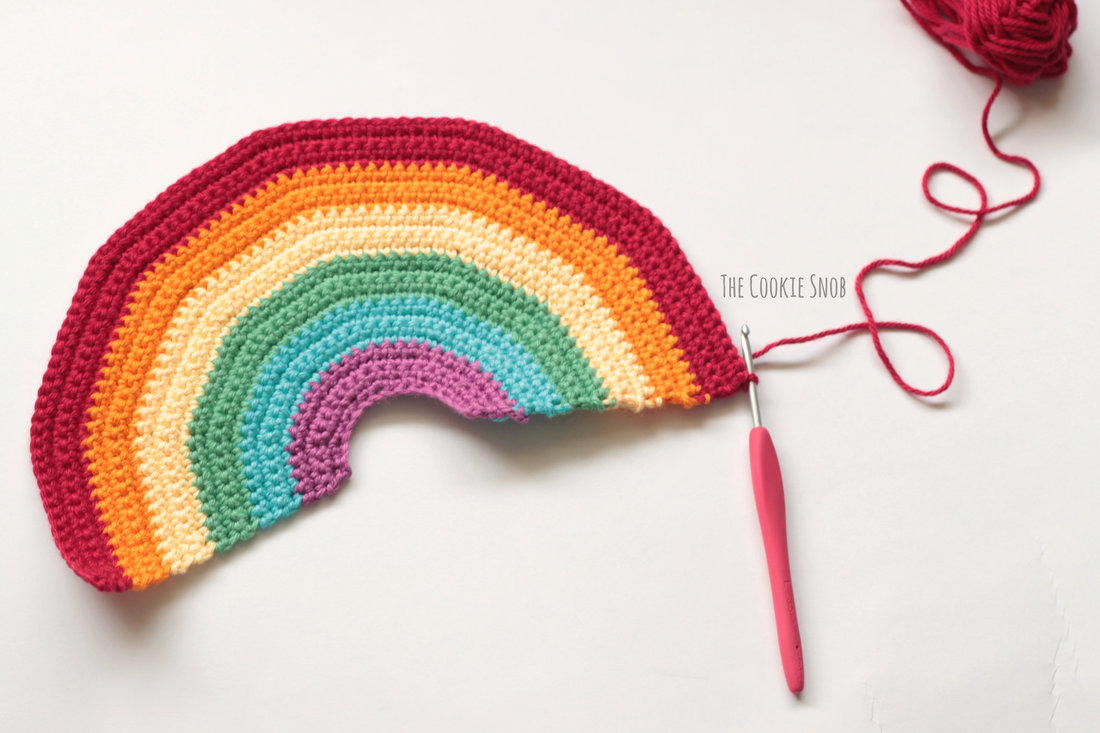 Rows 25-26: ch 1, sc across, turn (87) Row 27: ch 1, [sc in the next 27 sts, dec] 3 times, turn (84) Row 28: ch 1, [sc in the next 13 sts, dec, sc in the next 13 sts] 3 times, turn (81) Row 29: ch 1, [dec, sc in the next 25 sts] 3 times, turn (78) Row 30: ch 1, [sc in the next 12 sts, dec, sc in the next 12 sts] 3 times, turn (75) Switch to Glowing Row 31: ch 1, [sc in the next 23 sts, dec] 3 times, turn (72) Row 32: ch 1, [sc in the next 11 sts, dec, sc in the next 11 sts] 3 times, turn (69) Row 33: ch 1, [dec, sc in the next 21 sts] 3 times, turn (66) Row 34: ch 1, [sc in the next 10 sts, dec, sc in the next 10 sts] 3 times, turn (63) Switch to Banana Row 35: ch 1, [sc in the next 19 sts, dec] 3 times, turn (60) Row 36: ch 1, [sc in the next 9 sts, dec, sc in the next 9 sts] 3 times, turn (57) Row 37: ch 1, [dec, sc in the next 17 sts] 3 times, turn (54) Row 38: ch 1, [sc in the next 8 sts, dec, sc in the next 8 sts] 3 times, turn (51) Switch to Apple Green Row 39: ch 1, [sc in the next 15 sts, dec] 3 times, turn (48) Row 40: ch 1, [sc in the next 7 sts, dec, sc in the next 7 sts] 3 times, turn (45) Row 41: ch 1, [dec, sc in the next 13 sts] 3 times, turn (42) Row 42: ch 1, [sc in the next 6 sts, dec, sc in the next 6 sts] 3 times, turn (39) Switch to Turquoise Row 43: ch 1, [sc in the next 11 sts, dec] 3 times, turn (36) Row 44: ch 1, [sc in the next 5 sts, dec, sc in the next 5 sts] 3 times, turn (33) Row 45: ch 1, [dec, sc in the next 9 sts] 3 times, turn (30) Row 46: ch 1, [sc in the next 4 sts, dec, sc in the next 4 sts] 3 times, turn (27) Switch to Hot Orchid Row 47: ch 1, [sc in the next 7 sts, dec] 3 times, turn (24) Row 48: ch 1, [sc in the next 3 sts, dec, sc in the next 3 sts] 3 times, turn (21) Row 49: ch 1, [dec, sc in the next 5 sts] 3 times, turn (18) Row 50: ch 1, [sc in the next 2 sts, dec, sc in the next 2 sts] 3 times, turn (15) Rows 51-52: ch 1, sc around, turn (15) Fasten off, leaving a long yarn tail for sewing. 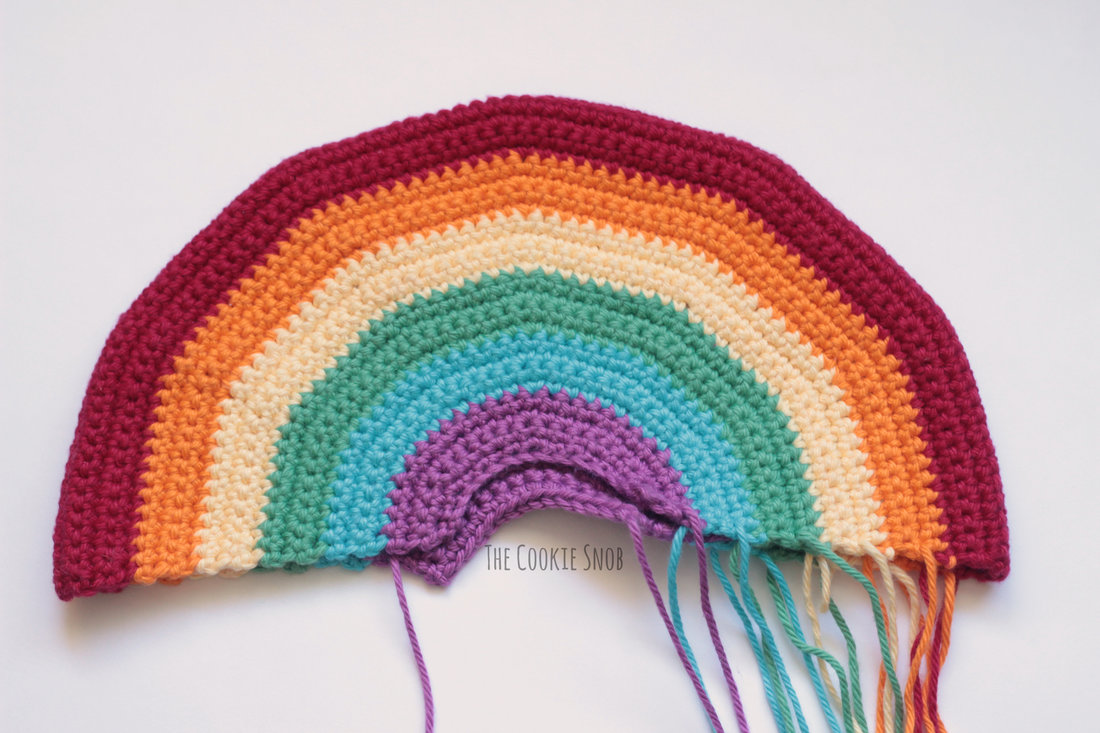 If you'd like to add a face to your rainbow, now is a perfect time to pause and do so. I placed 6 mm safety eyes about 8 sts apart, right where the blue and green stripes touch. Then I stitched a small smile in between. But feel free to personalize it with whatever expression/placement you'd like. 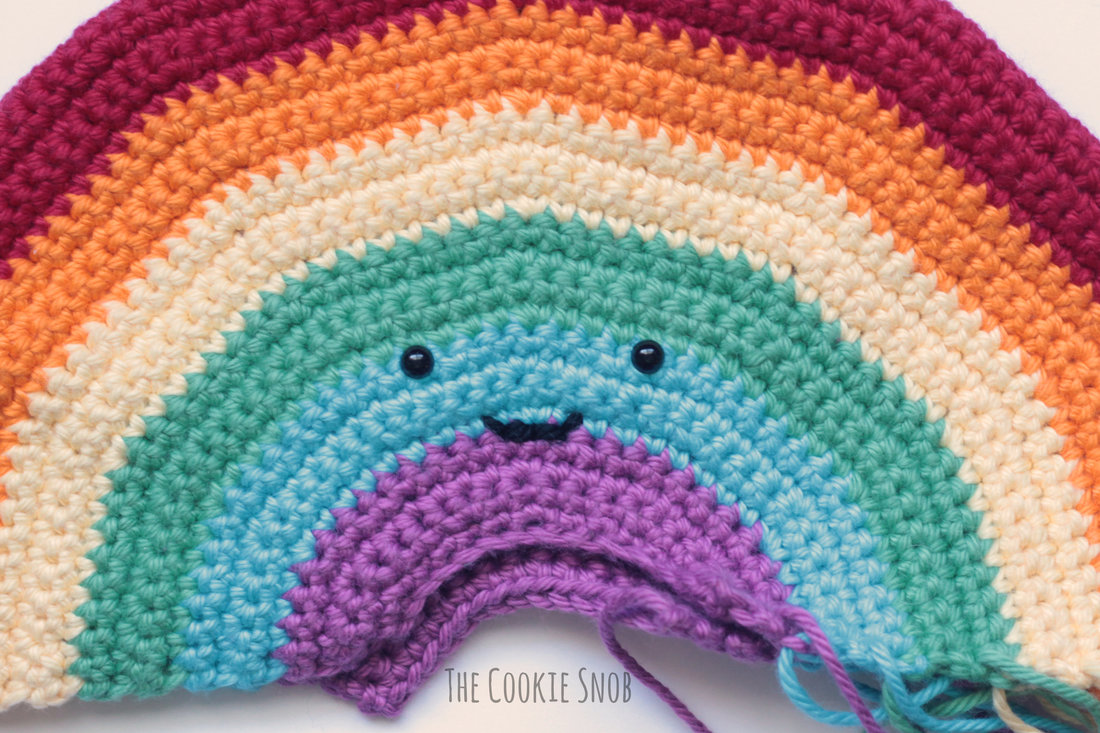 Now it's time to sew the bottom of the rainbow together. Using the tapestry needle and the long yarn tail, sew the bottom of the purple edges together (don't sew the sides of the purple stripe together). 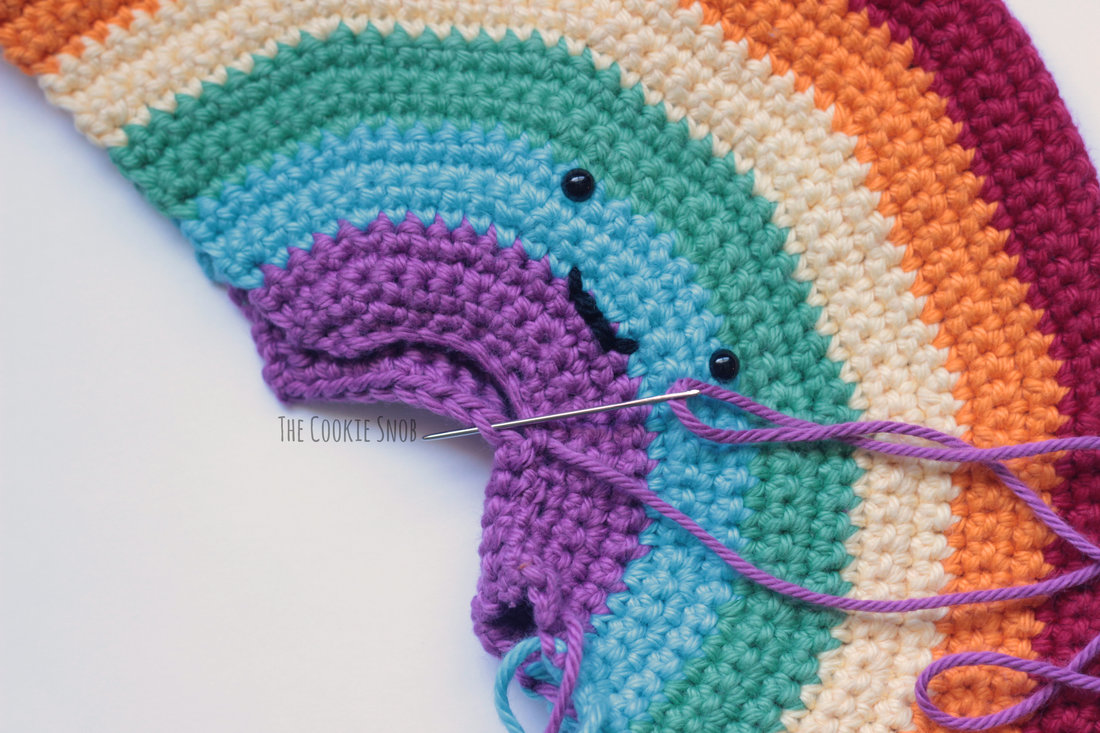 Let's take a look at the clouds now. Using White: Round 1: Work 48 sc evenly around one open end of the rainbow, ss to join (48) 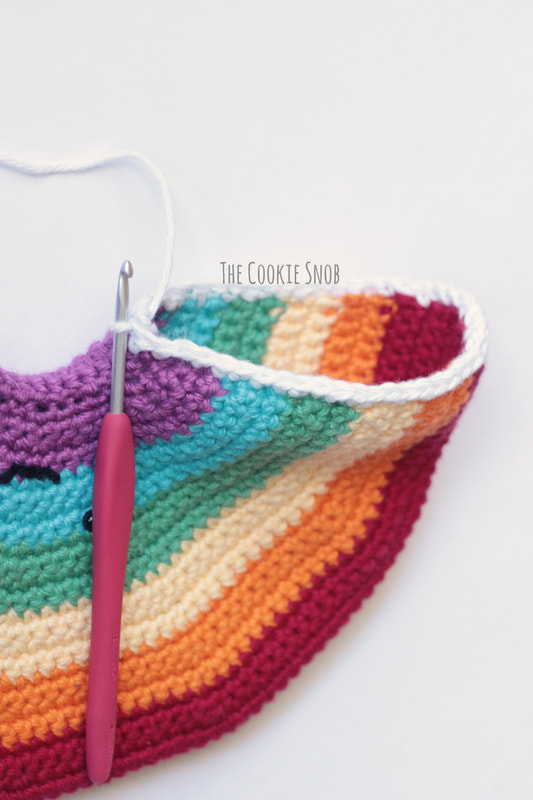 Round 2: ch 1, [inc, sc in the next 7 sts] around, ss to join (54) Round 3: ch 1, [sc in the next 4 sts, inc, sc in the next 4 sts] around, ss to join (60) Round 4: ch 1, [inc, sc in the next 9 sts] around, ss to join (66) Rounds 5-6: ch 1, sc around, ss to join (66) Round 7: ch 1, [dec, sc in the next 9 sts] around, ss to join (60) Round 8: ch 1, [sc in the next 4 sts, dec, sc in the next 4 sts] around, ss to join (54) Round 9: ch 1, [dec, sc in the next 7 sts] around, ss to join (48) Round 10: ch 1, [sc in the next 3 sts, dec, sc in the next 3 sts] around, ss to join (42) Round 11: ch 1, [dec, sc in the next 5 sts] around, ss to join (36) Round 12: ch 1, [sc in the next 2 sts, dec, sc in the next 2 sts] around, ss to join (30) Round 13: ch 1, [dec, sc in the next 3 sts] around, ss to join (24) Begin stuffing. Continue to stuff as you go. Round 14: ch 1, [sc, dec, sc] around, ss to join (18) Round 15: ch 1, [dec, sc] around, ss to join (12) Round 16: ch 1, dec around, ss to join (6) Finish stuffing; be sure to stuff the cloud firmly. Fasten off, leaving an extra long yarn tail (I recommend at least 36" so that you have plenty to work with). Using the tapestry needle, thread the yarn tail through the front loops only of the remaining 6 sts and pull taut to close the circle. Then insert the needle through the center of the circle you just closed. . . 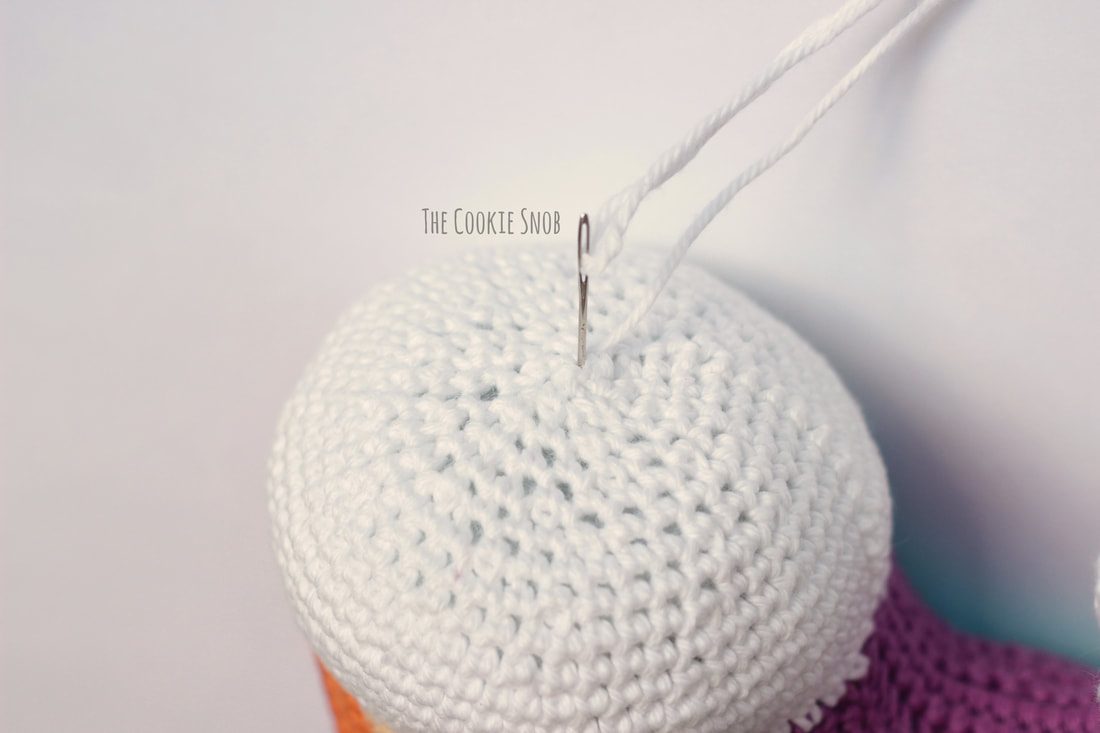 . . .and back out through the bottom of Round 1 (indicated by an arrow below). Pull the yarn all the way through . . . 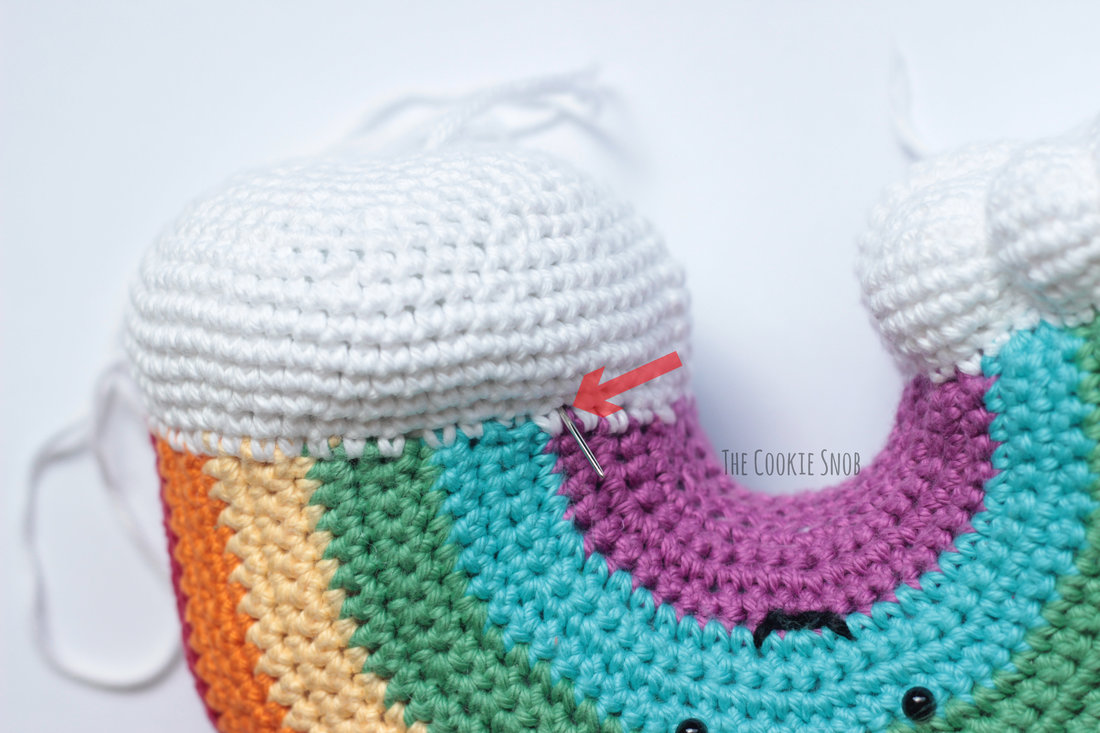 . . . and then put the needle back into the same spot at the center of the cloud . . . 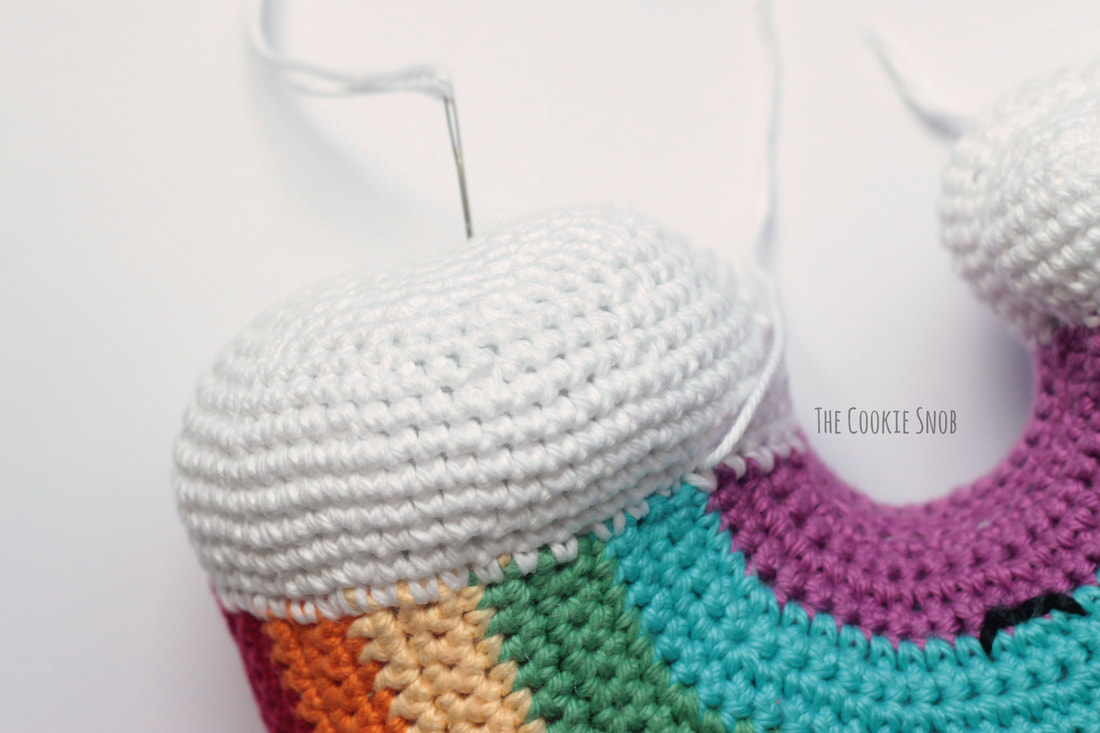 . . . and back out through a different spot at the bottom of round 1. Pull the yarn all the way through and pull taut. This will create the first indentation to help shape the cloud.  Repeat this process (inserting the needle though the center of the cloud and pulling it back out at a different spot at the bottom of round 1) around the cloud. You can choose whether or not you want to make each indentation evenly spaced. I decided that I wanted mine to be uneven, so I made some indentations closer together and other further apart. Once you have all the indentations you want, tie off the yarn tail and weave in any ends. Repeat for the second opening of the rainbow, being sure to stuff as you go.  And there you have it! A cuddly, friendly rainbow pal. I hope that you enjoy this pattern and that it brings a little bit of extra hope to your day. If you like the pattern or just want to support my blog, you can find an ad-free printable PDF version on Ravelry. And, as always, if you have any questions or comments about this pattern, you can reach me on social media or in the comments section below. Happy hooking! Want to make sure you don't miss any future blog posts? Join my mailing list: 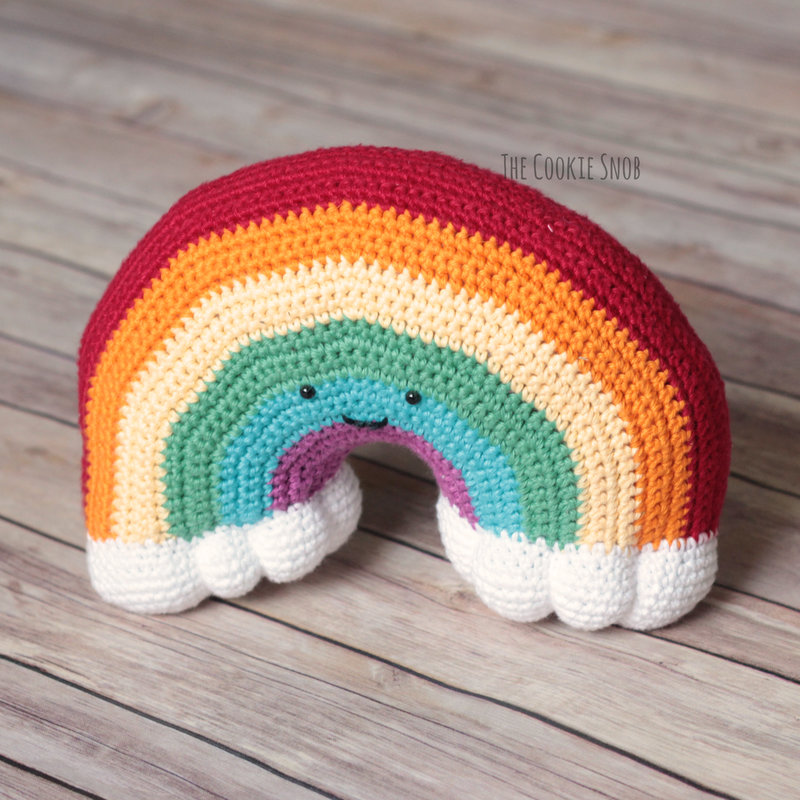 ***You're welcome to do whatever you'd like to with finished products made from this pattern but if you do sell them, I ask that you link back to my page. You may not copy this pattern, repost it anywhere (either altered or in its original form), or claim it as your own. You may not use any photos on this site for your own use. ***
27 Comments
Hazel F.
7/6/2018 06:06:53 am
This is so cute. I really like this and can’t wait to make this. Thank you.
Goh Helen
7/6/2018 06:53:11 am
I love the huggy rainbow cushion hopely to made one also😘🌈
Hulene W
7/12/2018 02:01:31 pm
Thank you so much for this pattern. It is perfect for my son. He lost his partner in a horrible car accident. They both loved rainbows and the colors you used are great
Erin
7/13/2018 02:51:45 pm
I am so sorry to hear about your son's loss. That is absolutely devastating for everyone involved and I sincerely hope that your son, Jason's family, and your family find the healing you all need to get through this tragedy.
Catherine Chong
3/23/2019 11:50:20 pm
This is super cute 😍😍thanks for sharing .. So wanna make one now 😊
Liron
9/20/2019 02:53:37 am
Thank you so much for this wonderful pattern! I made 2 for my daughter, she had an idea to add a bow ribbon on one of them, and a black brimmed hat on the other :-)
Erin
9/20/2019 01:58:25 pm
That sounds amazing! What a great idea! I would love to see a picture of your cute decorated rainbows.
Liron
9/20/2019 03:12:53 pm
Hi! Would love to show you, so glad you like the idea! I can’t see how to attach a picture here, so I shared a picture with credit to you in the comments to Sharon Ojala’s post in Facebook: https://www.facebook.com/216298378388952/posts/2733163360035762?sfns=mo
Erin
9/20/2019 06:27:11 pm
Oh, they're so adorable! I think mine might need a top hat now haha. Thanks for sharing! 3/22/2020 10:48:06 am
In questo periodo terribile che stiamo vivendo, è un simbolo di speranza.
Marina Burgess
3/29/2020 02:52:20 am
Thank you very much for your pattern 💙
Grace
4/7/2020 09:46:54 pm
I got the most precious request from a six year old. She wanted a rainbow so that she can jump over it. I’m so grateful for this pattern. Thank you.
donna mccarthy
4/18/2020 05:12:31 pm
I really enjoyed this pattern its the best shaped rainbow I have seen. Cant wait to give it to my Grandson now thank you so much.
Janny
7/4/2020 07:13:34 am
Very very nice. I am make it for my granddaughter.
Tilly
9/14/2020 12:35:13 pm
Hi Chiwei!
Erin
9/25/2020 10:44:38 pm
Hi Tilly! It's definitely possible; I've actually designed a mini version of this rainbow, but just haven't had a chance to post it on the blog yet. Basically, you would follow the same sort of increase/decrease pattern and construction, but use fewer stitches. Each color would have fewer rows and thus be less wide. Hopefully that makes some sort of sense. I'll make a mental note to add the mini rainbow back to my blog post queue.
Silvia
12/12/2020 03:53:07 pm
hi! I absolutely adore this and plan on making it soon. I was wondering, if i only want the rainbow to show on one side and have the other be all white... once the decreasing starts i just switch to white? and then stay with that until the end. thanks in advance!
Erin
12/13/2020 09:58:50 am
Hi! Yes, that will work! Just switch to white and ignore the color changes. Then the front will have the colored stripes and the back will be all white.
Dannielle
2/14/2021 02:55:55 am
What size is this approx? Also, is there a reason why we use a small hook? i started on the purple and with that hook the first purple is only about 3-4 inches long. Would using the recommended hook size make it bigger (6mm)?
Erin
2/15/2021 11:47:08 am
Hi Dannielle,
sn
6/30/2021 04:02:06 am
hi! love this easy to follow pattern. what should i do if i want mine a bit bigger in size
Erin
7/26/2021 04:13:33 pm
Hi! I'm glad you like the pattern! If you want it to be larger, you can either use a thicker weight yarn and a larger hook, or you can make each section of the rainbow bigger by continuing to follow the increase pattern until it's the size you want, then use the decrease pattern on the other side.
Hanna Vu
7/9/2021 04:46:53 am
I really love this pattern. I made 3 of them :3!! Thank you so much for sharing this!
Sanne
1/18/2022 07:06:29 am
Thank you so much for this lovely pattern. I’ve made one already for my daughter who just turned 1. She loves it. I am now working on a bigger size for in her room and figured out how to adapt the pattern. In the end I have 77 rows (made each color 6 rows instead of 4). But now I would like to start with the clouds but I can’t figure out how to adapt the pattern. 🙈. What should I do? A lot of thanks in advance.
Erin
1/20/2022 11:04:13 am
Great question! If you increase the size of the rainbow, you'll also need to increase the size of the clouds to keep everything in proportion. It's hard to say off the top of my head how many sts exactly you'll need, but you'll want to work more sts into the first row of the cloud. So instead of starting with 48 sts, you'd start with 66 sts (again, just spitballing the number). Then increase using the same type of pattern (adding 6 inc evenly across each round) until it's the size you want. Work a few rows without increasing, then just decrease evenly and finish off as written. Hopefully that makes sense. Let me know if you have more questions! And good luck!
Sanne
2/25/2022 04:51:25 pm
Thank you so much for your reply! It turned out really nice! It’s like a mother rainbow with her baby 🥰 Leave a Reply. |
Welcome!Thank you for stopping by to visit my own personal corner of the web! Feel free to take a look around and check out what I've been crafting, crocheting, or baking. Hopefully you'll find something to inspire your own creativity!   
Archives
March 2024
|
 RSS Feed