
|
I don't know about you, but I am counting down the days until it's officially fall this year. It has a been a long, hot summer, and I'm dreaming of cooler weather, fall baking, and cozy yarn. So even though it's a little early, I couldn't resist crocheting up a little bit of fall with this fun oversized mushroom throw pillow. This squishy mushroom is a fun addition to the couch, or you could use it for your fall decor anywhere you'd like, or you can just make a giant mushroom to hug! Whatever you choose to do with it, this is a super fun pattern to add a little bit of whimsy to your day. 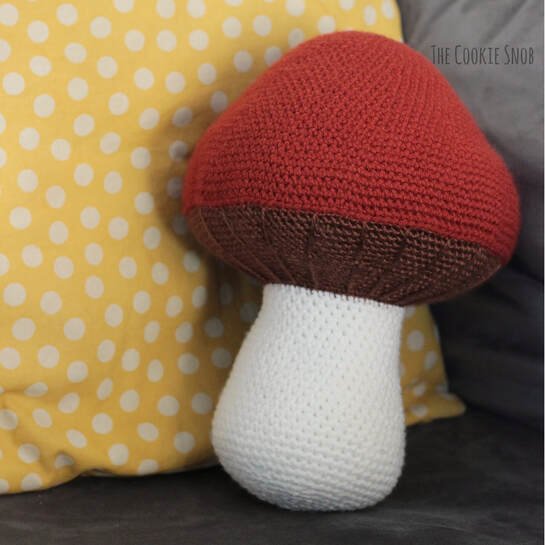 My older kids were insistent that this mushroom needed to have spots, but I decided that I preferred the solid look. If you're in the "mushrooms need spots" camp (my Mario-loving-children will applaud you), you could definitely add some. The easiest option would be to cut some felt or fabric spots and then sew them onto the mushroom cap, or you can crochet circles of different sizes and stitch them on with the yarn tails. Whether you decide to add spots or leave it spotless, I think this big mushroom is a winner. 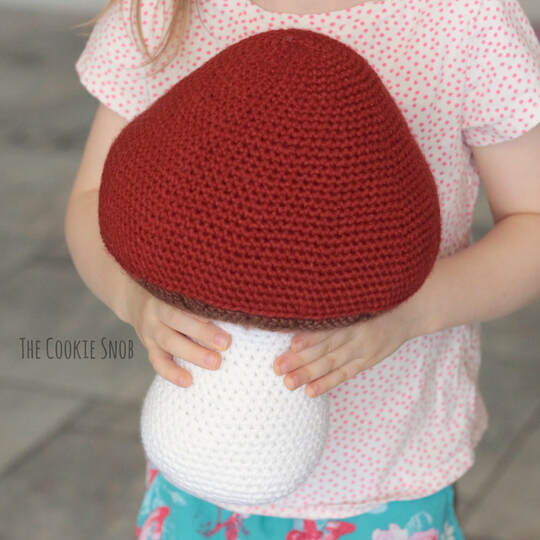 If you're interested in an ad-free printable PDF version of this pattern, you can find one on Ravelry. (And a special thank you to everyone who supports my blog and keeps it running!) Stitch Glossary: st(s) = stitch(es) ch = chain ss = slip stitch sc = single crochet inc = sc increase (work 2 sc into the same st) dec = sc decrease (I prefer to use an invisible decrease st) BLO = back loop only FLO = front loop only Materials:
Gauge: 2” = 9 sc sts, 2” = 10 rows Finished mushroom is about 13" tall Gauge isn't crucial for this project as long as your stitches are tight enough to keep in the stuffing. I tend to crochet tightly, so if you're a looser crocheter, I recommend sizing down a hook. Note: This pattern is worked in continuous rounds without joining. I recommend using a stitch marker and moving it after each round to help you keep your place. Mushroom: Starting with the Terra Cotta yarn: Round 1: Make a magic circle and work 6 sc into the circle (6) Round 2: inc 6 times (12) Round 3: [inc, sc] 6 times (18) Round 4: [sc, inc, sc] 6 times (24) Round 5: [sc in the next 3 sts, inc] 6 times (30) Round 6: [sc in the next 2 sts, inc, sc in the next 2 sts] 6 times (36) Round 7: [sc in the next 5 sts, inc] 6 times (42) Round 8: sc around (42) Round 9: [sc in the next 3 sts, inc, sc in the next 3 sts] 6 times (48) Round 10: sc around (48) Round 11: [sc in the next 7 sts, inc] 6 times (54) Round 12: sc around (54) Round 13: [sc in the next 4 sts, inc, sc in the next 4 sts] 6 times (60) Round 14: sc around (60) Round 15: [sc in the next 9 sts, inc] 6 times (66) Round 16: sc around (66) Round 17: [sc in the next 5 sts, inc, sc in the next 5 sts] 6 times (72) Round 18: sc around (72) Round 19: [sc in the next 11 sts, inc] 6 times (78) Round 20: sc around (78) Round 21: [sc in the next 6 sts, inc, sc in the next 6 sts] 6 times (84) Round 22: [sc in the next 13 sts, inc] 6 times (90) Round 23: sc around (90) Round 24: [sc in the next 7 sts, inc, sc in the next 7 sts] 6 times (96) Round 25: [sc in the next 15 sts, inc] 6 times (102) Round 26: sc around (102) Round 27: [sc in the next 8 sts, inc, sc in the next 8 sts] 6 times (108) Round 28: [sc in the next 17 sts, inc] 6 times (114) Round 29: sc around (114) Round 30: [sc in the next 9 sts, inc, sc in the next 9 sts] 6 times (120) Round 31: [sc in the next 19 sts, inc] 6 times (126) Rounds 32-34: sc around (126) Round 35: [sc in the next 19 sts, dec] 6 times (120) Round 36: [sc in the next 9 sts, dec, sc in the next 9 sts] 6 times (114)  Switch to the Cocoa yarn: Round 37: sc around in BLO (114) Round 38: [sc in the next 17 sts, dec] 6 times (108) Round 39: [sc in the next 8 sts, dec, sc in the next 8 sts] 6 times (102) Round 40: [sc in the next 15 sts, dec] 6 times (96) Round 41: [sc in the next 7 sts, dec, sc in the next 7 sts] 6 times (90) Round 42: [sc in the next 13 sts, dec] 6 times (84) Round 43: [sc in the next 6 sts, dec, sc in the next 6 sts] 6 times (78) Round 44: [sc in the next 11 sts, dec] 6 times (72) Round 45: [sc in the next 5 sts, dec, sc in the next 5 sts] 6 times (66) Round 46: [sc in the next 9 sts, dec] 6 times (60) Round 47: [sc in the next 4 sts, dec, sc in the next 4 sts] 6 times (54) Round 48: [sc in the next 7 sts, dec] 6 times (48) Round 49: [sc in next 3 sts, dec, sc in the next 3 sts] 6 times (42) Round 50: [sc in the next 5 sts, dec] 6 times (36) 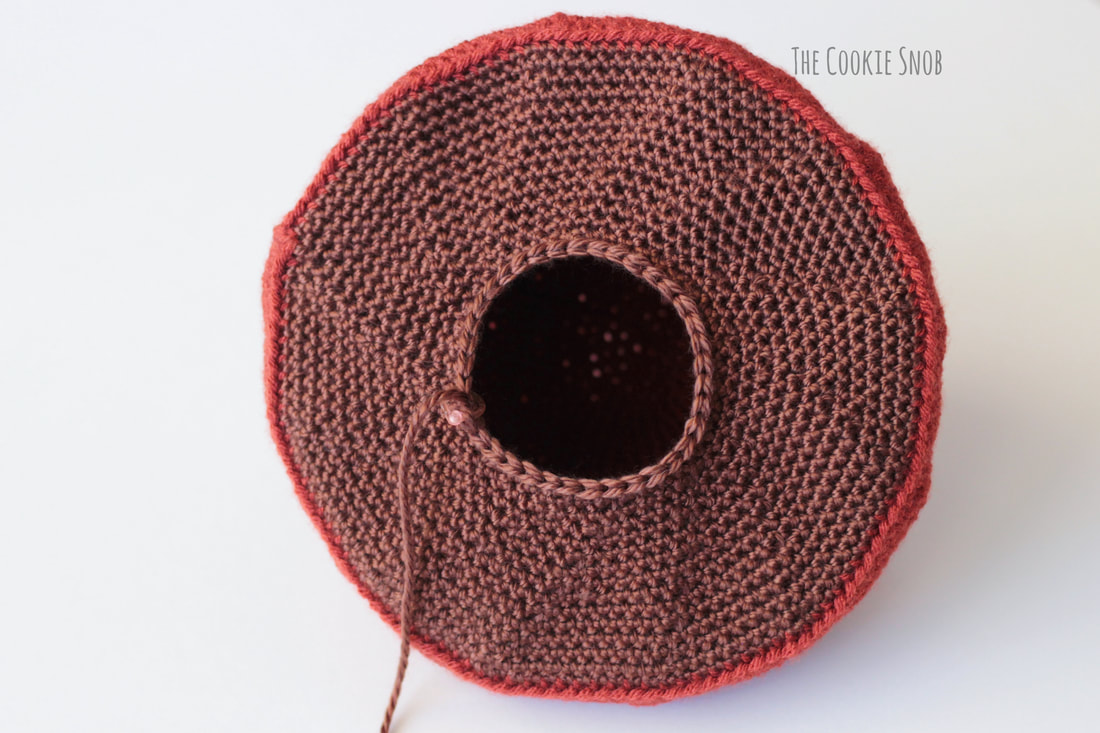 If you'd like add some decorative "gills" to your mushroom, you can pause here and use long pieces of the same Cocoa yarn to stitch them on. Because it's large and I didn't want the long bits of yarn to be pulling loose, I first stitched the gills from the center to the edge of the cap, all the way around, then used the same yarn to make tiny stitches in the middle of each gill to hold it in place. It puckers slightly in the center, but if your stitches are small it's not very noticeable and it keeps the yarn from snagging on things as much. Stuff the mushroom cap and continue to stuff as you go. 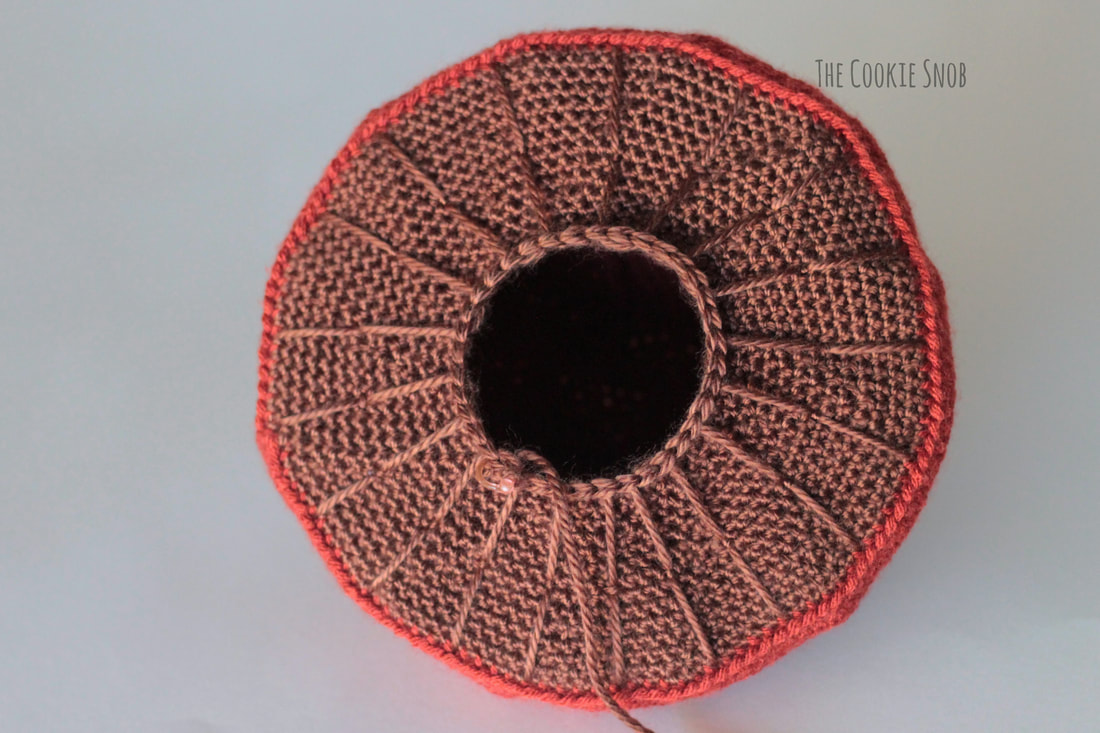 Switch to the White yarn: Round 51: sc around in FLO (36) Rounds 52-54: sc around (36) Round 55: [sc in the next 17 sts, inc] 2 times (38) Round 56: sc around (38) Round 57: [sc in the next 9 sts, inc, sc in the next 9 sts] 2 times (40) Round 58: sc around (40) Round 59: [sc in the next 19 sts, inc] 2 times (42) Round 60: sc around (42) Round 61: [sc in the next 10 sts, inc, sc in the next 10 sts] 2 times (44) Round 62: sc around (44) Round 63: [sc in the next 21 sts, inc] 2 times (46) Round 64: sc around (46) Round 65: [sc in the next 11 sts, inc, sc in the next 11 sts] 2 times (48) Round 66: sc around (48) Round 67: [sc in the next 23 sts, inc] 2 times (50) Round 68: sc around (50) Round 69: [sc in the next 12 sts, inc, sc in the next 12 sts] 2 times (52) Round 70: sc around (52) Round 71: [sc in the next 25 sts, inc] 2 times (54) Round 72: sc around (54) Remember to continue to stuff as you go Round 73: [sc in the next 7 sts, dec] 6 times (48) Round 74: [sc in the next 3 sts, dec, sc in the next 3 sts] 6 times (42) Round 75: [sc in the next 5 sts, dec] 6 times (36) Round 76: [sc in the next 2 sts, dec, sc in the next 2 sts] 6 times (30) Round 77: [sc in the next 3 sts, dec] 6 times (24) Round 78: [sc, dec, sc] 6 times (18) Round 79: [sc, dec] 6 times (12) Round 80: dec 6 times (6) Fasten off, leaving a yarn tail. Finish stuffing. Using a tapestry needle, thread the yarn tail through the front loops of the last round and pull taut to close. Weave in ends. 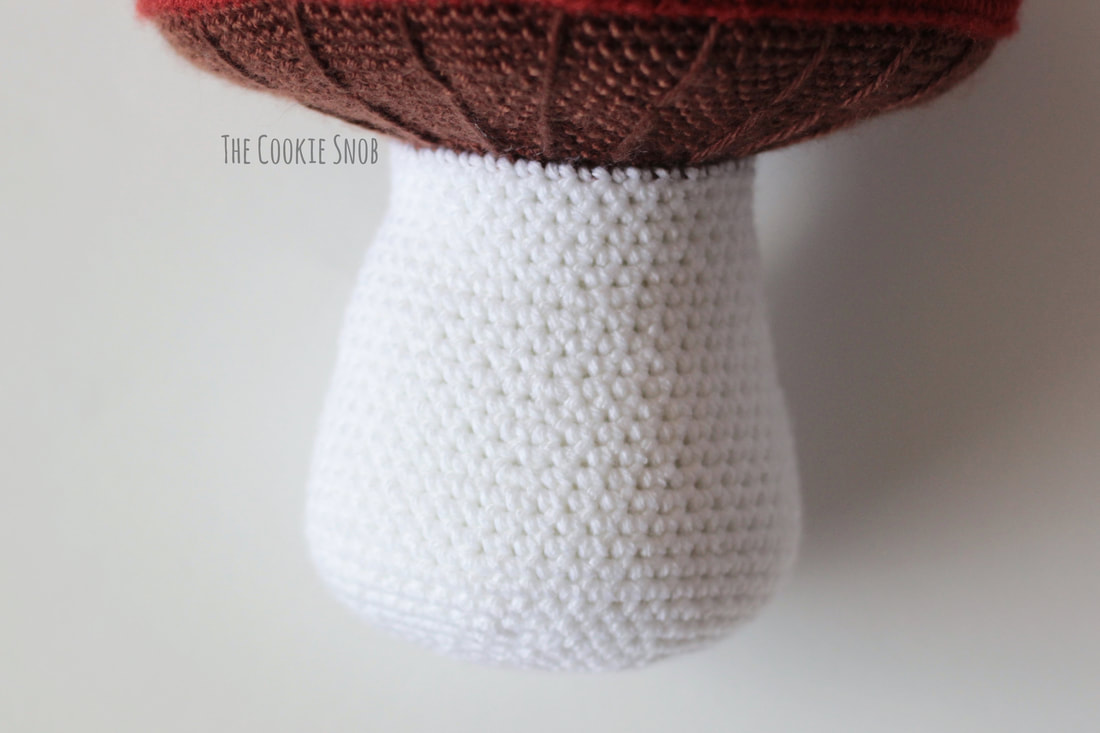 Great job! I hope that you enjoy your new cuddly mushroom throw pillow! I would love to hear about how it turns out, so feel free to get in touch or tag me in a picture. I always LOVE to see your projects! And, as always, if you have any comments or questions, you can reach me in the comments section below, by email, or on social media and I'll get back to you as soon as I can. Happy hooking! Want to make sure you don't miss any future blog posts? Join my mailing list! (Spam-free, I promise!) 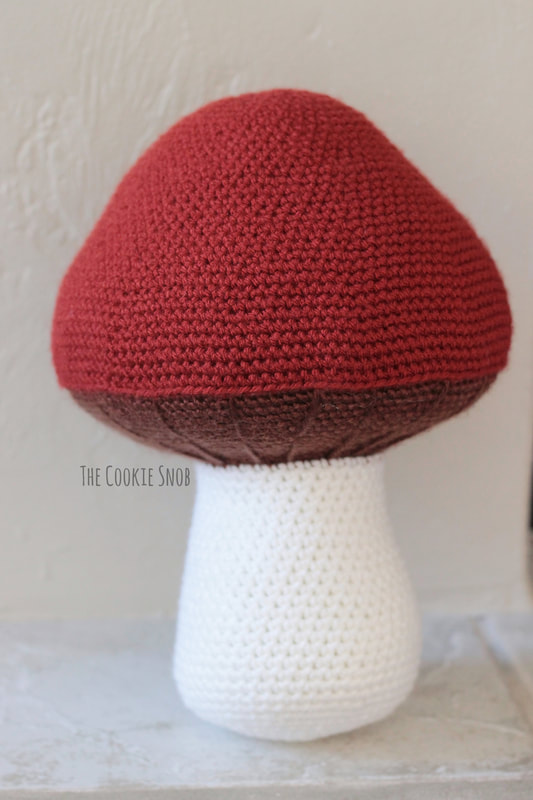 ***You're welcome to do whatever you'd like to with finished products made from this pattern but if you do sell them, I ask that you link back to my page. You may not copy this pattern, repost it anywhere (either altered or in its original form), or claim it as your own. You may not use any photos on this site for your own use. ***
0 Comments
Leave a Reply. |
Welcome!Thank you for stopping by to visit my own personal corner of the web! Feel free to take a look around and check out what I've been crafting, crocheting, or baking. Hopefully you'll find something to inspire your own creativity!   
Archives
March 2024
|
 RSS Feed