
|
I'm all about crochet shortcuts. A way to avoid joining pieces? Sign me up! Not having to weave in ends? Aaaaall over it. So when I took a look at my shark bag pattern and realized that it was only a few tweaks away from a mermaid tail, I couldn't resist. 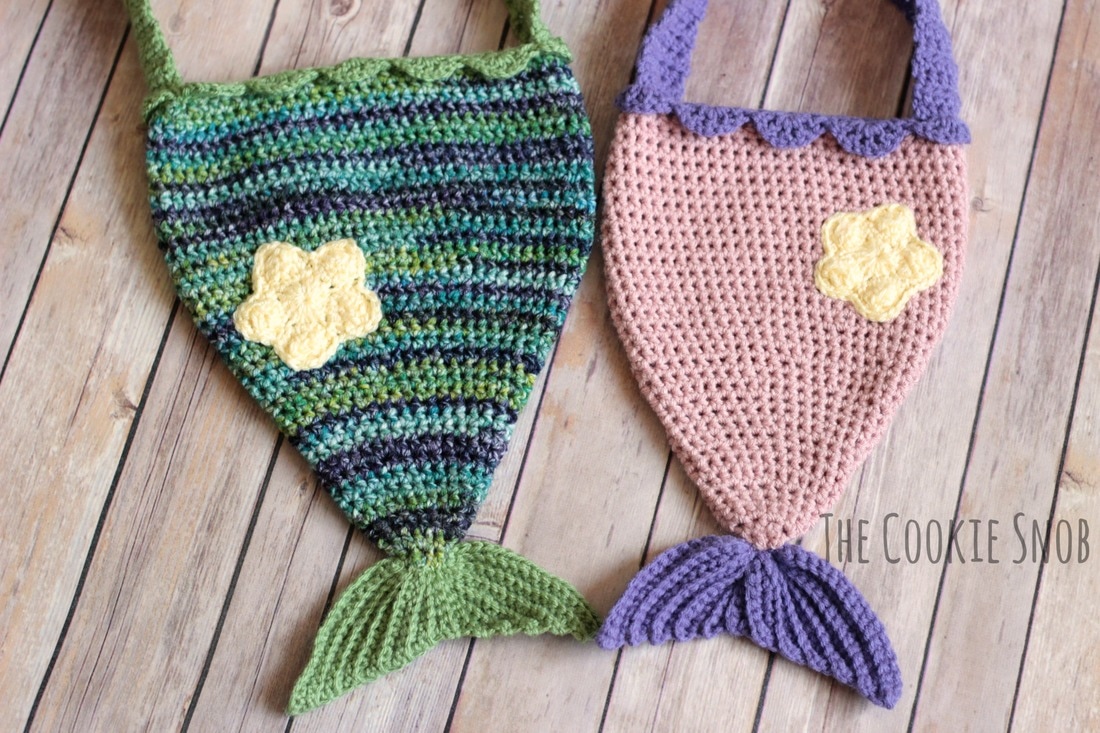 This fun bag is written in both child and adult sizes. I designed the straps for this bag to be more of a purse style, but if you'd like to make it into a cross body bag instead, you can reference the shark bag pattern, since the basic dimensions of the bag are the same. The pictures for this tutorial feature the child sized bag (the pink tail), but the construction techniques are the same for the adult sized bag (the blue/green tail) as well. The child instructions are written out first (illustrated with pictures), followed by the adult instructions. If you'd like a printer-friendly PDF version of this pattern (or if you just want to help support my blog), you can find one on Ravelry. 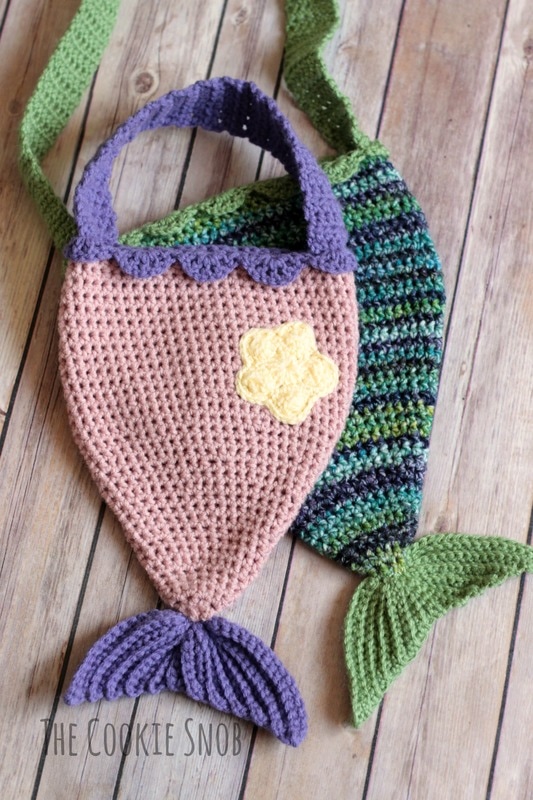 Child Size Materials:
st(s) = stitch(es) ss = slip stitch sc = single crochet inc = work 2 sc in the same st dec = single crochet decrease hdc = half double crochet hdc inc = work 2 hdc in the same st dc = double crochet dc3tog = double crochet 3 together (decrease across 3 dc) Body: This section begins in the round (in a continuous spiral without turning or joining) in order to avoid a visible seam. I recommend using a stitch marker to help keep your place. Begin with the size I (5.5mm) crochet hook. Round 1: Make a magic circle, ch 2, and work 8 hdc into the circle (8) Round 2: hdc around (8) Round 3: hdc inc around (16) Rounds 4-5: hdc around (16) Round 6: [hdc inc, hdc in the next st] around (24) Rounds 7-9: hdc around (24) Round 10: [hdc inc, hdc in the next 2 sts] around (32) Rounds 11-13: hdc around (32) Round 14: [hdc inc, hdc in next 3 sts] around (40) Rounds 15-16: hdc around (40) Round 17: [hdc inc, hdc in next 4 sts] around (48) Rounds 18-19: hdc around (48) Round 20: [hdc inc, hdc in next 5 sts] around (56) Rounds 21-34: hdc around (56) Sc then ss to even off the round. 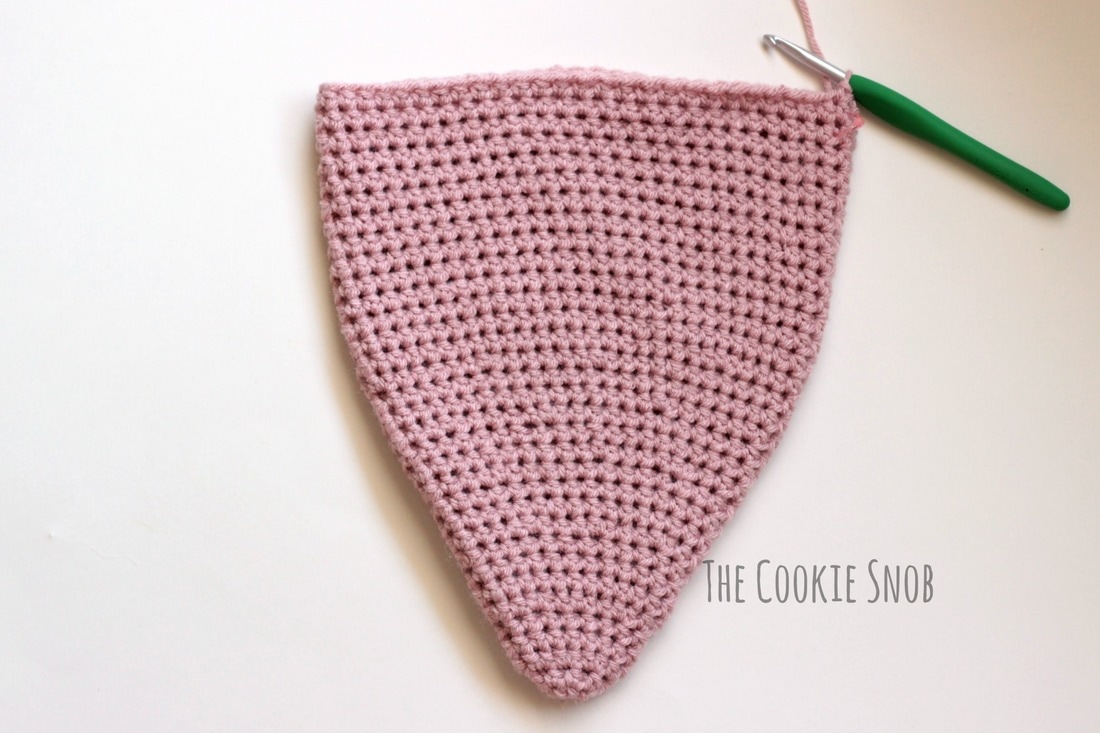 Switch to the contrasting color. Round 35: ch 1, dec, sc until the end of the round, ss to join (55) 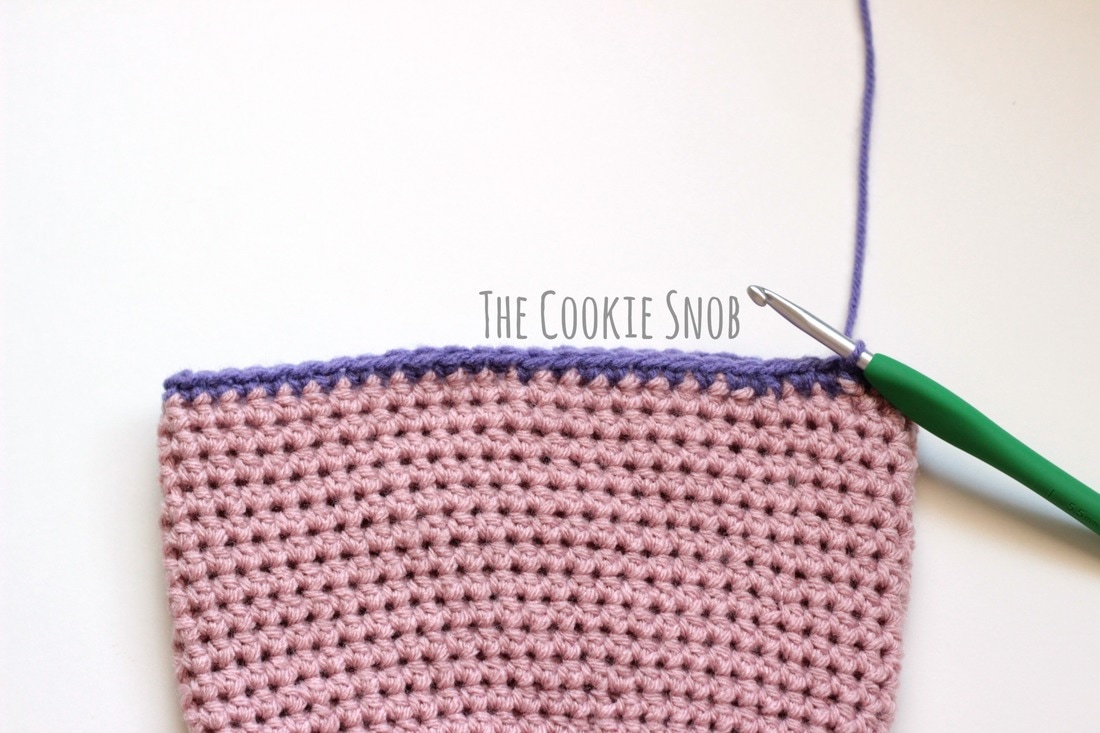 Round 36: Working in the front loop only, ss, [skip next 2 sts, work dc, ch 1, dc, ch 1, dc, ch 1, dc, ch 1, dc in the next st, skip next 2 sts, ss in next st] around, ss to join 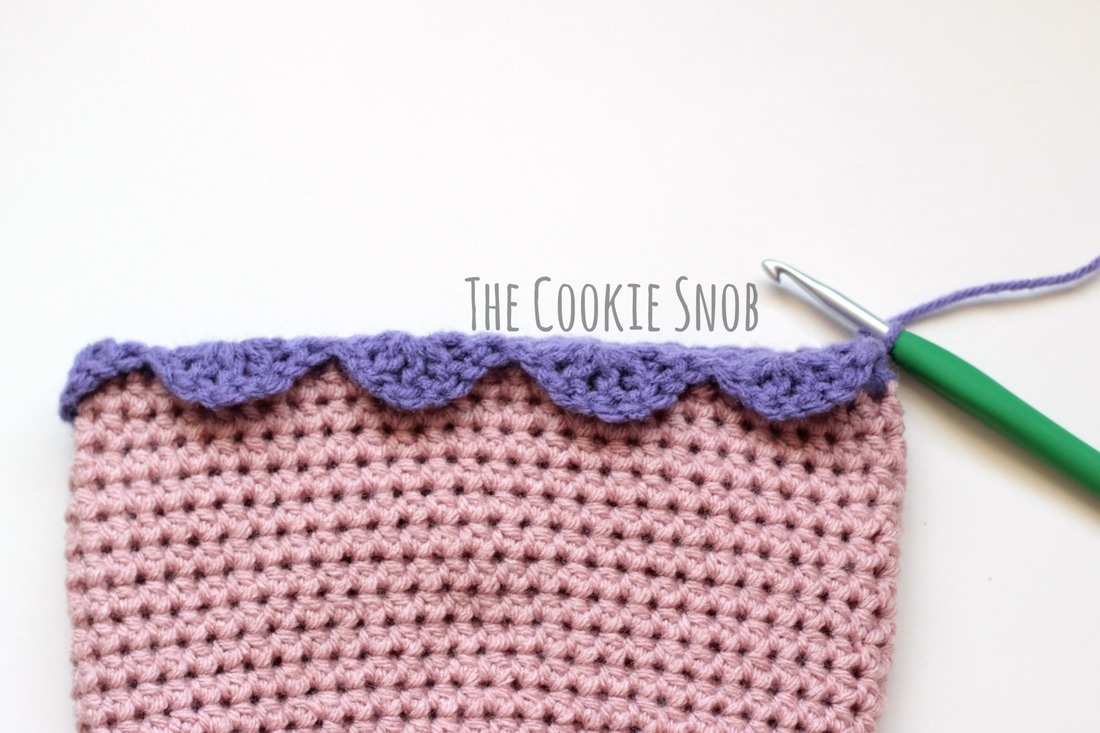 Round 37: ch 2, working in unused back loops from the previous round, hdc in the next 6 sts, turn (6) Rounds 38-70: ch 2, hdc across, turn (6) *Note: I designed the strap length to fit my small toddler. You may want to make the strap longer for an older child* Fasten off, leaving a long yarn tail for sewing. Using a tapestry needle and the yarn tail, stitch the end of the strap to the opposite side of the bag. 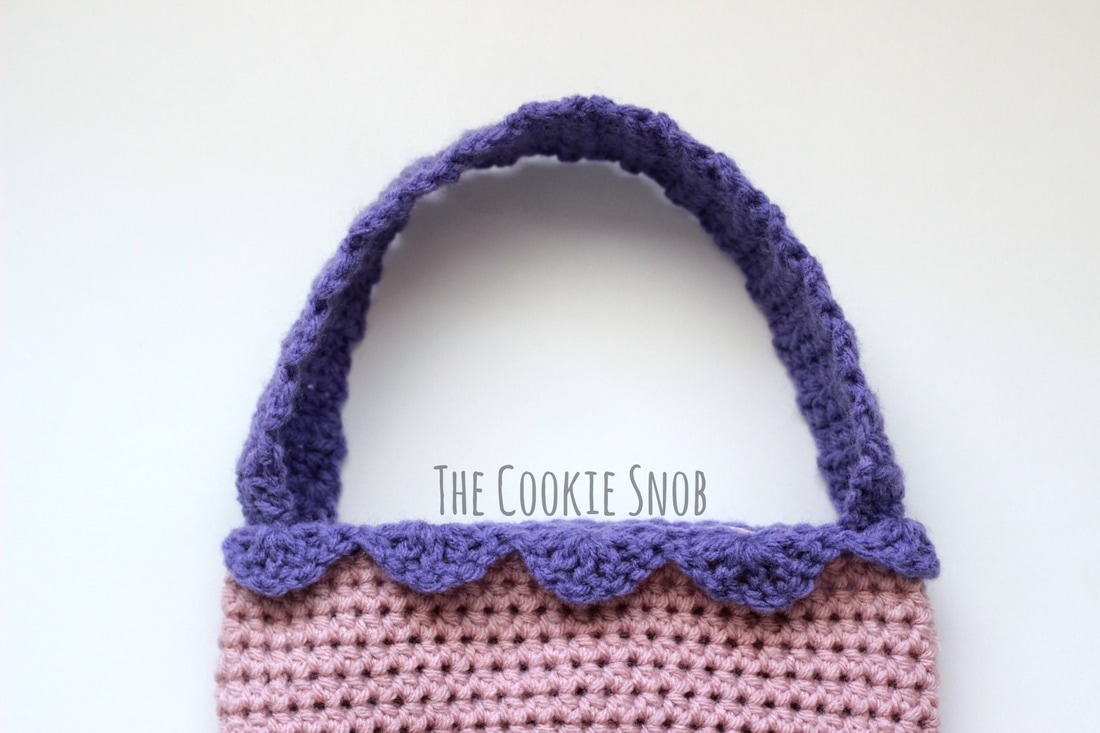 Fin: Each row in this section is worked in the back loops only to create a ridged look. Using the size I (5.5mm) crochet hook: ch 17 Row 1: sc in the 2nd ch from the hook and in each st across, turn (16) Row 2: ch 1, sc 14, dec, turn (15) Row 3: ch 1, dec, sc 13, turn (14) Row 4: ch 1, sc 12, dec, turn (13) Row 5: ch 1, dec, sc 11, turn (12) Row 6: ch 1, sc 10, dec, turn (11) Row 7: ch 1, dec, sc 9, turn (10) Row 8: ch 1, sc 8, dec, turn (9) Row 9: ch 1, dec, sc 7, turn (8) Row 10: ch 1, sc 6, dec, turn (7) Row 11: ch 1, dec, sc 5, turn (6) Row 12: ch 1, sc 4, dec, turn (5) Row 13: ch 1, inc, sc 4, turn (6) Row 14: ch 1, sc 5, inc, turn (7) Row 15: ch 1, inc, sc 6, turn (8) Row 16: ch 1, sc 7, inc, turn (9) Row 17: ch 1, inc, sc 8, turn (10) Row 18: ch 1, sc 9, inc, turn (11) Row 19: ch 1, inc, sc 10, turn (12) Row 20: ch 1, sc 11, inc, turn (13) Row 21: ch 1, inc, sc 12, turn (14) Row 22: ch 1, sc 13, inc, turn (15) Row 23: ch 1, inc, sc 14 (16) Fasten off, leaving a long yarn tail 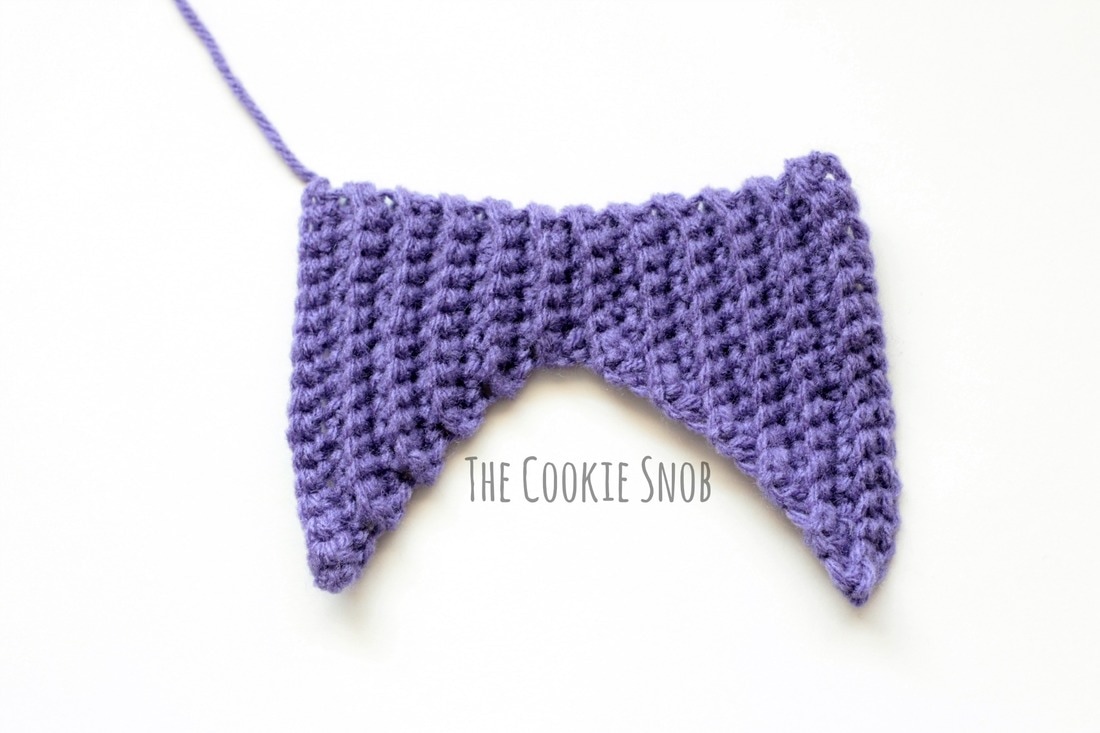 Using the long yarn tail and the tapestry needle, thread the long tail through the ends of the stitches on the straight edge of the fin, as shown. 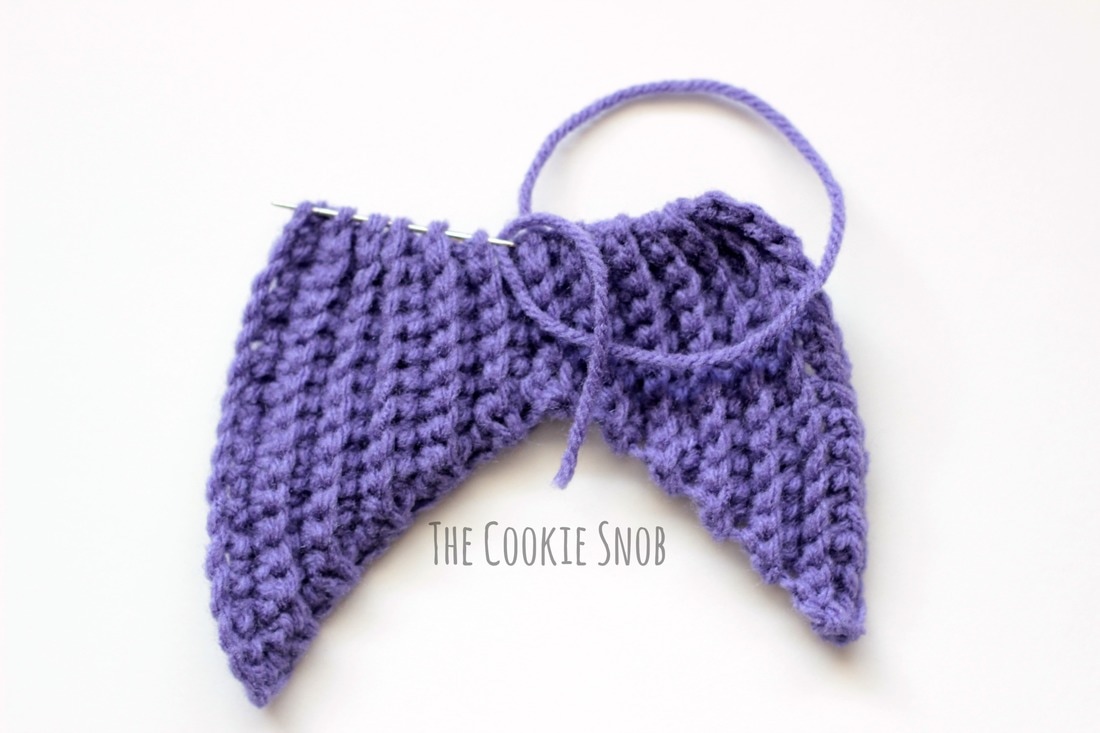 Pull taut to create the tail shape and then, using the remaining yarn tail, stitch securely to the bottom of the bag. 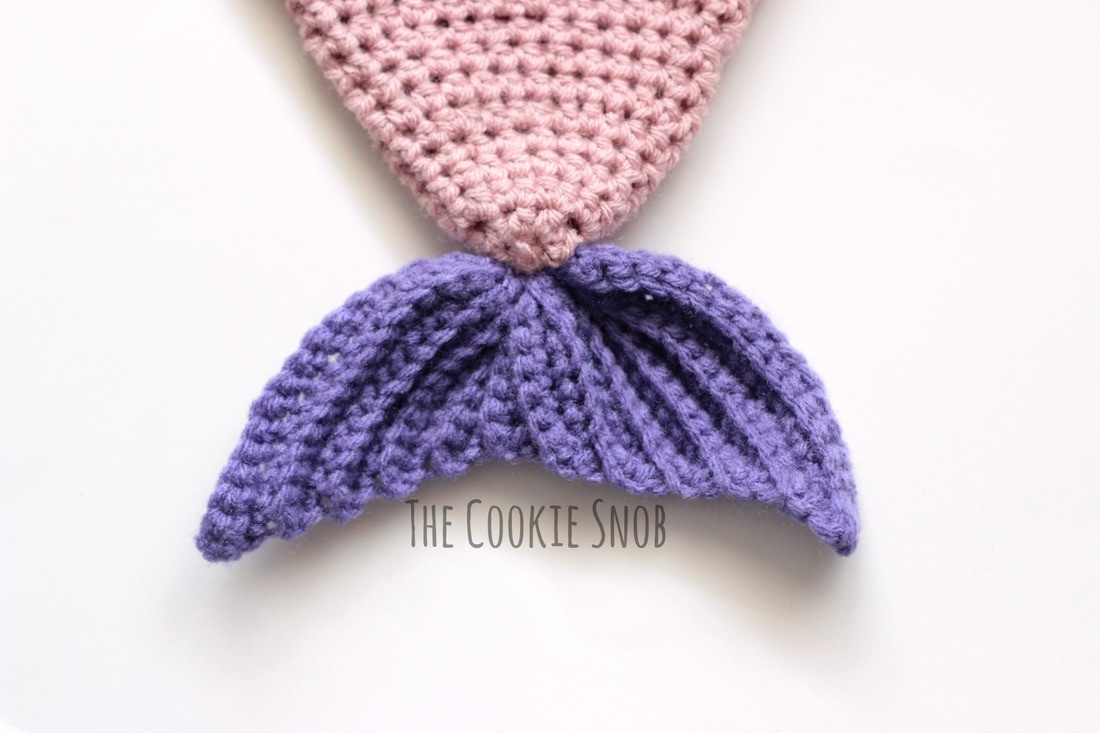 Optional: Star Fish Using the 7 (4.5mm) hook: Center: Make a magic circle, ch 2, and work 15 dc into the circle, ss to join Arms: [ch 2, dc in the same st and in the next 2 sts, turn, ch 2, dc3tog, turn, ss down side and into next st] 5 times, ss to join Fasten off, leaving a long yarn tail for sewing 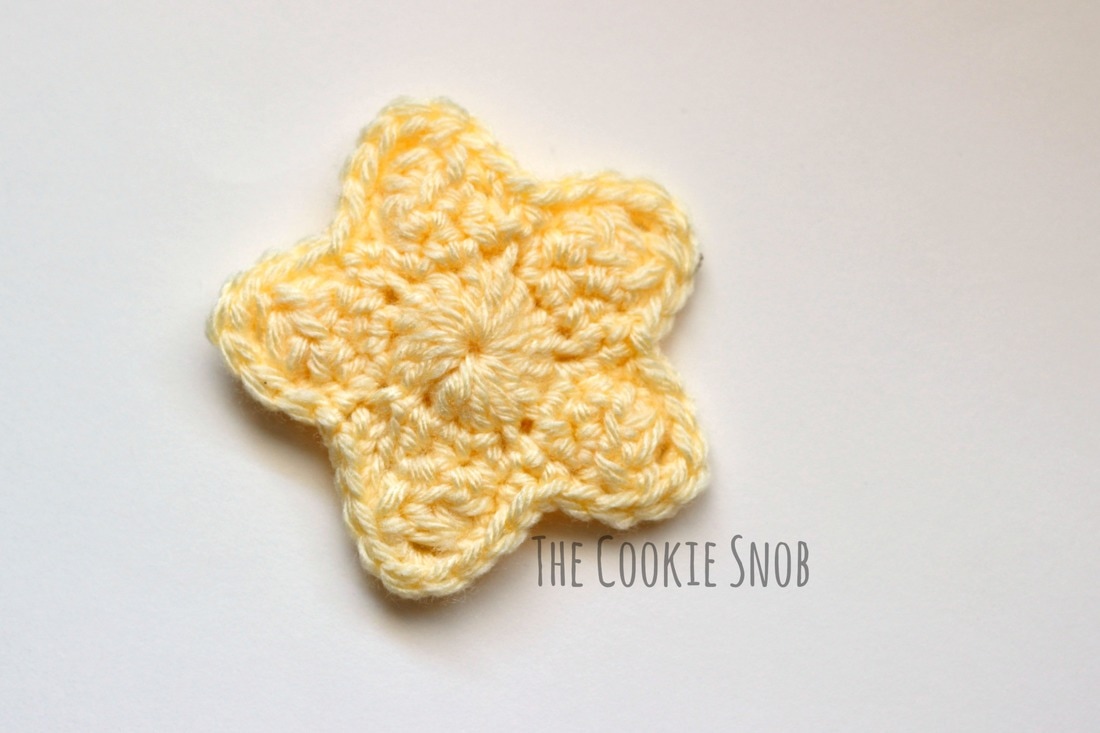 If you wish to add the starfish decoration (or some other decoration), stitch onto the body of the bag using the long yarn tail and the tapestry needle. Weave in any remaining ends.  Adult Size Materials:
st(s) = stitch(es) ss = slip stitch sc = single crochet inc = work 2 sc in the same st dec = single crochet decrease hdc = half double crochet hdc inc = work 2 hdc in the same st dc = double crochet dc3tog = double crochet 3 together (decrease across 3 dc) Body: This section begins in the round (in a continuous spiral without turning or joining) in order to avoid a visible seam. I recommend using a stitch marker to help keep your place. Round 1: Make a magic circle, ch 2, work 8 hdc into the circle (8) Round 2: hdc around (8) Round 3: hdc inc around (16) Rounds 4-5: hdc around (16) Round 6: [hdc inc, hdc in the next st] around (24) Rounds 7-9: hdc around (24) Round 10: [hdc inc, hdc in the next 2 sts] around (32) Rounds 11-13: hdc around (32) Round 14: [hdc inc, hdc in next 3 sts] around (40) Rounds 15-16: hdc around (40) Round 17: [hdc inc, hdc in next 4 sts] around (48) Rounds 18-19: hdc around (48) Round 20: [hdc inc, hdc in next 5 sts] around (56) Rounds 21-22: hdc around (56) Round 23: [hdc inc, hdc in next 6 sts] around (64) Round 24: hdc around (64) Round 25: [hdc inc, hdc in next 7 sts] around (72) Round 26-39: hdc around (72) Sc then ss to even off the round. Switch to the contrasting color. Round 40: ch 1, inc, sc until the end of the round, ss to join (73) Round 41: Working in the front loop only, ss, [skip next 2 sts, work dc, ch 1, dc, ch 1, dc, ch 1, dc, ch 1, dc in the next st, skip next 2 sts, ss in next st] around, ss to join Round 42: ch 2, working in unused back loops from the previous round, hdc in the next 6 sts, turn (6) Rounds 43-110 : ch 2, hdc across, turn (6) Fasten off, leaving a long yarn tail for sewing. Using a tapestry needle and the yarn tail, stitch the end of the strap to the opposite side of the bag. Fin: Each row in this section is worked in the back loops only to create a ridged look. ch 19 Row 1: sc in the 2nd ch from the hook and in each st across, turn (18) Row 2: ch 1, sc 16, dec, turn (17) Row 3: ch 1, dec, sc 15 (16) Row 4: ch 1, sc 14, dec, turn (15) Row 5: ch 1, dec, sc 13, turn (14) Row 6: ch 1, sc 12, dec, turn (13) Row 7: ch 1, dec, sc 11, turn (12) Row 8: ch 1, sc 10, dec, turn (11) Row 9: ch 1, dec, sc 9, turn (10) Row 10: ch 1, sc 8, dec, turn (9) Row 11: ch 1, dec, sc 7, turn (8) Row 12: ch 1, sc 6, dec, turn (7) Row 13: ch 1, dec, sc 5, turn (6) Row 14: ch 1, sc 4, dec, turn (5) Row 15: ch 1, inc, sc 4, turn (6) Row 16: ch 1, sc 5, inc, turn (7) Row 17: ch 1, inc, sc 6, turn (8) Row 18: ch 1, sc 7, inc, turn (9) Row 19: ch 1, inc, sc 8, turn (10) Row 20: ch 1, sc 9, inc, turn (11) Row 21: ch 1, inc, sc 10, turn (12) Row 22: ch 1, sc 11, inc, turn (13) Row 23: ch 1, inc, sc 12, turn (14) Row 24: ch 1, sc 13, inc, turn (15) Row 25: ch 1, inc, sc 14, turn (16) Row 26: ch 1, sc 15, inc, turn (17) Row 27: ch 1, inc, sc 16 (18) Fasten off, leaving a long yarn tail. Using the long yarn tail and the tapestry needle, thread the long tail through the ends of the stitches on the straight edge of the fin. Pull taut to create the tail shape and then, using the remaining yarn tail, stitch securely to the bottom of the bag. Optional: Star Fish Center: Make a magic circle, ch 2, and work 15 dc into the circle, ss to join Arms: [ch 2, dc in the same st and in the next 2 sts, ch 2, turn, dc3tog, turn, ss down side and into next st] 5 times, ss to join Fasten off, leaving a long yarn tail for sewing. If you wish to add the starfish decoration (or some other decoration), stitch onto the body of the bag using the long yarn tail and the tapestry needle. Weave in any remaining ends. 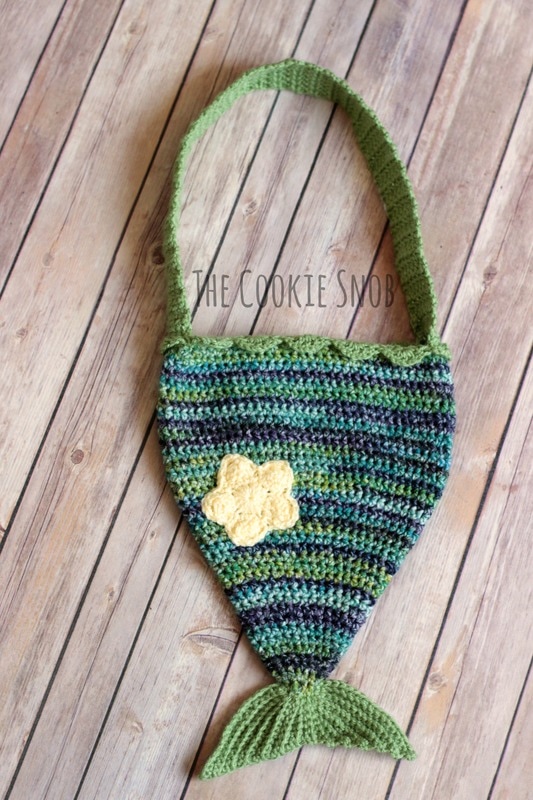 I hope that you enjoy this cute bag pattern! If you'd like a PDF, printable version, you can find one on Craftsy. There are lots of simple ways to personalize this pattern, so have fun with it and make it uniquely yours! If you end up making one, I'd love to hear about it or see a picture. You can reach me in the comment section below or on social media. Happy hooking! 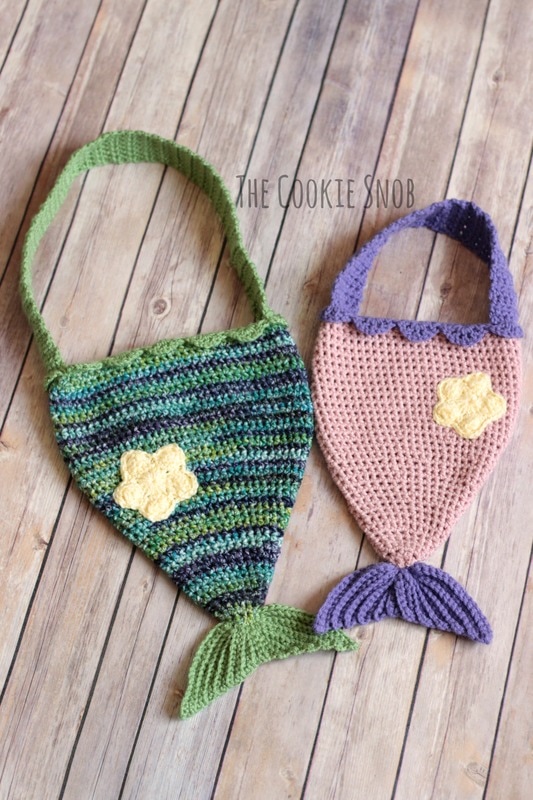 ***You're welcome to do whatever you'd like to with finished products made from this pattern but if you do sell them, I ask that you link back to my page. You may not copy this pattern, repost it anywhere (either altered or in its original form), or claim it as your own. You may not use any photos on this site for your own use. ***
27 Comments
Denise
6/17/2017 03:36:09 pm
Love them
Andrea
6/27/2017 04:34:51 am
So darling! Thank you for sharing!
Valerie
7/17/2017 09:43:29 am
Super cute pattern! I'm stuck on the starfish. After step one, when you say chain2, double crochet in the same stitch and the next two do you mean that you just chained? Or from the 15dc below? Thanks for sharing!!
Erin
7/17/2017 07:17:56 pm
It means to work in the 15 dc below. The part about working in the same st is just to indicate that the ch 2 does NOT count as its own dc, so you shouldn't skip any of the 15 dc to compensate. Hopefully that clears it up. Be sure to let me know if you still have questions :)
Sarah
7/23/2017 02:51:10 pm
Got it! Thanks so much for clarifying! :)
Sarah
7/23/2017 02:47:10 pm
I just made this for my little one and it worked up so cute! Thank you for the pattern! One question though, did you sew the scallops down? Mine suck straight up so I had to fold them down and sew them into place. No big deal, just wondering if I did something wrong...?
Sarah
8/5/2017 06:32:00 pm
Mine sticks up also I was wondering the same
Erin
8/5/2017 06:47:12 pm
Sorry for the delayed response; I didn't get notified of your comment for some reason.
Heather
12/16/2019 01:05:50 pm
I had the same issue with the scallops standing straight up, so I crocheted in the back loop instead of the front loop and that fixed it
Wendy
8/28/2017 12:23:10 pm
Hello!
Erin
8/28/2017 02:26:00 pm
I don't have the original mermaid bags with me, since I gave them away, but I made them to be approximately the same size as the shark bags. The child shark bag is about 11" tall (excluding the tail fin and the strap) and 9" wide at the widest part. The adult shark bag is about 12.5" tall and 10" wide. But exact dimensions will vary depending on which yarn you use and how tightly you crochet (I tend to crochet tighter than average). Hopefully that helps! :)
Wendy
8/28/2017 02:49:44 pm
Thank you so much! That is very helpful! The bags are adorable!! :)
Shazna
9/5/2017 12:26:11 pm
Hi, i just made 3 of these bags for my neices, and they absolutely love them!!! I have uploaded pictures on IG.
Erin
9/5/2017 07:05:36 pm
You did a great job! Thanks for sharing :)
Katie
9/14/2017 04:23:21 pm
I'm having a hard time with the starfish.
Erin
9/14/2017 10:30:02 pm
Just to clarify: are you asking where the dc3tog should be? In that case, it should be the last stitch at the tip of each arm. Or, if you're asking what you should do after the dc3tog, you should ss down the side of the arm into the next st (of the 15dc in the center). Hopefully that helps! Feel free to ask if you have more questions.
Aisha
3/23/2018 02:25:01 am
Hi, could u pls explain a little bit more how to round 38, with Hdc
Erin
3/26/2018 07:50:57 pm
I'm assuming that you're referring to round 38 on the child sized bag? In that case, that's the round where you'll start making the strap. So you'll just work 6 hdc across in back and forth rows to make a long skinny rectangle. Then you'll sew the strap to the other side so that it's connected on both sides. If it's easier, You can just finish off the bag after round 37 and make the strap separately. Then you can sew both ends of the strap to the bag. The end result will be about the same :)
Aisha
3/28/2018 01:24:47 am
Thank u, i had a hard time to make the scales too, but what i did was i made a long crocodile stich seperately and attached it to bag even the strap too.
Holly Williams
8/25/2018 11:52:47 am
Hello! I am trying to make the starfish, and I am very confused. The pattern says to do a dc in 3 stitches, ch 2, and then do a dc3tog. That will take up 6 stitches for each "arm".....I have stared and stared at the instructions and picture and I am just not understanding what to do. Lol. Thanks for the help :)
Erin
8/28/2018 08:20:01 pm
Thank you so much for your question! It gave me a chance to revisit this pattern for the first time in a while. Clearly I was sleep deprived when I typed this up, because it's definitely missing something important! It should be dc in 3 sts, TURN, dc3tog over those 3 sts you just made, TURN, ss down the side. I'll go fix that in the pattern as well, but hopefully that makes more sense. I'm not sure how that managed to stay uncorrected for so long, so thank you!
Deedra Martin
10/2/2018 09:43:43 pm
Sweet perfection! I'll be making an adult size for my daughter, a mermaid princess, to carry all of her trick or treats on Halloween! Thank you for sharing this sweet design! ❤
Amy
10/11/2018 05:55:30 am
Hello, I am in an auction and would like to sell a replica of this bag but I do not have a photo of my own. May I use one of your photos as long as you are credited? Thank you
Vicki
11/12/2018 06:52:03 pm
I love these! I have a Etsy shop and if I give you the credit may I sell the made item or would you prefer I didn't?
Erin
11/12/2018 09:42:40 pm
Hi Vicki,
Heather
12/16/2019 01:06:55 pm
Thanks for the pattern, it's so cute! Making it for my cousin for Christmas, she will absolutely love it! Leave a Reply. |
Welcome!Thank you for stopping by to visit my own personal corner of the web! Feel free to take a look around and check out what I've been crafting, crocheting, or baking. Hopefully you'll find something to inspire your own creativity!   
Archives
March 2024
|
 RSS Feed