
|
I know it's only January and that we still have a looong way to go before warm weather comes back to stay on the East Coast, but I'm already dreaming of spring. So what better way to incorporate a bit of sunshine into my winter wardrobe than to design something inspired by the honeybee? I decided to play around with some overlay crochet stitches to create this pattern mimicking a honeycomb design and then turned it into a cowl. So if you see me wearing this beauty and looking a little lost in the clouds, that's just me daydreaming of the days when the blossoms and the bees are in full swing again. 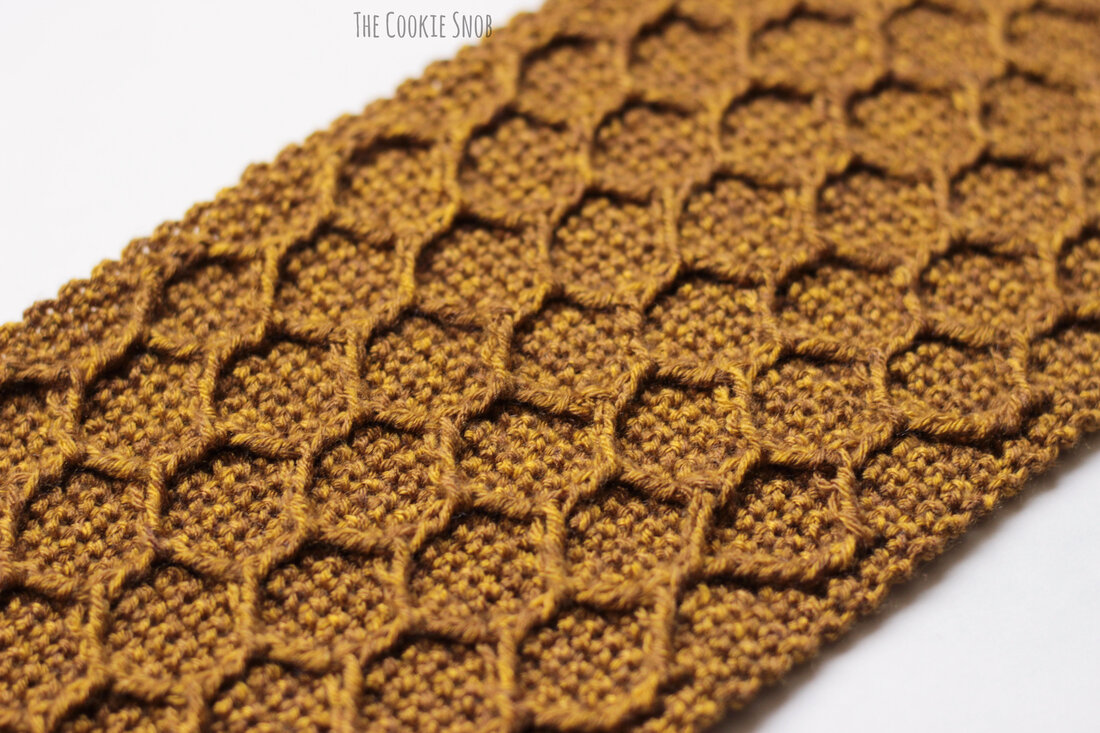 Side note: If you're looking for a book recommendation, I highly recommend The Beekeeper's Lament by Hannah Nordhaus; it's fascinating. Anyway, back to the pattern! In order to give this pattern the drape I was looking for, I ended up using a thinner yarn with a larger hook. I opted for Yarn Bee Soft & Sleek DK in the colorway Dijon. But I should let you know that even though the yarn literally has "DK" in its name, it doesn't seem like a typical DK weight to me. It seems to be closer to a fingering weight. (If anyone else has tried this yarn and has an opinion on the accuracy of the weight, feel free to chime in.) So if you decide to use a different brand yarn for this one, make sure you check your gauge! Otherwise I can't guarantee you'll end up with a cowl in the same size and with the same drape (unless you do some pattern adapting, which is totally possible with a bit of know-how).  As written, the cowl is 6" wide and 26.5" long. But you can easily make it longer for a double wrap cowl or scarf by just continuing the pattern until it's the length you want. And you can adjust the width of the cowl as well, you'll just need to change the number of repeats to create the honeycomb design. Feel free to get in touch with me if you have any questions about how to make that work.  If you're familiar with overlay crochet, this design should be fairly intuitive. But to make things easier just in case anything is confusing, I've put together a photo tutorial showing you the steps to make the honeycomb motif that you'll be repeating to make the cowl. So we're going to start by walking through the first repeat and then I'll write out the pattern below in a more normal crochet notation that you can use once you're familiar with what you're doing. Or if you're already feeling confident, you can just skip ahead to the full pattern at the bottom and reference the photo tutorial as needed. If you'd like an ad-free printable PDF version of this pattern (including a text-only version as well for simpler printing) you can find one on Ravelry. Stitch Glossary: st(s) = stitch(es) ch = chain sc = single crochet fsc = foundation sc fpdc = front post double crochet fptr = front post treble crochet fptr2tog = front post treble crochet 2 together RS = right side WS = wrong side Materials:
Gauge: 2" = 12 sc sts 2:" = 12 rows of sc Motif Tutorial: We're going to start off with a couple rows of sc sts. (Row 1) Begin by making 33 fsc (or, if you really don't like fsc, ch 34 and then sc in the 2nd ch from the hook and then in each remaining st). (Row 2) Turn, ch 1, sc across. Now we're going to start making things interesting with some fpdc sts. (Row 3) Turn, ch 1, sc in the first 4 sts. Then fpdc around the next sc from the first row (indicated by the arrow below). 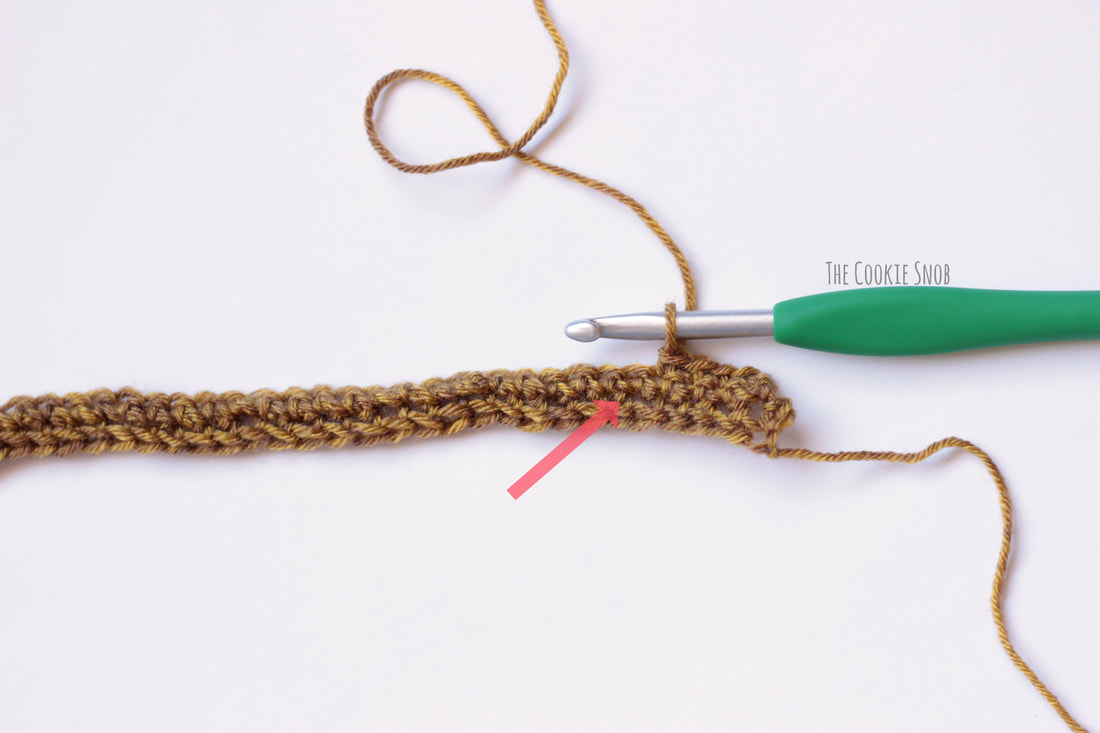 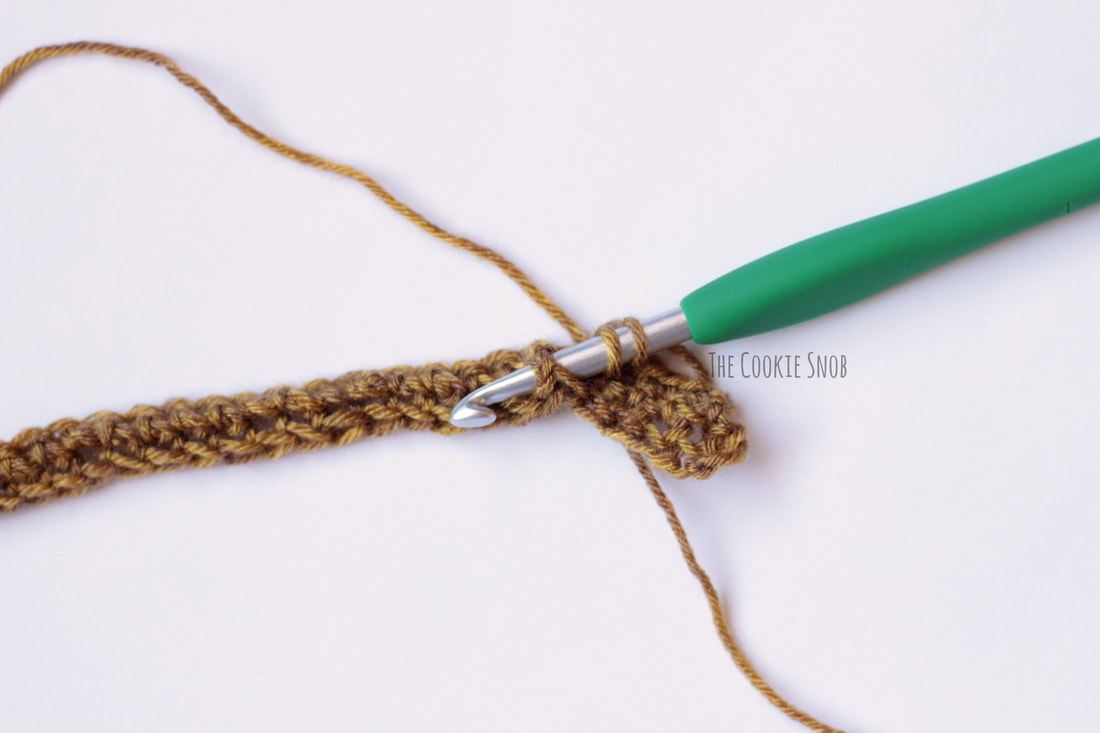 Then sc in the next st from row 2 (be sure to skip the st directly above the fpdc you just worked; if you make your sc in that st, you'll mess with the st count). Sc in the next 4 sts. Then fpdc around the next st from row 1 as before. Repeat the pattern of [sc in the next 5 sts, fpdc] until the last 4 sts of the row. Sc in the last 4 sts. You should now have 5 fpdc stitches evenly spaced along the row with sc sts in between. 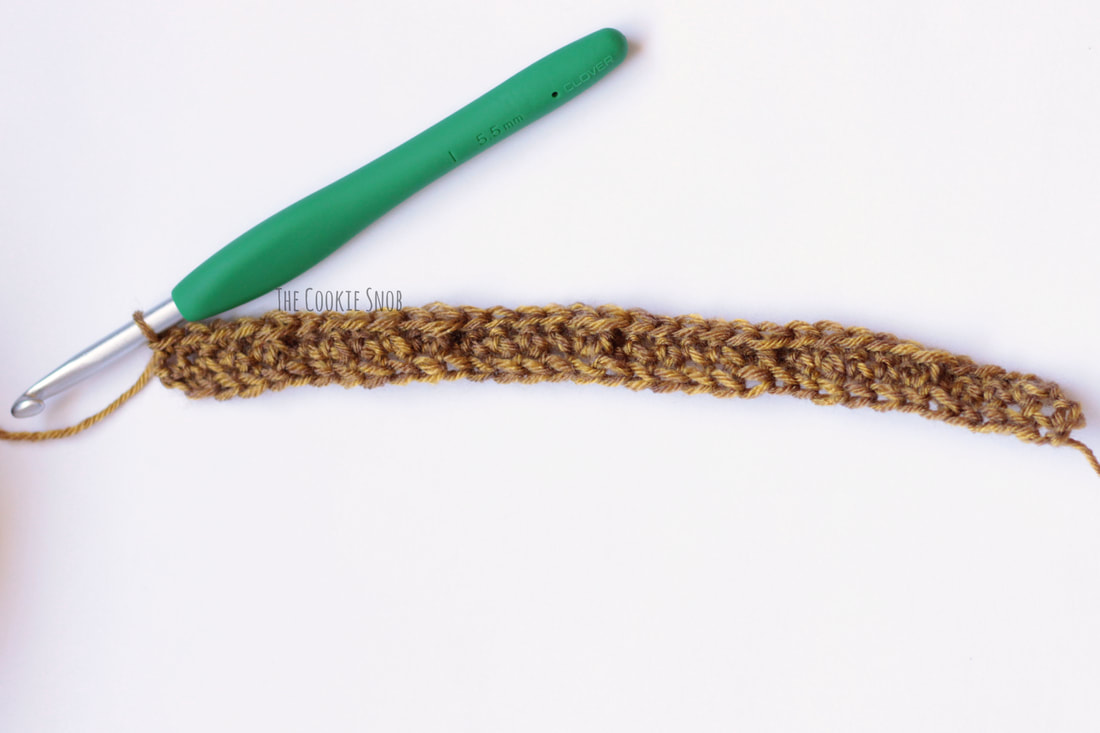 (Row 4) Turn, ch 1, sc across. (Row 5) Then turn, ch 1, sc in the first st. We're going to work our first fptr around the fpdc you made in row 3 (indicated by the arrow in the picture below). 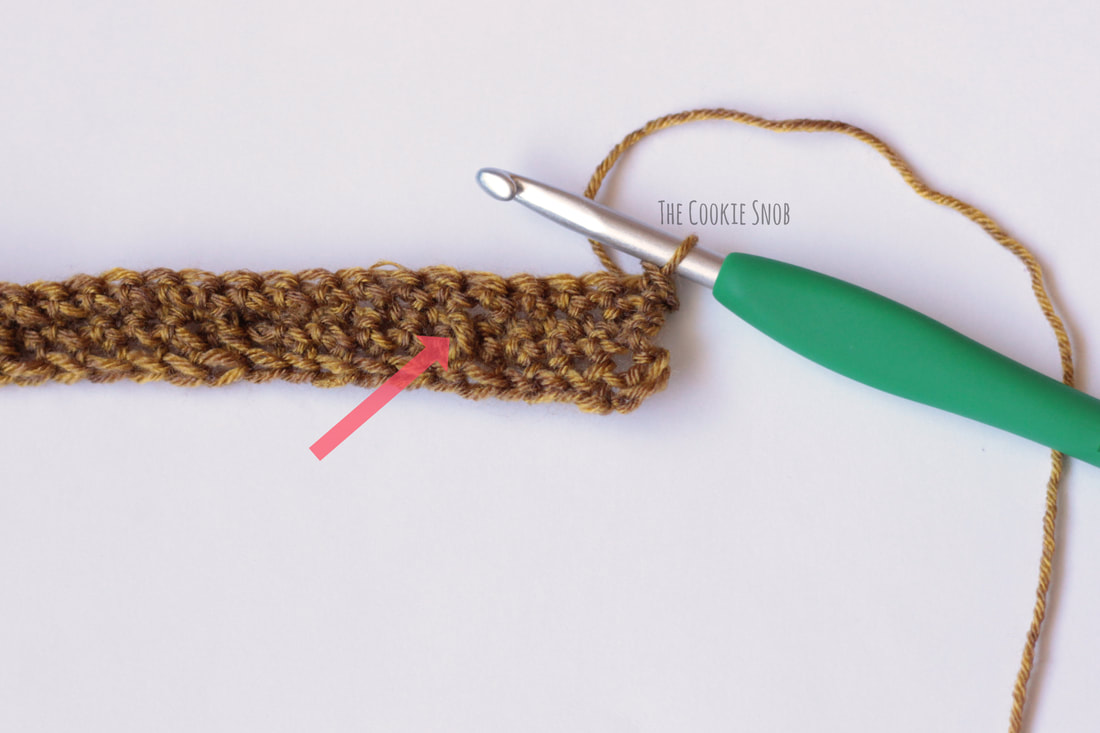 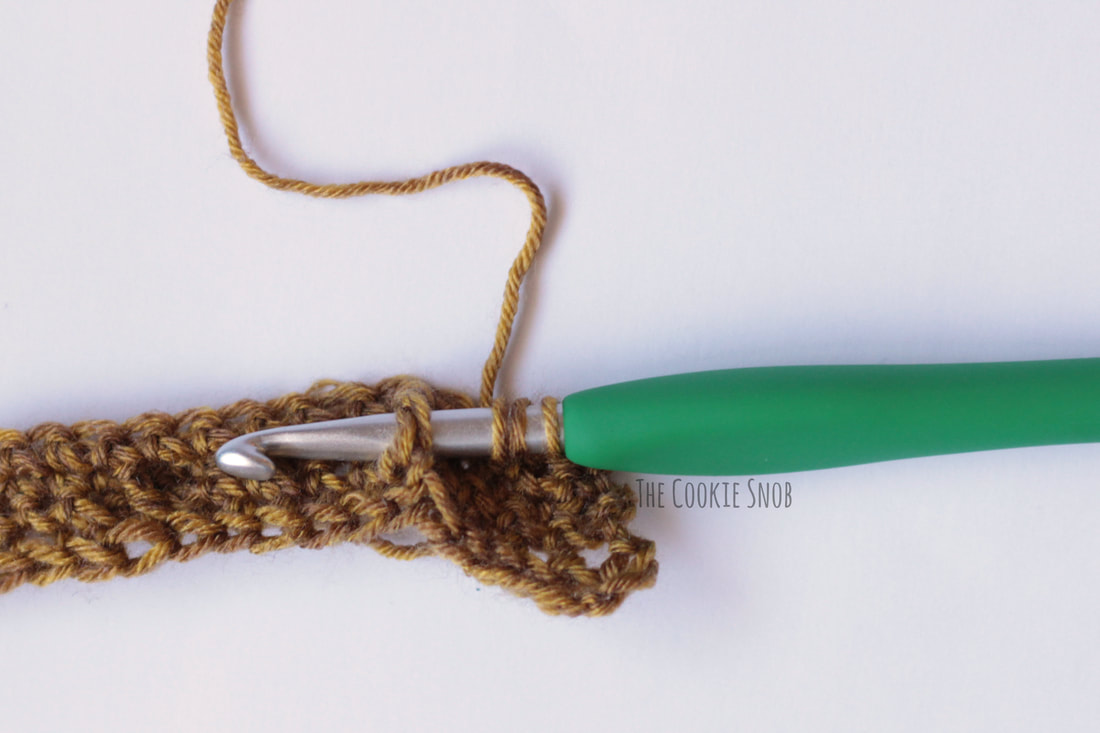 Sc in the next 5 sts. (Again, make sure you skip the st directly above the fptr you just made so that you don't add extra stitches; the fptr you made counts as that stitch. Be sure to always skip that stitch after you work any front post stitch in the pattern going forward). Now we're going to make a fptr2tog around the fpdc you just used and the next fpdc (indicated by the arrow below). If that sounds confusing at all, here's the basic concept: start working a fptr st around the fpdc to the right (this should be the same one you just worked the last fptr into). When you have 2 loops left on your hook, don't finish off the stitch. Instead, yarn over twice and start working the next fptr around the fpdc to the left (again, shown with the arrow). When you get to the end of the stitch, you'll have 3 loops left on your hook. Finish off the stitch by yarning over and pulling through all 3 loops. 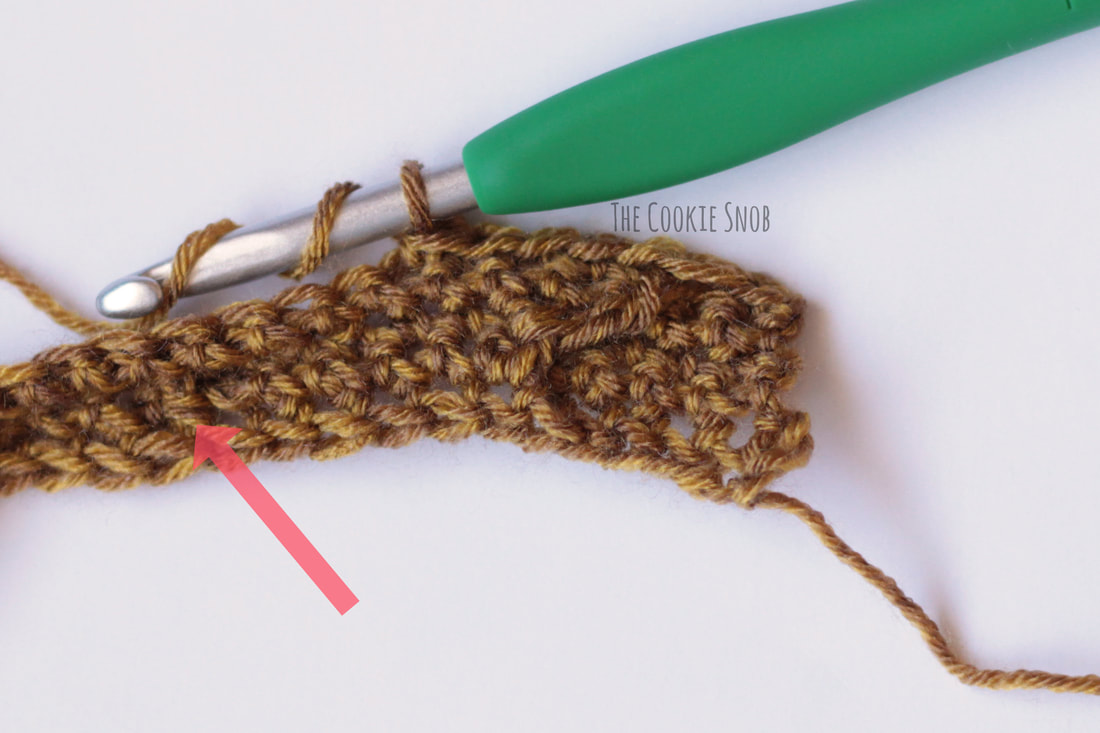 This will create two little "legs" looped around the fpdc on either side. Repeat the pattern of [sc in the next 5 sts, fptr2tog] 3 more times. Then sc in the next 5 sts, fprtr in the last fpdc, and sc in the last st. (Row 6) Turn. Ch 1, sc across. 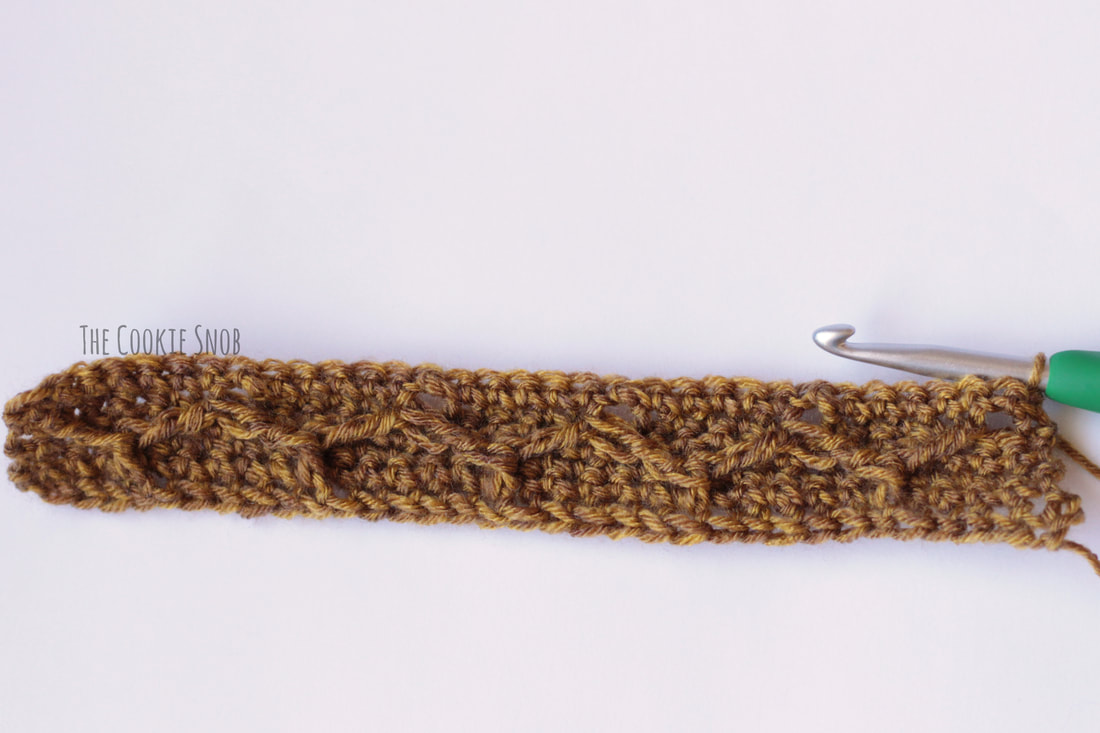 See how it's starting to form the tops of the honeycomb? Don't fret if it looks a little squashy at this point. The next row will help shape it better. (Row 7) Turn. Ch 1, sc in the first st. Fpdc around the first fptr. 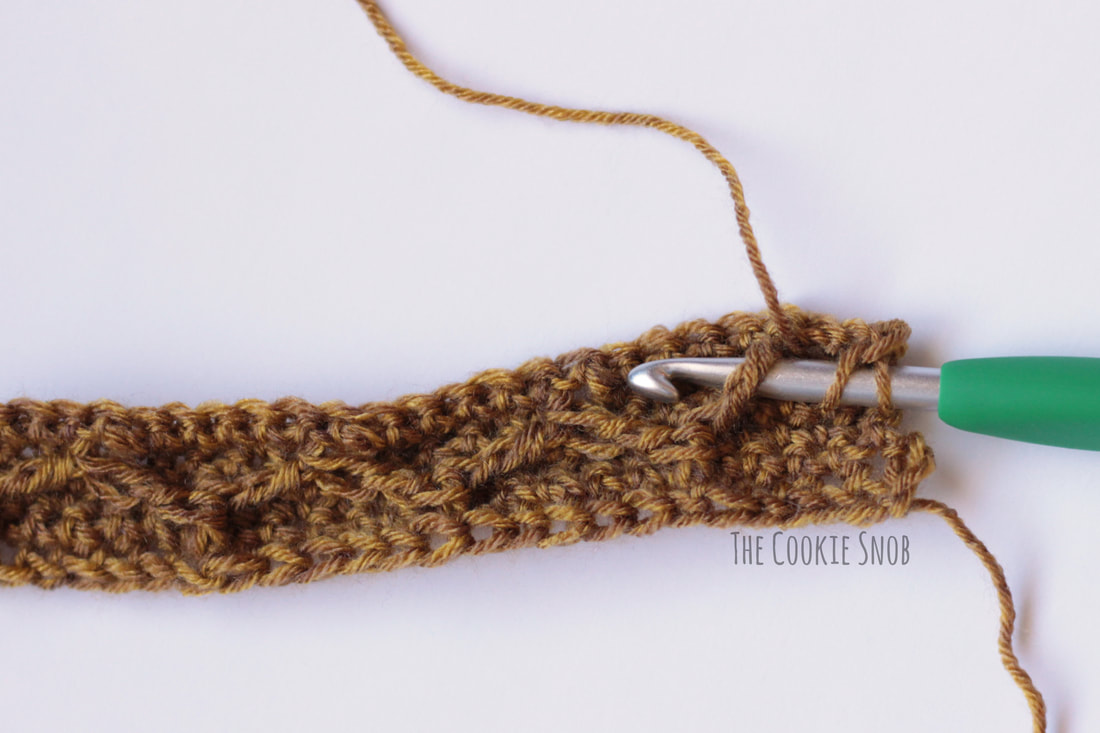 Sc in the next 5 sts. Then fpdc around the fptr2tog; make sure you insert your hook under both "legs" of the stitch. 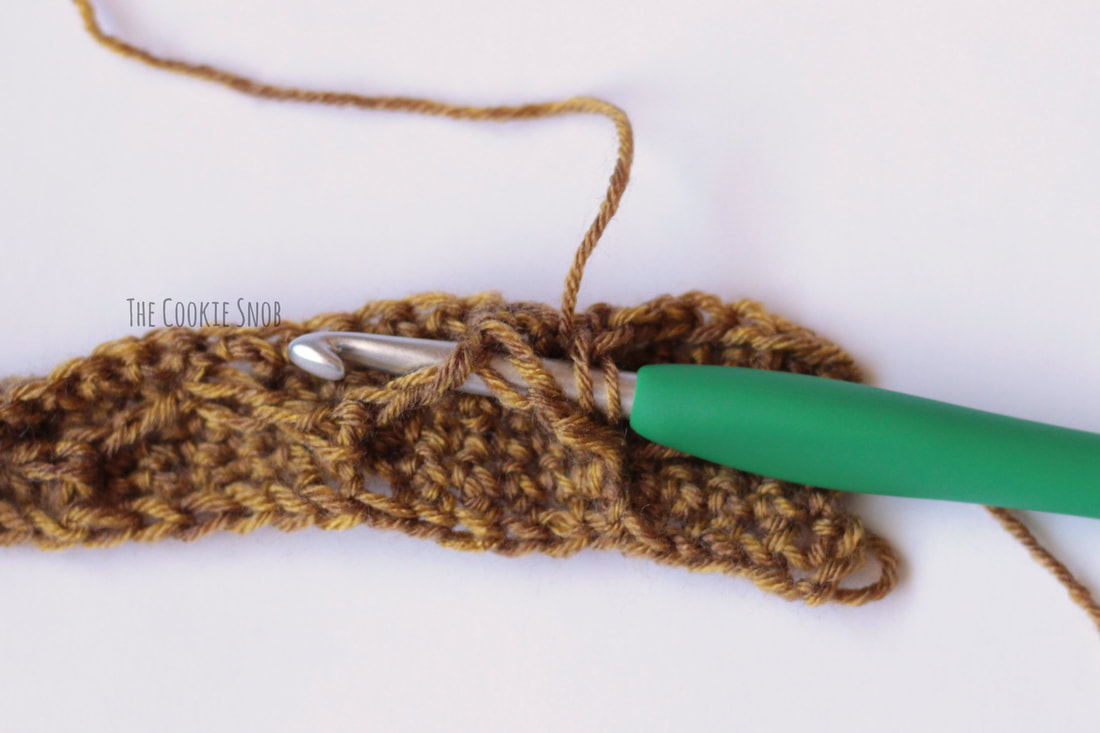 Continue to repeat the pattern of [sc in the next 5 sts, fpdc] until the end of the row. Sc in the last st. (Row 8) Turn, ch 1, sc across. 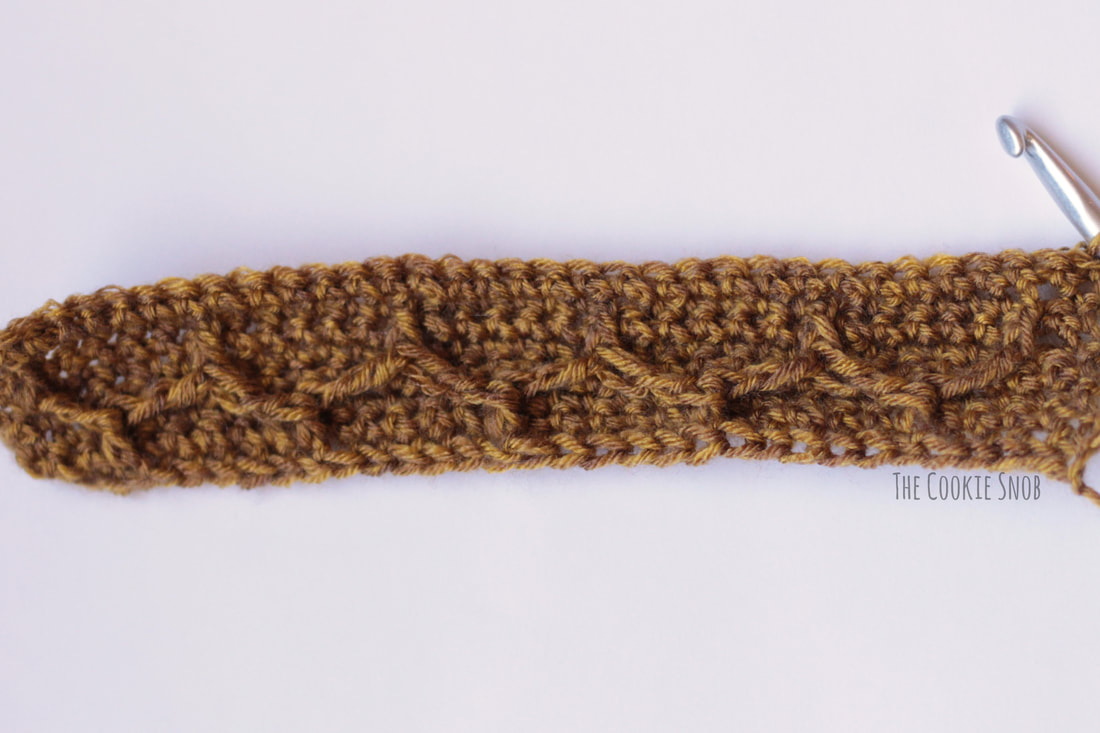 Repeat the last two rows by (Row 9) working a sc into each sc st and working the fpdc sts around the fpdc from the previous row and then (Row 10) turn, ch 1 and sc across. (Row 11) Turn, ch 1, sc in the first 4 sts. Then fptr2tog around the fpdc to the right and to the left, just like we did before (marked with arrows below). Make sure that you're working around the post of the fpdcs from row 9; if you use the first set of fpdcs you made in row 7, the hexagons will be stretched oddly and it won't look symmetrical. 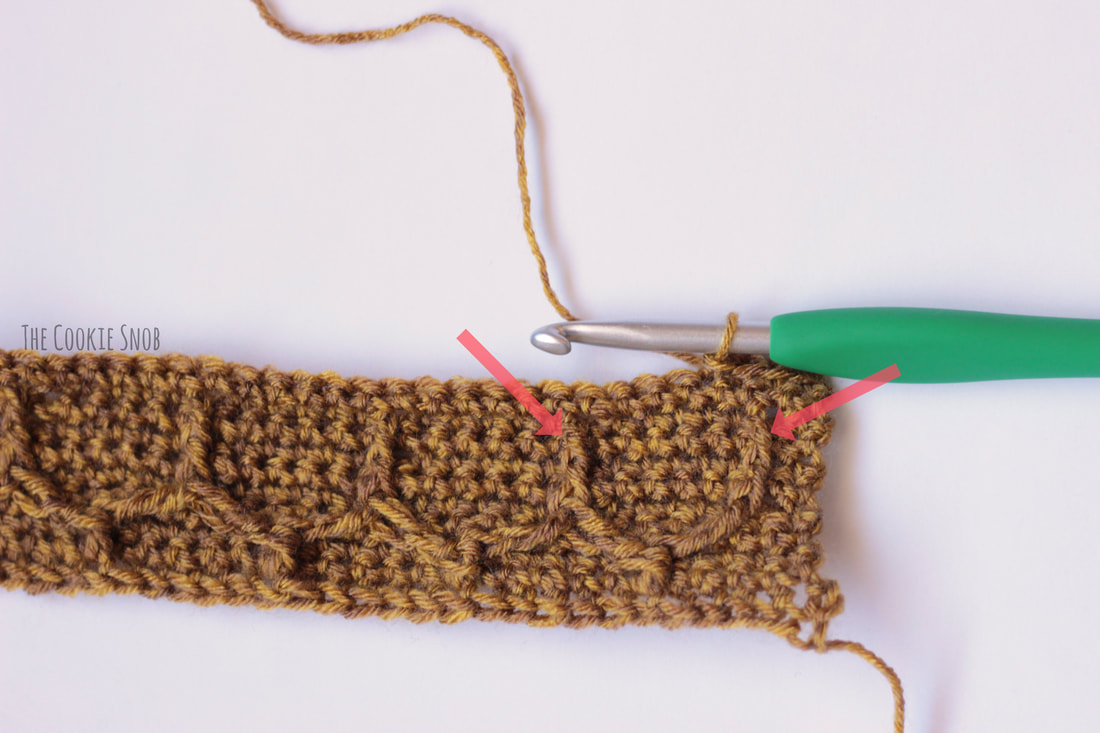 Repeat the pattern of [sc in the next 5 sts, fptr2tog] until the last 4 sts, then sc in the last 4 sts. (Row 12) Turn, ch 1, sc across. 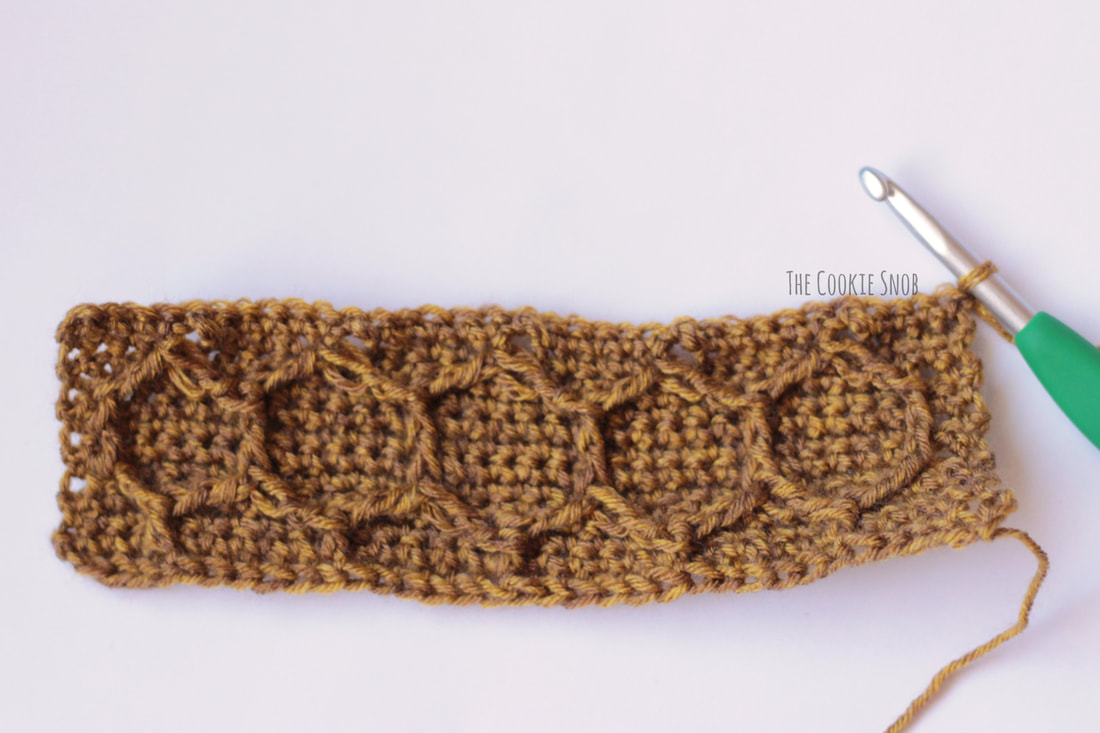 (Row 13) Turn, ch 1, sc in the first 4 sts. Then fpdc around the fptr2tog below (again, make sure to insert your hook under both "legs" of the st). [Sc in the next 5 sts, fpdc] until the last 4 sts, sc in the last 4 sts. (Row 14) Turn, ch 1, sc across. 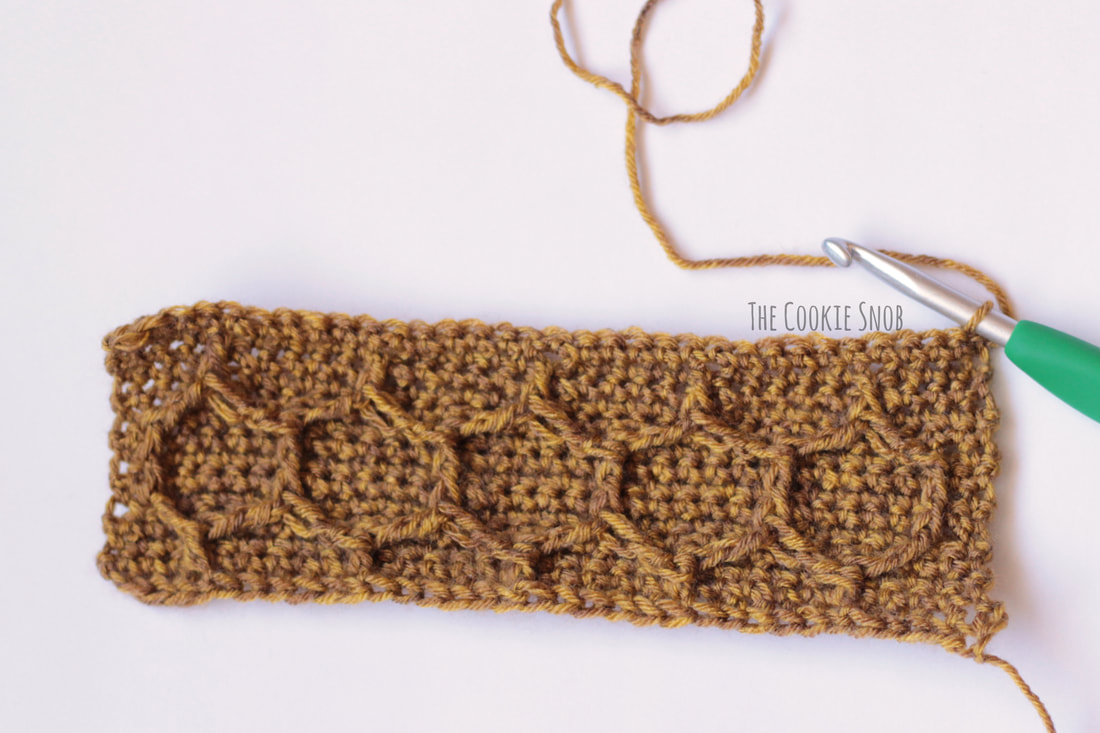 And there you have it! You're now right back where you started and can just continue to repeat the pattern! Hopefully that photo tutorial was helpful (and hopefully it made sense). Now I'm going to write out the pattern in a more typical format and you can switch back and forth between the pattern and the photo tutorial as needed to help you make the cowl. Honeycomb Cowl Pattern: Row 1 (RS): fsc 33, turn (33) Row 2 (WS): ch 1, sc across, turn (33) Row 3 (RS): ch 1, sc in the first 4 sts, fpdc around the next sc from row 1, *sc in the next 5 sts, fpdc around the next sc from row 1*, repeat from * to * 4 times, sc in the last 4 sts, turn (33) Row 4 (WS): ch 1, sc across, turn (33) Row 5 (RS): ch 1, sc in the first st, fptr around the fpdc to the left, *sc in the next 5 sts, fptr2tog around the fpdc to the right and to the left*, repeat from * to * 4 times, sc in the next 5 sts, fptr around the fpdc to the right, sc in the last st, turn (33) Row 6 (WS): ch 1, sc across, turn (33) Row 7 (RS): ch 1, sc in the first st, fpdc around the fptr below, *sc in the next 5 sts, fpdc around the fptr2tog below*, repeat from * to * 4 times, sc in the next 5 sts, fpdc around the fptr below, sc in the last st, turn (33) Row 8 (WS): ch 1, sc across, turn (33) Row 9 (RS): ch 1, sc in the first st, fpdc around the fpdc below, *sc in the next 5 sts, fpdc around the fpdc below*, repeat from * to * 5 times, sc in the last st, turn (33) Row 10 (WS): ch 1, sc across, turn (33) Row 11 (RS): ch 1, sc in the first 4 sts, *fptr2tog around the fpdc from row 9 to the right and to the left, sc in the next 5 sts*, repeat from * to * 4 times, fptr2tog around the fpdc from row 9 to the right and to the left, sc in the last 4 sts, turn (33) Row 12 (WS): ch 1, sc across, turn (33) Row 13 (RS): ch 1, sc in the first 4 sts, fpdc around the fptr2tog below, *sc in the next 5 sts, fpdc around the fptr2tog below*, repeat from * to * 4 times, sc in the last 4 sts, turn (33) Row 14 (WS): ch 1, sc across, turn (33) Row 15 (RS): ch 1, sc in the first 4 sts, fpdc around the fpdc below, *sc in the next 5 sts, fpdc around the fpdc below*, repeat from * to * 4 times, sc in the last 4 sts, turn (33) Repeat rows 4-15 until the cowl is approximately 26.5" (or your desired length), ending with row 14. 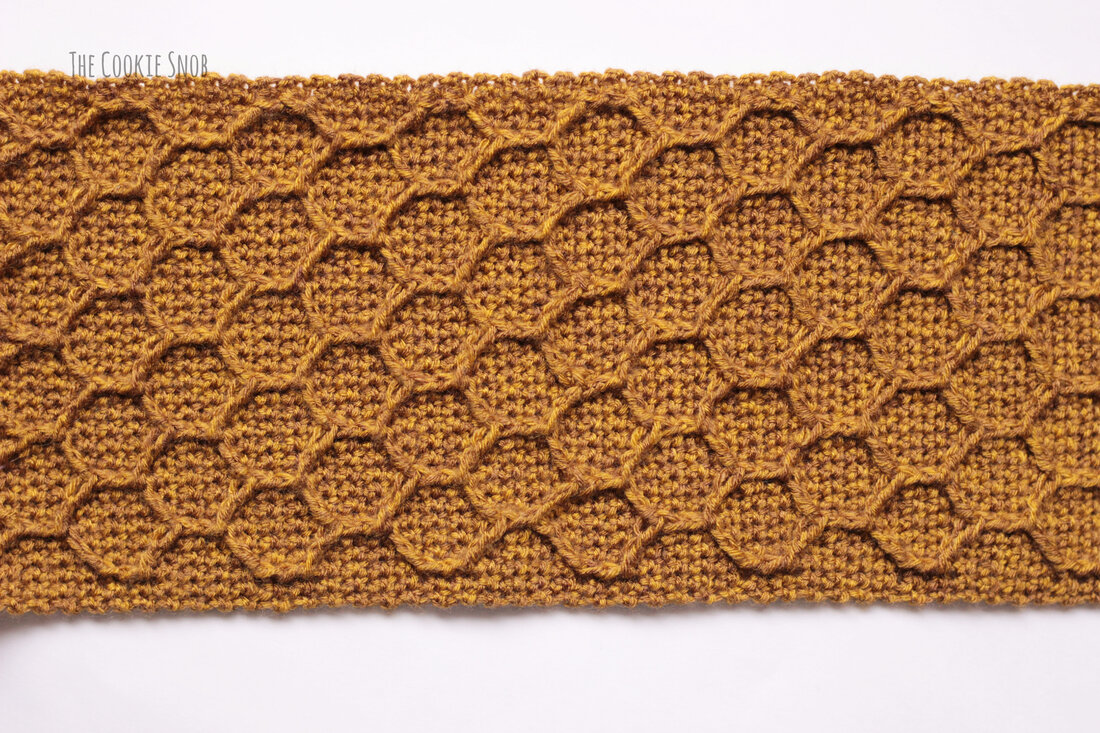 Fasten off, leaving an extra long yarn tail. For extra definition, lightly block the rectangle. Then bring the short ends of the cowl together (the first and last rows), being sure not to twist the cowl. Using the tapestry needle and the long yarn tail, sew the short ends together. I like to sew mine using a mattress stitch around the posts of the first and the last row in order to make the seam less visible from the front. This way the pattern looks continuous (although there will be a larger seam on the wrong side using this sewing method). 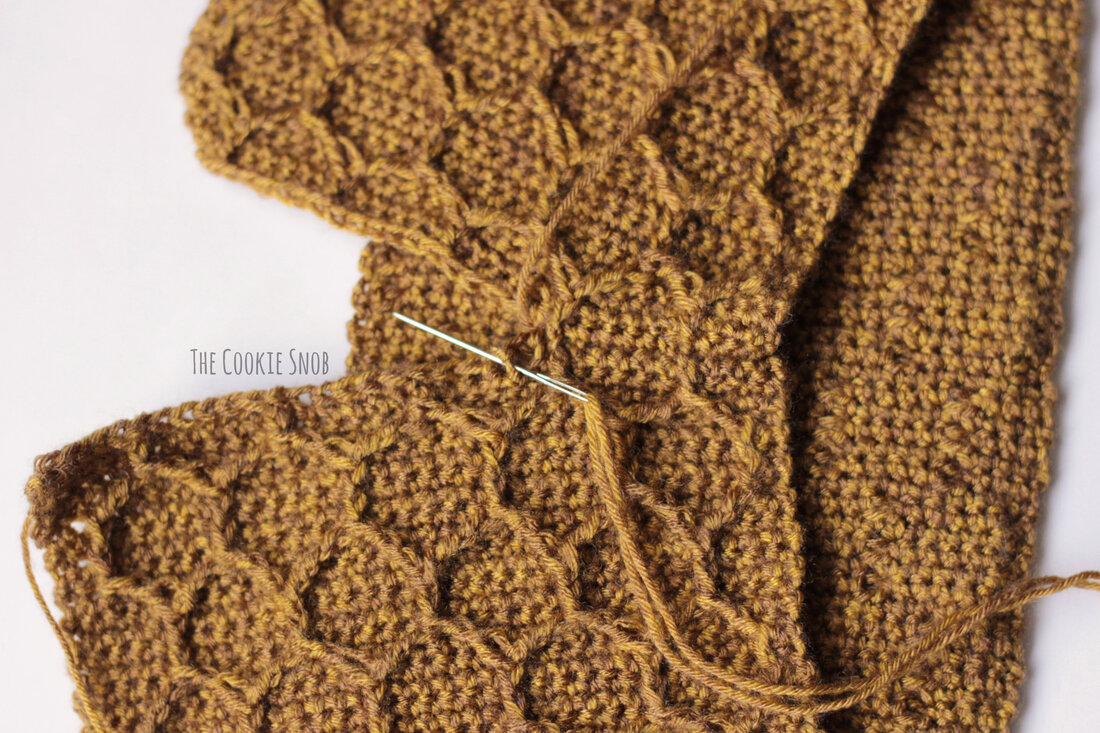 Can you spot the seam below? Weave in ends. 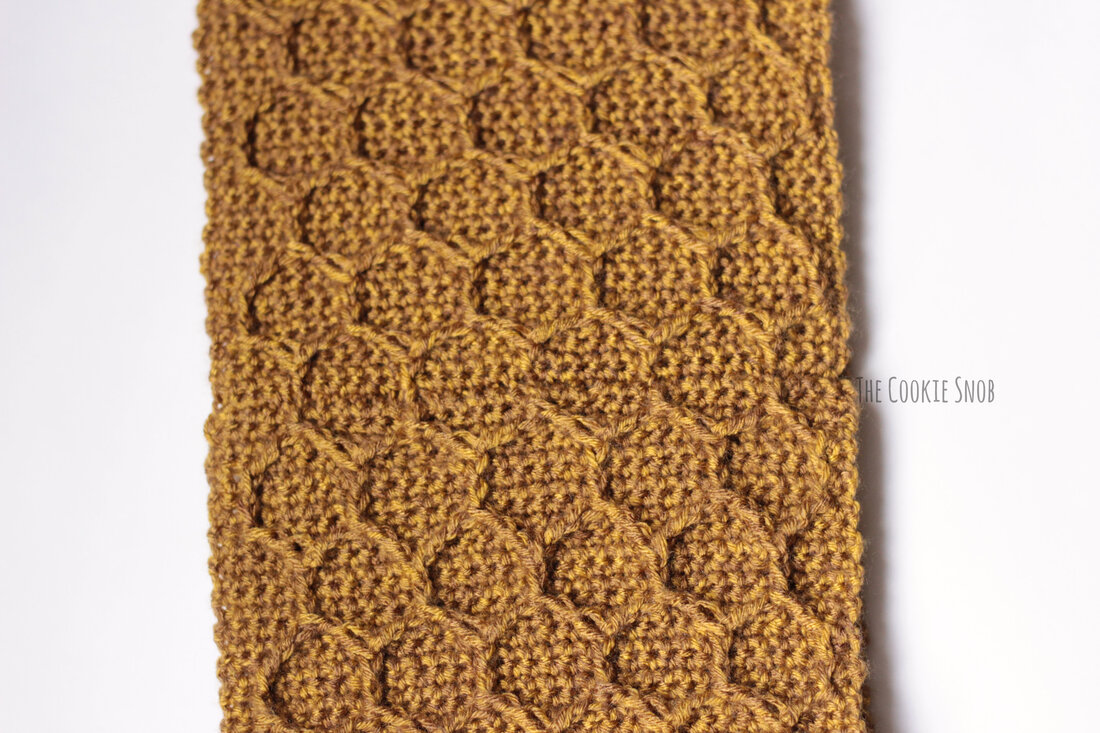 And there you have it! I hope you enjoyed this pattern! I think that this simple, yet elegant, honeycomb design brings a bit of springtime to your day.  If you have any questions or comments about this pattern, you can reach me in the comments section below, by email, or on social media. And if you end up making a cowl (or making something else using the honeycomb motif), I'd love to hear about how it goes! Happy hooking! Want to make sure you don't miss out on any future blog posts? Join my mailing list! (Spam free, I promise!) ***You're welcome to do whatever you'd like to with finished products made from this pattern but if you do sell them, I ask that you link back to my page. You may not copy this pattern, repost it anywhere (either altered or in its original form), or claim it as your own. You may not use any photos on this site for your own use. ***
14 Comments
Erin
1/20/2020 01:20:29 pm
Oh, good, I'm glad it's not just me! I was staring at the label that says "DK" and was wondering if I was crazy haha. It is beautiful yarn though. I bet your vest is gorgeous!
Pat
1/19/2020 02:06:32 pm
After row 15, should it say repeat rows 4 through 15? (instead of 5 through 15). The extra row of sc is needed.
Erin
1/20/2020 01:08:02 pm
Yes, it absolutely should! Thank you for catching that typo! I'll correct it now :)
Charlotte
3/12/2020 03:17:49 pm
This cowl is just too pretty! Thanks for sharing!!!
kathleen⁰ timmins
12/31/2020 10:51:21 am
Just saw your pattern which was recommended on a group community I belong to. I went to the Hobby Lobby site to check out the yarn and it is even more confusing . It does say DK on the front of the yarn label which now I'm wondering if it stands for something other than what we all think DK stands for in yarn. The weight on the label says 3 light. That's why you thought it felt like fingerling because it is.
Cerisa
1/14/2021 11:12:37 am
Any tips for making a matching beanie?
Erin
1/26/2021 09:44:11 pm
Great question! I haven't designed one yet, but if I were going to attempt it, I'd probably make it rectangle-based to preserve the stitch pattern and then seam it together like the Cabled Crown Beanie (https://www.cookiesnobcrochet.com/home/cabled-crown-beanie)
Keith
1/27/2022 05:22:53 pm
If I want to make this into a blanket, is there a number of FSC you need to add to make it work? So is there a multiplier of stitches to make it wider? Thanks!
Kristen
1/9/2024 08:29:38 pm
I tested it out, and if you add from 33 in multiples of 6, you can make it as long as you want.
Chloé
10/31/2022 01:54:29 pm
Hi, lovely pattern you have here. Would you consider doing a video tutorial for us on YT?
Chloé
11/1/2022 09:00:24 pm
Hi, do you know what multiple can be used used for the foundation to adapt this pattern to different projects? Leave a Reply. |
Welcome!Thank you for stopping by to visit my own personal corner of the web! Feel free to take a look around and check out what I've been crafting, crocheting, or baking. Hopefully you'll find something to inspire your own creativity!   
Archives
March 2024
|
 RSS Feed