
|
Once upon a time, I decided to crochet a seal. When I was about to finish said seal, it became apparent that I don't actually know what a seal looks like without a reference picture. But the little seal was just so cute that I couldn't resist sharing the pattern with you all anyway. So now we can all make anatomically-incorrect seals together! And, to make it even better, I decided to make mine a Christmas seal by dressing it up with a cute red and green winter outfit. But why stop there? Change up the colors and it's totally a Hanukkah seal! Or make it extra sparkly and it's a New Year's seal! Or make it pink and it's a Valentine's seal! Seals for all occasions!!! Okay, so maybe I'm getting a bit carried away...but if being excited about holiday seals is wrong, then I don't want to be right. 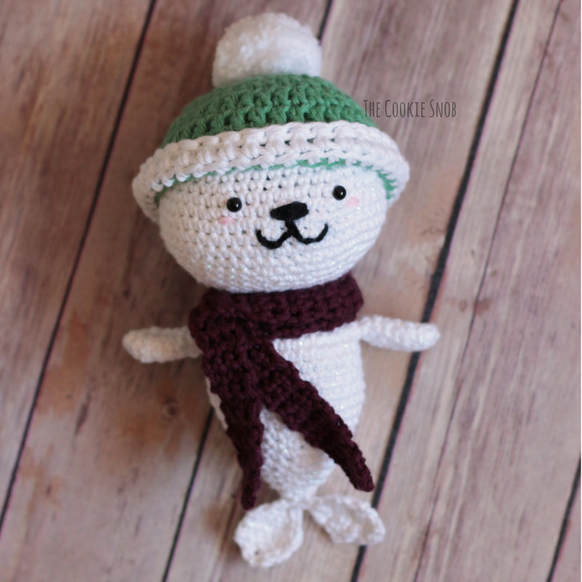 Of course, you can also make this cute little fella sans clothing (don't worry guys, seal nudity is totally non-controversial). Personally, I think it's adorable no matter how you dress it up or down. 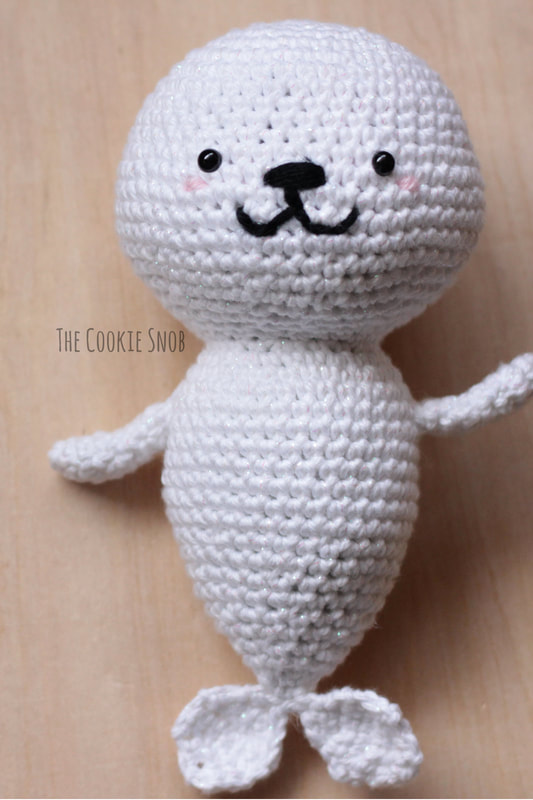 The head, body, and tail fins for this seal pattern are all worked in one piece, so only the flipper arms have to be sewn on (score!). I realize that my lazy crochet method for adding the tail fins all in one piece is somewhat untraditional, so I'll also give you a more standard approach for adding them, in case it's easier. You'd have to sew them on that way, but they're foolproof, so don't worry about anything being too tricky. If you're comfortable with standard amigurumi then this little guy should be a breeze. 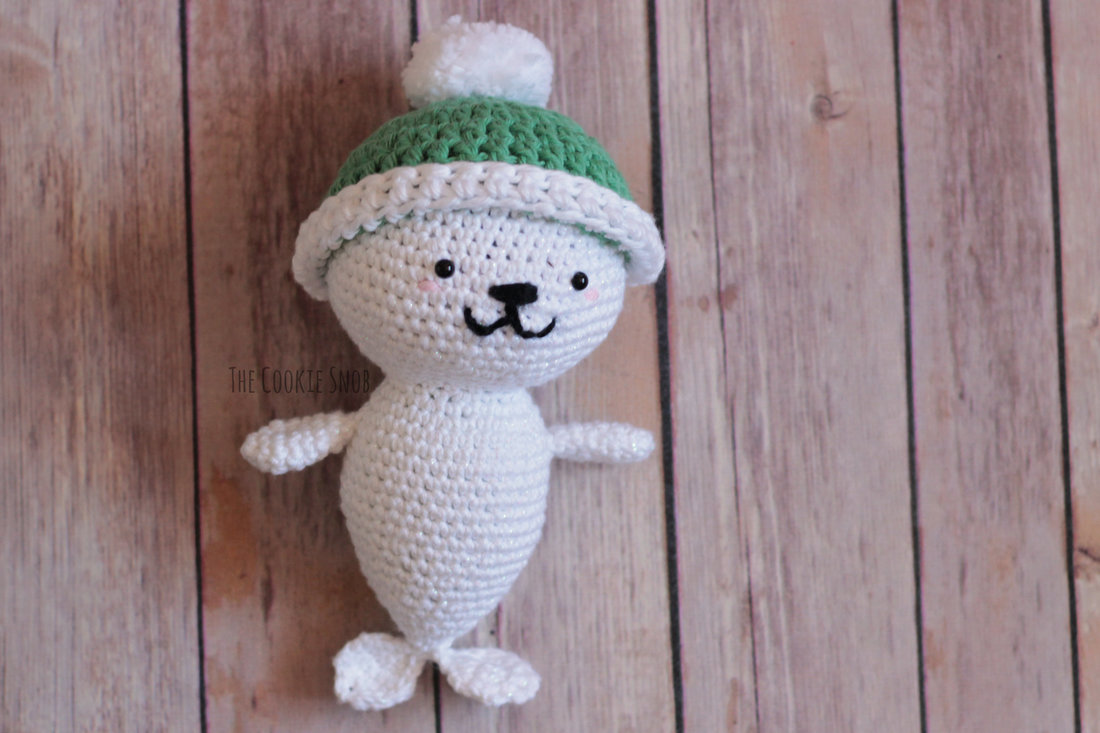 Oh, and one more note before we get started: Gauge isn't super crucial for this project, but you should be aware that I have a tendency to crochet more tightly than most. So if you're a looser crocheter, yours will probably turn out bigger than mine. But as long as your stitches are tight enough to hold all the stuffing in (without big gaping holes), then you should be good to go. If you find your stitches are too loose, you can size down a hook or two. So let's take a look at the pattern! 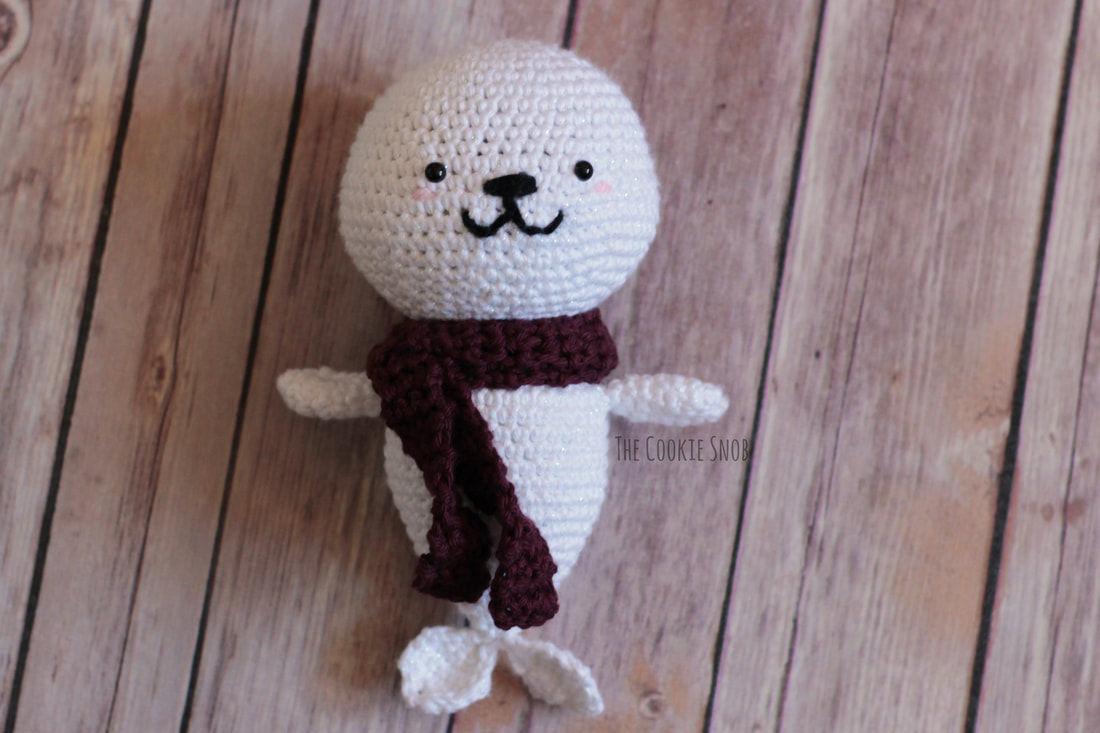 Materials:
Stitch Glossary: st(s) = stitch(es) ch = chain sc = single crochet inc = sc increase (work 2 sc into the same st) dec = sc decrease (sc2tog) (note: I prefer to use the invisible decrease method) hdc = half double crochet dc = double crochet dc inc = double crochet increase (work 2 dc into the same st) Note: This pattern is worked in a continuous round, meaning the stitches are worked in a continuous spiral without joining or turning. I recommend using a stitch marker to help you keep your place Seal Body: Using the E hook and the White Sparkle yarn: Round 1: Make a magic circle and work 6 sc into the circle, pull taut to close (6) Round 2: inc 6 times (12) Round 3: [inc, sc] 6 times (18) Round 4: [sc, inc, sc] 6 times (24) Round 5: [inc, sc in the next 3 sts] 6 times (30) Round 6: [sc in the next 2 sts, inc, sc in the next 2 sts] 6 times (36) Round 7: [inc, sc in the next 5 sts] 6 times (42) Rounds 8-11: sc around (42) Round 12: [sc in the next 3 sts, inc, sc in the next 3 sts] 3 times, sc in the next 21 sts (45) Round 13: [inc, sc in the next 7 sts] 3 times, sc in the next 21 sts (48) Round 14: [sc in the next 4 sts, inc, sc in the next 4 sts] 3 times, sc in the next 21 sts (51) Rounds 15-17: sc around (51) Round 18: [sc in the next 4 sts, dec, sc in the next 4 sts] 3 times, sc in the next 21 sts (48) Round 19: [dec, sc in the next 7 sts] 3 times, sc in the next 21 sts (45) Round 20: [sc in the next 3 sts, dec, sc in the next 3 sts] 3 times, sc in the next 21 sts (42) Round 21: [dec, sc in the next 5 sts] 6 times, (36) Let's pause crocheting here and add on the face. You'll notice that rounds 12-20 have created a head that protrudes slightly on one side. You'll be adding the face in the center of the section that sticks out. Place the 6 mm safety eyes between rounds 13 and 14, about 8 stitches apart. Using the tapestry needle and black yarn, stitch the mouth and nose on as shown, between rows 14 and 17. I like to stitch over the nose 5 times to make it thicker than the mouth. If you want to, you can also stitch on some cute little pink cheeks just outside each eye. Begin stuffing the head and continue to stuff as you go. 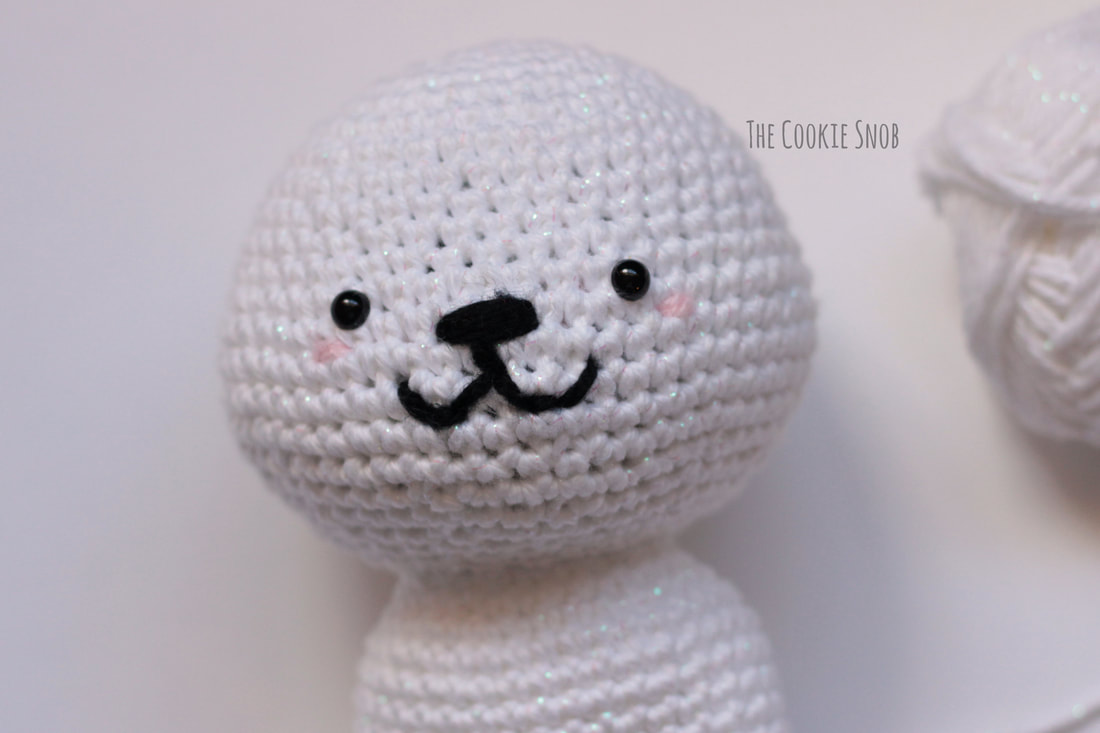 Round 22: [sc in the next 2 sts, dec, sc in the next 2 sts] 6 times (30) Round 23: [dec, sc in the next 3 sts] 6 times (24) Round 24: [sc, dec, sc] 6 times (18) Round 25: [sc, inc, sc] 6 times (24) Round 26: [inc, sc in the next 3 sts] 6 times (30) Round 27: [sc in the next 2 sts, inc, sc in the next 2 sts] 6 times (36) Rounds 28-35: sc around (36) 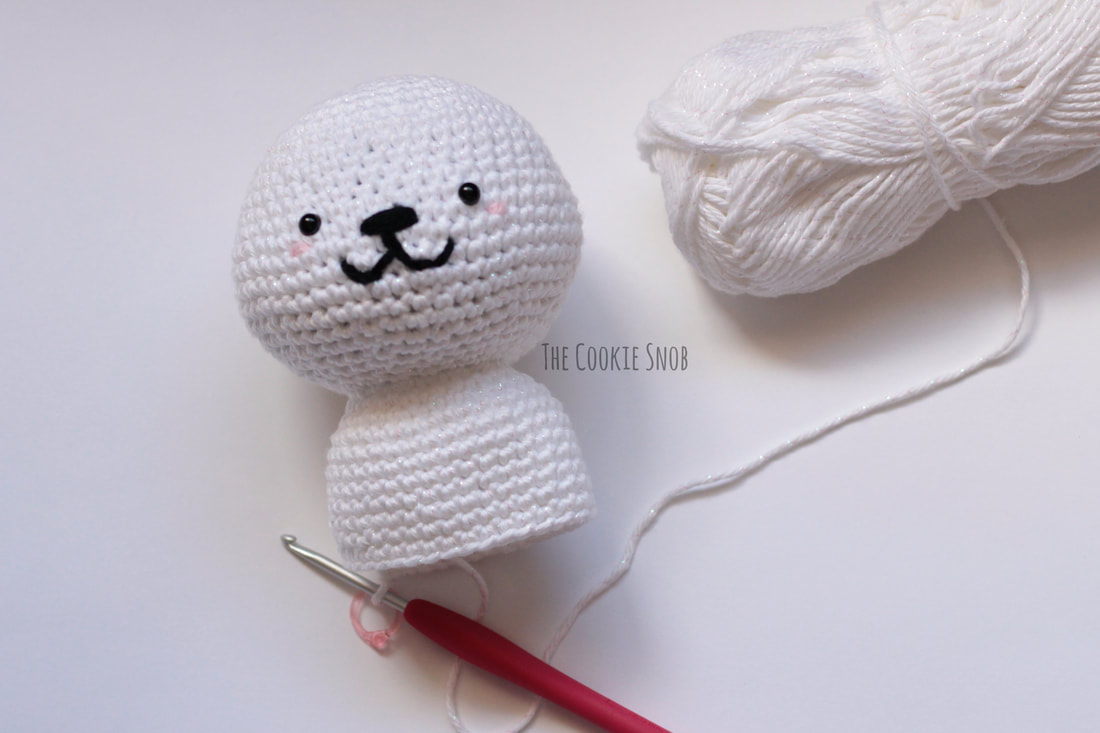 Round 36: [sc in the next 2 sts, dec, sc in the next 2 sts] 6 times (30) Round 37: sc around (30) Round 38: [dec, sc in the next 3 sts] 6 times (24) Round 39: sc around (24) Round 40: [sc, dec, sc] 6 times (18) Round 41: sc around (18) Round 42: [dec, sc] 6 times (12) Round 43: sc around (12) Round 44: dec 6 times, ss to the first st to even off (6) Tail Fin: ch 1, sc in the same st, turn ch 1, inc, turn ch 1, inc in the next 2 sts, turn ch 1, inc, sc in the next 2 sts, inc, turn ch 1, sc in the next 6 sts, turn ch 1, dec, sc in the next 2 sts, dec, turn ch 1, dec twice, turn, ch 1, dec ss down the side of the the fin and into Round 44, then repeat the tail fin one more time Fasten off, leaving a long yarn tail for sewing. Using the tapestry needle and the yarn tail, stitch the small hole at the bottom of the seal shut. Weave in ends. Alternate Tail Fin (make 2): Fasten off the body at the end of Round 44 and use the yarn tail to sew the hole shut. Ch 2 Row 1: sc in the 2nd ch from the hook, turn (1) Row 2: ch 1, inc, turn (2) Row 3: ch 1, inc in the next 2 sts, turn (4) Row 4: ch 1, inc, sc in the next 2 sts, inc, turn (6) Row 5: ch 1, sc across, turn (6) Row 6: ch 1, dec, sc in the next 2 sts, dec, turn (4) Row 7: ch 1, dec twice, turn, (2) Row 8: ch 1, dec (1) If you want to make a neater edge, ss or sc around the entire fin. Fasten off, leaving a long yarn tail and stitch the fin to the bottom of the seal body. 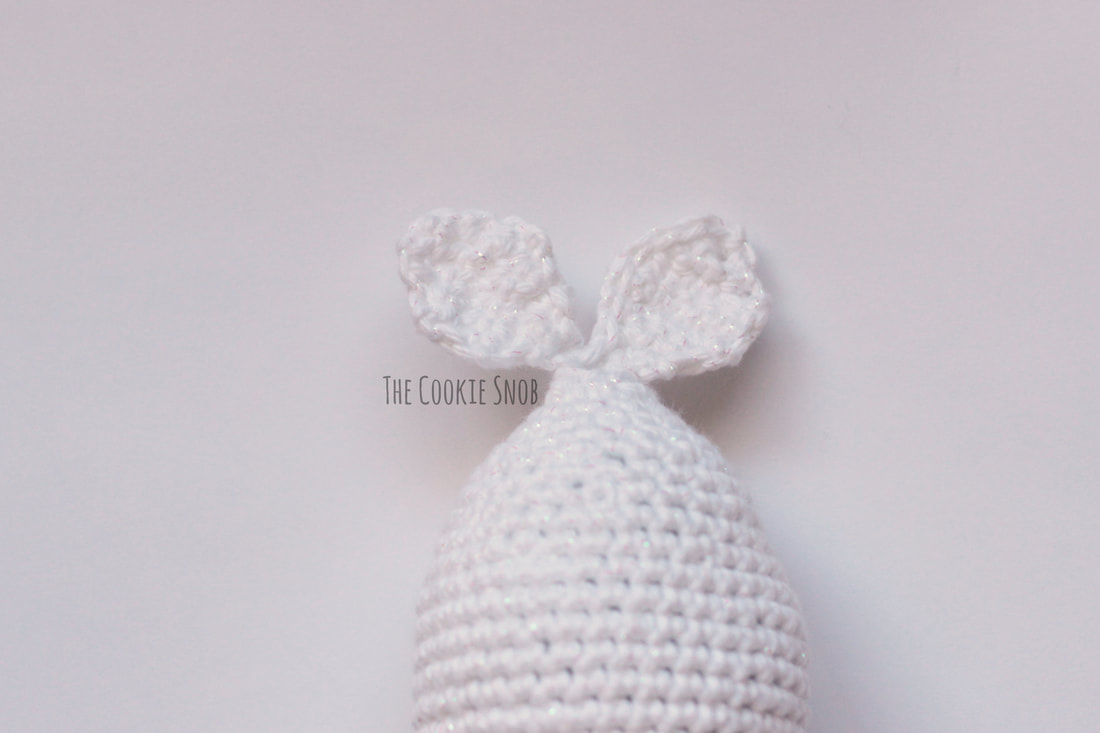 Flipper (Make 2): Using the E hook and the White Sparkle yarn: Round 1: Make a magic circle and work 6 sc into the circle, pull taut (6) Round 2: sc around (6) Round 3: inc 6 times (12) Round 4: sc around (12) Round 5: [dec, sc] 4 times (8) Rounds 6-7: sc around (8) Round 8: [dec, sc in the next 2 sts] twice (6) Fasten off, leaving a long yarn tail for sewing. Flatten the flipper (do not stuff) and sew onto the sides of the body using the tapestry needle and the yarn tail. Weave in remaining ends.  And your seal is done! Now let's take a look at the accessories. 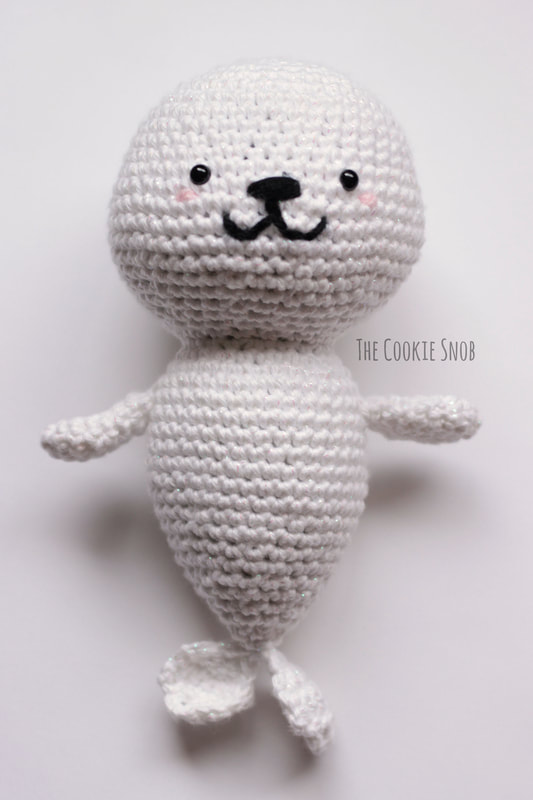 Beanie: Using the I hook and the Apple Green yarn: Round 1: Make a magic circle and work 12 dc into the circle, pull taut and ss to the first dc to join (12) Round 2: ch 2, dc inc 12 times, ss to join (24) Round 3: ch 2, [dc inc, dc] 12 times, ss to join (36) Rounds 4-6: ch 2, dc around, ss to join (36) Switch to White yarn Round 7: ch 1, hdc in the front loop only around, ss to join (36) Round 8: ch 2, dc around, ss to join (36) Fasten off and weave in ends. Sew the pompom to the top of the hat and fold up the white brim. 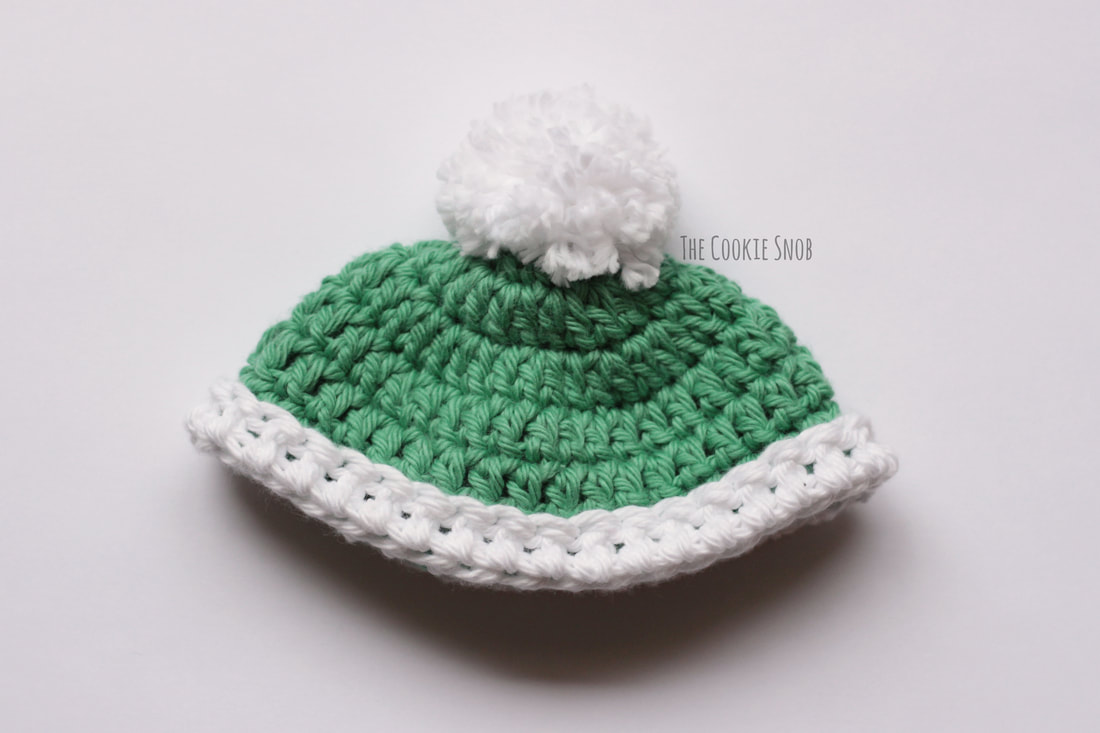 Scarf: Using the I hook and the Aubergine yarn: Ch. 4 Row 1: sc in the 2nd ch from the hook and in the next 2 sts, turn (3) Row 2: ch 1, sc across, turn (3) Repeat Row 2 until the scarf is about 20" long (or a different length if you prefer) Fasten off and weave in ends. 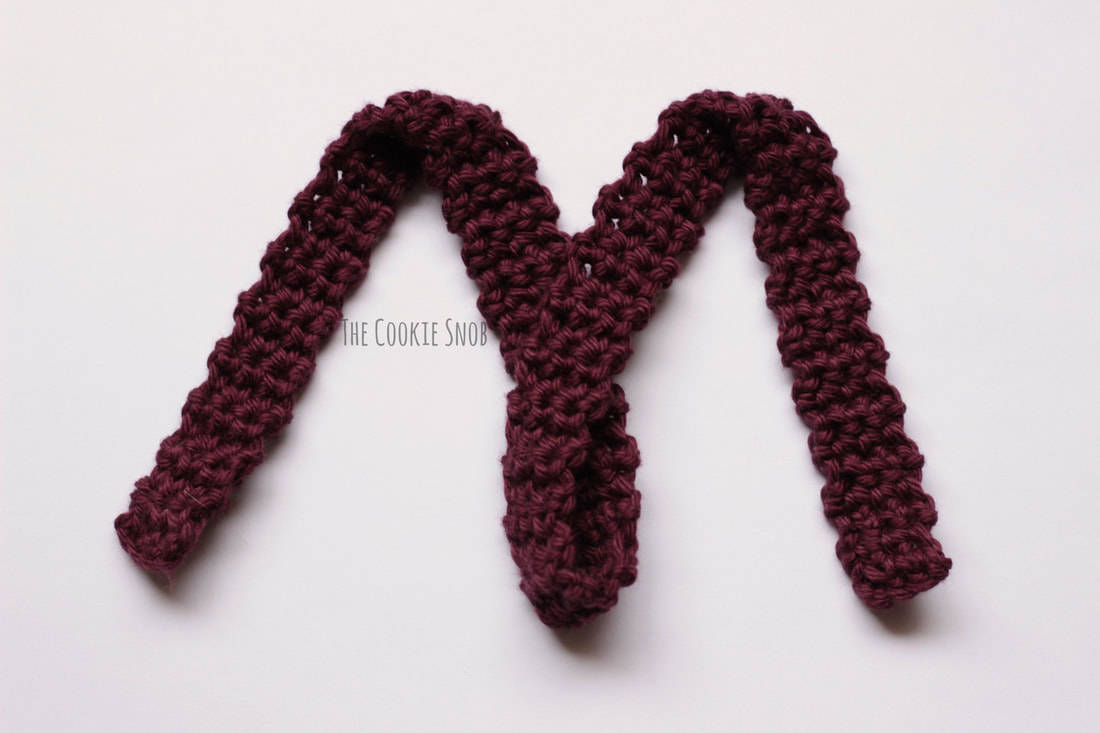 Your little seal is now ready for whatever holiday (or regular day) you want to celebrate! I hope that you enjoy this fun pattern! If you have any comments or questions, you reach me in the comments section below or on social media. And, of course, if you make a seal, I'd love to see it! Seeing your crochet creations always makes my day. Happy hooking and happy holidays! Want to make sure you don't miss any future blog posts? Join my mailing list:  ***You're welcome to do whatever you'd like to with finished products made from this pattern but if you do sell them, I ask that you link back to my page. You may not copy this pattern, repost it anywhere (either altered or in its original form), or claim it as your own. You may not use any photos on this site for your own use. ***
2 Comments
Platypus
10/20/2021 11:14:51 am
It is so cute! What size did it end up being? :) 1/29/2024 12:26:20 pm
Podlix Breeze Pro Flavors is a cutting-edge line of electronic vaporizers designed for users seeking a sleek and user-friendly vaping experience. Crafted with precision and style, these devices offer a perfect blend of form and function. With a focus on simplicity, Podlix Breeze Pro Flavors Flavors feature easy-to-use controls, ensuring both novices and seasoned vapers can enjoy a hassle-free experience. Leave a Reply. |
Welcome!Thank you for stopping by to visit my own personal corner of the web! Feel free to take a look around and check out what I've been crafting, crocheting, or baking. Hopefully you'll find something to inspire your own creativity!   
Archives
March 2024
|
 RSS Feed