
|
I've been in a bit of crocheting rut lately. I let myself get down about how the blog's going (I don't get compensated in any way for this blog, so it's easy to fall down the external validation rabbit hole, since there's not really anything else to reward my efforts). But then I remembered some really excellent advice I got from my creative writing professor, back in the day. He told us to just write what we would want to read; doing what interests you will always give better results than trying to please your audience. So I decided to get back to something I love with my next crochet project and make myself a eukaryotic cell pillow. Biology nerd for life! 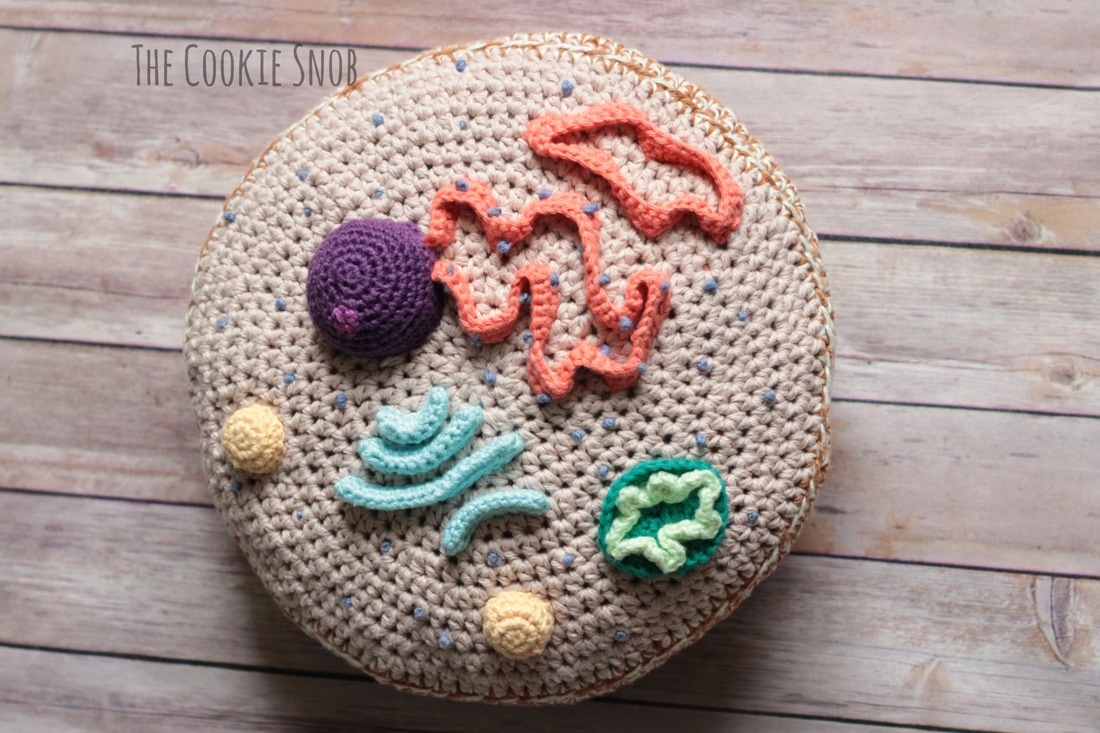 While I doubt most people (or really anyone but me) would want one of these, it makes me happy, so I thought I'd share the pattern anyway. Who knows? Maybe some fellow science lover will make one someday. I made all of mine from various colors of I Love This Cotton! Yarn, since it was what I had on hand. Feel free to ask if you want specific color names. The main body of the pillow was crocheted holding two strands together, but it should work with bulky yarn as well. Gauge doesn't matter for the project; if you really want to avoid any stuffing showing at all you may want to size down, but I'm pleased with how it turned out as is. If the pattern looks strange to you, it's probably because I staggered the locations of the increases/decrease to keep it more round; you could do a more traditional increase pattern, but it'll have funny corners on it. If you'd like a printable, PDF version of this pattern, you can find one on Ravelry. 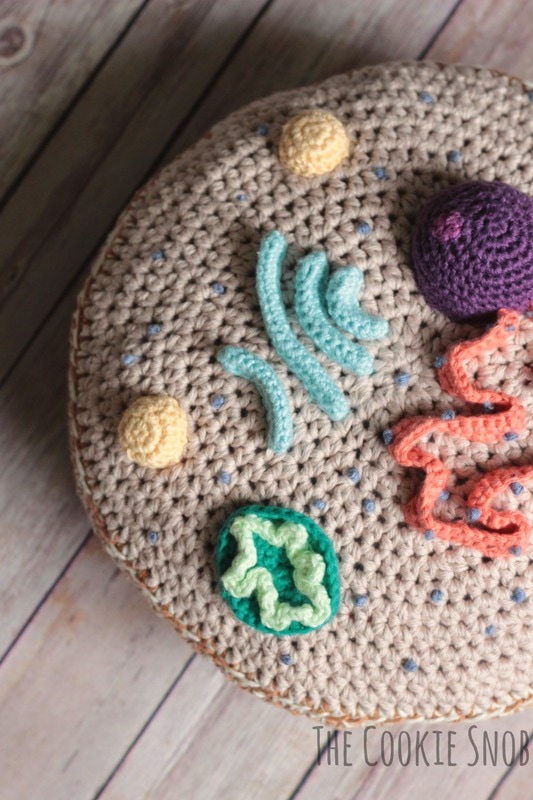 Materials:
Stitch Glossary: st(s) = stitch(es) ch = chain sc = single crochet ss = slip stitch inc = work 2 sc in the same st hdc = half double crochet hdc inc = work 2 hdc in the same st hdc dec = hdc decrease (work 2 hdc together) dc = double crochet Note: Most of this pattern is worked in the round (meaning the stitches are worked in a continuous spiral). I recommend using a stitch marker and moving it after every round to help you keep track of which round you're working on. Cytoplasm (Pillow Base): Using 2 strands of worsted weight yarn held together and the J hook: Round 1: make a magic circle and work 8 hdc into the circle (8) Round 2: hdc inc around (16) Round 3: [hdc inc, hdc] around (24) Round 4: hdc, [hdc inc, hdc in the next 2 sts] 7 times, hdc inc, hdc (32) Round 5: [hdc inc, hdc in the next 3 sts] around (40) Round 6: hdc in the next 2 sts, [hdc inc, hdc in the next 4 sts] 7 times, hdc inc, hdc in the next 2 sts (48) Round 7: [hdc inc, hdc in the next 5 sts] around (56) Round 8: hdc in the next 3 sts, [hdc inc, hdc in the next 6 sts] 7 times, hdc inc, hdc in the next 3 sts (64) Round 9: [hdc inc, hdc in the next 7 sts] around (72) Round 10: hdc in the next 4 sts, [hdc inc, hdc in the next 8 sts] 7 times, hdc inc, hdc in the next 4 sts (80) Round 11: [hdc inc, hdc in the next 9 sts] around (88) Round 12: hdc in the next 5 sts, [hdc inc, hdc in the next 10 sts] 7 times, hdc inc, hdc in the next 5 sts (96) Round 13: [hdc inc, hdc in the next 11 sts] around (104) Round 14: hdc in the next 6 sts, [hdc inc, hdc in the next 12 sts] 7 times, hdc inc, hdc in the next 6 sts (112) Optional: to even it off, sc, then ss. Fasten off. 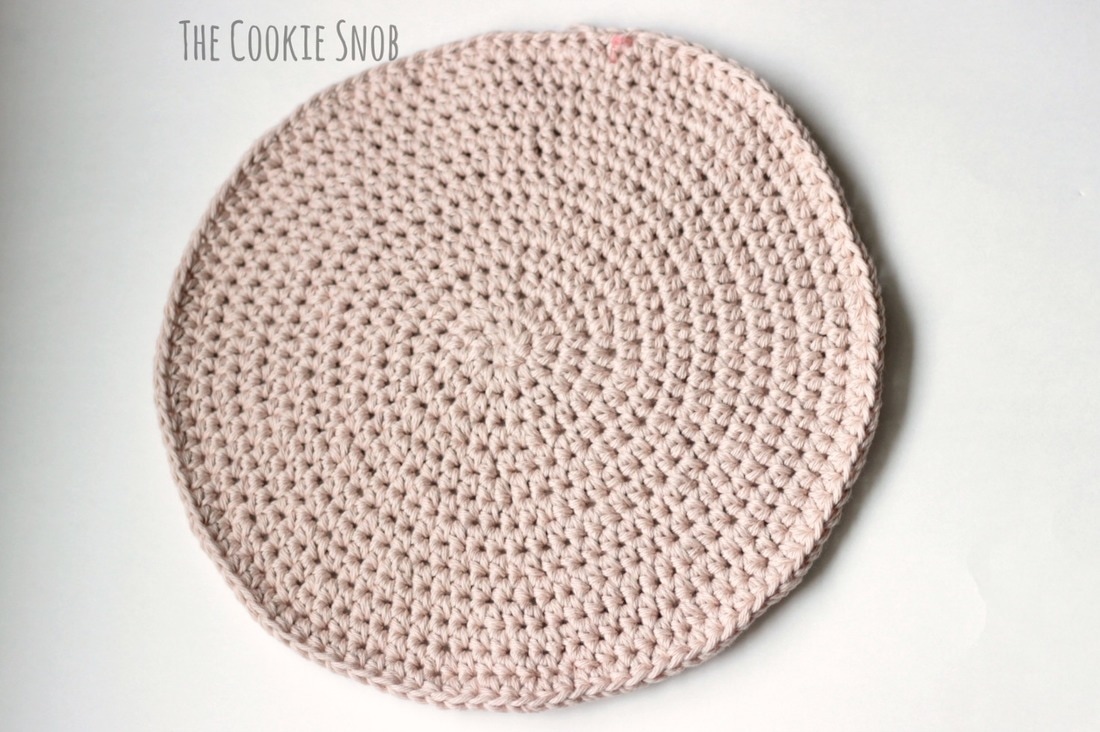 Nucleus: Using one strand of worsted weight yarn and the G hook: Round 1: make a magic circle and work 6 sc into the circle (6) Round 2: inc around (12) Round 3: [inc, sc] around (18) Round 4: [inc, sc in the next 2 sts] around (24) Round 5: [inc, sc in the next 3 sts] around (30) Round 6: sc around (30) Round 7: [inc, sc in the next 4 sts] around (36) Rounds 8-10: sc around (42) Ss to even off. Fasten off, leaving a long yarn tail for sewing. 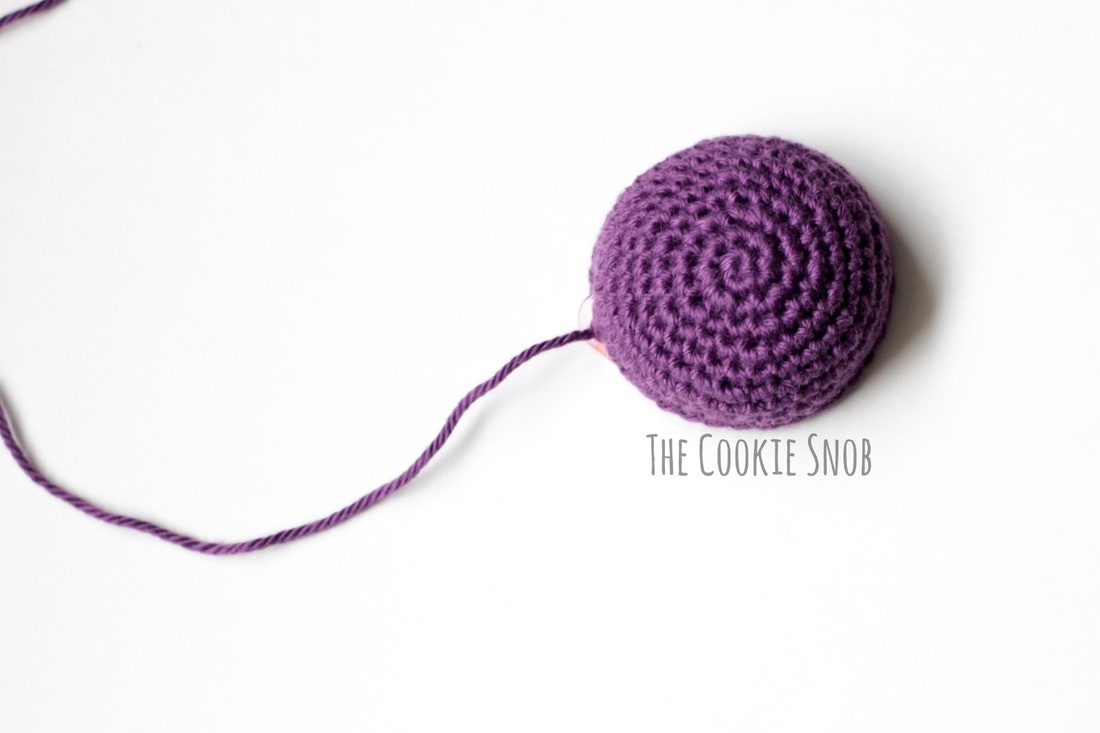 If you'd like to, you can stitch a nucleolus onto the nucleus using a contrasting yarn color. Then stuff with fiberfill and sew onto your pillow base using the long yarn tail. 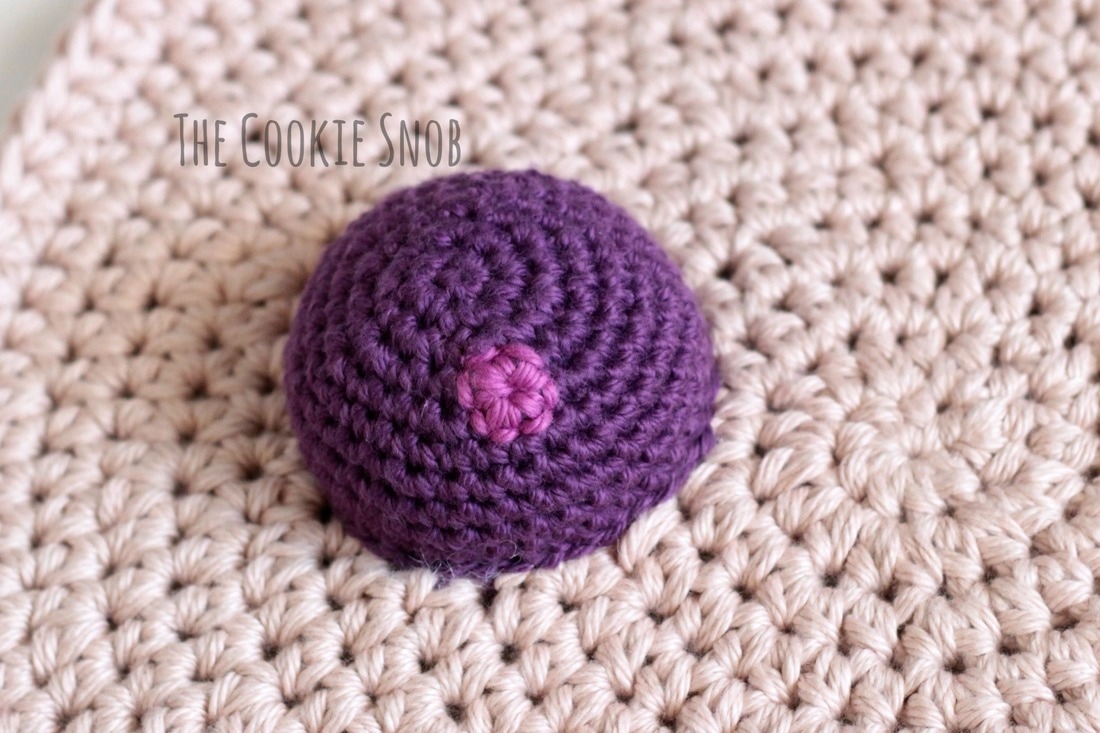 Golgi Body: Using one strand of worsted weight yarn and the G hook: Large Golgi Piece (make 1): Ch 18 Row 1: sc in the 2nd ch from the hook and in the next 15 sts, work 3 sc in the last st, then turn the piece and continue on the other side and sc in the next 15 sts, inc in the last st, ss to join (36) 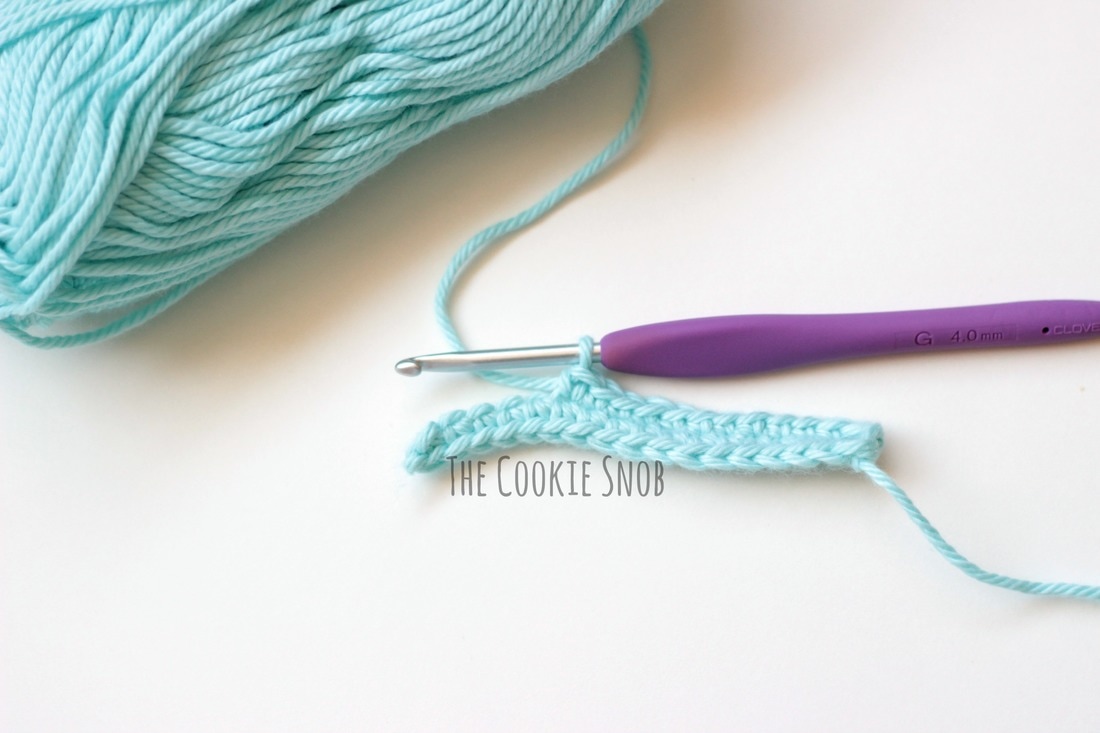 Row 2: ch 1, sc around, ss to join (36) Fasten off, leaving a long yarn tail for sewing. 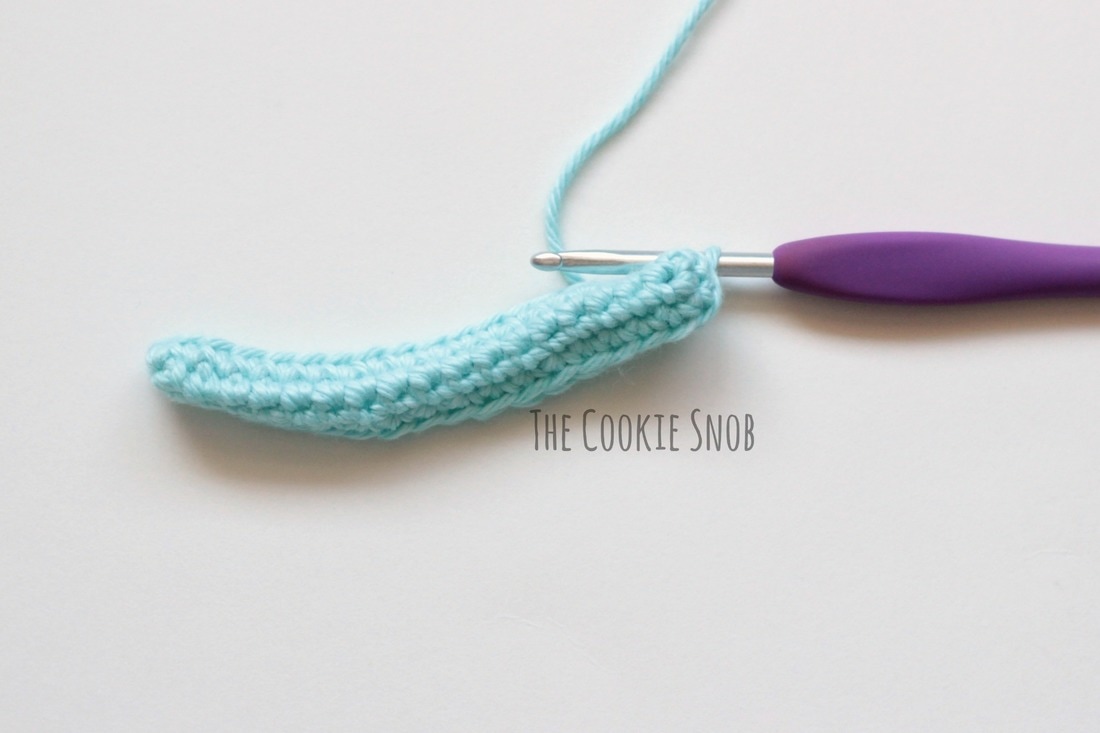 Medium Golgi Piece (make 2): Ch 12 Row 1: sc in the 2nd ch from the hook and in the next 9 sts, work 3 sc in the last st, then turn the piece and continue on the other side and sc in the next 9 sts, inc in the last st, ss to join (24) Row 2: ch 1, sc around, ss to join (24) Fasten off, leaving a long yarn tail for sewing. Small Golgi Piece (make 1): Ch 8 Row 1: sc in the 2nd ch from the hook and in the next 5 sts, work 3 sc in the last st, then turn the piece and continue on the other side and sc in the next 5 sts, inc in the last st, ss to join (16) Row 2: ch 1, sc around, ss to join (16) Fasten off, leaving a long yarn tail for sewing. Fold the golgi pieces in half and sew them onto the pillow base as shown (or in a different arrangement of your choosing) using the long yarn tails. Be sure to bend the pieces before sewing so that they're curved rather than straight lines. 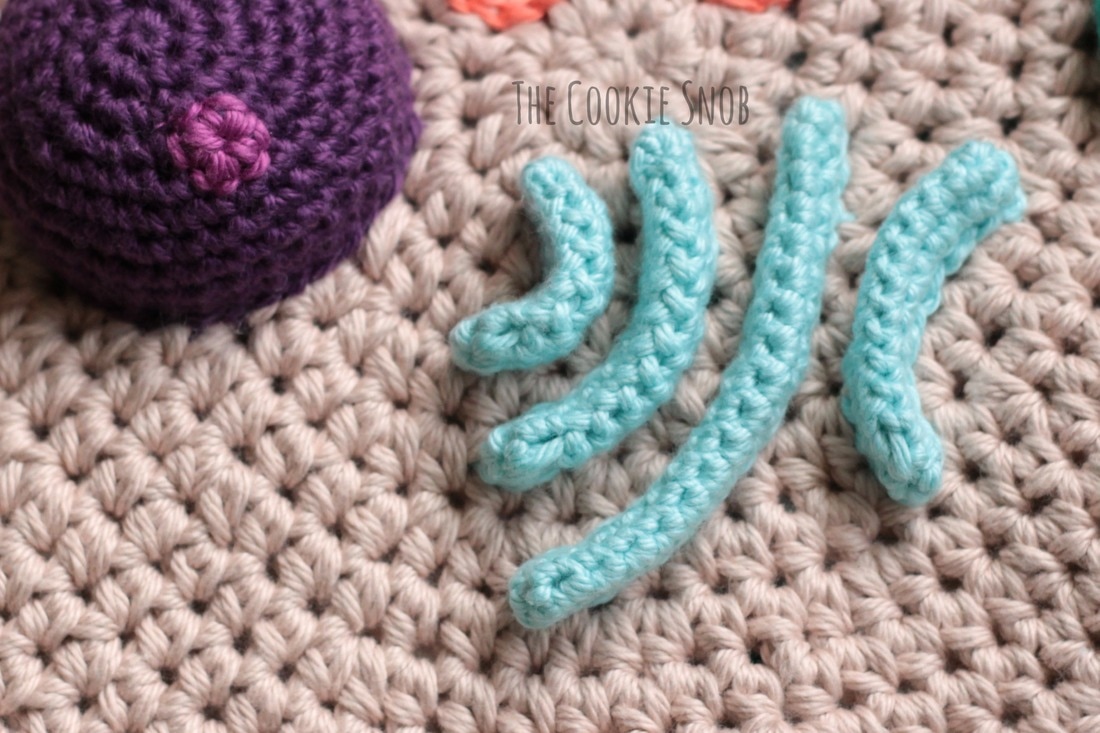 Lysosome (make 2): Using one strand of worsted weight yarn and the G hook: Round 1: make a magic circle and work 6 sc into the circle (6) Round 2: inc around (12) Round 3: [inc, sc] around (18) Round 4: sc around (18) Ss to even off. Fasten off, leaving a long yarn tail for sewing. Stuff with fiberfill and stitch onto pillow base in desired locations using the yarn tail. 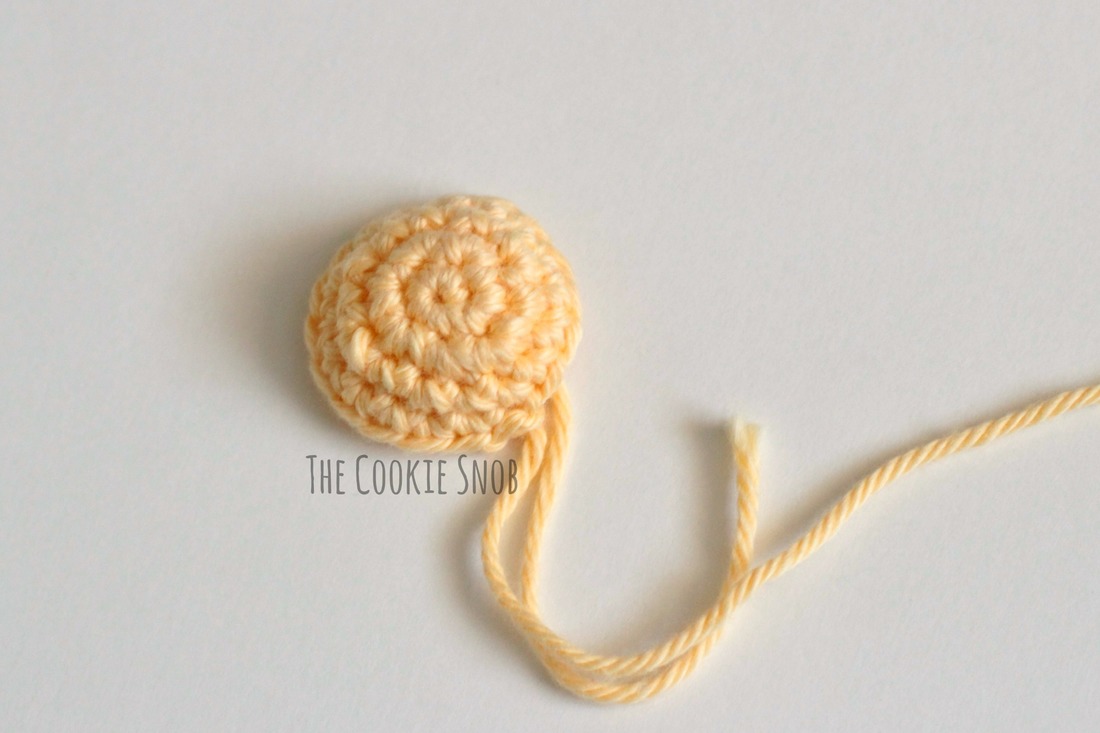 Mitochondria: Using one strand of worsted weight yarn and the G hook: Round 1: make a magic circle and work [sc, hdc, sc] twice into the circle (6) Round 2: [inc, hdc inc, inc] twice (12) Round 3: [inc, sc, hdc inc, hdc, inc, sc] twice (18) Round 4: [inc, sc in the next 2 sts, hdc inc, hdc in the next 2 sts, inc, sc in the next 2 sts] twice (24) Round 5: [inc, sc in the next 3 sts, hdc inc, dc in the next 2 sts, hdc, inc, sc in the next 3 sts] twice (30) Round 6: sc around (30) Ss to even off. Fasten off, leaving a long yarn tail for sewing. Using a contrasting color and the E hook, surface crochet an oval on the inside of the mitochondria. 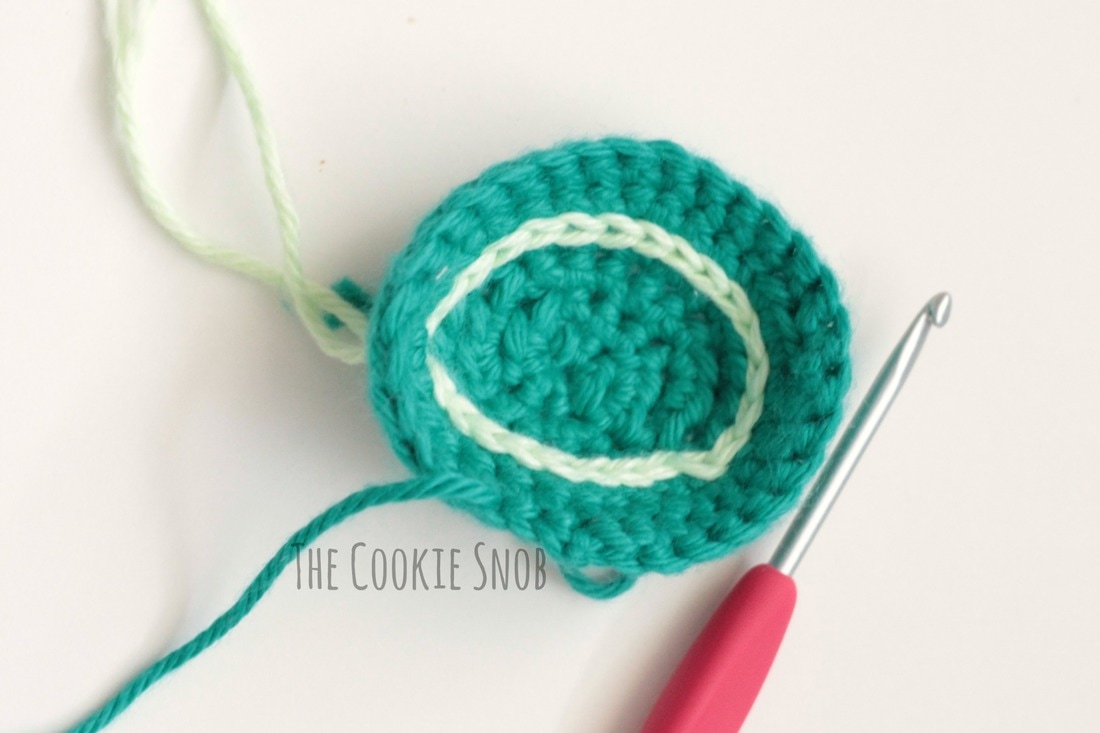 Then join your yarn to the top of the surface crochet, ch 2, and hdc inc in the same st. Then work 3 hdc in each surface crochet stitch around. Ss to join and fasten off. Using the long yarn tail from the body of the mitochondria, sew the mitochondria onto the pillow base (don't sew it at the outer edges if you want to retain the 3D cup-like shape, but sew it at the bottom, near the surface crochet instead). 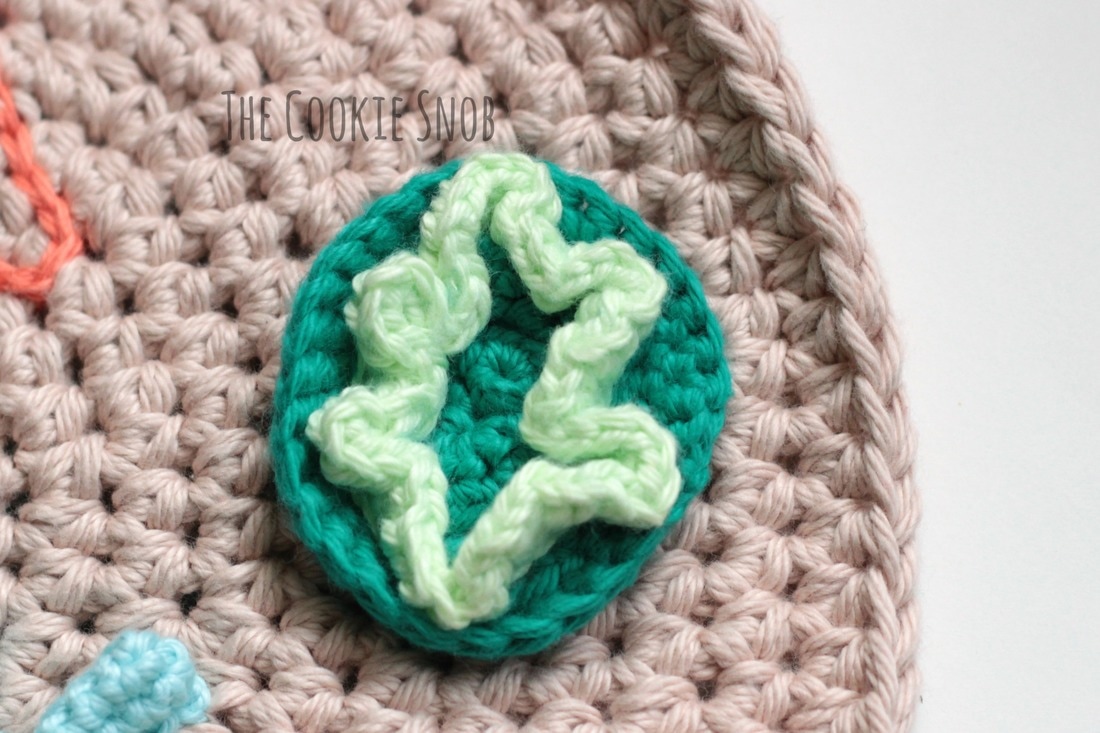 Endoplasmic Reticulum (ER): Using one strand of worsted weight yarn and the G hook, surface crochet the outline of the ER onto the pillow base, as shown (or use a shape of your own design).  Then join your yarn to the top of the surface crochet. Ch 2, then hdc across each surface crochet st. To make it taller, ch 1, turn, then sc across each st. Fasten off. To make it into a rough ER, add ribosomes by stitching on French knots in a contrasting color. I chose to make 2 different ERs for mine: one rough (with ribosomes) and one smooth (without ribosomes). 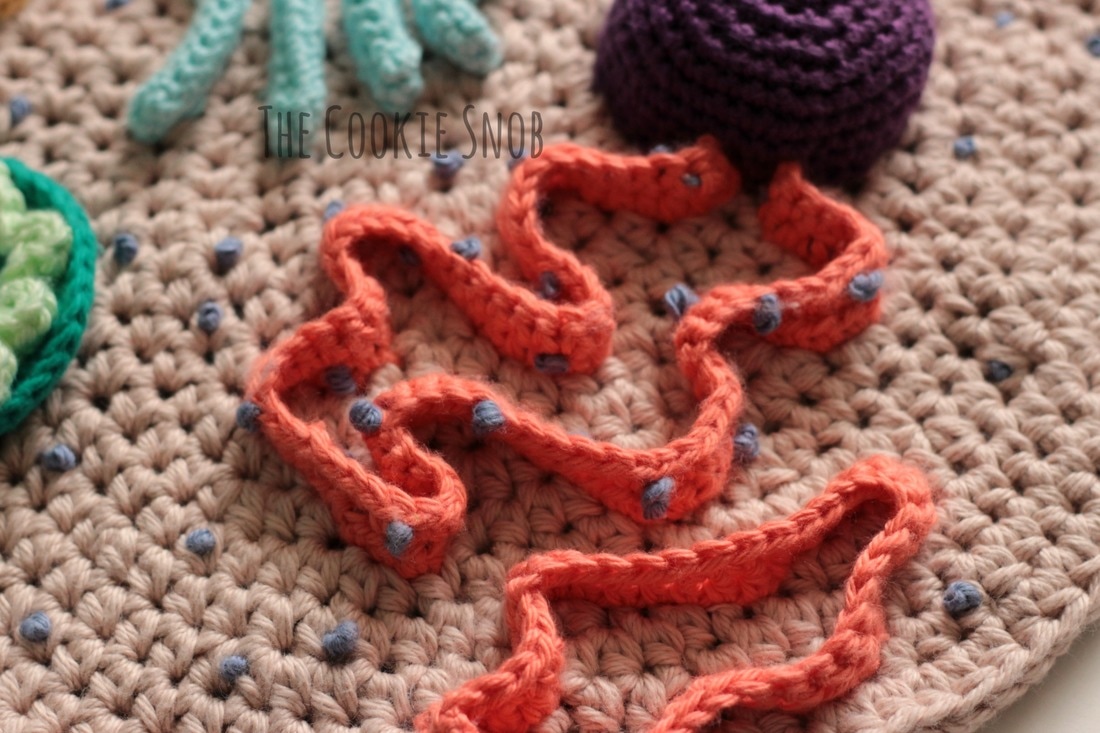 Now step back and admire all your hard work! You can easily customize your cell by adding more of any organelle you might want. I ended up using 2 lysosomes and 2 ERs for mine and 1 of everything else. You can also stitch on additional ribosomes in the cytoplasm by adding French knots in random locations. You don't need to worry about weaving in any ends, since they'll be hidden inside of the pillow by the time it's finished (#winning). 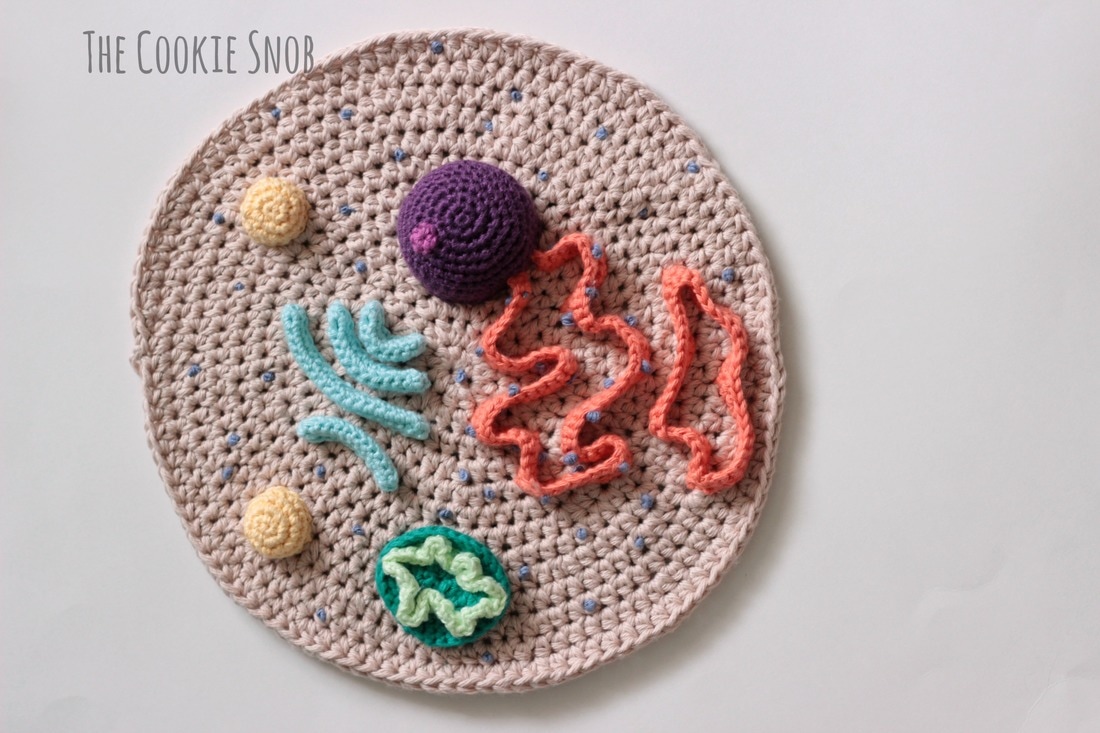 Cell Membrane (Pillow Back): Using 2 strands of worsted weight yarn held together and the J hook: Round 1: Join the yarn and sc around the outer edge of the pillow base (112) 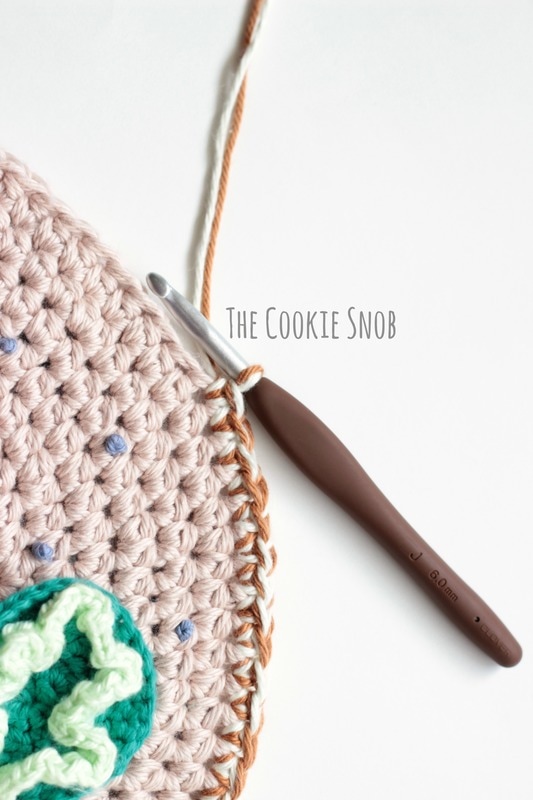 Round 2: hdc around in back loops only (112) Round 3: hdc around (112) Round 4: hdc in the next 6 sts, [hdc dec, hdc in the next 12 sts] 7 times, hdc dec, hdc in the next 6 sts (104) Round 5: [hdc dec, hdc in the next 11 sts] around (96) Round 6: hdc in the next 5 sts, [hdc dec, hdc in the next 10 sts] 7 times, hdc dec, hdc in the next 5 sts (88) Round 7: [hdc dec, hdc in the next 9 sts] around (80) Round 8: hdc in the next 4 sts, [hdc dec, hdc in the next 8 sts] 7 times, hdc dec, hdc in the next 4 sts (72) Round 9: hdc around (72) Round 10: [hdc dec, hdc in the next 7 sts] around (64) Round 11: hdc in the next 3 sts, [hdc dec, hdc in the next 6 sts] 7 times, hdc dec, hdc in the next 3 sts (56) Round 12: hdc around (56) Round 13: [hdc dec, hdc in the next 5 sts] around (48) Round 14: hdc in the next 2 sts, [hdc dec, hdc in the next 4 sts] 7 times, hdc dec, hdc in the next 2 sts (40) Round 15: [hdc dec, hdc in the next 3 sts] around (32) Begin stuffing pillow. Continue to stuff pillow as you go. Round 16: hdc, [hdc dec, hdc in the next 2 sts] 7 times, hdc dec, hdc (24) Round 17: [hdc dec, hdc] around (16) Round 18: hdc dec around (8) Fasten off. Finish stuffing. Using the tapestry needle, weave the yarn tail through the remaining loops and pull taut to close. Weave in any remaining ends. 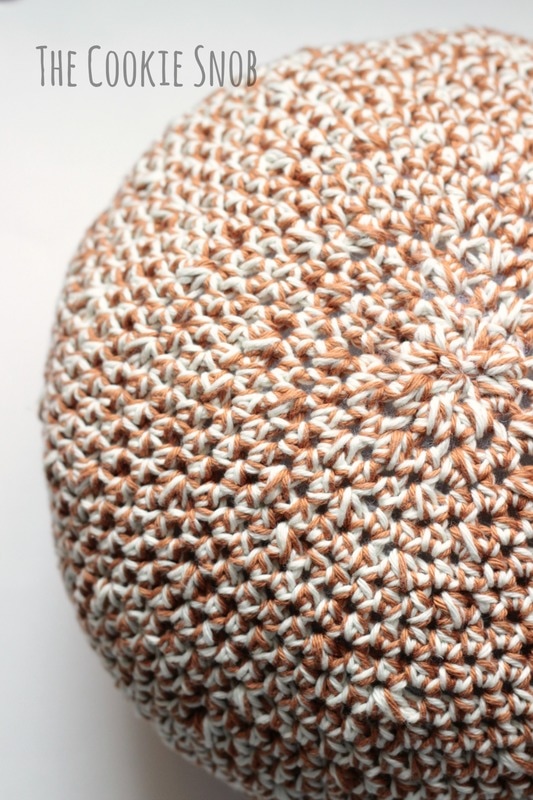 And there you have it! A eukaryotic cell pillow! It's guaranteed to be a conversation piece. And, if nothing else, it makes my nerdy little heart happy. If you end up making one of your own, please share a picture! I would love to see it. And, as always, if you have any questions or comments, you can reach me in the comment section below or on social media. Happy hooking! 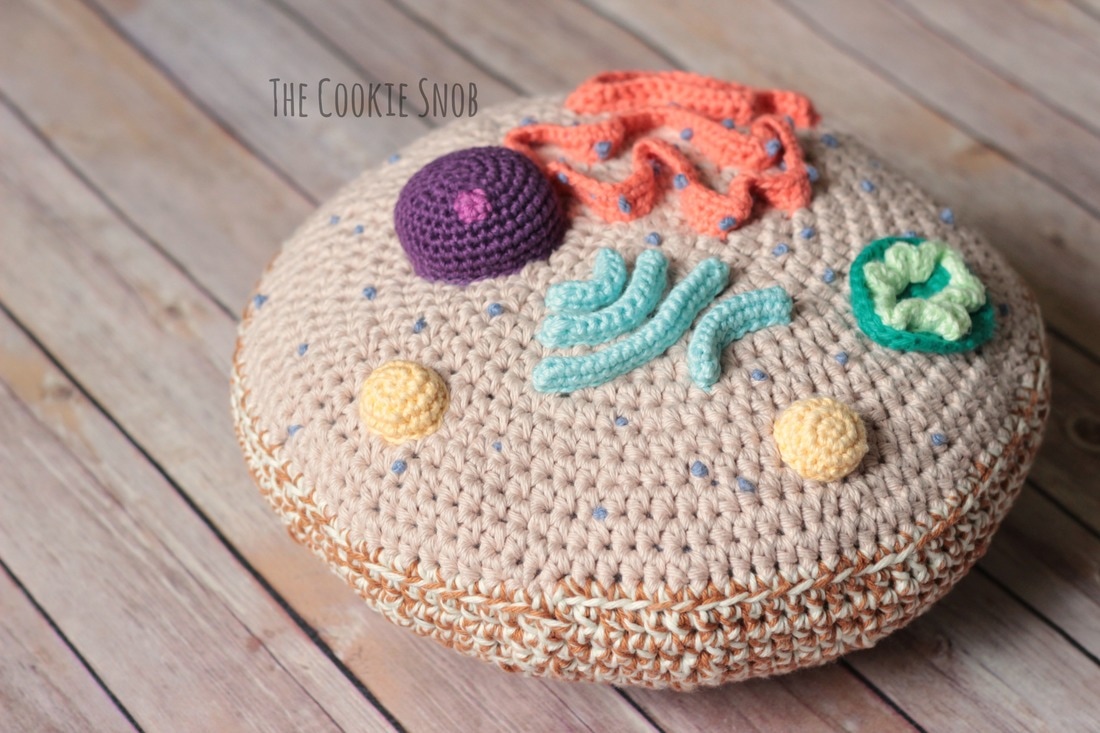 ***You're welcome to do whatever you'd like to with finished products made from this pattern but if you do sell them, I ask that you link back to my page. You may not copy this pattern, repost it anywhere (either altered or in its original form), or claim it as your own. You may not use any photos on this site for your own use. ***
23 Comments
Linda
4/25/2017 10:19:14 pm
Love this!!
Andrea
4/25/2017 11:05:48 pm
This is great! Maybe I can make it for one of my teachers! Thanks!
Cam
4/26/2017 10:49:41 am
Whoa. This is GREAT! Always good to know there are more crocheting biology geeks out here. :)
Kristyn
5/25/2017 04:44:00 pm
That looks so fun what a great sampling.
Angie L Garcia
7/17/2017 09:06:51 pm
when making the cytoplasm on round two you say hdc around but you end up with 16 stitches when you actually end up with 8 do i need to do a double hdc?
Erin
7/17/2017 09:14:22 pm
Oops! Looks like you found a typo. That should be hdc inc (meaning 2 hdc in each st). Thanks for catching that!
Angie L Garcia
7/17/2017 09:21:47 pm
wow you're fast!! thank you very much for responding :) i also bought the pattern I'm making this right now!!!
Erin
7/17/2017 10:52:05 pm
Thank you so much for supporting my blog! I hope you enjoy the pattern :)
Rosie Mims
10/26/2017 08:31:01 am
What do you do for the increase and the decrease
Erin
11/7/2017 10:49:08 am
Hi Rose! Sorry for the delay; I thought I'd already responded, but it doesn't look like it went through. The stitch glossary at the top of the pattern explains all the abbreviations used. But, to sum up, for an increase stitch, you work 2 sts in the same spot. And for a decrease, you work 2 sts together into 1 st. If you've never done increases or decreases before, there are lots of tutorials online that should help show you how. Hopefully that helps! :)
Ashley
7/9/2018 10:29:58 pm
I graduated with a bio degree and I love this! I am going to make this ASAP. I have only been crocheting for 10 months, so I'm not experienced enough to create patterns yet. I was thinking about making a pillow series for mitosis or meiosis. Starting with the prophase, then the metaphase, anaphase, and ending with telophase. What do you think? I would love to discuss it.
Erin
7/10/2018 10:50:08 pm
Crocheting bio nerds unite! I hope you enjoy the pattern :)
Fergie
9/2/2018 03:13:09 am
Oh, this is wonderful! Also a science geek here (-: Thank you for posting!!
Ann Perren
9/2/2018 11:13:49 am
Fellow science geek here, love this I am going to make one that's for sure! What a great idea! Brilliant for teachers to help those kinetic learners much better than a drawing.
christine
9/4/2018 07:29:48 pm
This is a fantastically fun piece of crochet. My B Sc daughter is going to receive one of these for Christmas! Thanks and please know that people do appreciate your artistic abilities!
Stephany
8/11/2019 10:30:42 pm
I am a biology teacher. I made this pattern last summer now I am modifying it for a plant cell. My kids loved the cell last year. A great learning tool and fun classroom decor.
Jasmine
10/30/2020 05:36:02 pm
AMAZING!! I'm doing this for a biology project! That's so much!.
MW
11/2/2021 03:06:47 pm
Hi!
Sarah
4/22/2022 08:19:27 am
I made a plant cell using your guide as a rough guide for my biology class. Now the teacher wants one! Thank you.
Christie
9/5/2022 05:26:39 pm
I just completed mine! Where can I send a picture to?
ChoyceRandum
10/2/2023 04:49:09 am
It is a bit sad that all the bio degree folks teachers and nerds don't point out the following issues.
Mia
10/4/2023 01:17:41 pm
Hi! For surface crocheting the ER, how exactly do you do that? I'm relatively new to crochet. I can follow the rest of the pattern, but I'm a little lost on that part. Would you care to explain it? :) Leave a Reply. |
Welcome!Thank you for stopping by to visit my own personal corner of the web! Feel free to take a look around and check out what I've been crafting, crocheting, or baking. Hopefully you'll find something to inspire your own creativity!   
Archives
March 2024
|
 RSS Feed