
|
Our family is getting ready to move cross-country to Arizona, which is both exciting and overwhelming. I've never lived there before, but one thing that it always makes me think of is cacti. A cactus is a pretty amazing plant. They are such a cool example of adapting to grow and even flourish in extremes. They're basically the ultimate example of "blooming where you're planted." So for this move, I'm trying to think like a cactus, if you will. There are so many wonderful opportunities out there that I'm excited for and I can't wait to bloom in the desert with my little family. I think it's going to be really great for us. To celebrate, it felt especially appropriate to design a cuddly cactus plushy.  I'm extra proud of this design because I had to solve several different challenges to make it work. First I had to find a stitch that would make a dense enough fabric to keep all the stuffing in/hold its shape while still having textured ridges for that cactus look. Then I had to figure out shaping the ridges during increases and decreases while still making it look good. And then I had find a method for creating curved arm pieces while maintaining the ridges and keeping the stitches tight. Check, check, and check! I'm super pleased with how this one turned out and I hope you all love it too! The pictures were extra tricky on this one, since the bright green yarn wreaked havoc on my camera's sensors, so apologies if it's hard to see the stitches; I tried to mark the stitches when needed to (hopefully) help make things easier to follow.  One last note: please pay close attention to the turns in the pattern. If there's no turn listed, do NOT turn the piece at the end of the row. Most of the pattern is made without turning. But there's one section of the arms where you'll have to turn it. I'll bold the turns in the pattern so that you don't miss them. If you'd like an ad-free printable PDF version of this pattern (including a text-only version for simpler printing), you can find one on Ravelry. Stitch Glossary: st(s) = stitch(es) ss = slip stitch ch = chain sc = single crochet inc = sc increase (work 2 sc in the same st) dec = sc decrease (decrease over 2 sc sts) hdc = half double crochet dc = double crochet fpdc = front post dc fpdc2tog = fpdc 2 together (decrease over 2 fpdc sts) BLO = back loop only Materials:
Gauge: For a 10" tall cactus: 2" = 10 sc sts 2" = 10 rows of sc Body: Round 1: Make a magic circle, work 6 sc into the circle, pull taut to close, ss to join (6) Round 2: ch 1, inc 6 times, ss to join (12) Round 3: ch 1, [inc, sc] 6 times, ss to join (18) Round 4: ch 1, [sc, inc, sc] 6 times, ss to join (24) Round 5: ch 1, [inc, sc in the next 3 sts] 6 times, ss to join (30) Round 6: ch 1, [sc in the next 2 sts, inc, sc in the next 2 sts] 6 times, ss to join (36) Round 7: ch 1, [inc, sc in the next 5 sts} 6 times, ss to join (42) Round 8: ch 1, hdc around in BLO, ss to join (42) Round 9: ch 1, [sc, fpdc] around, ss to join (42) Round 10: ch 1, sc around, ss to join (42) Rounds 11-55: repeat rounds 9-10  Now we're going to pause for a minute and add the face. Insert the safety eyes between rounds 40 and 41. The eyes should be 3 ridges apart from each other. Using the tapestry needle and the bit of black yarn, stitch a smile between rounds 33 and 36. Then use a little bit of pink yarn to stitch the cheeks between rounds 37 and 38. I like to stitch them back and forth in the same spot about 5 times to make them thick enough. Begin stuffing the cactus and continue to stuff as you go. 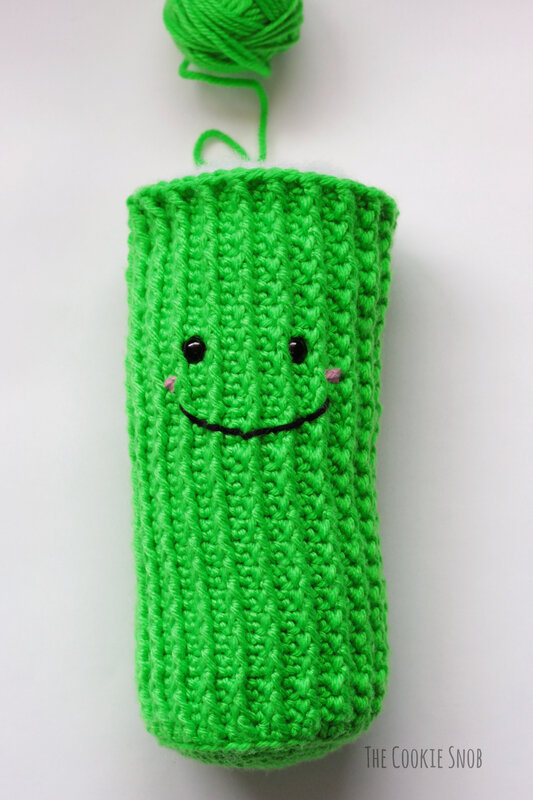 Now it's time to start decreasing. Round 56: ch 1, [dec, sc in the next 5 sts] 6 times, ss to join (36) Round 57: ch 1, [sc, fpdc] 3 times, sc, fpdc2tog, [sc, fpdc] 5 times, sc, fpdc2tog, [sc, fpdc] 5 times, sc, fpdc2tog, [sc, fpdc] 2 times, ss to join (36) Round 58: ch 1, [dec, sc in the next 4 sts] 6 times, ss to join (30) Round 59: ch 1, sc, fpdc, sc, fpdc2tog, [sc, fpdc] 4 times, sc, fpdc2tog, [sc, fpdc] 4 times, sc, fpdc2tog, [sc, fpdc] 3 times, ss to join (30) Round 60: ch 1, [dec, sc in the next 3 sts] 6 times, ss to join (24) Round 61: ch 1, [sc, fpdc] 3 times, sc, fpdc2tog, [sc, fpdc] 3 times, sc, fpdc2tog, [sc, fpdc] 3 times, sc, fpdc2tog, ss to join (24) Round 62: ch 1, [dec, sc in the next 2 sts] 6 times, ss to join (18) Round 63: ch 1, sc, fpdc2tog, [sc, fpdc] 2 times, sc, fpdc2tog, [sc, fpdc] 2 times, sc, fpdc2tog, [sc, fpdc] 2 times, ss to join (18) Round 64: ch 1, [dec, sc] 6 times, ss to join (12) Round 65: ch 1, sc, fpdc, sc, fpdc2tog, sc, fpdc, sc, fpdc2tog, sc, fpdc, sc, fpdc2tog, ss to join (12) Finish stuffing. Fasten off, leaving a long yarn tail. Using the tapestry needle, thread the yarn tail through the front loops of the remaining sts. Pull taut to close. Tie off and weave in ends. 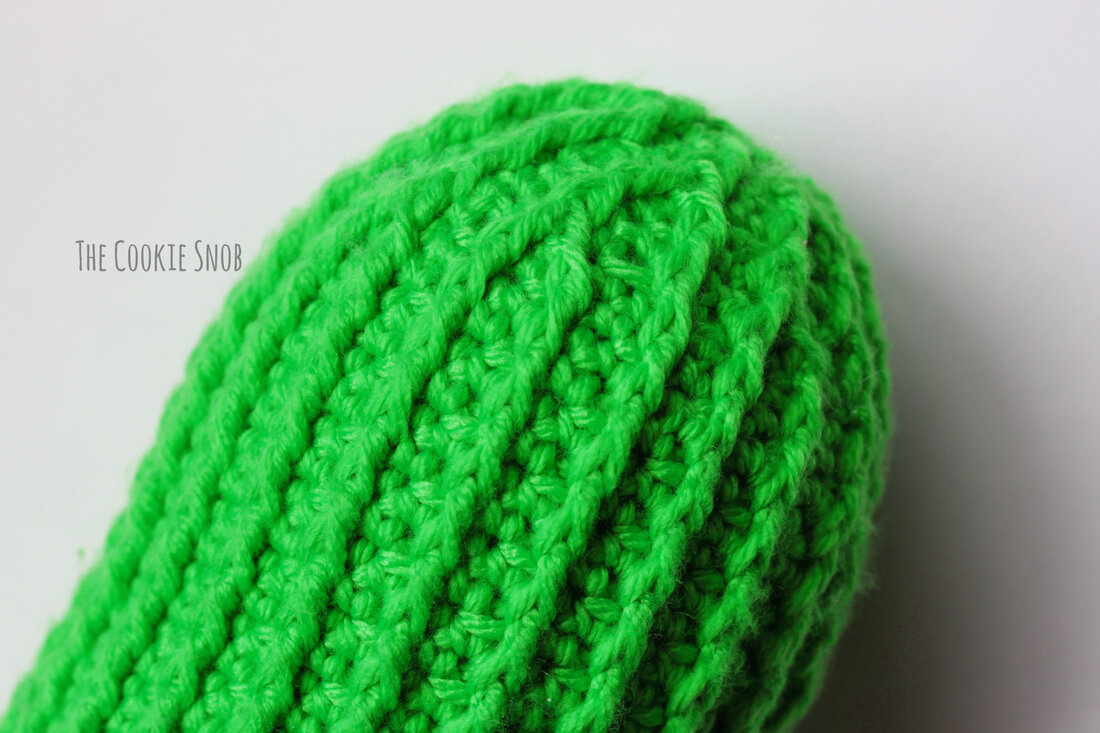 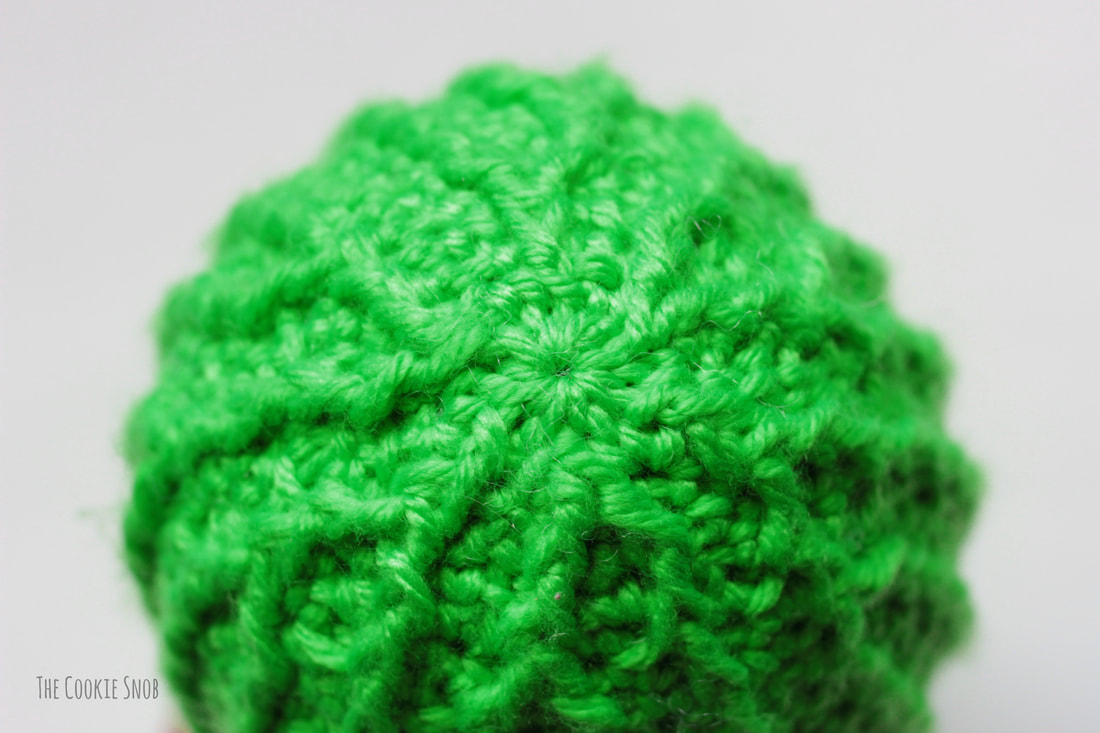 Arms (Make 2): These are a little bit trickier, so I'm gonna walk you through this step by step with some photos. I'll rewrite it again below without the pictures/commentary so you can use whichever version you prefer. Round 1: Make a magic circle, ch 2, work 12 dc into the circle, ss to join (12) Round 2: ch 1, [sc, fpdc] 6 times, ss to join (12) 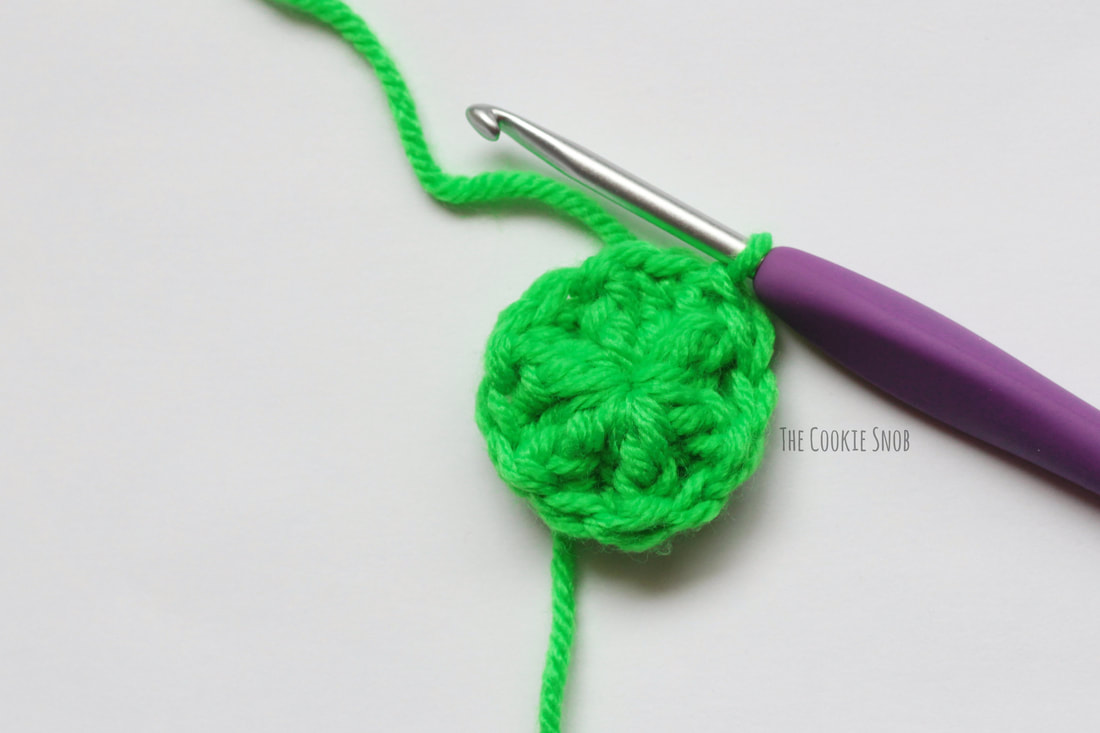 Round 3: ch 1, [inc, sc] 6 times, ss to join (18) Round 4: ch 1, sc, fpdc (indicated with an arrow in the picture below), sc, fpdc in the same st as the previous fpdc (circled below)... 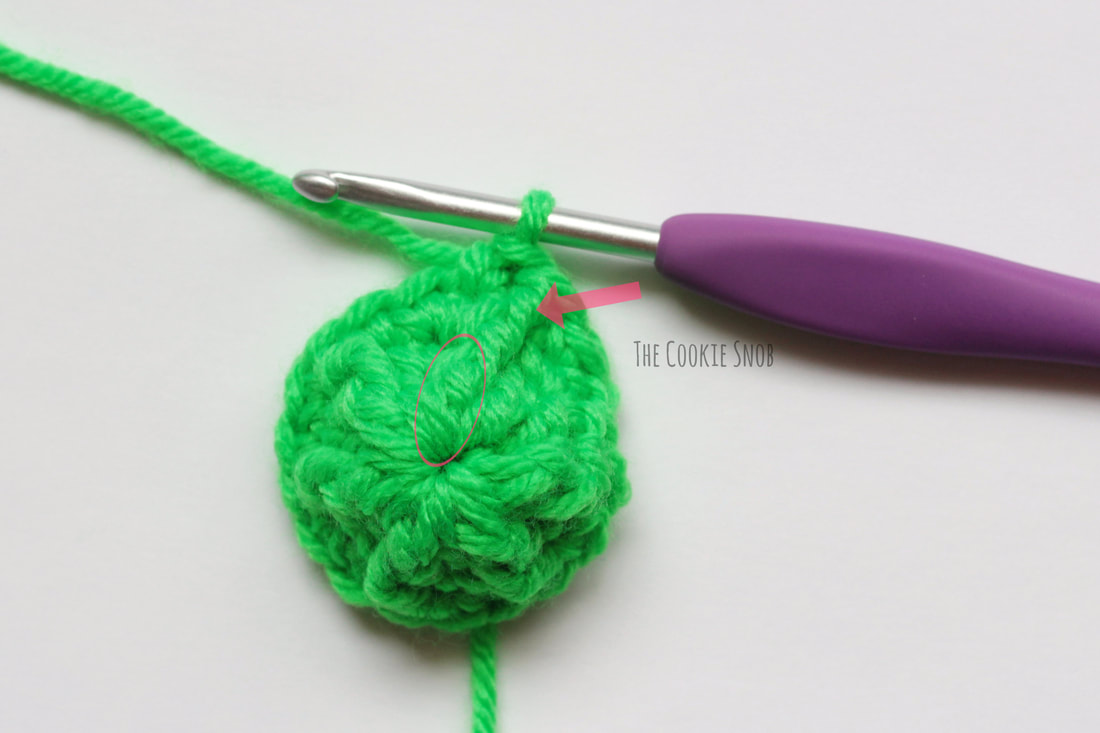 ...See how the front post stitches form a "Y" Shape? This is how we'll be increasing during all the ribbed rows, so keep an eye out for these... 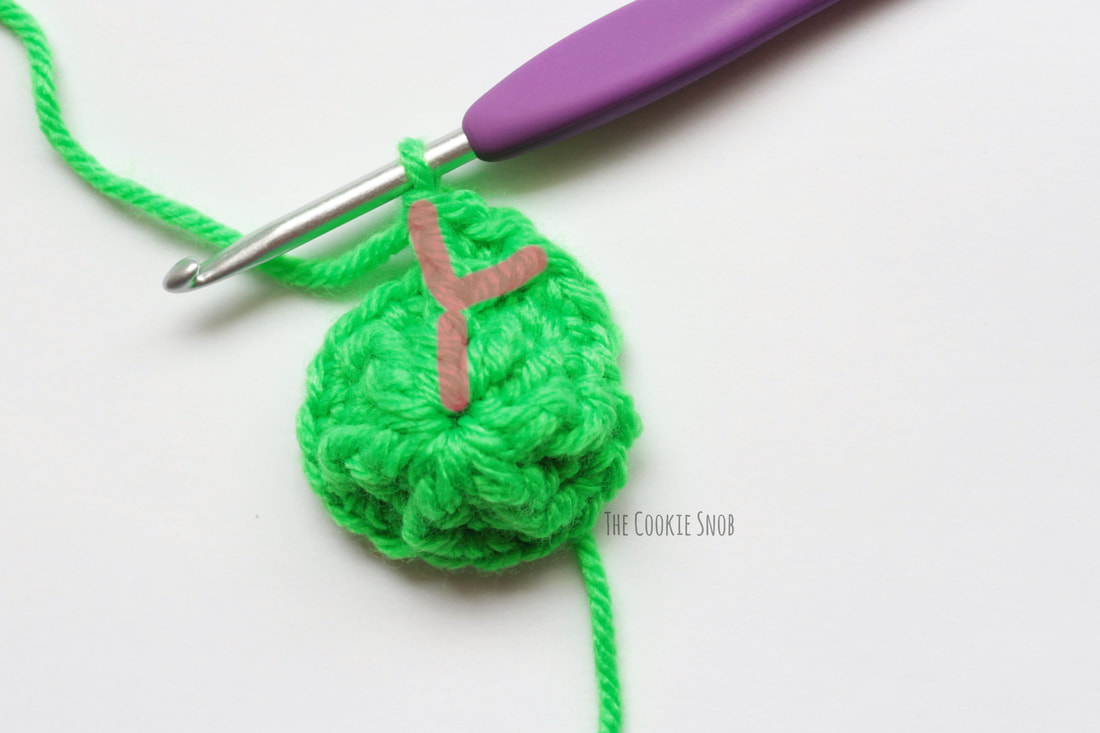 then sc, fpdc, [sc, fpdc, sc fpdc in the same st, sc, fpdc] 2 times, ss to join (18) I've circled all the ribbed increases (the "Y"s) in the picture below so you can see what it should look like. 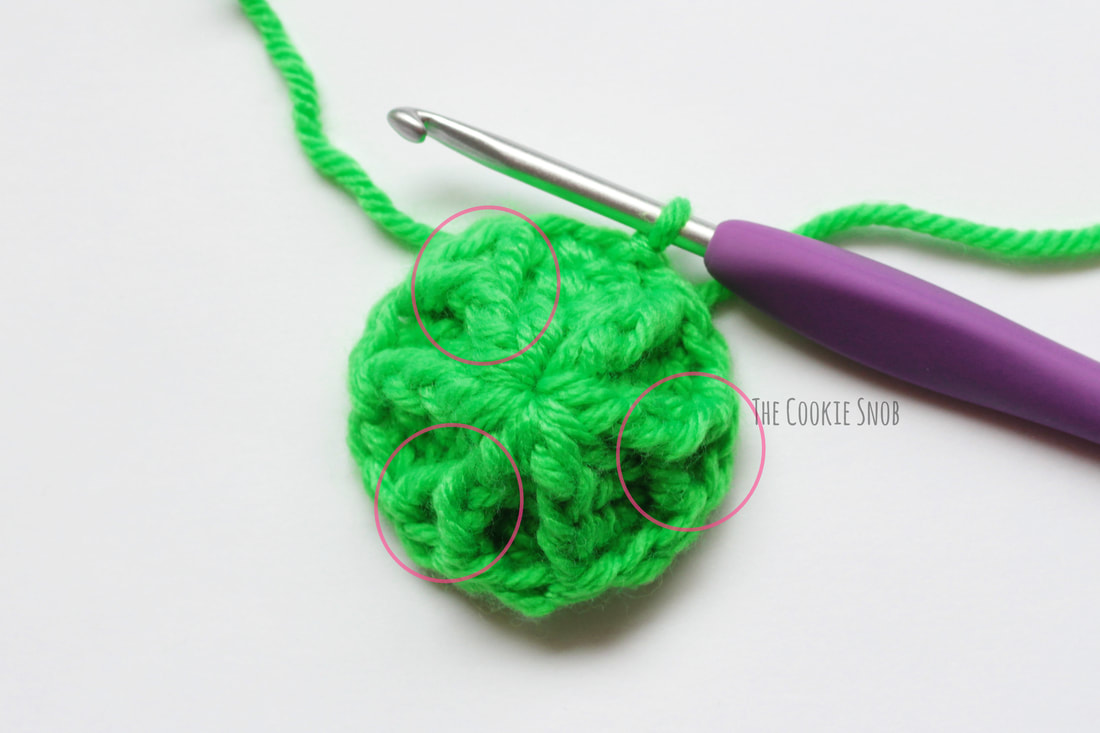 Round 5: ch 1, [inc, sc in the next 2 sts] 6 times, ss to join (24) Round 6: ch 1, sc, fpdc in the post to the right (right behind the stitch, circled in the picture below). . . 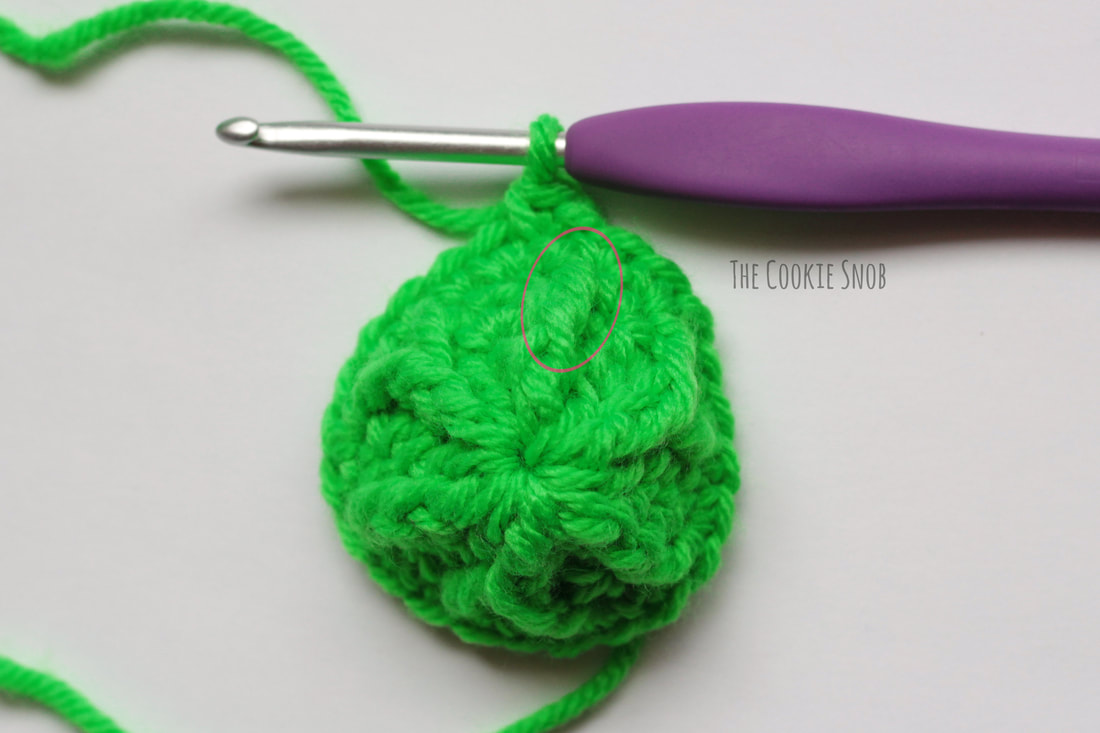 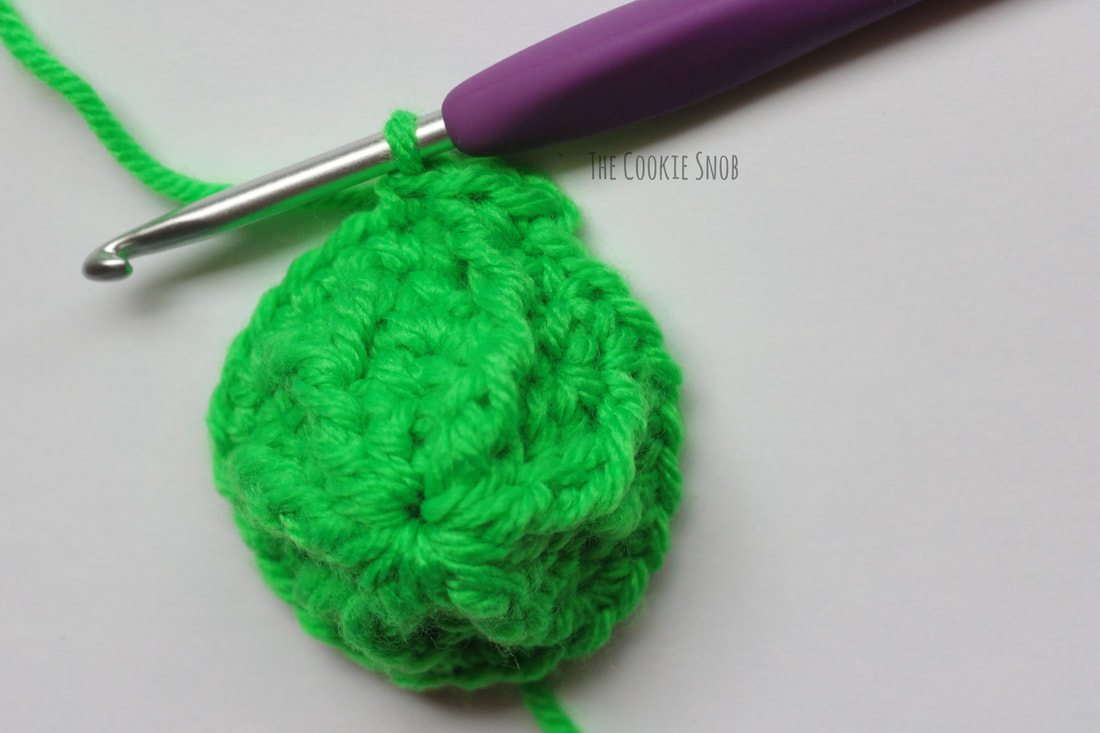 . . . [sc, fpdc, sc, fpdc, sc, fpdc, sc, fpdc in the same st] 2 times, sc, fpdc, sc, fpdc, sc, fpdc in the same st where you worked the first fpdc of the round, ss to join (24) I've marked the new "Y"s for this round in the picture below, in case it's helpful. 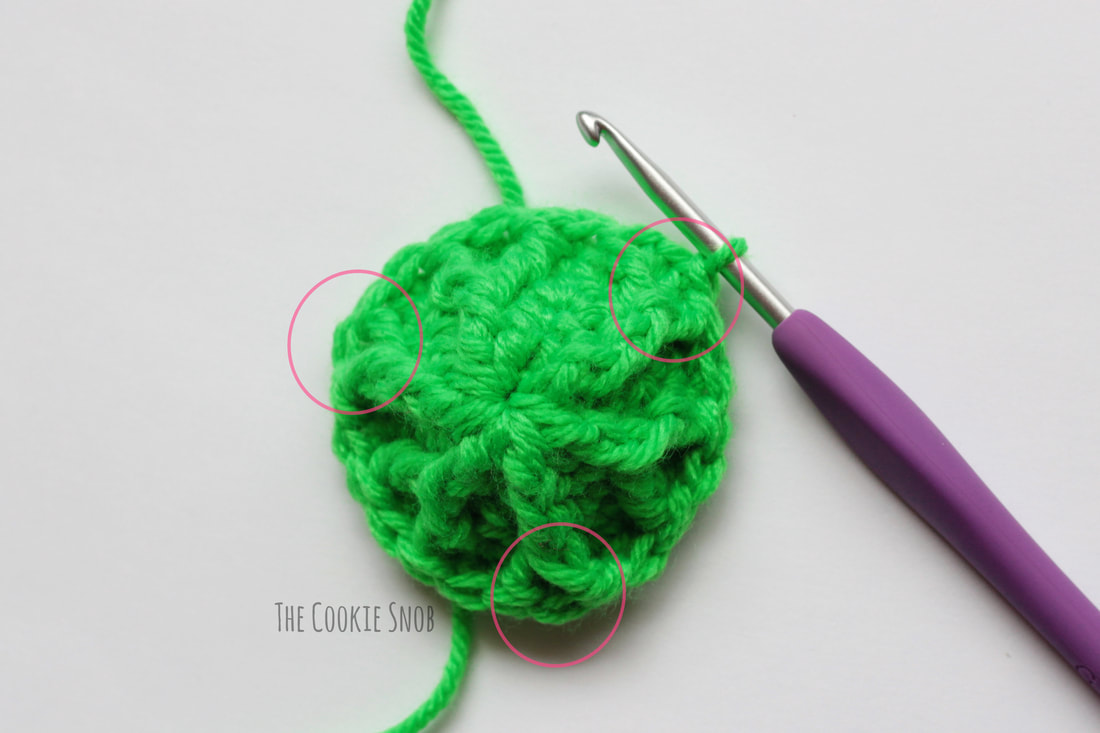 Round 7: ch 1, sc across, ss to join (24) Round 8: ch 1, [sc, fpdc] 12 times, ss to join (24) Rounds 9-10: repeat Rounds 7-8, turn (24) Now we're going to use short rows to shape the "elbow" of the cactus arm Round 11a: ch 1, sc in the next 12 sts, turn (12) Round 11b: ch 1, [sc, fpdc] 6 times, turn (12) Rounds 11c-j: repeat Rounds 11a-11b 4 times (12) Note: Don't forget to turn at the end of Round 11j! 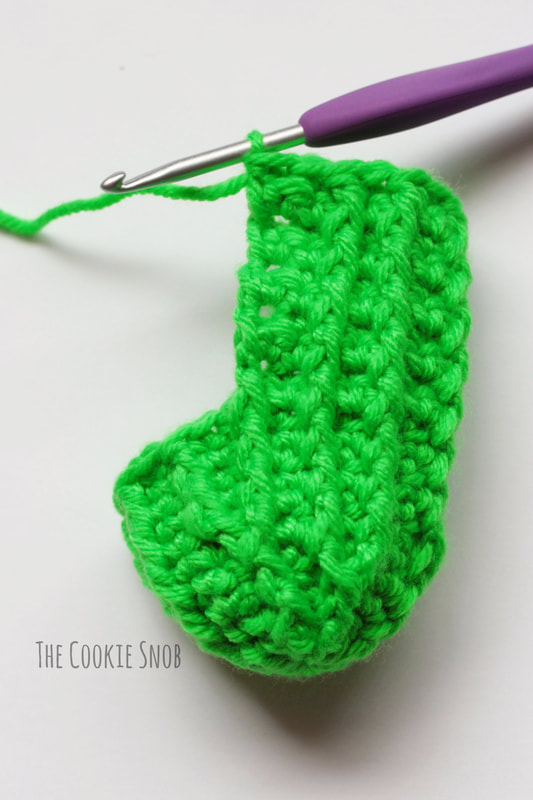 Round 11k: ch 1, sc in the next 12 sts, pick up 5 loops evenly down the side of the short rows you made (as shown below) by inserting your hook, yarning over and pulling up a loop, then insert your hook in the next st, yarn over, pull up a loop, yarn over and pull it through all of the loops on your hook . . . 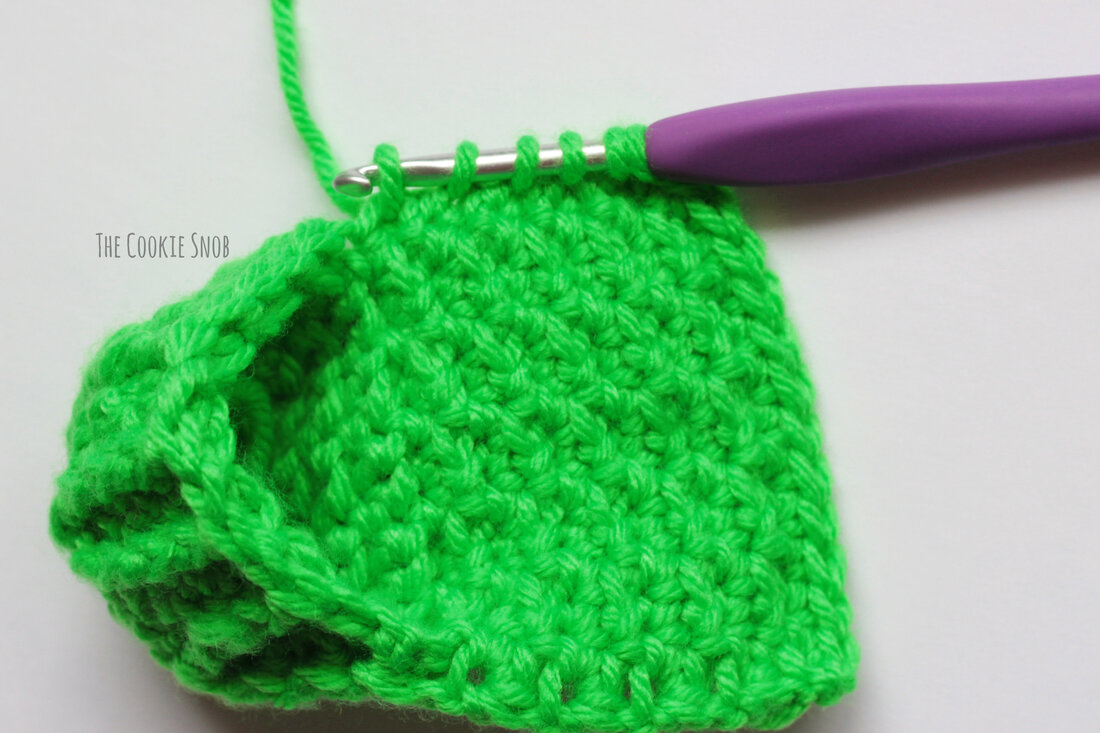 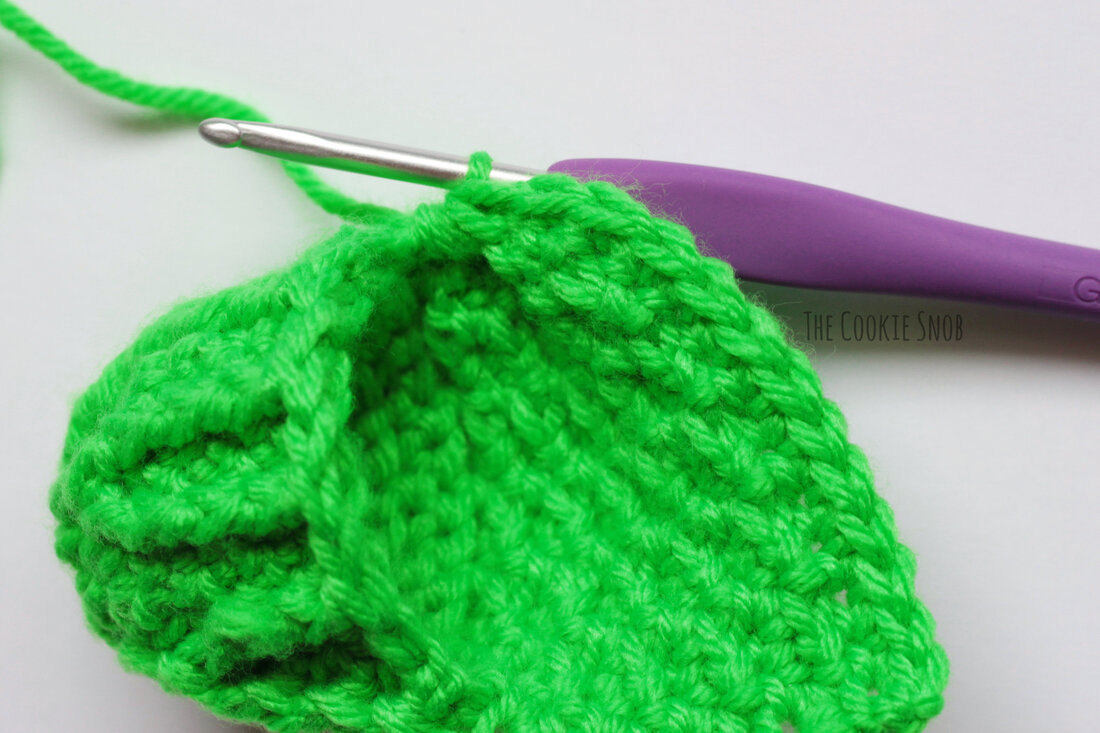 . . . sc in the next 10 sts, insert your hook into the next st, yarn over, pull up a loop, pick up 5 loops evenly up the other side of the short rows in the same way, yarn over and pull it through all of the loops on your hook, ss to join, turn (24) 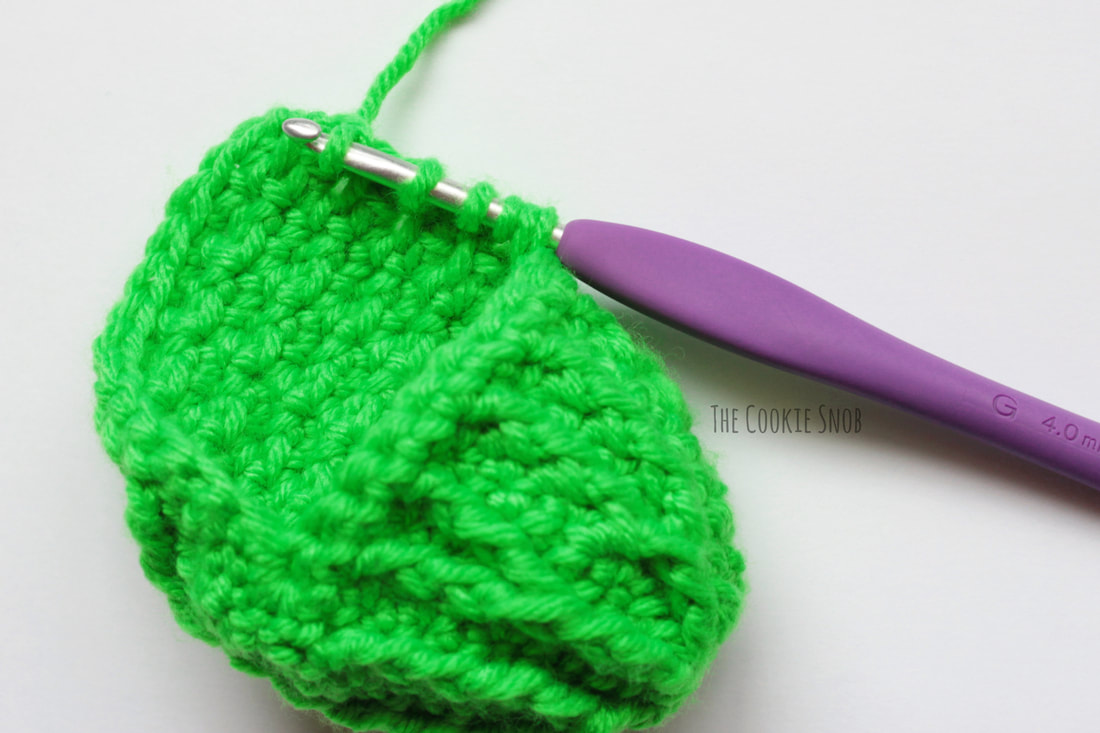 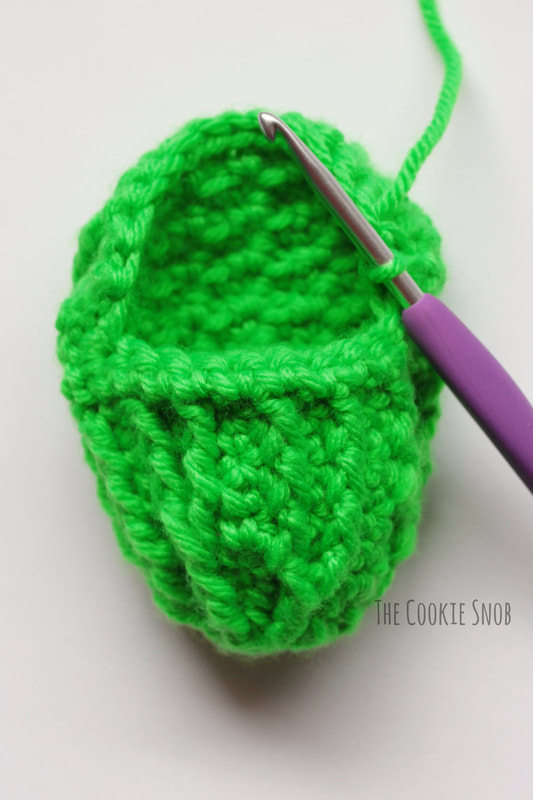 Round 12: ch 1, [sc, fpdc] 12 times, ss to join (24) Round 13: ch 1, sc around, ss to join (24) Round 14: ch 1, [sc, fpdc] 12 times, ss to join (24) Rounds 15-16: Repeat Rounds 13-14 Fasten off, leaving a long yarn tail for sewing.  And here's the pattern for the arms one more time, written out without the extra pictures/commentary (in case that works better for you): Round 1: Make a magic circle, ch 2, work 12 dc into the circle, ss to join (12) Round 2: ch 1, [sc, fpdc] 6 times, ss to join (12) Round 3: ch 1, [inc, sc] 6 times, ss to join (18) Round 4: ch 1, [sc, fpdc, sc fpdc in the same st, sc, fpdc] 3 times, ss to join (18) Round 5: ch 1, [inc, sc in the next 2 sts] 6 times, ss to join (24) Round 6: ch 1, sc, fpdc in the post to the right, [sc, fpdc, sc, fpdc, sc, fpdc, sc, fpdc in the same st] 2 times, sc, fpdc, sc, fpdc, sc, fpdc in the same st where you worked the first fpdc of the round, ss to join (24) Round 7: ch 1, sc across, ss to join (24) Round 8: ch 1, [sc, fpdc] 12 times, ss to join (24) Rounds 9-10: repeat Rounds 7-8, turn (24) Round 11a: ch 1, sc in the next 12 sts, turn (12) Round 11b: ch 1, [sc, fpdc] 6 times, turn (12) Rounds 11c-j: repeat Rounds 11a-11b 4 times (12) Round 11k: ch 1, sc in the next 12 sts, pick up 5 loops evenly down the side of the short rows, then insert your hook in the next st, yarn over, pull up a loop, yarn over and pull it through all of the loops on your hook, sc in the next 10 sts, insert your hook into the next st, yarn over, pull up a loop, pick up 5 loops evenly up the other side of the short rows, yarn over and pull it through all of the loops on your hook, ss to join, turn (24) Round 12: ch 1, [sc, fpdc] 12 times, ss to join (24) Round 13: ch 1, sc around, ss to join (24) Round 14: ch 1, [sc, fpdc] 12 times, ss to join (24) Rounds 15-16: Repeat Rounds 13-14 Fasten off, leaving a long yarn tail for sewing. Stuff the arms. Using the long yarn tail and the tapestry needle, sew the arms securely in place just below the eyes. Weave in ends. 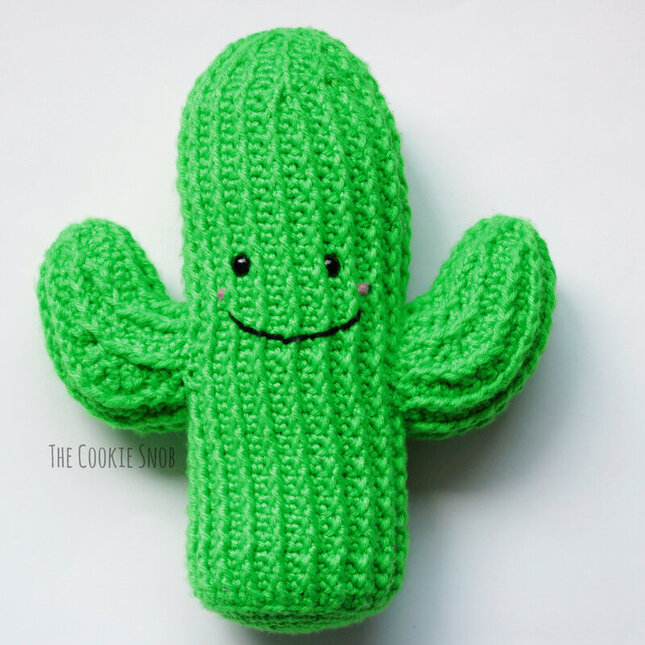 And you're done! Hopefully no one got lost during this pattern. If you do find yourself with any questions, feel free to get in touch. You can reach me in the comments section below, on social media, or by email. I should note that I'm going to be on a brief hiatus for the next bit while we get everything ready for our big move, so don't panic if you don't get a response right away. The blog is still up and running, but I won't be checking on emails and things quite as frequently, so it may take me a bit longer to get back to you. I hope you all are staying well and keep sharing your lovely projects that you've been making. I LOVE seeing them! Happy hooking! Want to make sure you don't miss any future blog posts? Join my mailing list! (Spam-free, I promise!) 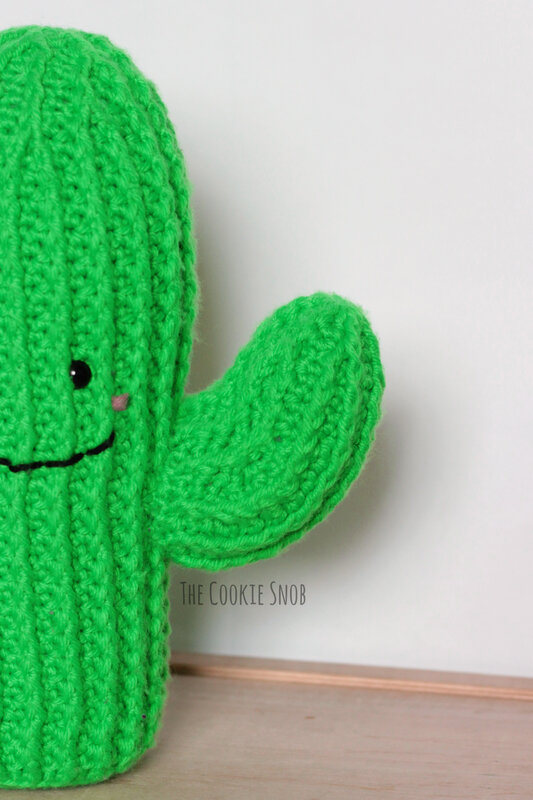 ***You're welcome to do whatever you'd like to with finished products made from this pattern but if you do sell them, I ask that you link back to my page. You may not copy this pattern, repost it anywhere (either altered or in its original form), or claim it as your own. You may not use any photos on this site for your own use. **
3 Comments
Marny CA
6/11/2020 11:38:39 pm
Enjoy your move ... love "bloom where planted" - 'cause I moved from northern Ohio to Long Island New York and now blooming in southern California. 6/16/2021 10:30:46 pm
Trying for third time to make the little green cactus as I am a snowbird and wanted to make some for my friends. I cannot figure out how to make the ribs go up and not around in a circle. Doing the rounds 9-10 the 55 times. It’s not working 🥲. The ribs are going around in a circle and not up!!! Just can’t get it figured out. Can you please help me🤞🏼🙏🏻
Bonny
10/23/2021 03:48:48 pm
Hello. I’m having the same problem, how do I get the ridges to run up and down instead of around Leave a Reply. |
Welcome!Thank you for stopping by to visit my own personal corner of the web! Feel free to take a look around and check out what I've been crafting, crocheting, or baking. Hopefully you'll find something to inspire your own creativity!   
Archives
March 2024
|
 RSS Feed