
|
I don't know about you all, but I think I could use some extra joy and goodness lately. So when I came across Rachel Borello Carroll's A Little Kindness Monster, I knew that I wanted to create a cute but easy crocheted friend with the same basic purpose: a small softy that you can give away to others! In homage to Rachel's pattern, I'm calling this cutie "A Little Love Monster." So you can send A Little Love to someone in the mail. Or you can drop off A Little Love on someone's doorstep. Or you can give A Little Love to someone to make their day a bit brighter. Or you can even just keep A Little Love for yourself. Because a Little more Love never hurt.  To make this pattern accessible to as many crocheters as possible, I designed this monster friend with simplicity in mind. It's made with scrap yarn and works up quickly. It's all one piece, including the ears, and you don't even have to sew on the arms; they get crocheted directly on the side. It's worked in joined rounds, so you don't need to use stitch markers. Basically, I took common complaints about making amigurumi as inspiration. Hate sewing on pieces? You're covered! Don't like sc stitches? The original version is all hdc. Don't like using a tiny hook? You won't need to. Sounds like a winner to me! 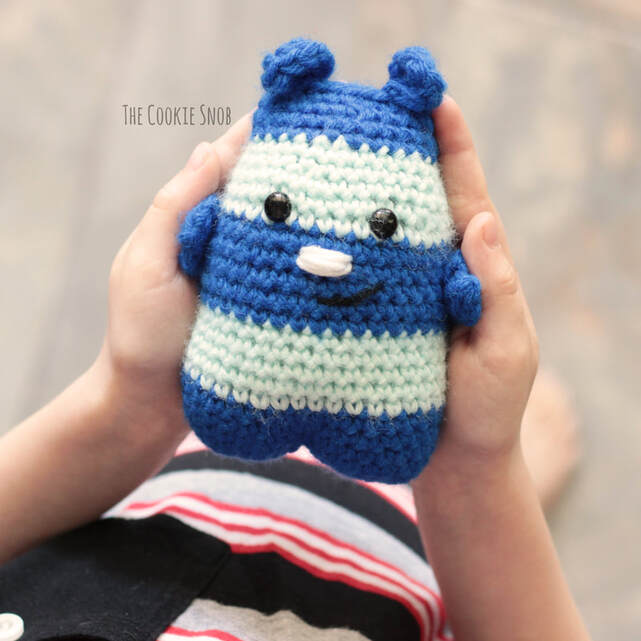 After making my prototype version with hdc stitches I did get slightly paranoid about the stitches being too loose, so I ended up designing a sc version as well. It's the same basic shape and proportions as the original, it just requires a few more rows. I decided to just keep both versions of the pattern so that you can decide to make whichever one you prefer. Or both! Why not? 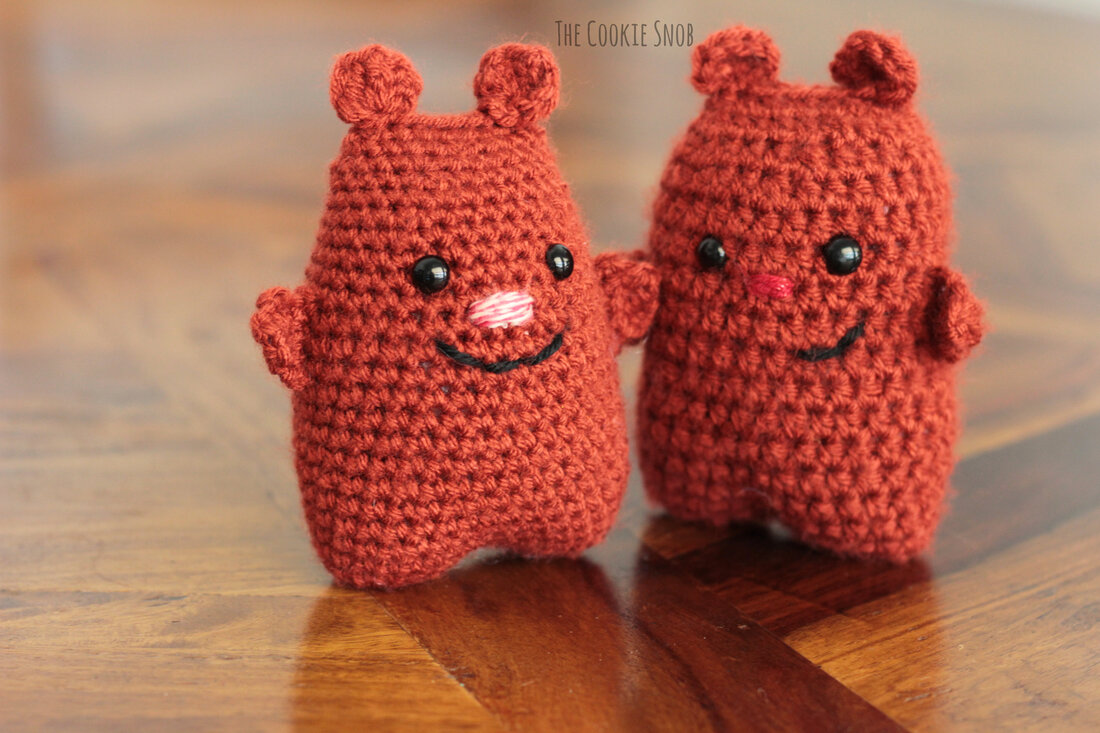 These Little Love Monsters are fun and easy to make and you can have your own little army of them in no time. My kids have extensively field tested them, so I can definitively say that they're perfect for hugging and fun to play with (although, apparently they have a penchant for swinging on jungle vines into volcanoes or something...? Kids are weird...). So let's stop dawdling and check out the pattern! There's probably an excessive number of pictures involved, but I wanted to walk you through every step of the pattern to make it as beginner-friendly as possible. If you find that you just want the pattern with no frills, be sure to check out the PDF version, which will have both a detailed photo version and a text-only printer-friendly version. We'll start with the original HDC version and then go through the SC version. Let's get to it! 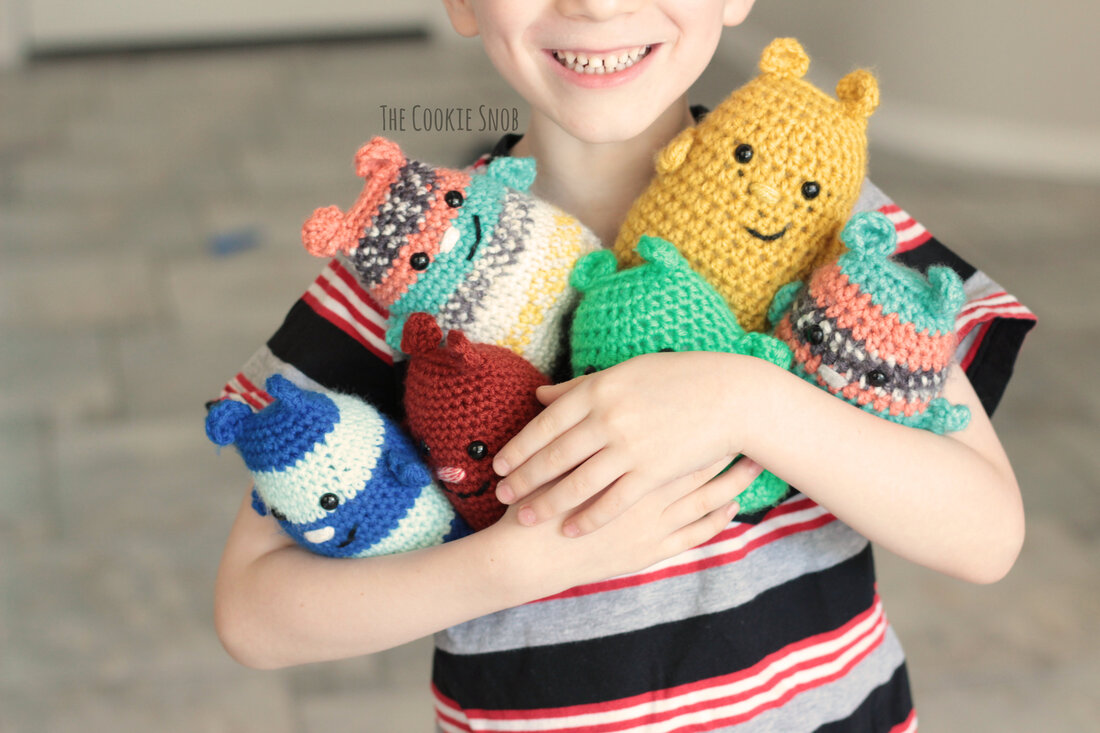 If you'd like an ad-free printable PDF version (including a text-only version for simpler printing), you can find one on Ravelry. Stitch Glossary: st(s) = stitch(es) ch = chain ss = slip stitch sc = single crochet dec = sc decrease (decrease over 2 sc sts) hdc = half double crochet hdc2tog = decrease over 2 hdc sts hdc3tog = decrease over 3 hdc sts dc = double crochet tr = treble (triple) crochet Materials:
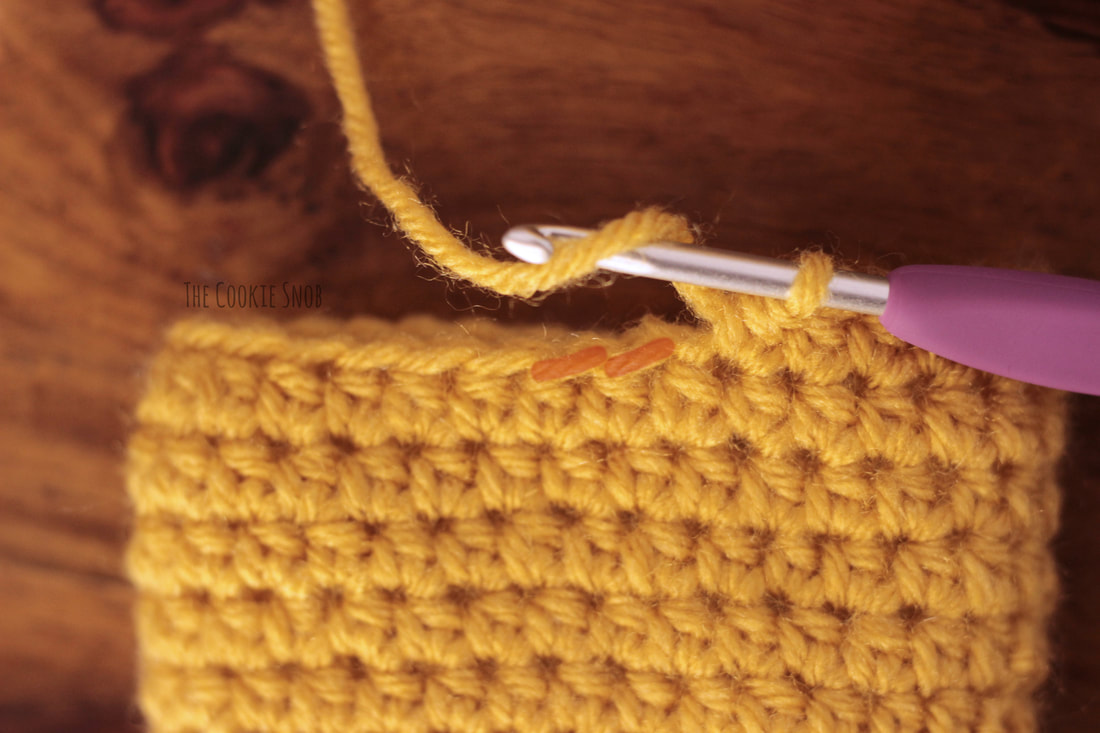
Note: For the SC version, I recommend using the invisible decrease for Rounds 17-24 of the body. For the HDC version, I recommend using the invisible hdc2tog for Rounds 13-16. I have no idea if that's the official name; I just tweaked the invisible decrease sc stitch to make a hdc version. I'm sure I'm not the first person to come up with this concept, since it's just applying the sc version, but I'll walk you through the process here just in case so you won't have to try to puzzle it out on your own. Begin by yarning over, just like you would to start a normal hdc stitch. Then insert your hook into the front loop only of the next 2 sts (highlighted in the first picture below). Make sure you're inserting the hoop from the bottom of the stitch both times.
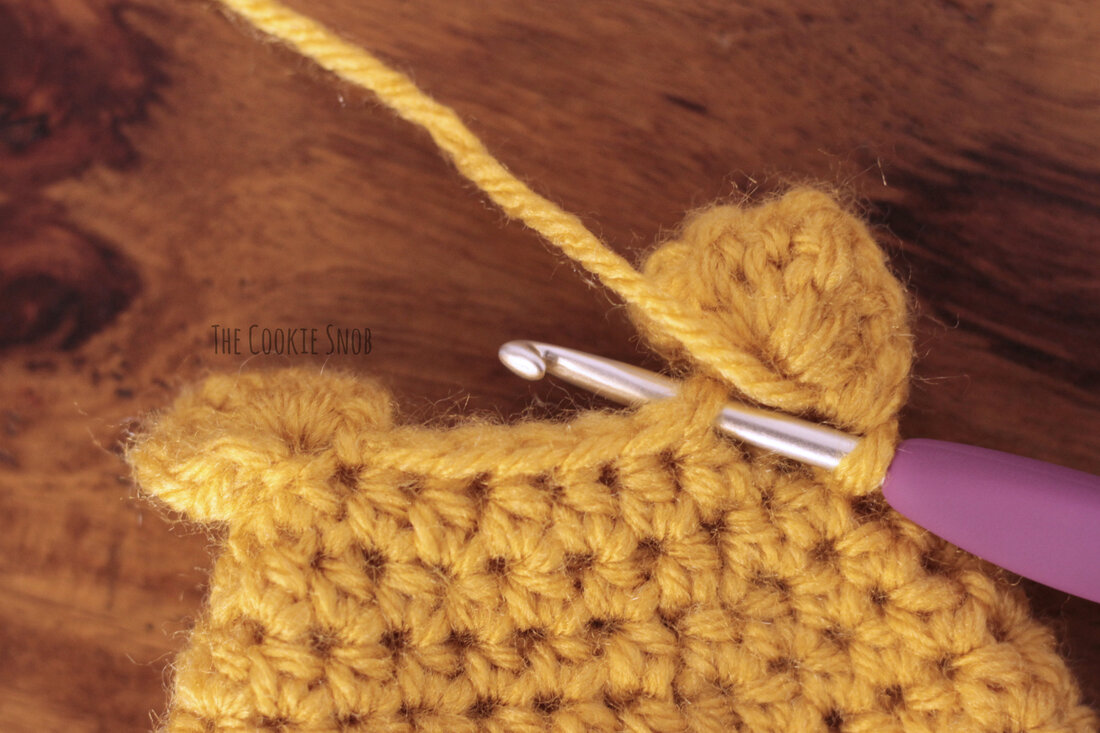
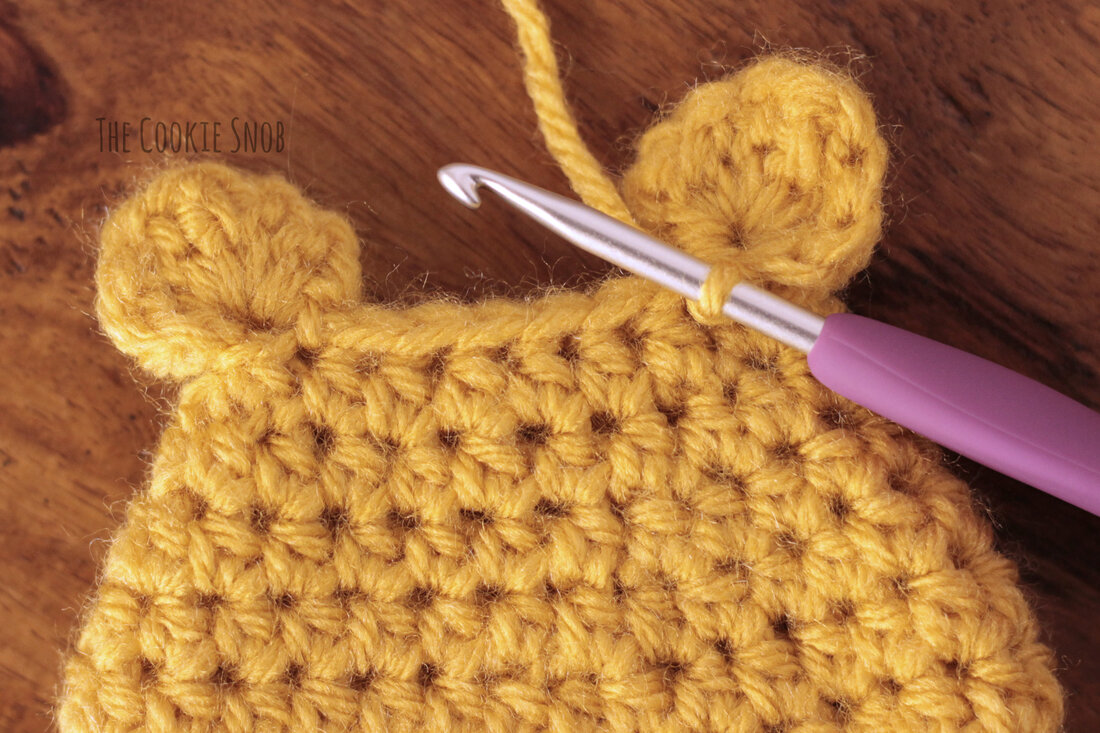
You should now have 4 loops on your hook. Yarn over and pull the yarn through the first 2 loops. 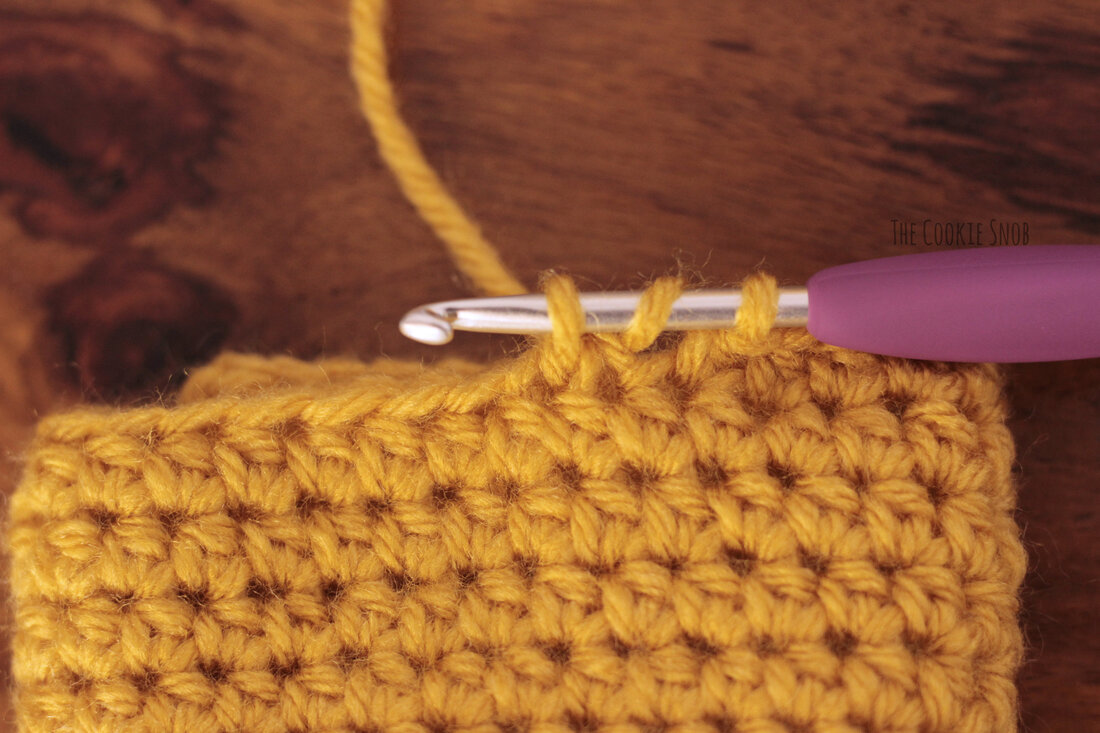 It should now look an awful lot like a normal hdc st, and we're going to finish it off the same way. Yarn over and pull through all 3 hoops left on your hook. Neat, right? 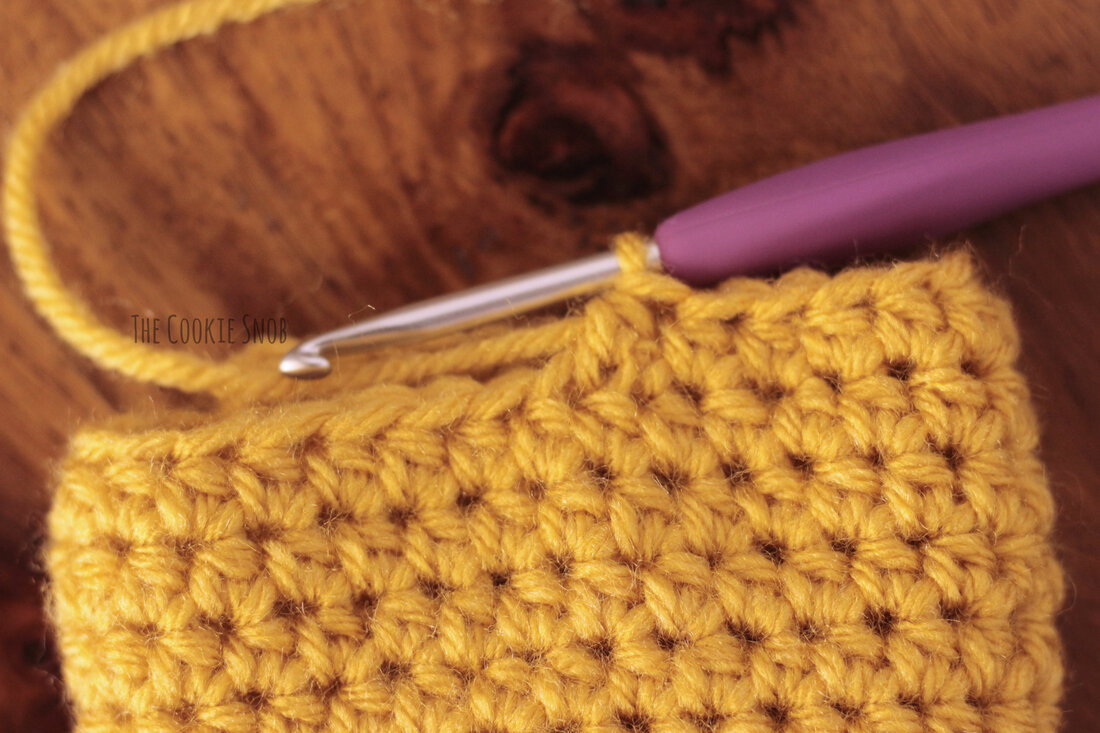 If you're having trouble with either the sc invisible decrease or the invisible hdc2tog, you can substitute a typical decrease stitch instead. The pattern will still work, the decreases will just be more visible. HDC Version: Leave an extra long (18"+) tail before your slip knot. Ch 30, ss to first ch to join into a loop. 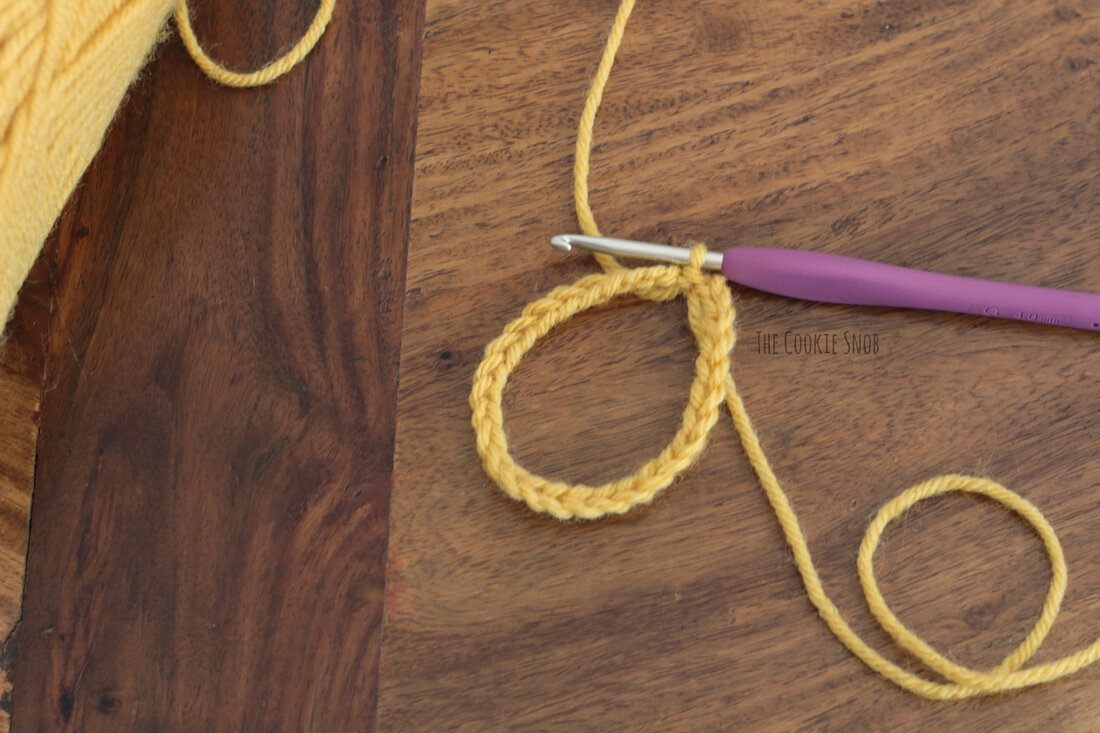 Round 1: ch 1, hdc in each ch around, ss to join (30) 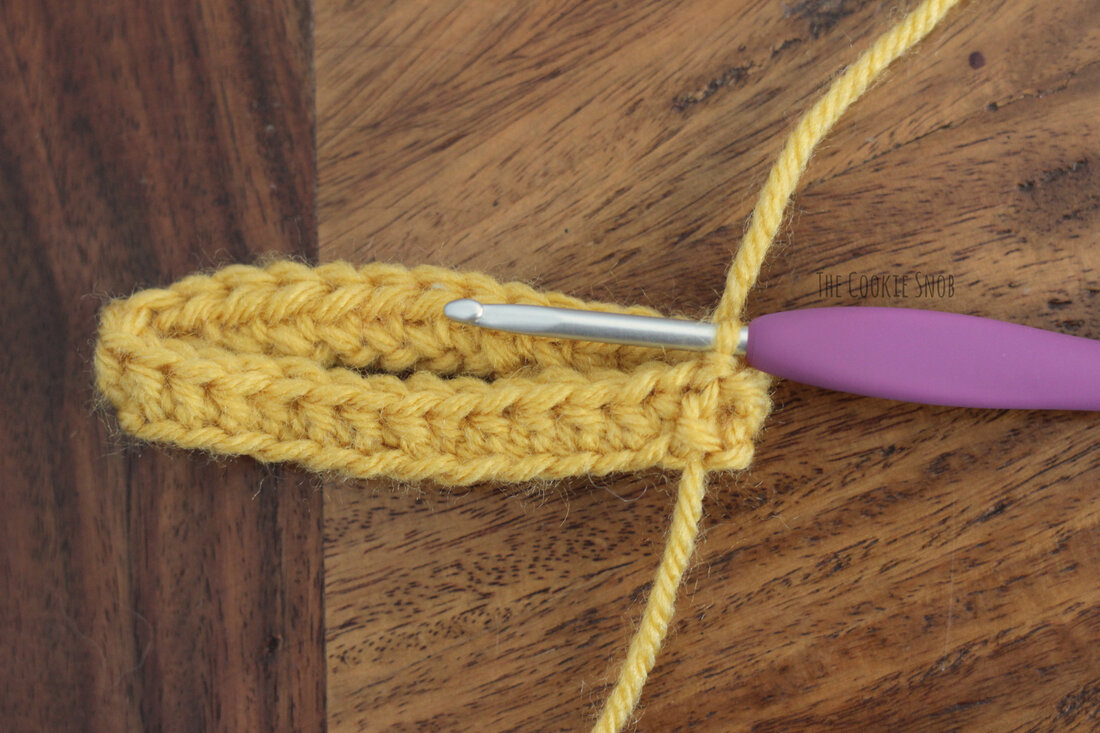 Rounds 2-12: ch 1, hdc in each st around, ss to join (30) 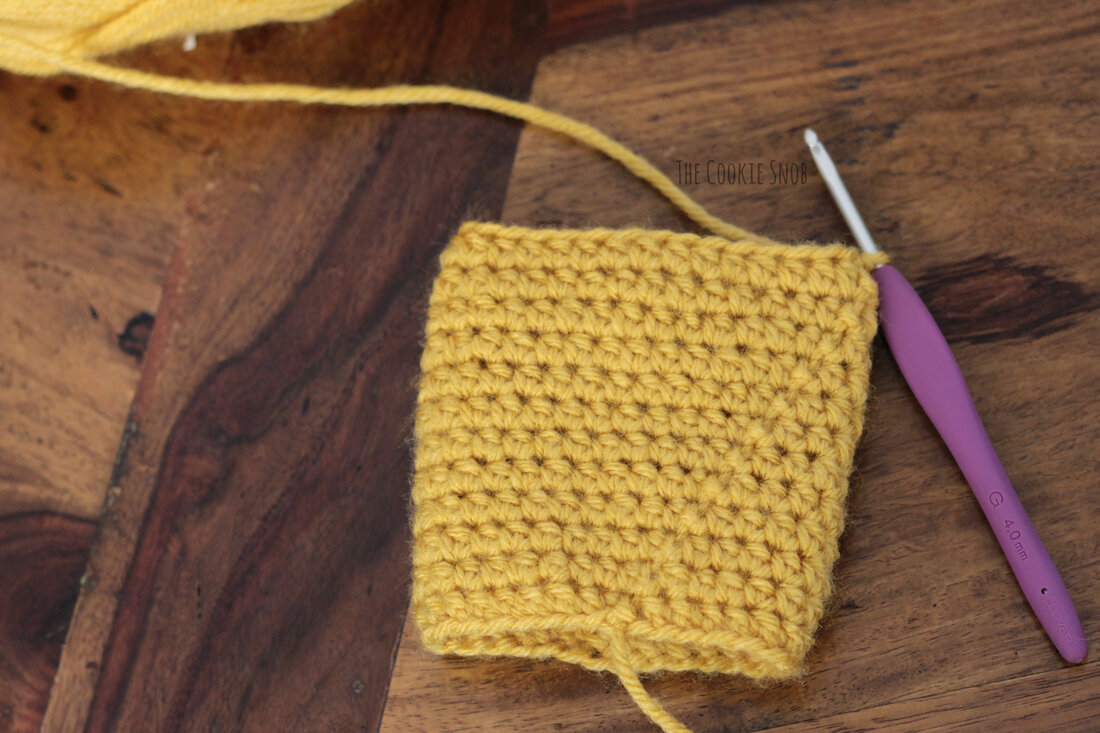 Round 13: ch 1, [hdc in the next 8 sts, hdc2tog] 3 times, ss to join (27) Round 14: ch 1, [hdc in the next 7 sts, hdc2tog] 3 times, ss to join (24) Round 15: ch 1, [hdc in the next 6 sts, hdc2tog] 3 times, ss to join (21) Round 16: ch 1, [hdc in the next 5 sts, hdc2tog] 3 times, ss to join (18)  Now we're going to create the ears and close off the top at the same time. Round 17: ch 1, [hdc, dc, dc, tr, dc, dc, hdc] in the same st. . .  . . . flatten the top to create two rows of parallel stitches, insert your hook through the next set of parallel stitches and ss to close. . . 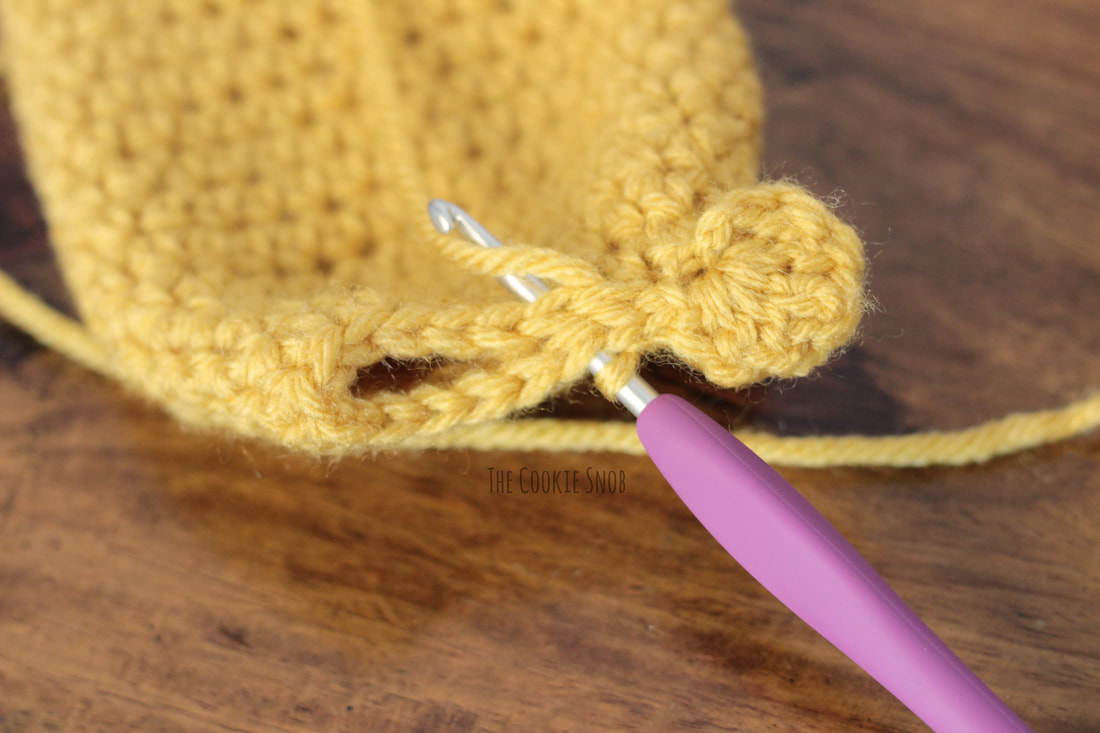 . . . repeat with the remaining stitches until the top is completely closed. . . 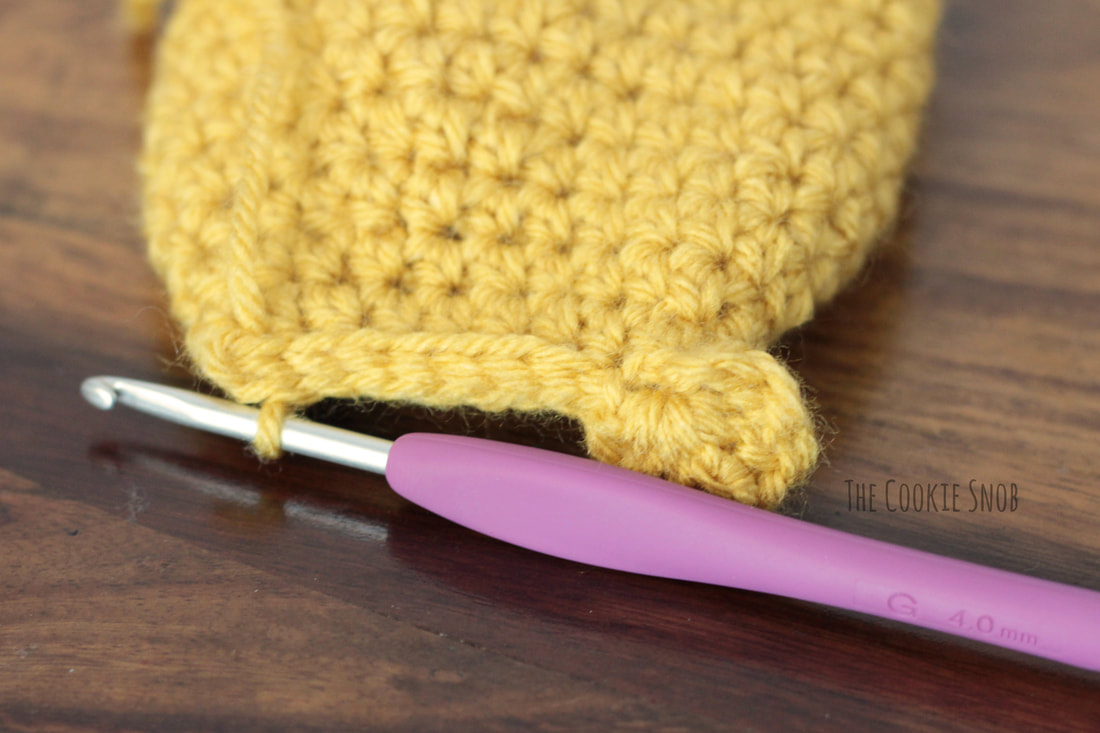 . . . working in the last st remaining (or you can just insert your hook at the very end, if you can't find it), ch 1, [hdc, dc, dc, tr, dc, dc, hdc] in the last st to make the second ear. . . 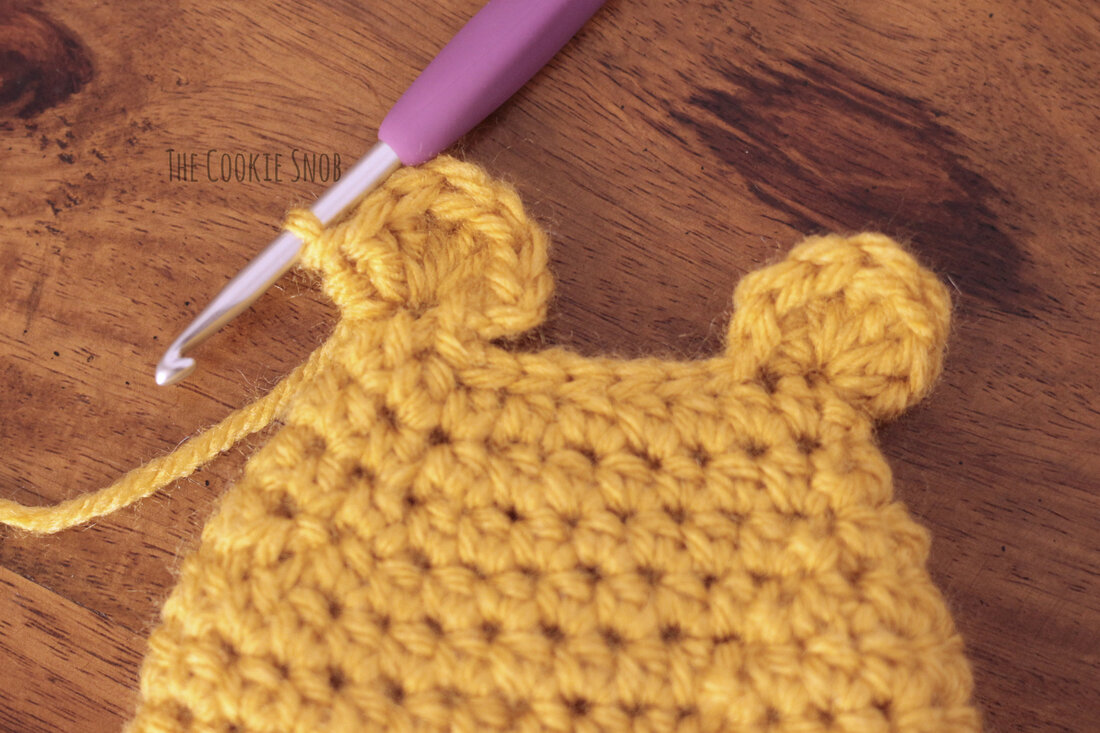 . . . then turn the piece and ss to the last ss you made to join. Fasten off.
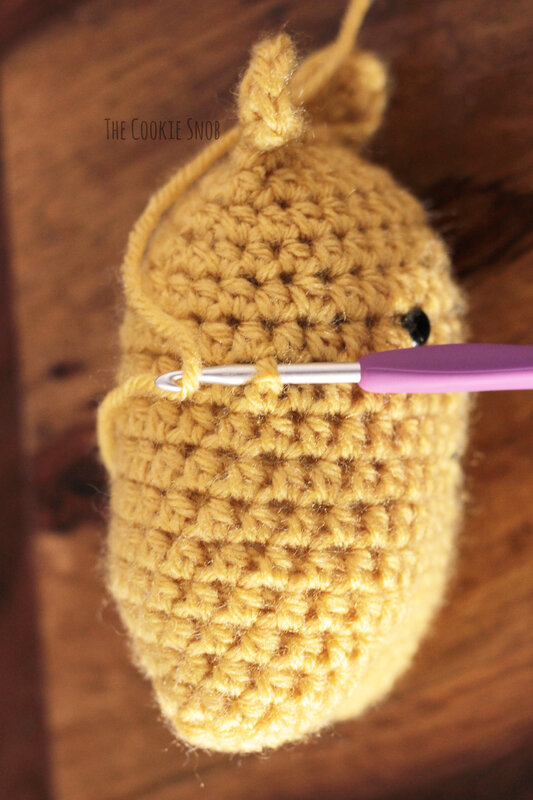
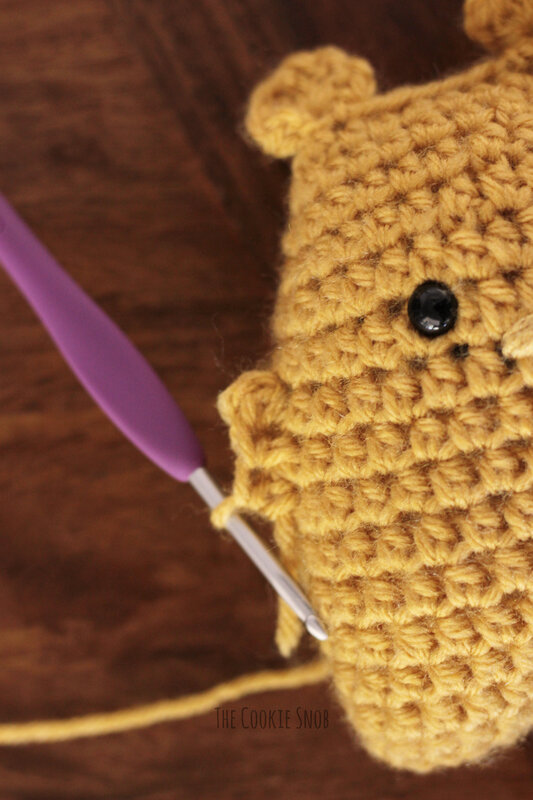
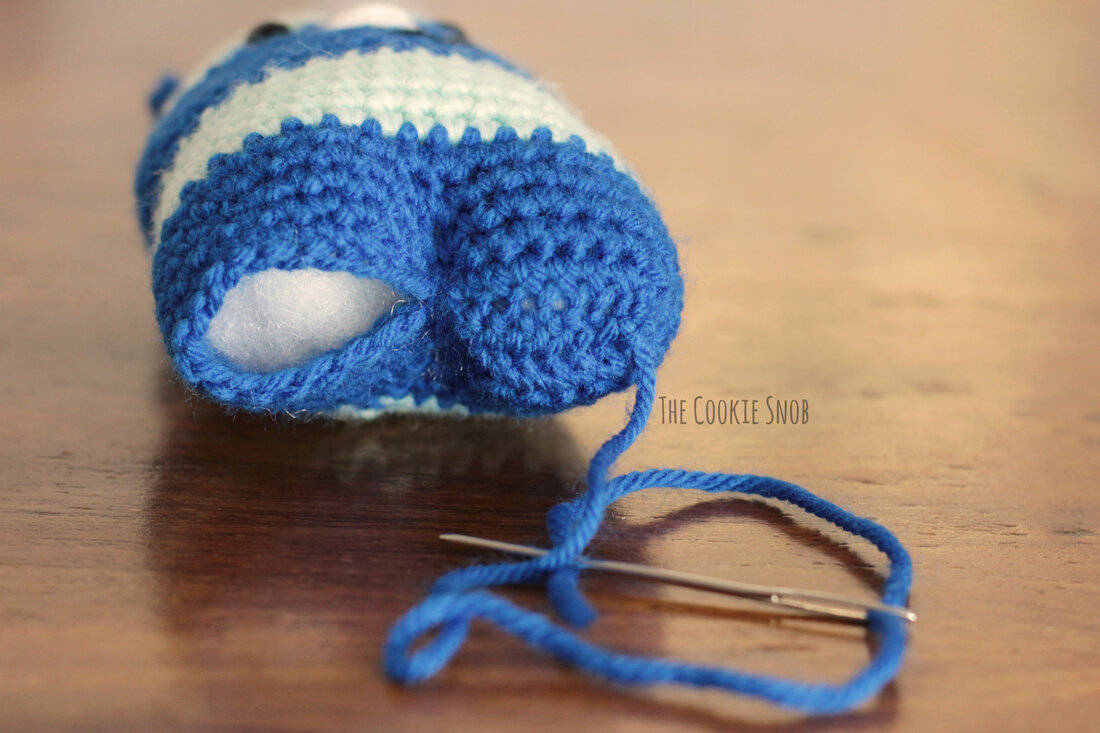
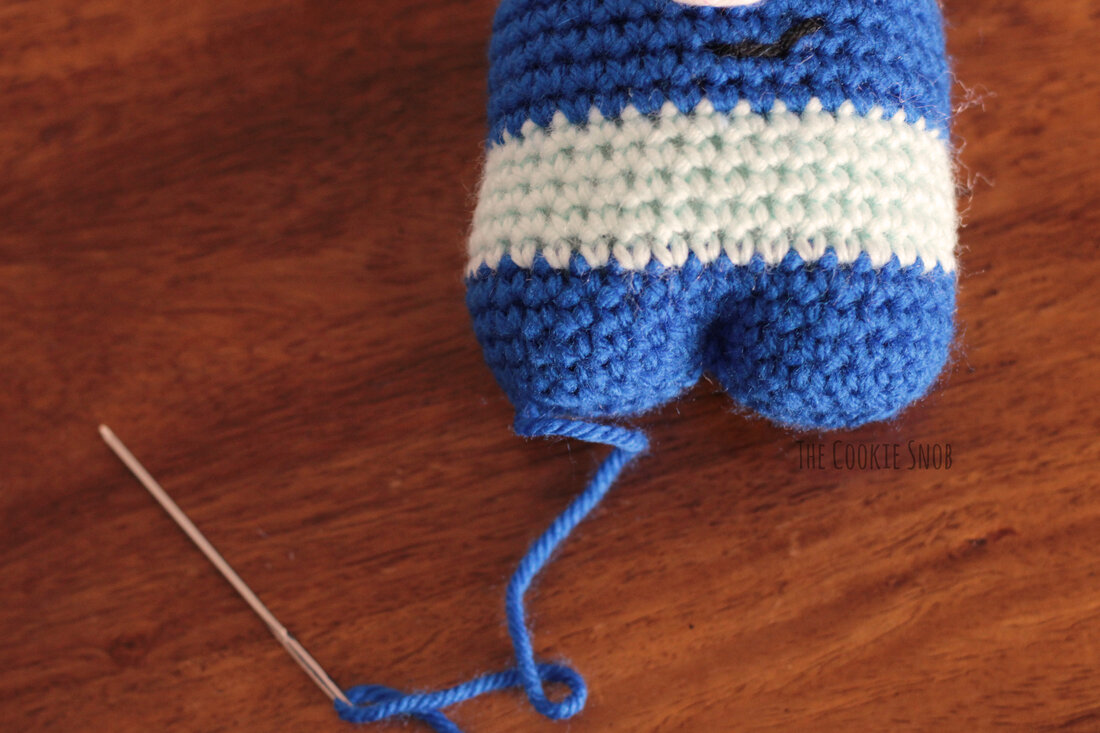
Now it's time to add the face and finish shaping the body. Place the eyes between Rounds 11 and 12, with about 4 sts in between. Using the contrasting color yarn and a tapestry needle, stitch the nose between the eyes, between Rounds 10 and 11. Stitch back and forth 5 or more times to get the look you want. Then stitch the mouth on across Rounds 8-9. 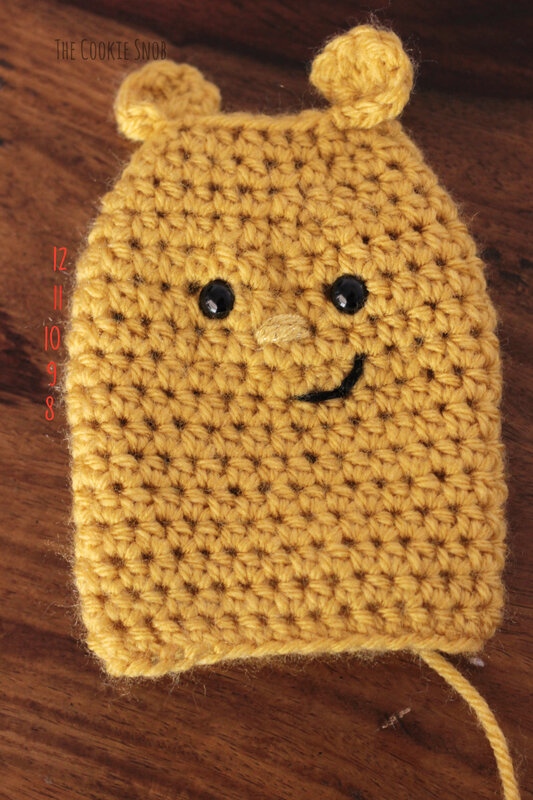 Begin stuffing the body. We're going to use the long yarn tail we started with and the tapestry needle to shut the bottom while also shaping the legs. I find that the easiest option is to start by weaving the tail through two stitches toward the side of the monster (shown with an arrow below). When you pinch the bottom edges together, the yarn tail should now be at the top of one end. 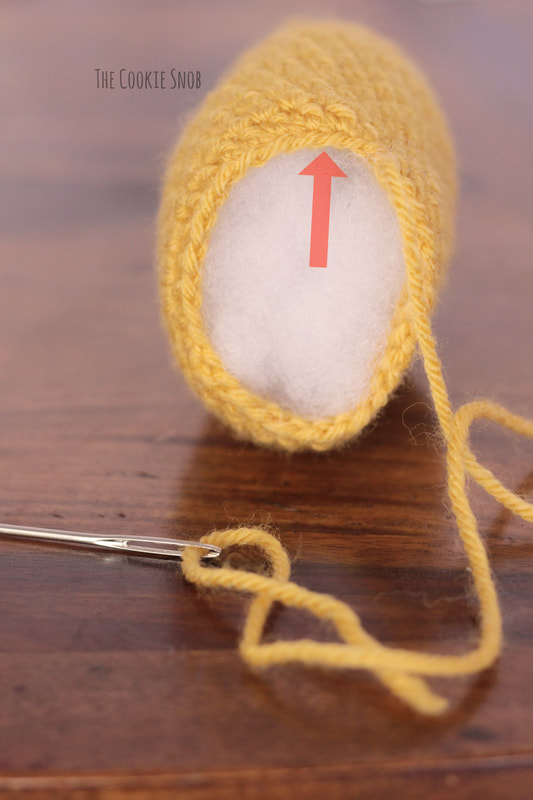 Using your tapestry needle and the yarn tail, stitch the two parallel sides of the bottom edge together, closing the hole. Pause when you're halfway through (you should be centered at the front now). Insert the needle in between Rounds 2-3 on the front side (indicated by the top arrow) and then back out between Rounds 2-3 on the back side (indicated by the bottom arrow).  Repeat 1-2 more times and pull taut. This will create a little divot, shaping the legs. At this point I like to make sure to add more stuffing to finish off the first leg. 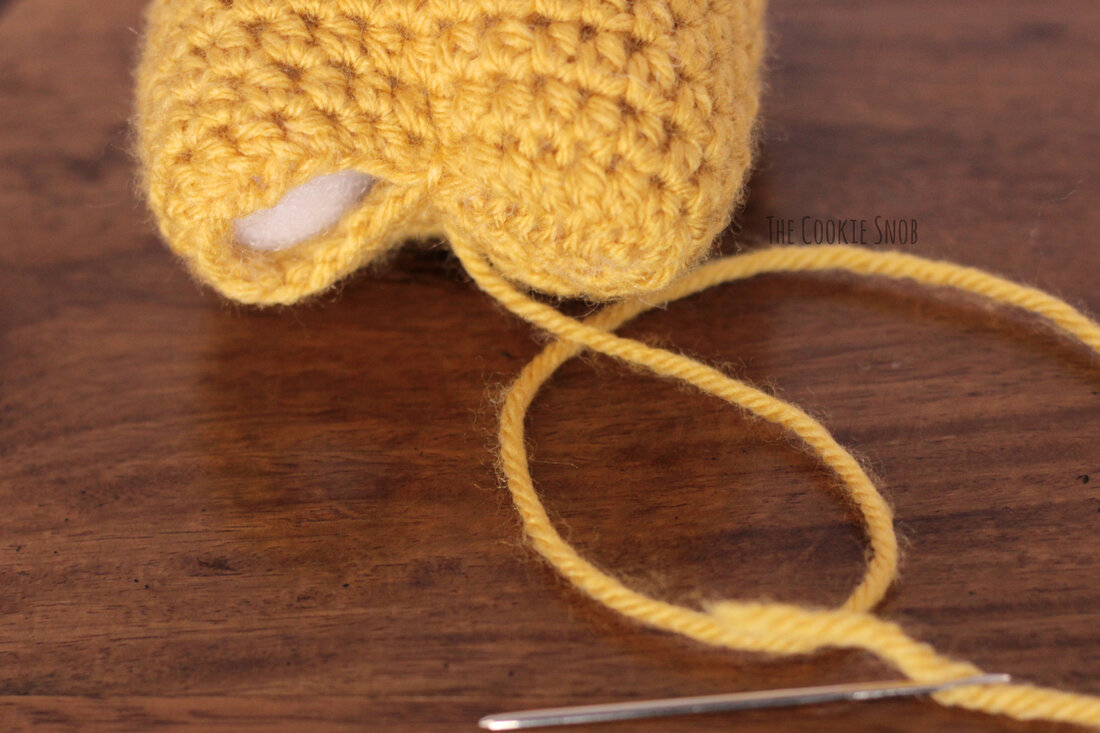 Continue to stuff as you go. With the tapestry needle and the yarn tail, resume stitching the parallel sides of the bottom edge together to close off the hole and form the second leg. Tie off securely. 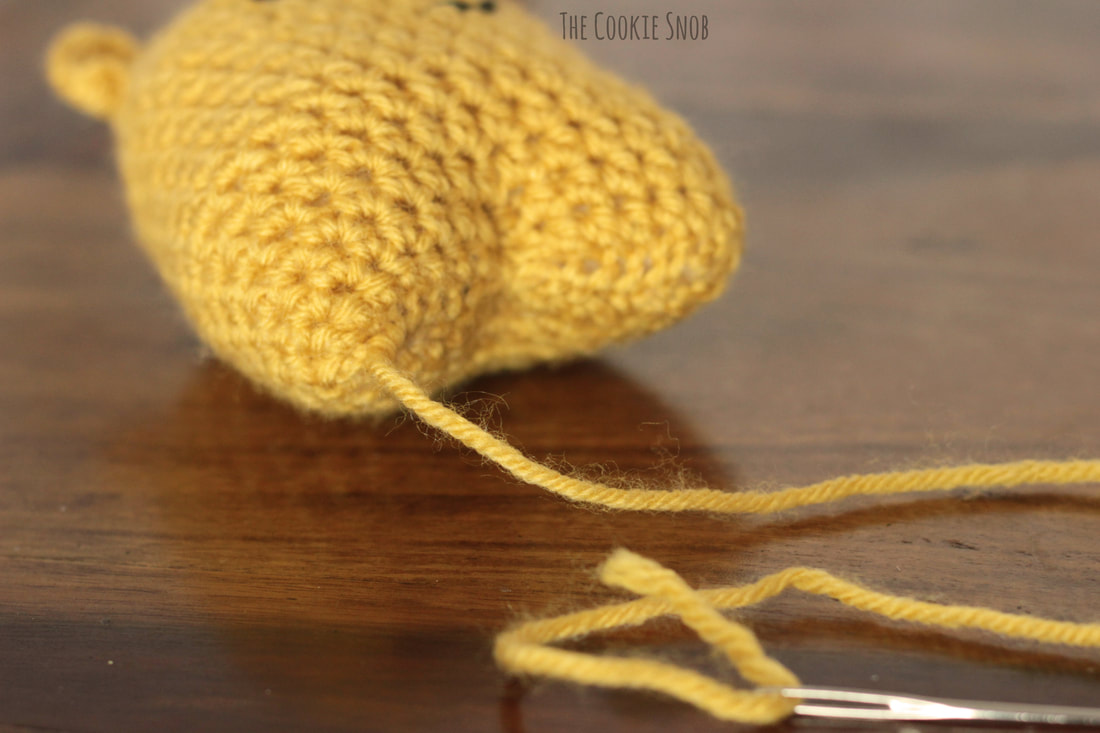 At this point, you can either weave in the remaining end, or you can use it to stitch on a little tail. If you want to add the tail, insert your needle through the end of the leg you just finished and then back out through the backside of the monster, wherever you want the tail to be. Stitch back and forth several times for better definition, then tie off and weave in the end. 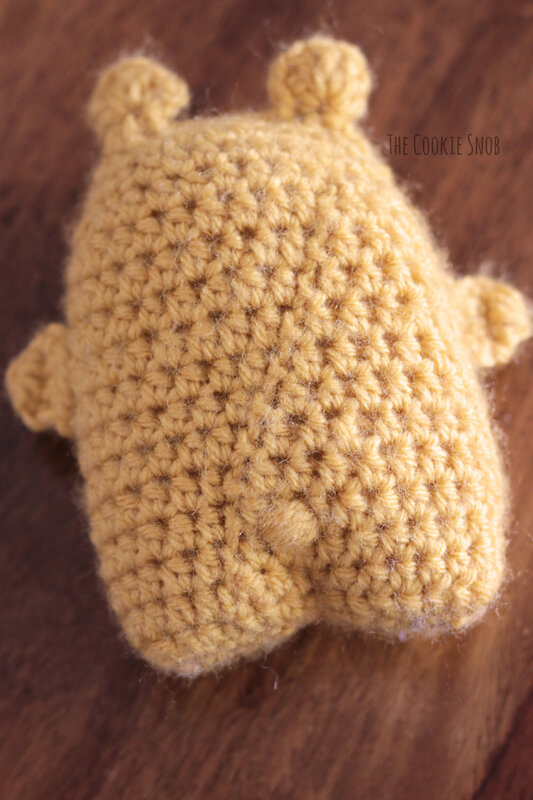 Time for the last step! Now we're going to add the arms. Instead of making them separately and then having to sew them on, we're going to just directly crochet them onto the body. Row 1: Starting with the monster's right side, insert your hook between Rounds 10-11, ch 1, hdc in the same spot, hdc between Rounds 9-10, hdc between Rounds 8-9, turn (3)
Row 2: ch 1, hdc across, turn (3) Row 3: ch 1, hdc3tog, fasten off 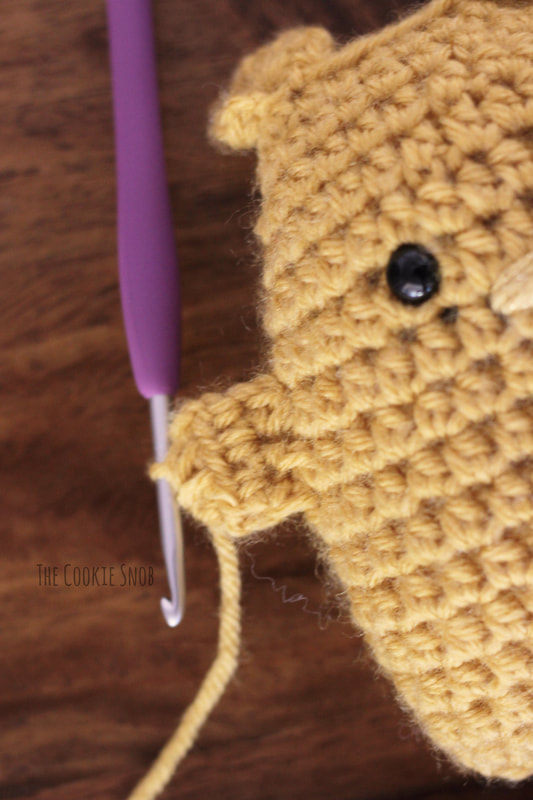 And then we'll make the other side: Row 1: Starting with the monster's left side, insert your hook between Rounds 8-9, ch 1, hdc in the same spot, hdc between Rounds 9-10, hdc between Rounds 10-11, turn (3) Row 2: ch 1, hdc across, turn (3) Row 3: ch 1, hdc3tog, fasten off Weave in any remaining ends. Ta-dah! You did it! Striped Variation: For a striped version, follow the pattern as written, but change colors at Round 4, Round 7, Round 10, and Round 13. 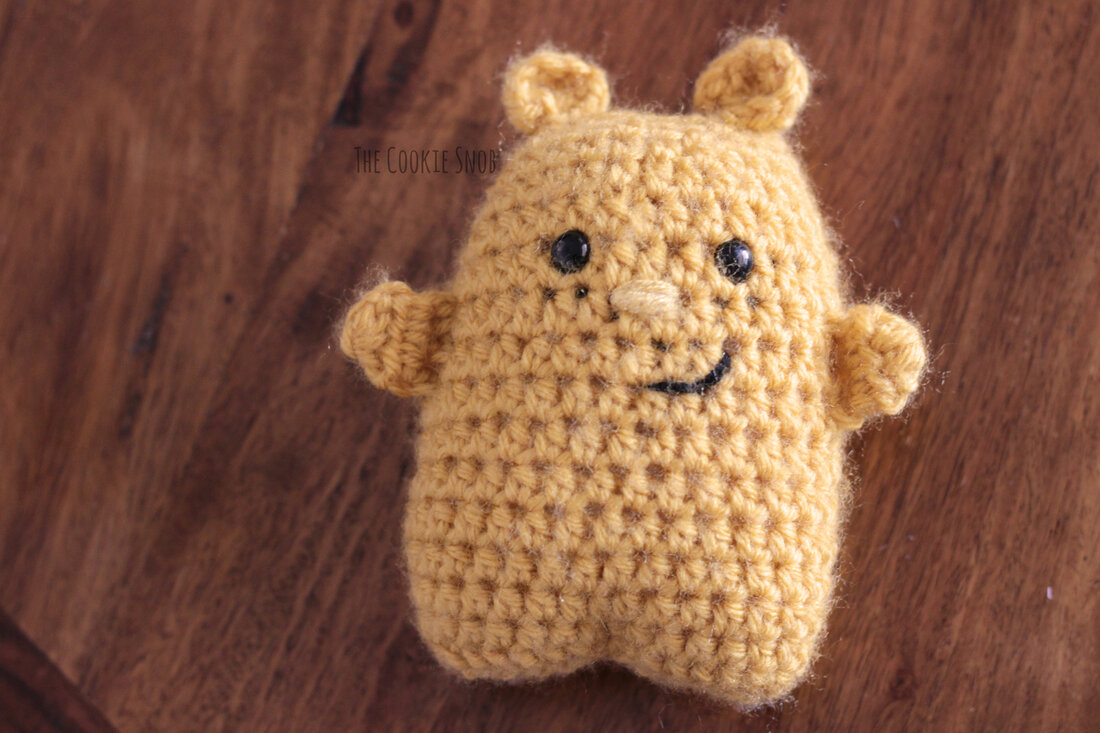 Let's switch gears now and check out the SC version. The basic construction is the same as the HDC version, so you can reference the step-by-step pictures above if you find it helpful. SC Version: Leave an extra long (18"+) tail before your slip knot. Ch 34, ss to first ch to join into a loop. Round 1: ch 1, sc in each ch around, ss to join (34) Rounds 2-16: ch 1, sc in each st around, ss to join (34) Round 17: ch 1, [sc in the next 15 sts, dec] 2 times, ss to join (32) Round 18: ch 1, sc in each st around, ss to join (32) Round 19: ch 1, [sc in the next 6 sts, dec] 4 times, ss to join (28) Round 20: ch 1, sc in each st around, ss to join (28) Round 21: ch 1, [sc in the next 5 sts, dec] 4 times, ss to join (24) Round 22: ch 1, sc in each st around, ss to join (24) Round 23: ch 1, [sc in the next 4 sts, dec] 4 times, ss to join (20) Round 24: ch 1, [sc in the next 8 sts, dec] 2 times, ss to join (18) Round 25: ch 1, [hdc, dc, dc, tr, dc, dc, hdc] in the same st, flatten the top to create two rows of parallel stitches, insert your hook through the next set of parallel stitches and ss to close, repeat with the remaining stitches until the top is completely closed, working in the last st remaining (or you can just insert your hook at the very end, if you can't find it), ch 1, [hdc, dc, dc, tr, dc, dc, hdc] in the last st to make the second ear, then turn the piece and ss to the last ss you made to join. Fasten off. Place the eyes between Rounds 16 and 17, with about 4 sts in between. Using the contrasting color yarn and a tapestry needle, stitch the nose between the eyes, between Rounds 14 and 15. Stitch back and forth 5 or more times to get the look you want. Then stitch the mouth on across Rounds 12-13. 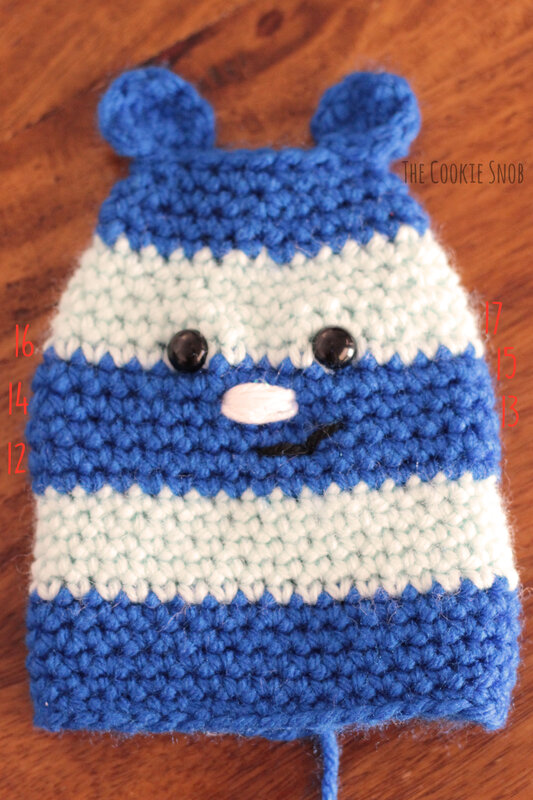 Begin stuffing the body. As with the HDC version, we're going to sew the bottom shut and shape the legs at the same time using the tapestry needle and the long yarn tail. If you prefer, you can just weave the yarn tail over the side and then follow the same steps as for the HDC version. Or, since the yarn tail is almost centered on this version, you can weave the tail over a couple stitches to the center of the front (indicated by the arrow below). 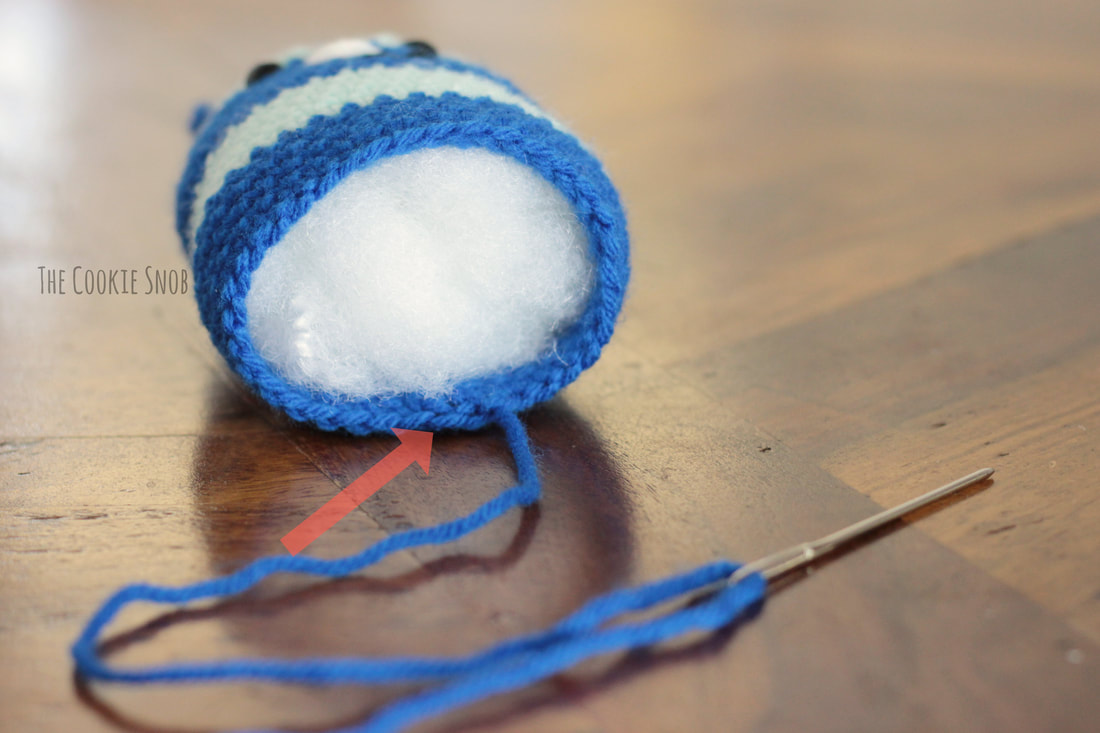 Begin by shaping the legs. Insert the needle in between Rounds 3-4 on the front side and then back out between Rounds 3-4 on the back side (indicated by the bottom arrow). Repeat 1-2 more times and pull taut. 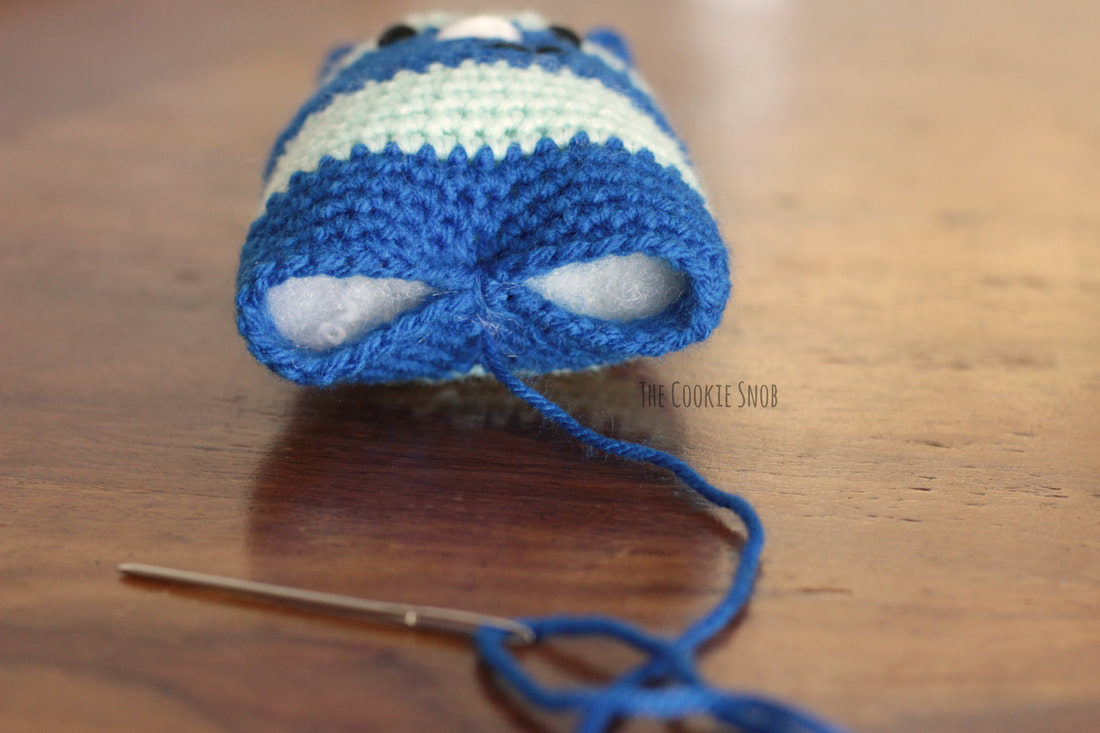 Then sew one leg shut and stuff the leg. Continue to stuff as you go. Sew the second leg shut and tie off. Stitch on a tail using the remaining yarn tail (follow the HDC instructions) if desired, then weave in ends.
Time to add the arms. The arms are the same for both versions, the placement will just vary slightly. For the right arm: Row 1: Starting with the monster's right side, insert your hook between Rounds 13-14, ch 1, hdc in the same spot, hdc between Rounds 12-13, hdc between Rounds 11-12, turn (3) Row 2: ch 1, hdc across, turn (3) Row 3: ch 1, hdc3tog, fasten off For the left arm: Row 1: Starting with the monster's left side, insert your hook between Rounds 11-12, ch 1, hdc in the same spot, hdc between Rounds 12-13, hdc between Rounds 13-14, turn (3) Row 2: ch 1, hdc across, turn (3) Row 3: ch 1, hdc3tog, fasten off 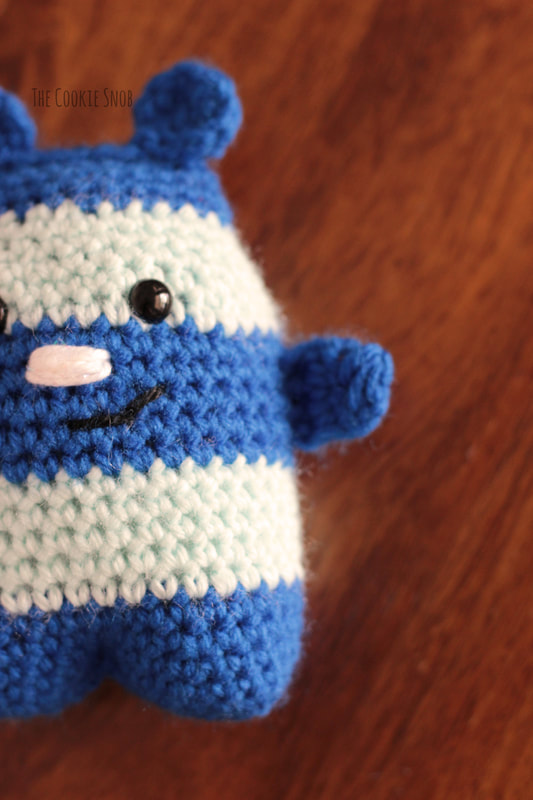 Weave in any remaining ends. And you're done! Striped Variation: For a striped version, follow the pattern as written, but change colors at Round 6, Round 11, Round 16, and Round 21. 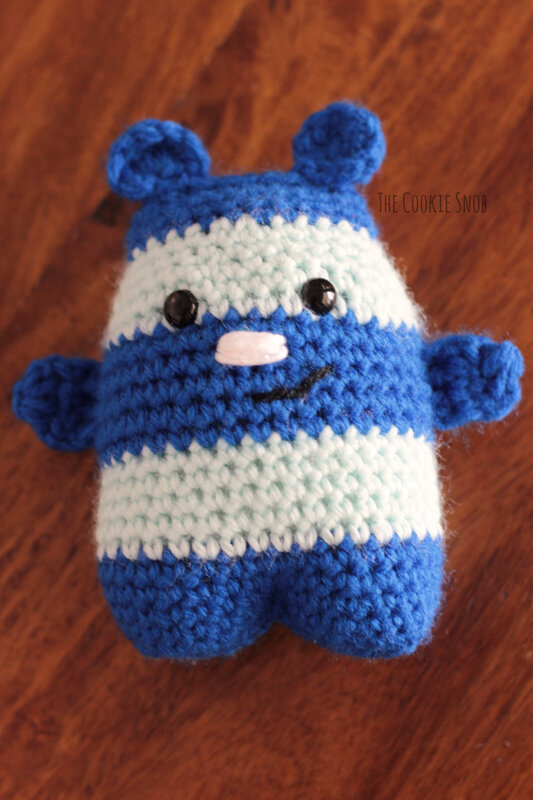 I hope that you enjoy this pattern and that you end up making one (or five)! And remember, you can find a printable PDF version on Ravelry, including a text-only version, if you find that easier to follow.  If you have any comments or questions, you can reach me in the comments section below, by email, or on social media. It always makes my day to see your projects, so please share! I'd also love to know: who would you make one for? Happy hooking, friends! 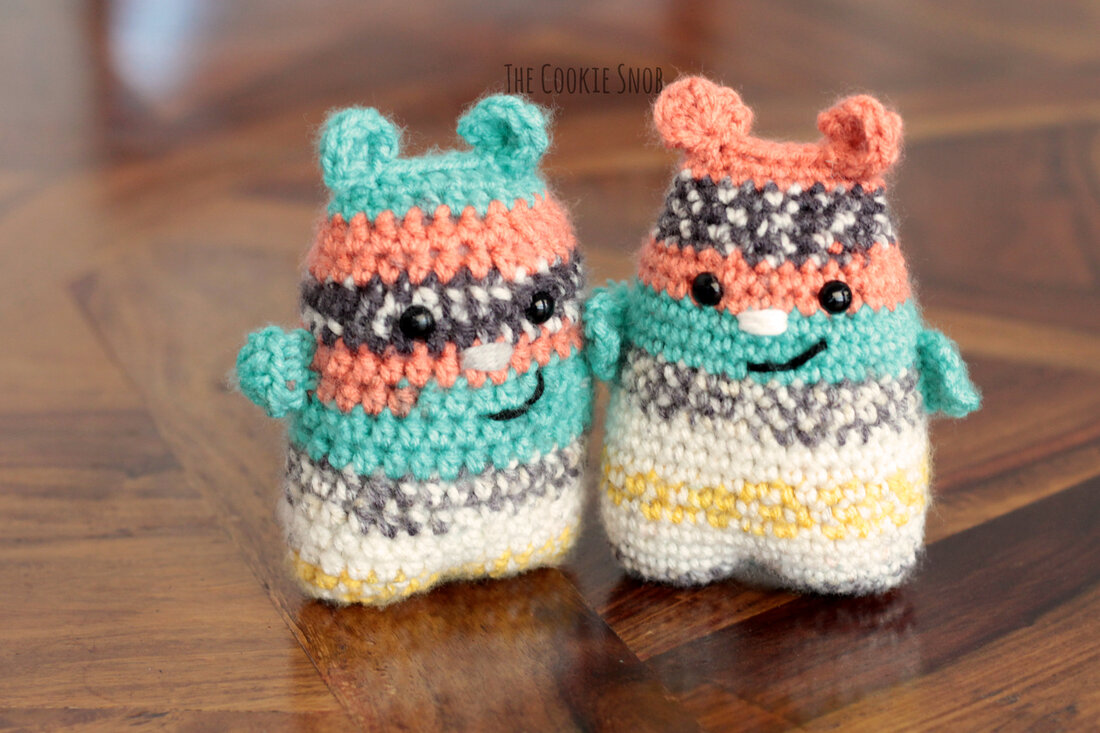 Want to make sure you don't miss any future blog posts? Join my mailing list! (Spam-free, I promise!)  ***You're welcome to do whatever you'd like to with finished products made from this pattern but if you do sell them, I ask that you link back to my page. You may not copy this pattern, repost it anywhere (either altered or in its original form), or claim it as your own. You may not use any photos on this site for your own use. ***
14 Comments
Anita
9/16/2020 10:21:44 am
Oh, how adorable, cute and Easy! Other little figures are too complicated and time consuming, but I can handle. Thank you!
Donna
10/7/2020 07:10:05 pm
Thank you so much, these are adorable. I do a lot of crochet creatures for charity and these will be quick and cute a win win :)
Jennifer D
10/16/2020 01:16:20 pm
Hi! These are so cute! Question about the hdc version: for a striped version of the monster, are the color changes happening at the same place as the SC version? (Row 6, 11, and 16, and 21- although I don’t think there is a row 21?)
Erin
10/16/2020 10:18:00 pm
Hi Jennifer,
Jennifer
10/16/2020 10:23:44 pm
Thank you, that was helpful! And you’re right, I missed it! I am so sorry. I am helping with remote learning with my three kids and I find it so easy to over look some things.
Erin
10/16/2020 10:31:10 pm
No worries! I'm homeschooling my 3 right now, so I know exactly what you mean. 2020...enough said. Enjoy the pattern!
Jennifer
10/16/2020 10:41:42 pm
Yes, 2020 can go kick the bucket already!
Sonia Minervine
3/22/2021 07:20:32 pm
I think these are so very cute. I finally made one, only had to frog it once at the beginning. It turned out a lot better than I thought it would! Now, I can make some for my grandbabies! The only part I didn't get was the htog3 for the arms. They almost looked like wings but I managed.
Melissa Pottash
2/1/2022 06:42:15 pm
I love this pattern! I’m struggling with shaping the legs though-mine don’t look as pronounced as the one in the picture. Any suggestions?
Natalie
4/21/2023 05:46:20 pm
Thanks for the cute free pattern. I made one with cotton yarn DK size 3 yarn. It's smaller, only about 4.5" from ear top to toes, but just the size I was going for.
Mary J
9/4/2023 07:16:29 pm
Thank you for the "A Little Monster Love" pattern, just adorable.
Erin
9/5/2023 01:01:52 pm
Hi, Mary! I'll do my best to help. After chaining 1, you should sc in the first st. So it's not making a sc into the turning chain itself, but into the first ch you made initially (the base chain). If it's easier, you can absolutely substitute a foundationless single crochet instead of chaining and then working into the chain; whichever works best for you, since either will work for the pattern. Leave a Reply. |
Welcome!Thank you for stopping by to visit my own personal corner of the web! Feel free to take a look around and check out what I've been crafting, crocheting, or baking. Hopefully you'll find something to inspire your own creativity!   
Archives
March 2024
|

 RSS Feed