
|
After I finished redesigning my 3 mL beanie, I found myself thinking that something was still missing. And then it hit me: slouchy hat! Who doesn't love a good slouchy hat, right? So with a couple of quick changes, the beanie now has a slouchy BFF. I just love how it turned out! It gives the design such an effortless, chic feel. And I would say that it's a fairly unisex design, so it's perfect for all of the slouchy hat lovers out there. So grab your hooks, because this hat is calling your name! 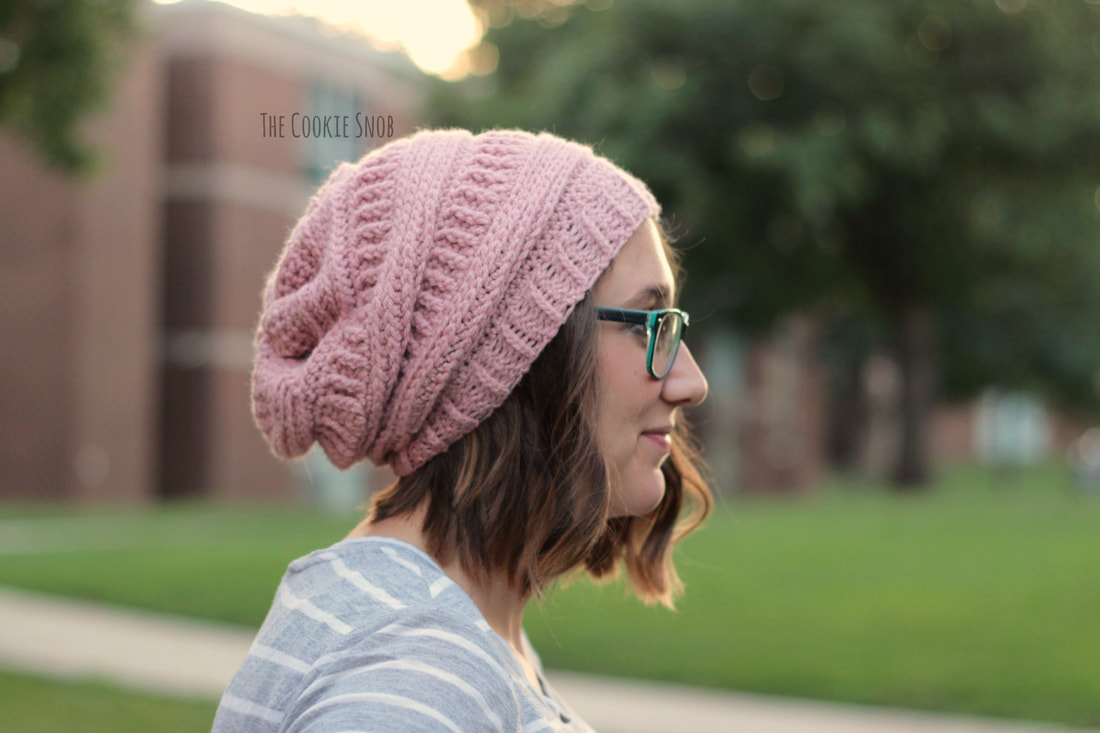 Most of this pattern is identical to the beanie version, so if you've made that one then you should already be a pro at this pattern. But there are a few important differences. Unlike the tighter fitting beanie, this slouchy version is designed for worsted weight yarn (meaning you have no excuse not to make this beauty). To compensate, I made a couple of small changes to improve drape, since no one wants a stiff slouchy hat. I also changed the brim since it would have been too bulky with the thicker yarn. 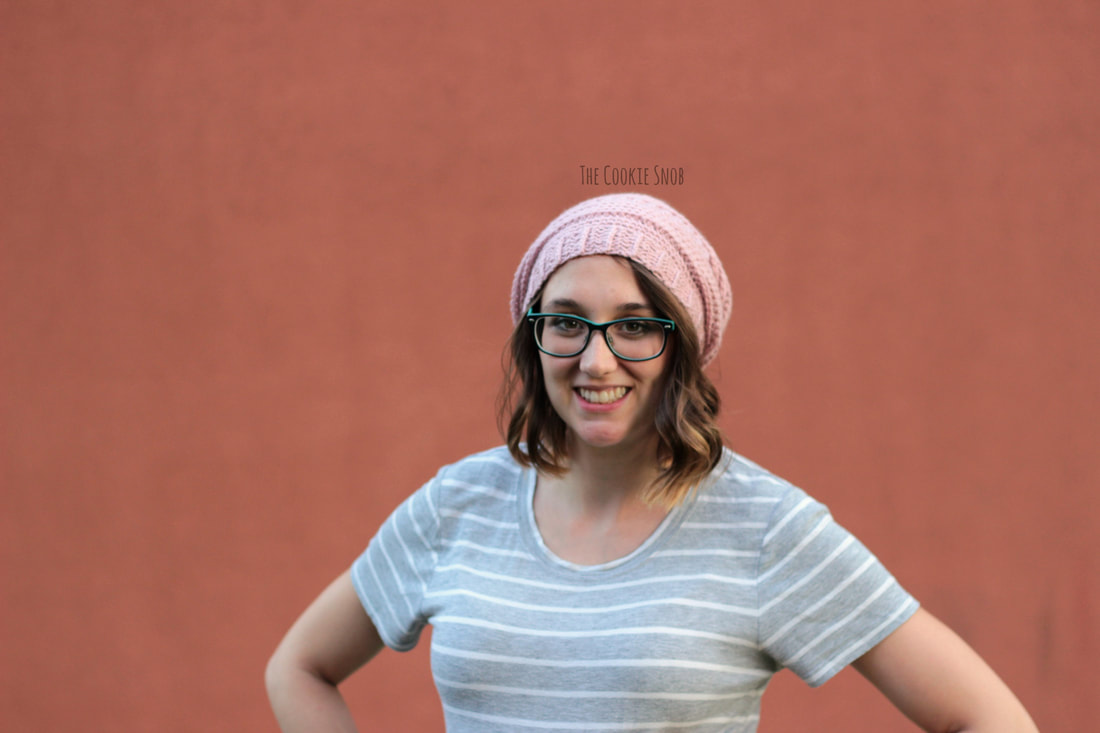 I designed this hat to fit my small head (my head is about 21" in circumference), but you can easily alter the pattern to fit any size head. I've noted simple modifications you can make to change the size in underlined text throughout the pattern, so keep an eye out for those. 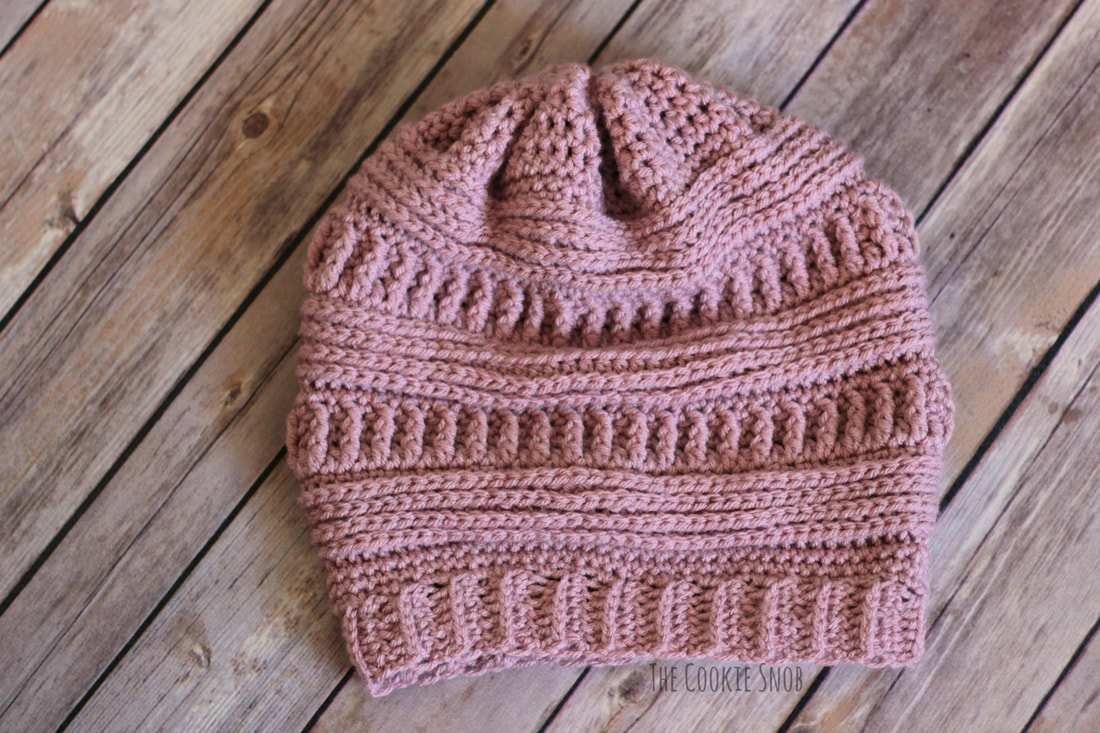 As with the beanie version, a good portion of this hat is worked in the 3rd loop. If you're not familiar with the technique, you'll be inserting your crochet hook in a different spot than you normally would. Instead of using the "v" looking stitch (consisting of the front and back loops), you'll be working into the extra loop (aka the 3rd loop) just below the "v." I've highlighted the 3rd loops for the rest of the row in the picture below, as a visual. If you find that this is tricky or you'd like more guidance on this, take a look at this quick tutorial I put together. 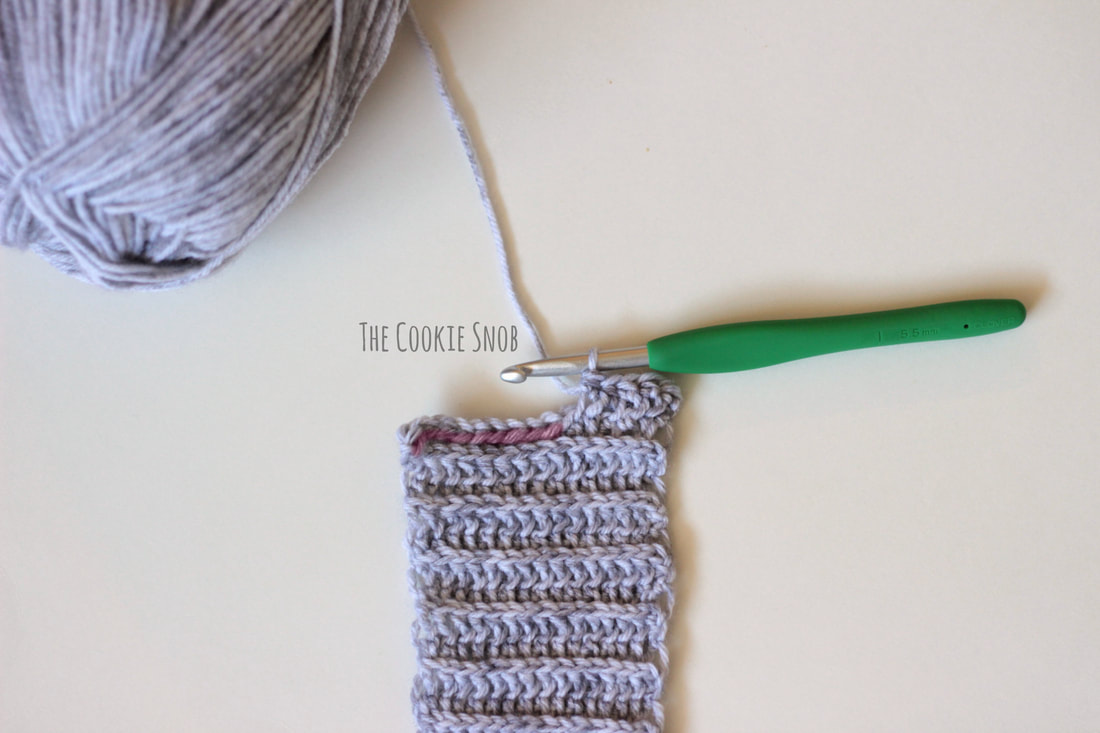 Edit: To help with sizing, I'm including instructions for a simple gauge swatch so that you can compare your stitches to mine. My swatch was made using the J hook and I Love This Yarn! from the original hat. Gauge Swatch: Ch. 14 Row 1: hdc in the 2nd ch from the hook and in each st across, turn (13) Rows 2-11: ch 1, hdc across, turn (13) You should now have a square that measures 4" wide and 4" tall. If yours is smaller, you'll want to go up a hook size. If your square is larger, you'll want to consider going down a hook size. However, you don't want to sacrifice the drape, since this is a slouchy hat, so if your swatch is too large and the stitches look too tight when you manage to get a matching gauge, I would recommend just decreasing the number of stitches in the hat instead (since it's super easy to do); the last thing you want is a really stiff hat. 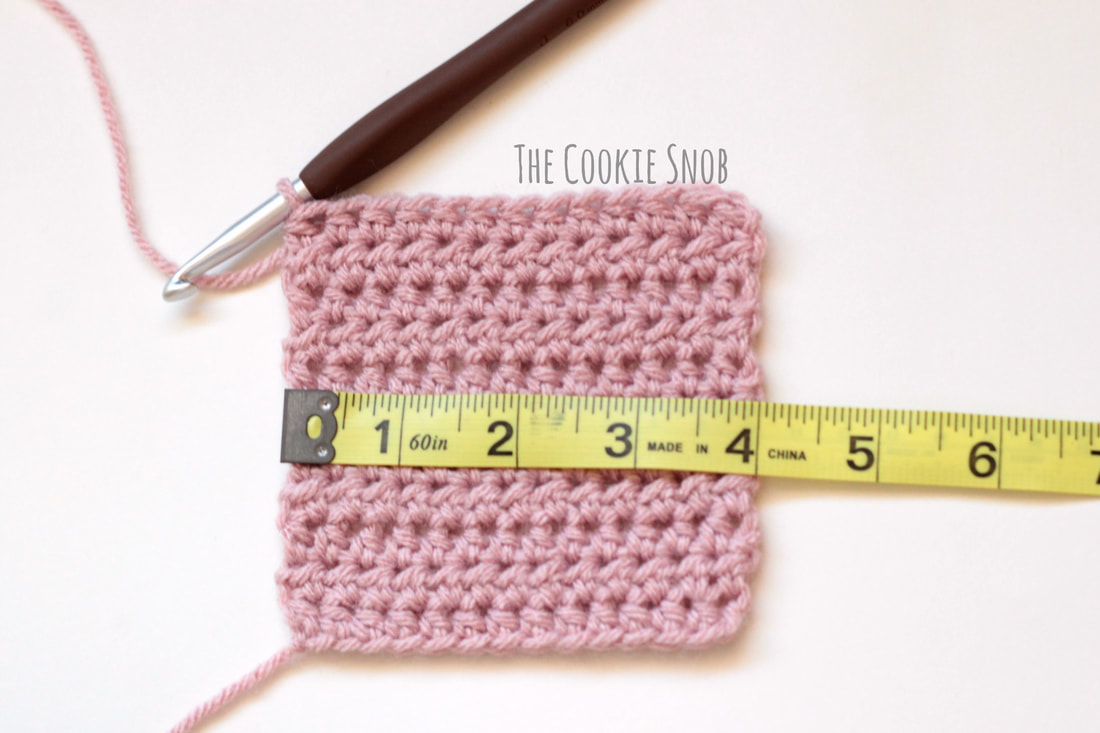 If you're interested in a printable PDF version of this pattern, you can find one on Ravelry (it includes both this pattern and the tighter beanie version in the same PDF). Edit: You can now also find it bundled with all 3 versions of the 3mL beanie (including the new messy bun version). Enough talking. Let's get to hooking! Materials:
Stitch Glossary: st(s) = stitch(es) ss = slip stitch ch = chain sc = single crochet hdc = half double crochet dc = double crochet fpdc = front post double crochet flo = front loop only Edit: If you're having any trouble with this pattern, be sure to check out the FAQ Brim: Using the smaller (5.5mm) hook: Ch 8 Row 1: hdc in the 2nd ch from the hook and in each st across, turn (7) Row 2: ch 1, hdc across in the 3rd loop (see note above), turn (7) Repeat row 2 until the brim is your desired length. I made mine 22" when lightly stretched. Make it as long as you need to fit comfortably on your head, but please keep in mind that the brim will stretch a tiny bit with use over time. 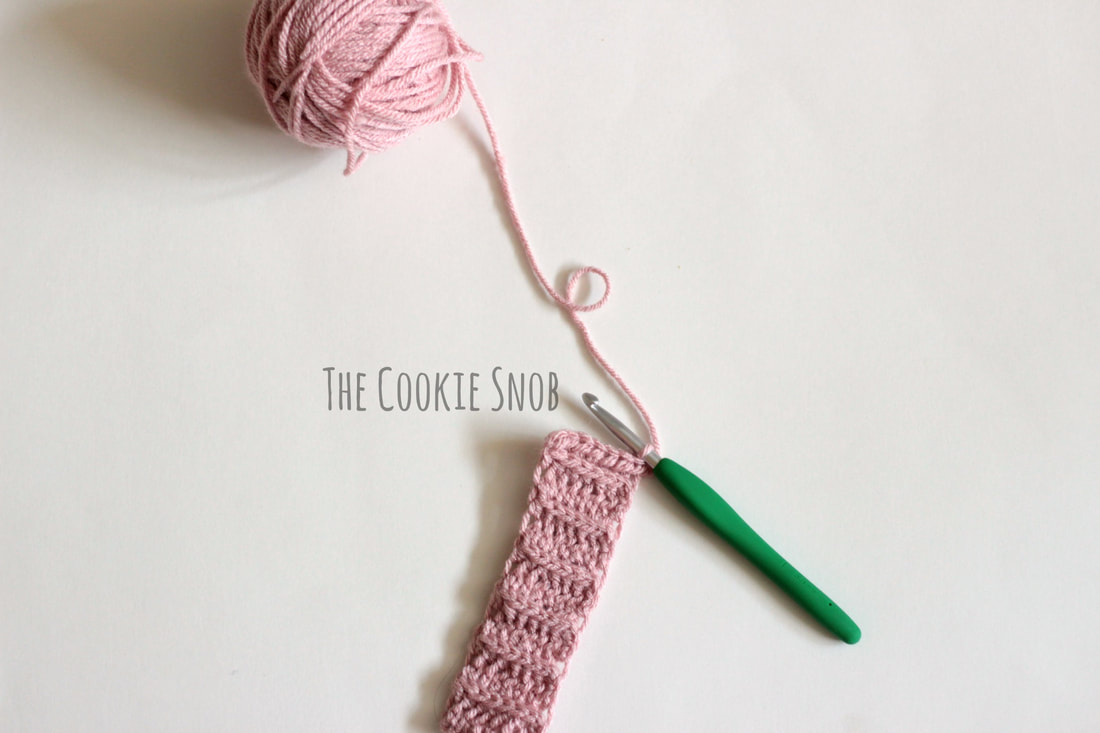 Fasten off, leaving a long tail of yarn for sewing. Place the two short ends of the brim together and sew them into a loop with the tapestry needle and the yarn tail. I recommend using the mattress stitch for neatness. I recommend dividing the brim into 4 equal sections using stitch markers at this point to make the next step easier, but it's not required. Body of the hat: Using the larger (6.0mm) hook: Round 1: Work 84 sc evenly across the top of the brim, with the right side facing out. If you've divided your brim into 4 sections, you can evenly work 21 sc into each section (or you can just eyeball it if that works better for you). Join to the first sc with a ss. (84) Or, if you want to make the circumference of the hat larger, you can increase the number of stitches over the top of the brim (just be sure that it's an even number of stitches). Rounds 2-3: ch 1, sc across, ss to join (84) Round 4: ch 1, hdc across in flo, ss to join (84) Rounds 5-7: ch 1, hdc across in 3rd loop, ss to join (84) Round 8: ch 1, sc across in 3rd loop, ss to join (84) Round 9: ch 2, dc across, ss to join (84) Round 10: ch 1, [sc, fpdc] around, ss to join (84) Round 11: ch 1, sc around, ss to join (84) Round 12: ch 1, [sc, fpdc] around, ss to join (84) Note: The fpdc from round 12 should be worked into the fpdc from round 10 Round 13: ch 1, sc around, ss to join (84) Rounds 14-23: Repeat rounds 4-13 Rounds 24-28: Repeat rounds 4-8 Round 29: ch 1, sc around, ss to join (84) Rounds 30-34: ch 1, hdc around, ss to join (84) *Note: the hdc rows here will cause the top of the hat to splay out a bit at the top, as shown in the picture. This won't be visible at all when you close up the hat, but if it bothers you, you can easily use sc here instead. Just keep adding sc rows until your hat measures about 10" from the brim to the top (although this may make the top a tiny bit stiffer, depending on how tightly you crochet)* 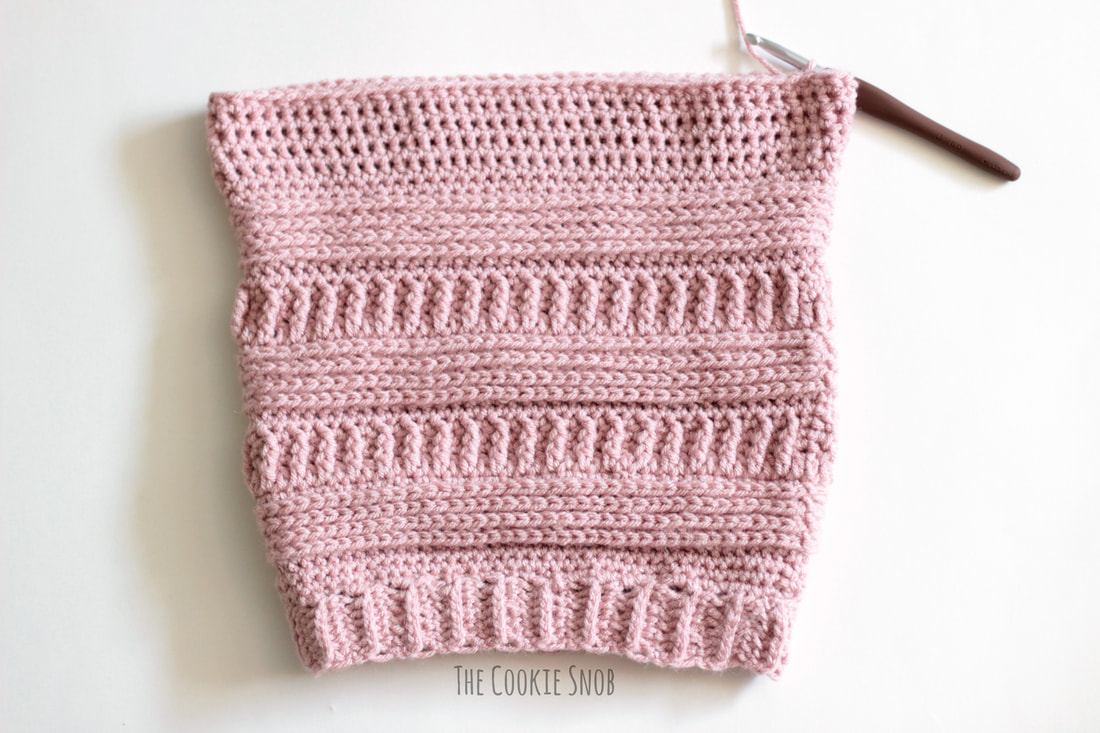 The closing at the top of this hat is a little different, but really simple once you get the hang of it. Keeping the loop on your hook (do NOT fasten off yet), fold the top of the hat in half, with the hook in the center. Ss into the stitch opposite your hook, creating a figure 8-type shape. 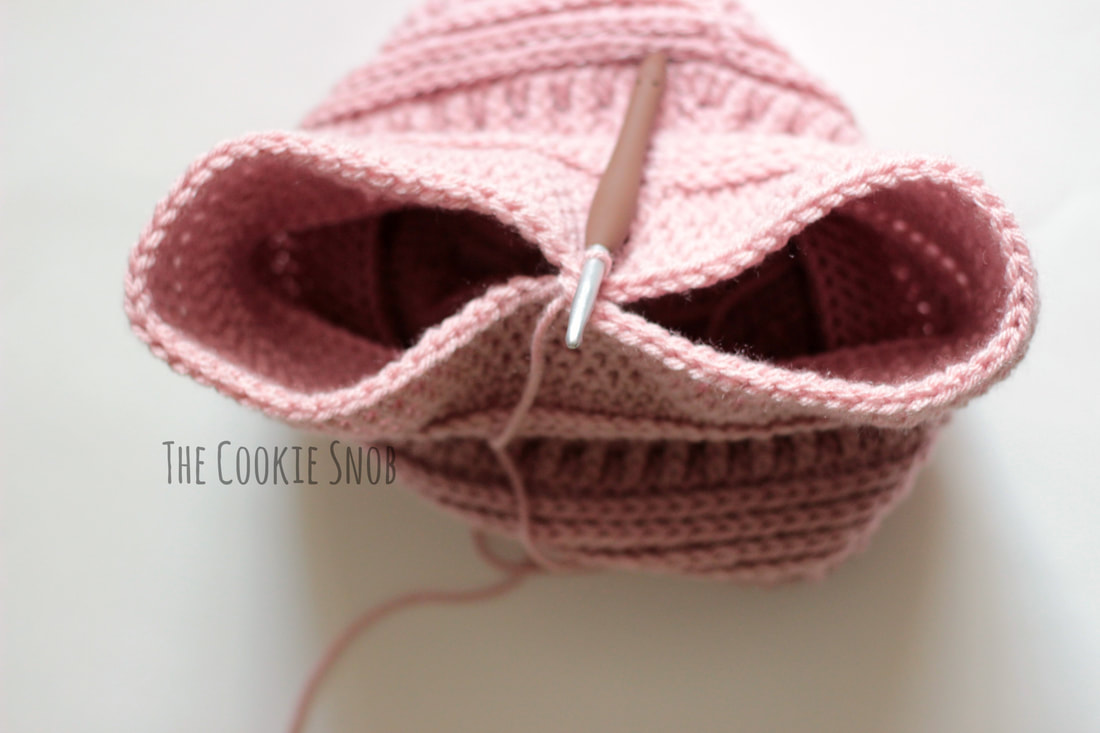 Pinch the far end of the "8" to the center and ss into it; repeat on the other end of the "8". This will create a shape that resembles an "x" (with four arms). 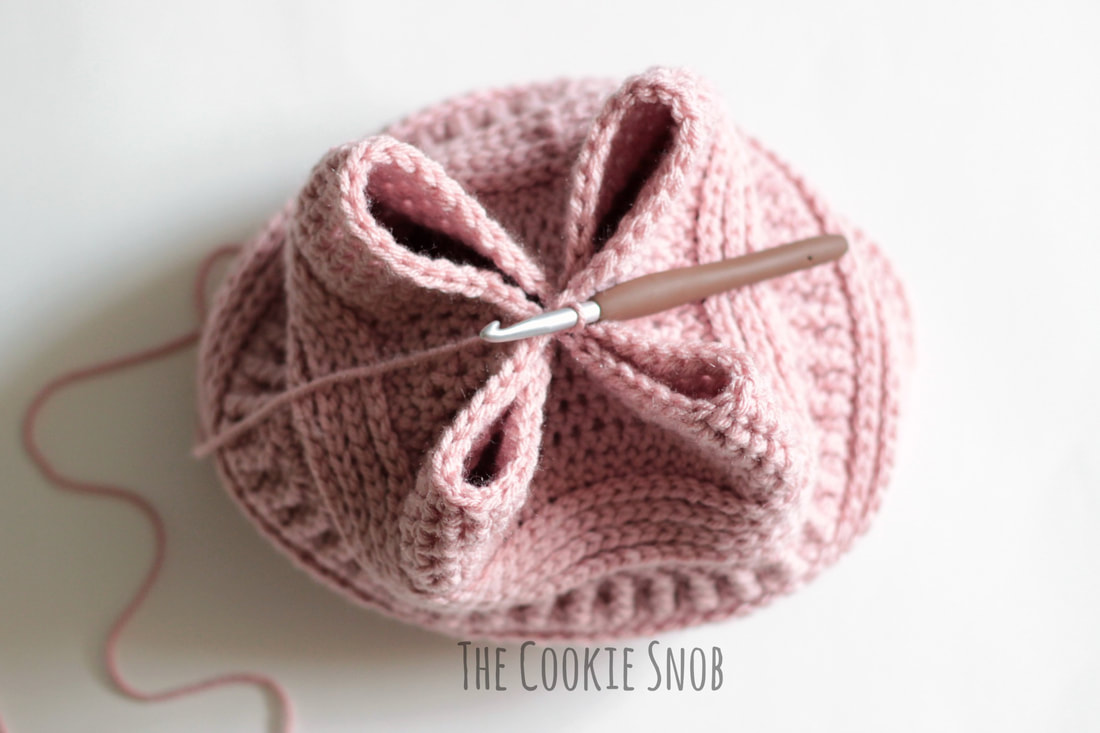 Ss into the center point of each "arm." Continue to ss into the opposite ends of loops formed until the top of the hat is closed. Or, alternatively, you can thread a long piece of yarn back and forth through the top round of the hat and then pull taut to close. Fasten off and weave in any remaining ends. 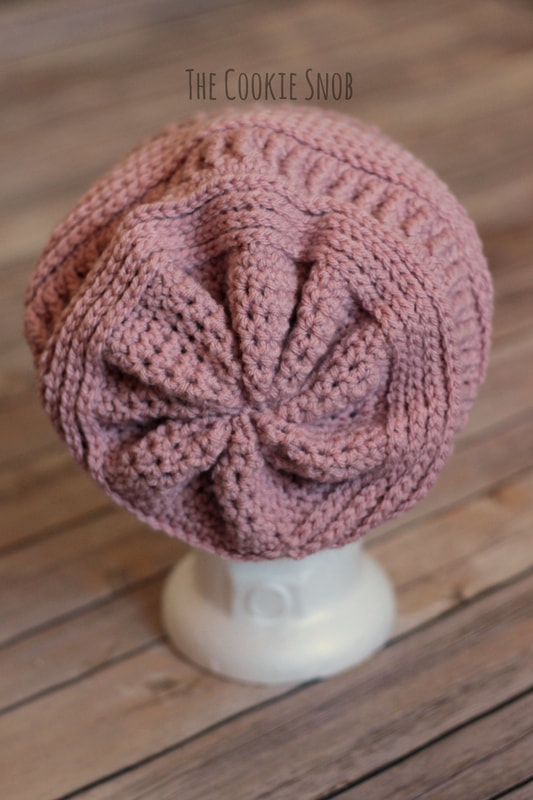 Congratulations! You're now the owner of your very own über chic slouchy hat! I hope that you all enjoy this pattern. Please consider supporting my blog by buying the printable PDF version on Ravelry (the PDF includes the patterns for both this hat and the tighter beanie style version); your support allows me to keep designing patterns for you all! Edit: You can now also find it bundled with all 3 versions of the 3mL beanie (including the new messy bun version). If you end up making this hat, I'd love to hear about how it turns out! And, as always, feel free to reach out with any comments or questions you might have. You can find me in the comments section below or on social media. Happy hooking! 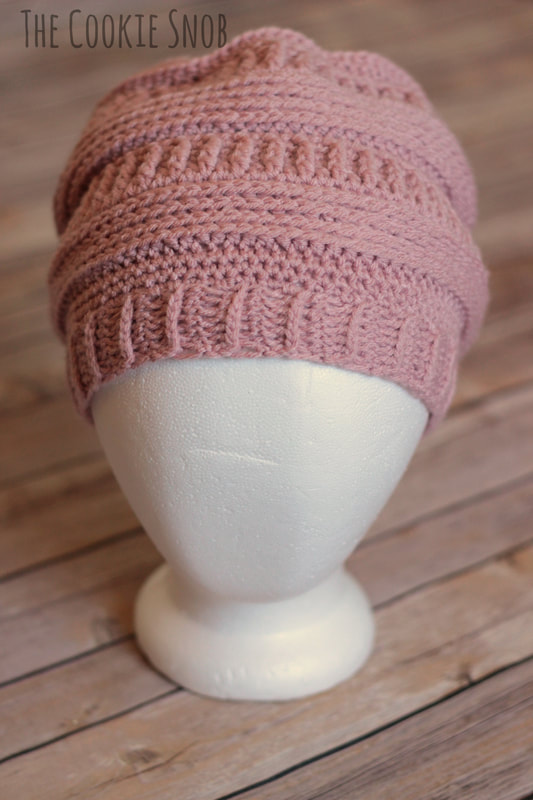 ***You're welcome to do whatever you'd like to with finished products made from this pattern but if you do sell them, I ask that you link back to my page. You may not copy this pattern, repost it anywhere (either altered or in its original form), or claim it as your own. You may not use any photos on this site for your own use. ***
72 Comments
8/3/2017 08:53:26 am
Hello, I come from moogly. I loved this piece of crochet, you explain very well. That will be my next project. Thanks for posting. God bless you. Here in Brazil, we also like to crochet, I have a crochet shop, who can access, I get gratio: http://www.mundodocroche.com.br/tapete-de-barbante-quadrado
Michelle
8/13/2017 07:15:21 pm
Mine seems too long, but I hope someone likes it.
Erin
8/13/2017 07:30:10 pm
It's hard to make a pattern that will turn out exactly the same for everyone, since everyone uses a different hooks, different tensions, and different yarns. If it seems like your hat is too big overall, try going down a hook size. If it's too long, you can always leave out some rows (either omit one of the repeats or just take a row or two out of the repeating pattern, depending on how much length you need to take off). Or, if it's too wide, you can easily decrease the number of stitches in each round (as long as you have an even number, the pattern will work). You can also try the beanie version, if you just don't like the slouchiness of it. Good luck! I hope your hat finds a good home :)
Jessie Kriel?
9/10/2017 10:40:39 am
Hi! I'm having trouble with rows 11,12,13... it's not making nice ribs like yours. Is there a reason there is a sc row in between? It seems I should skip the sc row and fpdc sc for three rows instead...
Erin
9/10/2017 10:48:15 am
Hi Jessie! I use the sc row because I thought it looked neater for the way I crochet. But I tend to crochet tighter than average. So if you find it disrupts the ribbing when you make it, feel free to leave it out. The pattern should still work. Good luck with your hat!
nicole
10/22/2017 08:53:48 pm
If my round 10 starts to curl, am I doing it wrong? Maybe putting too many stitches.
Erin
10/29/2017 03:44:53 pm
Hi Nicole! You want to make sure that you keep the same number of stitches in every round. If you work the sc and the fpdc in the same st, then you'll effectively double the number of stitches, which you don't want. My best guess is that's why it's curling (but it's hard to know for sure without seeing it in person). So if that's the issue, then just make sure that you're alternating stitches. Work a sc in the first st, then a fpdc in the second st, then a sc in the third stitch...and so on. Hopefully that helps!
Fareeha
11/11/2017 04:57:51 am
I love this pattern. I wanna ask that what to do with that square you made first?
Erin
11/13/2017 10:43:04 pm
Great question! I think I ended up frogging this one and using the yarn for something else because I needed it for a project. But I do have an idea for using up gauge squares that I'm reminded of. One of these days I'll have to add it to the blog :)
Wendy Bradley
10/14/2019 10:46:59 am
A great idea is to keep them, with a note attached to each one, noting the yarn brand, color, weight, and hook or needle used. Then, when you make something else with the same type of yarn, you already have an idea of your gauge. If you use smaller hooks/needles, you know your st per inch will increase by a few stitches. Likewise, if you use larger hooks/needles, your st per inch will lessen by a few st.
Sharon
12/21/2017 05:57:24 pm
Hi. I would like to make this hat for my 10 year old. Would 60 stitches instead of 84 be enough? I will also reduce the number of rows. Thanks for your help!
Erin
12/21/2017 10:47:03 pm
Hi Sharon! The number of stitches you'll need will depend on the the size of your 10 year old's head and how slouchy you want it to be. But I think 60 stitches sounds like a really good starting point (especially if you're a loose crocheter). This hat is pretty forgiving, so as long as the brim fits, you'll have a bit of flexibility.
monica
12/23/2017 01:55:12 pm
i love love love this pattern!!! it came out perfectly. thank you so much for documenting it and making it available for free :)
Kat
1/1/2018 07:51:51 pm
I was wanting to make a messy bun version of this hat. Do you think its possible? What row do you think I should stop at to make a pony opening?
Erin Sharp
1/1/2018 08:05:20 pm
It's definitely possible! I have a messy bun version available on this site. It's linked to above, but if it's easier, you can also find it here: http://www.cookiesnobcrochet.com/home/3-ml-messy-bun-beanie
Tiff
1/12/2018 10:51:18 pm
Hi, I don't know what I'm doing wrong. Went great till row 5, but the 3rd loop is now at the back and I can't grab it like I could in the ribbing. Help please!
Erin
1/13/2018 05:13:57 pm
Hi Tiff,
Mel
4/27/2020 10:46:56 am
Does this also mean that for row 4 when you say FLO it is actually the loop furthest away from me because of not turning the pattern?
Erin
4/27/2020 03:54:06 pm
Hi Mel,
Cas R
1/15/2018 11:55:59 am
For the sc, fpdc - is it both stitches into one stitch or alternating? Any chance there is a video tutorial for this?
Erin
1/15/2018 12:10:15 pm
It's alternating stitches; if you put them both into the same stitch then you'll end up with twice as many stitches. There's no video at the moment, but there is a FAQ post that covers this question that you can find linked to in the post above. Hopefully this helps 😊
Kaden
1/28/2018 06:04:21 pm
I seem to be having trouble with the sc fpdc round as well. when I alternate the stitches, there gaps and it looks holey. Am I doing something wrong or is just to do with the tension and weight of my yarn?
Erin
1/28/2018 07:12:17 pm
Hi Kaden,
Kaden
1/28/2018 09:43:55 pm
I think it was a tension issue. I sized down the hook for the ribbing and it looks fine now. Thanks for the help! I'm still a beginner lol
Ticiana
1/17/2018 10:31:05 pm
Hi. I absolutely LOVE the look of this hat. I just have a couple of questions. I can’t seem to join rounds with a slip stitch without decreasing the number of stitches. When joining with a slip stitch, do you join to the first stitch of previous round, or to the the chain one stitch? Also when working the first round of single stitches into the brim, do I need to first chain 1? Thank you so much for sharing this pattern!
Erin
1/18/2018 02:04:04 pm
Great questions! When I'm making the hat, I ss to the first st of the round to join. Then I ch 1 and work the first st of the next round in the same st (so the first st from the previous round). That way you'll always have the same number of stitches and the seam will be a bit tighter as well.
Ticiana
1/18/2018 08:15:05 pm
Thank you! I can’t wait to get started again!
Karen
2/6/2018 09:21:28 am
Erin,
Erin
2/6/2018 02:47:00 pm
Yay! I'm glad you liked the pattern and that it helped you get your crojo back!
Tricia
8/4/2018 06:30:44 pm
Hi! Sorry for my english (i’m spanish speaker)
Tricia
8/5/2018 11:02:25 am
I’ve tried everything and I can’t do it :(
Erin
8/5/2018 04:46:26 pm
Hi Tricia,
Julia
8/12/2018 03:45:27 am
Just finished it and love it... just in time to wear it to the footy
susie
10/25/2018 07:58:42 pm
this is not a quick crochet hat but thanks for sharing it anyway
Shanice
11/16/2018 07:02:33 am
My advice, pick a new TV series to watch and you'll be done with the hat before the series is over! I completed about half one evening then woke up the next day and finished it within a few hours.
Erin
11/15/2018 09:34:25 pm
I'm so glad you like the pattern! The PDF version is just a printable, ad-free version of what you see here. So there aren't any official size variations on there. But the beauty of this pattern is that you can really easily adjust the size; just make sure you have an even number of stitches and you'll be good to go!
Donna
11/16/2018 06:33:27 am
Hi Erin, I've really enjoyed making this hat, I love the look of it. I'm just having trouble understanding how to close the top. Is there a video tutorial I could use?
Erin
11/17/2018 02:19:37 pm
Hi Donna,
Val L
12/3/2018 05:39:09 pm
Hey there! I'm just wondering, I'm having the hardest time getting my hook into the third loop. Is there something to help this? Does that mean I crochet too tightly? Lol. It's a real.pain and I keep putting it down :(
Erin
12/3/2018 07:31:51 pm
Sorry that it's giving you a tough time! I find that I get faster at working into the 3rd loop as I go, but it's definitely frustrating to feel like things are going at a turtle's pace. Crocheting a little bit looser will probably help if you find that the loop is too tight to insert the hook into easily. (Pausing for half a second in the middle of a stitch will usually help loosen things up automatically). You may also want to double check that you're inserting the hook into the right place. If you're meeting a lot of resistance, you might be trying to force the hook where it isn't meant to go.
Mary
1/4/2019 03:47:49 pm
I'm having a slight issue with stitching into the 3rd loop. Nowhere does it mention if you turn the hat after each row so some of my rows arent completely matching up.
Erin
1/4/2019 07:49:02 pm
Hi Mary! The pattern doesn't mention turning the hat because you shouldn't turn the hat as you go. The same side should be facing you the whole time as you work in the round. As such, the 3rd loop will always be on the inside of the hat (unlike the brim, which was turned, resulting in the 3rd loop being in the front). If you want to practice this or get a better mental image of what working the 3rd loop in the round is like, I recommend checking out the 3rd loop tutorial I posted (you can find it here: https://www.cookiesnobcrochet.com/home/3rd-loop-tutorial-snail-coaster)
Sabrina
1/4/2019 04:23:27 pm
Hello, trying to adjust for my big head. When you say yours is 21" circumference are you measuring around your head above your ears or actually where the brim of this beanie sits? Thank you
Erin
1/4/2019 07:53:21 pm
Hi Sabrina! Great question. I was measuring my head around where the brim of the beanie sits. Although when I measured around my ears, the measurement came out the same. Hopefully that helps!
Faith
1/6/2019 08:03:46 am
Really great hat and great pattern - I learned about a world of new stitches! Thank you!
Danielle
1/10/2019 12:15:21 pm
HI, when you said in your materials listed that it took less than a ball of yarn, you didn't specify that the ball you used was a 7 oz ball, and that yarn you listed has to be searched for in order to find out that it was a 7 oz ball. I started with almost 4 oz, and don't have enough because the wording is weird. Balls of yarn very in sizing, and I feel like it should have been a little more clear by saying less than 7 oz ball of yarn, rather than just less than a ball. However, my project is working up nicely, and I appreciate that, as I have attempted several other slouchie hat patterns that have not worked up at all like they should, and I make these for gifts, so it's rather frustrating.
Melissa Miller
1/20/2019 12:30:47 pm
Just made this for a friend with a beautiful orange yarn. Love it!! :)
Elmarie
6/20/2019 03:04:41 am
There are so many comments on this pattern that I might have missed the answer to my question...is this in UK or US terms (I'm from South Africa)
Erin
6/21/2019 09:14:14 am
Welcome from South Africa! All of my crochet patterns use US terms. I hope you enjoy the pattern!
Alyssa Wall
7/9/2019 03:31:36 pm
Hi! I'm somewhat of a beginner and I LOVE this hat. I'm running into a couple issues though.
Erin
7/10/2019 10:53:40 am
Hi Alyssa! I'm glad you like the hat! I'll do my best to answer your questions.
Alyssa Wall
7/11/2019 10:07:20 pm
So I tried crocheting from the outside of the brim, going around and following the pattern exactly...and it’s inside-out? How does that happen, I wonder? Is there such a thing as crocheting backwards accidentally?
Erin
7/12/2019 11:34:56 pm
How strange! Maybe I misunderstood what you meant when you said "from the outside?" This is one of those cases where a picture would be really handy, since text can sometimes be ambiguous. If you want to send me a picture, feel free. If not, I've got a work-around for an inside out hat you can find on the FAQ page for this pattern: https://www.cookiesnobcrochet.com/home/faq-3-ml-slouchy-beanie
Alyssa Wall
7/13/2019 02:59:35 pm
Ohhhh the 3rd loop is in the BACK on the body of the hat. That’s what I missed, since it’s in the front on the brim. :D
Wendy Bradley
10/14/2019 10:33:40 am
Hi! Love your pattern! A few comments: I have found when working the brim, do a sc in the back loops of each stitch, instead of a hdc in 3rd loop. This gives very defined ridges to the brim. The sc instead of hdc also prevents the brim from stretching out too much after wearing (assuming because sc is a slightly shorter stitch?)
Celeste Kennedy
12/5/2019 09:57:06 pm
I am having trouble with the closing technique you used here, but I really like the look of it and don't want to give up on it. Any further help on that would be greatly appreciated!!
Erin
12/6/2019 09:23:42 am
Hi Celeste! I'm sorry that it's giving you a hard time! If you're stuck on closing up the hat, I recommend you check out the FAQ page for this pattern, which has an alternate method for closing up the top that might work better for you. It's a bit easier to follow and it still looks great. You can find it here: https://www.cookiesnobcrochet.com/home/faq-3-ml-slouchy-beanie
Erin
1/14/2020 09:39:55 am
I'm glad you like the pattern!
Jennifer C.
2/12/2020 10:18:48 am
Thank you very much for sharing this pattern. All year long I work on donation hats and scarves for the University I work for. Every January the Women's Center holds a Scarf and Hat Frenzy. Students are welcome to take what they need for the winter weather. I am happy to report that I will be working up many of these hats for our students next year! Your pattern will be on display! Thank You Again!
Meghan
11/2/2020 09:35:46 am
Hi! Thank you so much for sharing this pattern! My sister loves these kinds of hats! My hat is working up perfectly, except that it seems to be inside out. I saw others were having this problem. I haven't turned my work and have continued in the round. Do I just flip it right side out when I'm finished? Thanks!
Erin
11/8/2020 10:06:11 am
Hi Meghan! I'm glad you like the pattern!
Claire
11/25/2020 05:33:26 pm
Thank you for this lovely pattern! I made it with chunky yarn so it's quite huge and heavy but I love it!
Amy
1/27/2021 12:55:30 pm
Hi there! Injust love this pattern! It took me a little bit to get the hang of the 3rd loop but once I got it it was easy!!
Tiffany
5/31/2021 11:23:36 pm
Thank you for posting this pattern! I love it and it turned out great! I'm glad I read some of the comments about finding the 3rd loop on the back side of the half double stitch before doing it. It really helped.
AJ
10/24/2021 12:43:56 pm
Hey! I'm having a great time making this beanie. I'm kind of a beginner, I've only made 2 hats before. I'm just a little confused about Round 10. Does [sc, fpdc] mean, do one single crochet, then one fpdc, then one single crochet, then one fpdc and repeat? Or just one sc, and fpdc on the remainder of the stitches? Also, do I do every single post, or every other post? Im worried about accidentally increasing the stitches. Please let me know
Hehe
9/2/2022 11:33:38 am
Hi! How long is this hat supposed to measure? Is the 10 inches the entire length of it or is it 10 inches from top of brim to last row?
Erin
9/24/2022 05:04:33 pm
It measures 10" in total length (including the brim) before it gets closed up. You can get a visual of what I mean on the FAQ page: https://www.cookiesnobcrochet.com/home/faq-3-ml-slouchy-beanie
Alex
3/2/2024 04:15:25 pm
I was just wondering if this beanie could be made with a typical single crochet, double crochet or treble crochet? Like I really love the shape but I want to make a simpler texture since the hat will have a bunch of colors. Leave a Reply. |
Welcome!Thank you for stopping by to visit my own personal corner of the web! Feel free to take a look around and check out what I've been crafting, crocheting, or baking. Hopefully you'll find something to inspire your own creativity!   
Archives
March 2024
|
 RSS Feed