
|
First there was the 3 mL Beanie, which got a much-needed makeover and became the 3.2 mL Beanie. Then there was the 3 mL Slouchy Beanie, which some of you all have actually been making! (It always blows my mind a little when I see a picture of one.) And now, I'm happy to announce the latest addition to the 3 mL family: the 3mL Messy Bun Beanie! 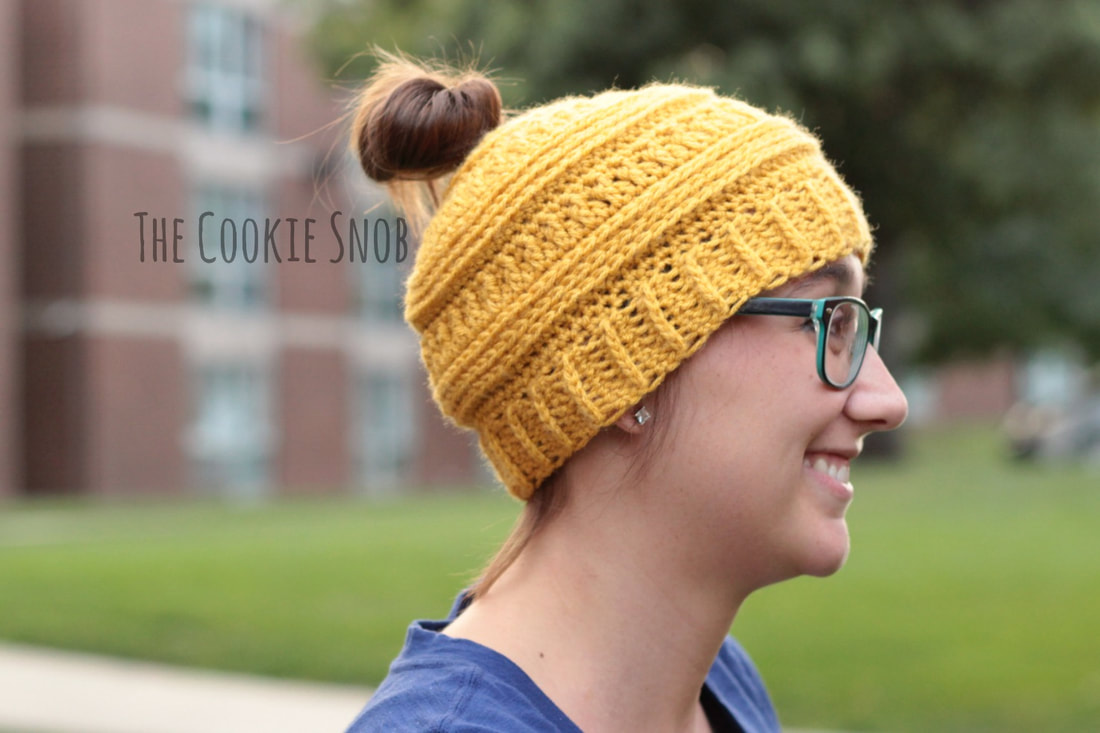 In case you somehow missed the messy bun hat trend and have no clue what I'm talking about, this is a beanie style with a hole on top so that you wear that hat with a high ponytail or the eponymous messy bun. This hat has a really similar construction to its predecessors, except that it has fewer rows and strategically placed decreases to taper off the beanie towards the top for a more fitted look. 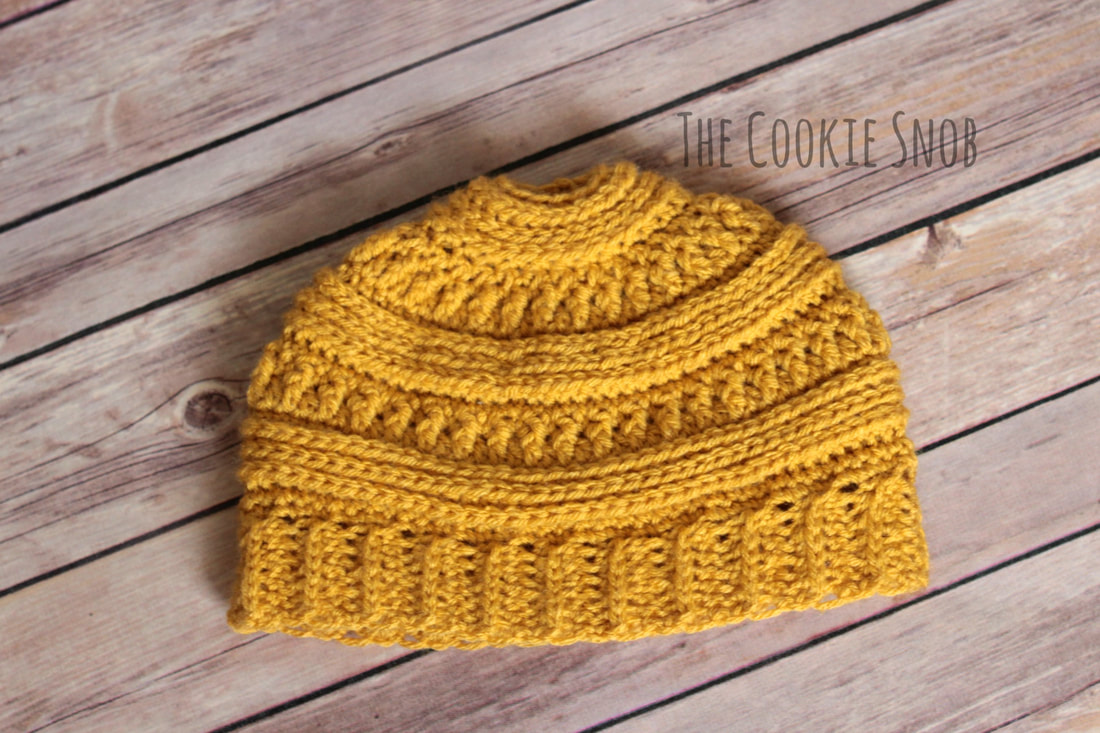 In case you aren't familiar with the previous versions, you should be aware that a good portion of this hat is worked in the 3rd loop. If you're not familiar with the technique, you'll be inserting your crochet hook in a different spot than you normally would. Instead of using the "v" looking stitch (consisting of the front and back loops), you'll be working into the extra loop (aka the 3rd loop) just below the "v." If you find that this is tricky or you'd like more guidance on this, take a look at this quick tutorial I put together. 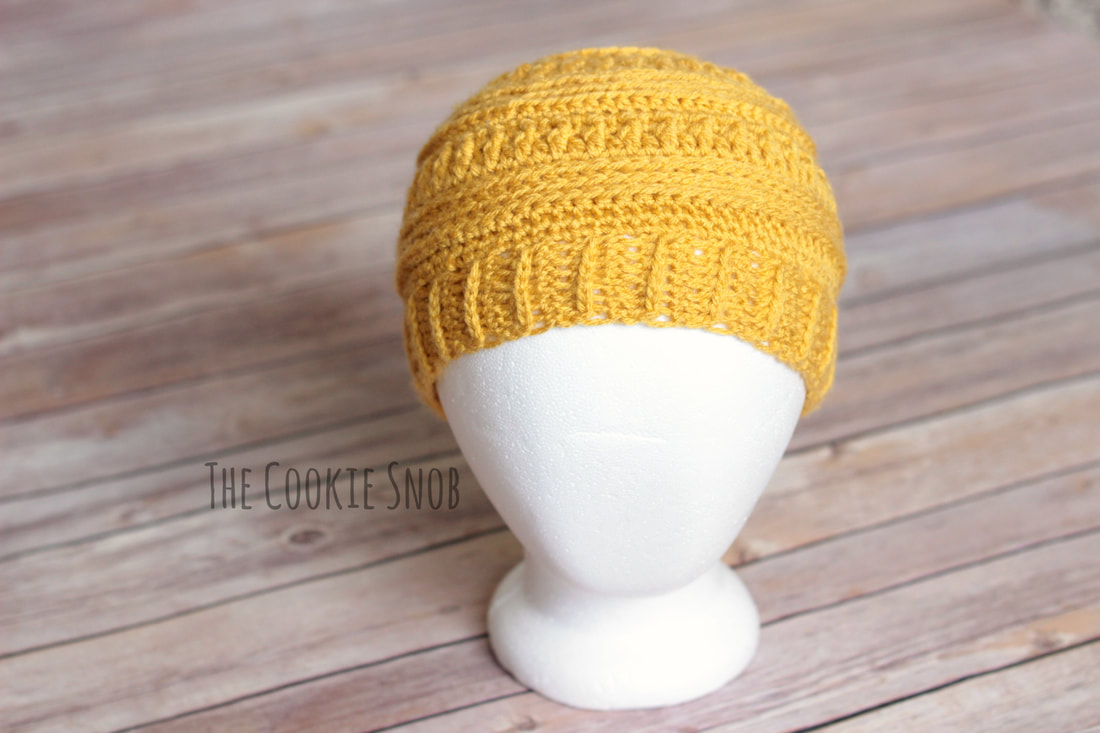 As with the other hats, I've designed this one to fit my small (~21" circumference) head, so if you need different sizes you'll have to modify the pattern a bit. Also, keep in mind that I tend to crochet tighter than average, so you may want to adjust your hook size accordingly. To help with the sizing, you can make this simple gauge swatch based on the J hook and Vanna's Choice yarn to compare your stitches to mine. Gauge Swatch: Using the J (6.0mm) hook: Ch 13 Row 1: hdc in the 2nd ch from the hook and in each st across, turn (12) Rows 2-11: ch 1, hdc across, turn (12) You should now have a square that measures 4" wide and 4" tall. If your square is too large, try going down a hook size. If your square is too small, trying going up a size. Now on to the pattern! 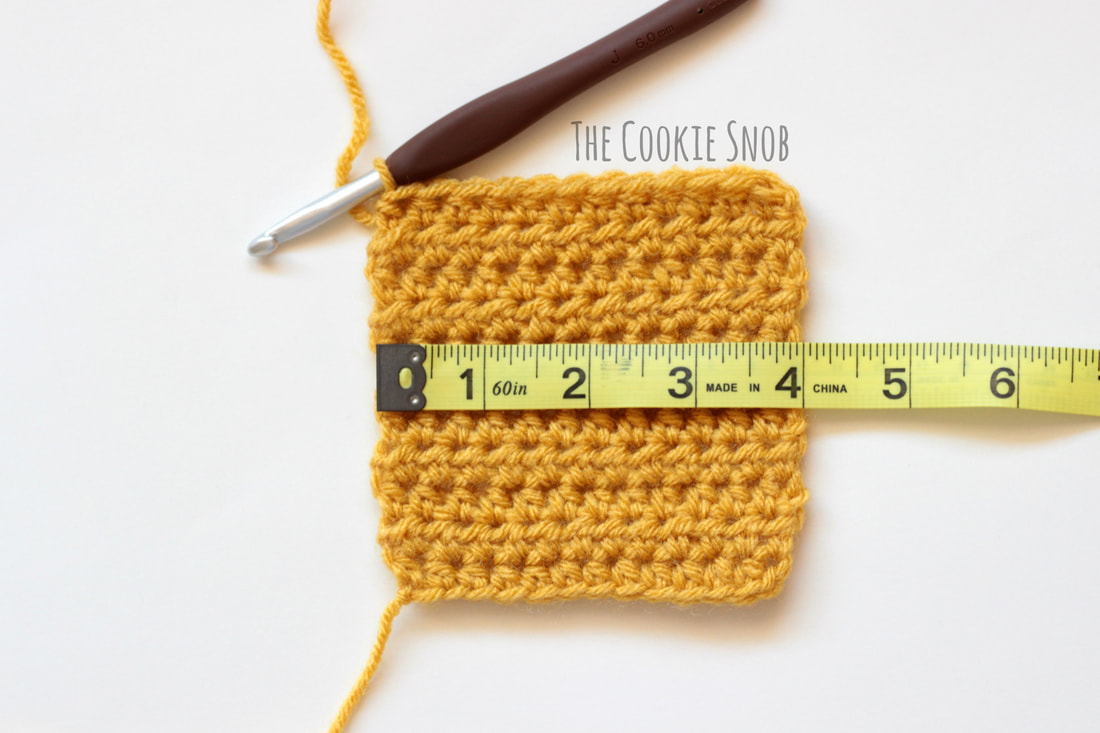 If you're interested in a printable PDF version of this pattern, you can find one on Ravelry. Materials:
Stitch Glossary: st(s) = stitch(es) ss = slip stitch ch = chain sc = single crochet hdc = half double crochet dc = double crochet fpdc = front post double crochet flo = front loop only dec = sc decrease dc2tog = double crochet 2 together (decrease over 2 dc) Brim: Using the smaller (5.5mm) hook: Ch 8 Row 1: hdc in the 2nd ch from the hook and in each st across, turn (7) Row 2: ch 1, hdc across in the 3rd loop (see note above), turn (7) Repeat row 2 until the brim is your desired length. I made mine 22" when lightly stretched. Make it as long as you need to fit comfortably on your head, but please keep in mind that the brim will stretch a tiny bit with use over time. 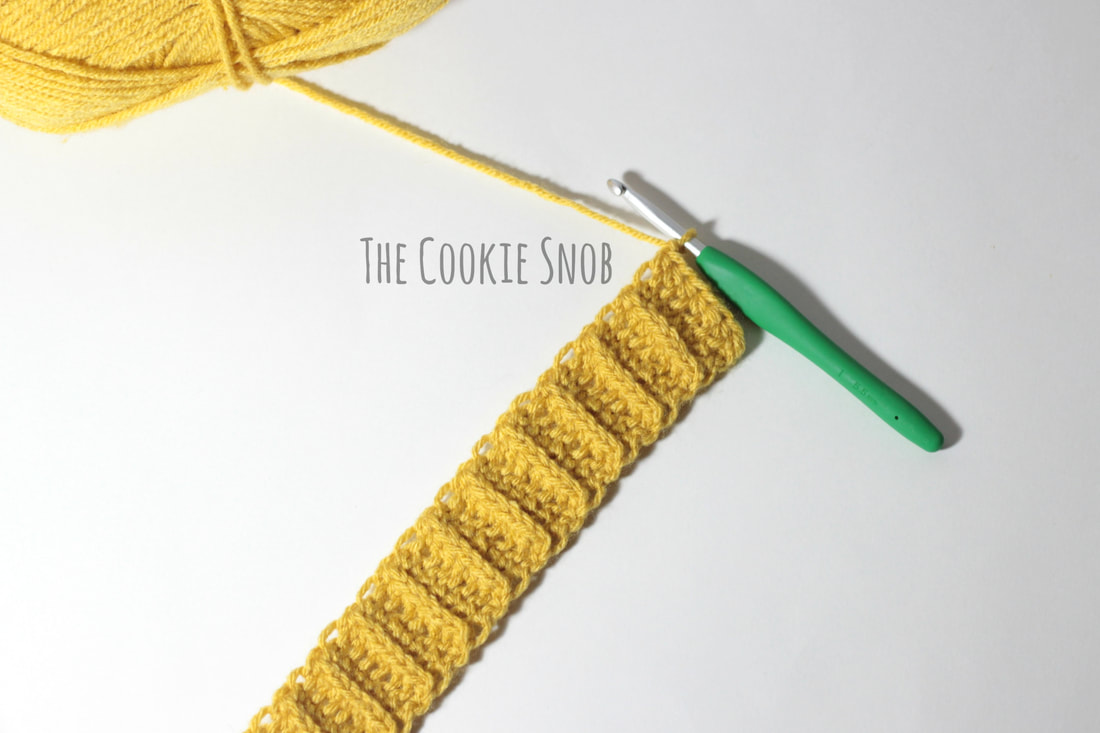 Fasten off, leaving a long tail of yarn for sewing. Place the two short ends of the brim together and sew them into a loop with the tapestry needle and the yarn tail. I recommend using the mattress stitch for neatness. I recommend dividing the brim into 4 equal sections using stitch markers at this point to make the next step easier, but it's not required. Body of the hat: Using the larger (6.0mm) hook: Round 1: Work 76 sc evenly across the top of the brim, with the right side facing out. If you've divided your brim into 4 sections, you can evenly work 19 sc into each section (or you can just eyeball it if that works better for you). Join to the first sc with a ss. (76) 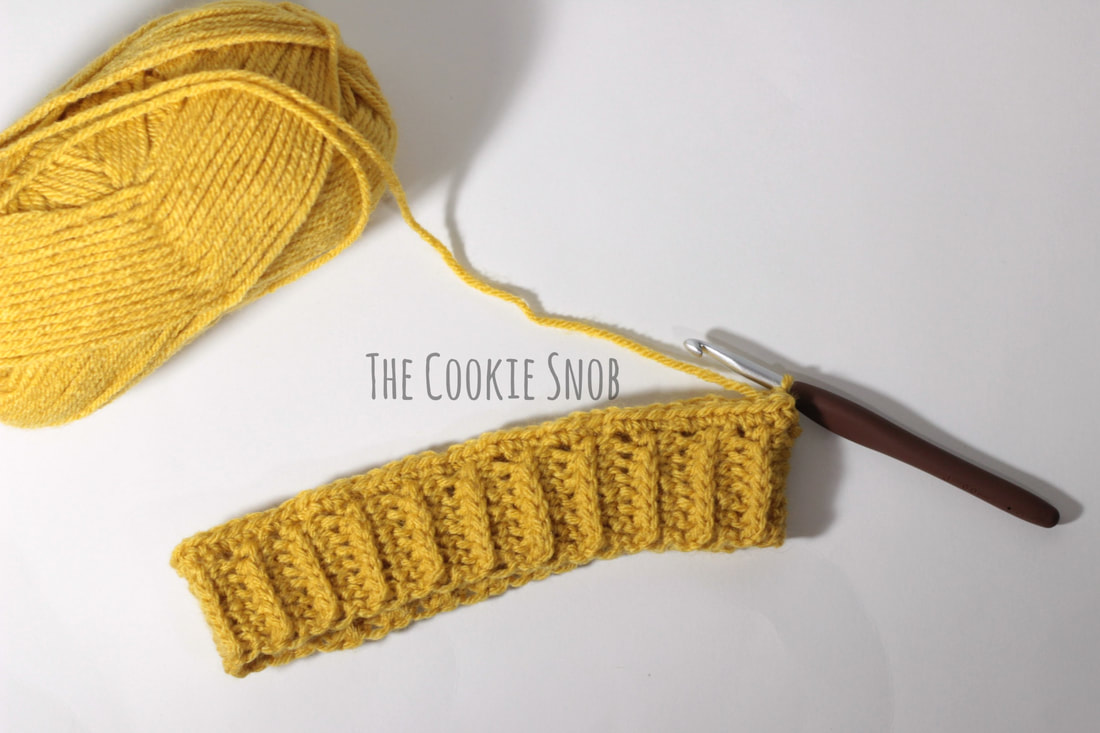 Round 2: ch 1, sc across, ss to join (76) Round 3: ch 1, hdc across in flo, ss to join (76) Rounds 4-5: ch 1, hdc across in 3rd loop, ss to join (76) Round 6: ch 1, sc across in 3rd loop, ss to join (76) Round 7: ch 2, dc across, ss to join (76) Round 8: ch 1, [sc, fpdc] around, ss to join (76) Round 9: ch 1, sc across, ss to join (76) Round 10: ch 1, hdc across in flo, ss to join (76) Rounds 11-12: ch 1, hdc across in 3rd loop, ss to join (76) The next row will begin the decreases. I recommend using a slight variation on the invisible decrease stitch. To make the invisible stitch, insert your hook into the next 3rd loop, as normal... 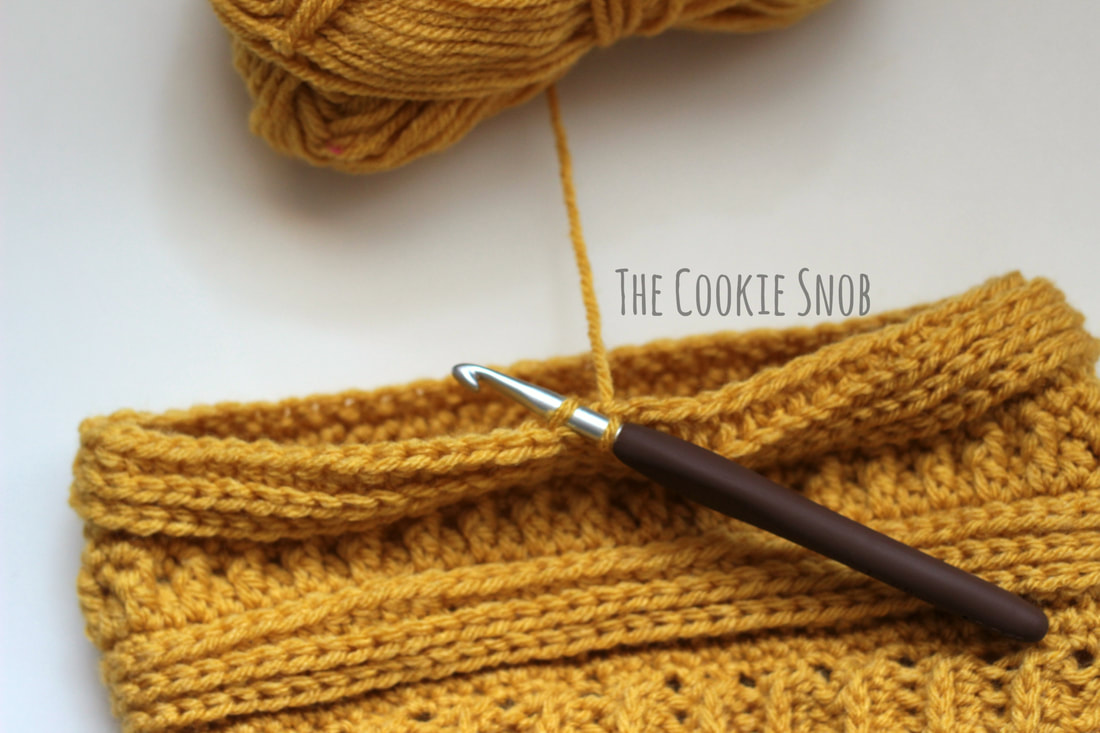 ...then without yarning over, insert the hook into the next 3rd loop. Be sure to insert your hook from underneath the loop. 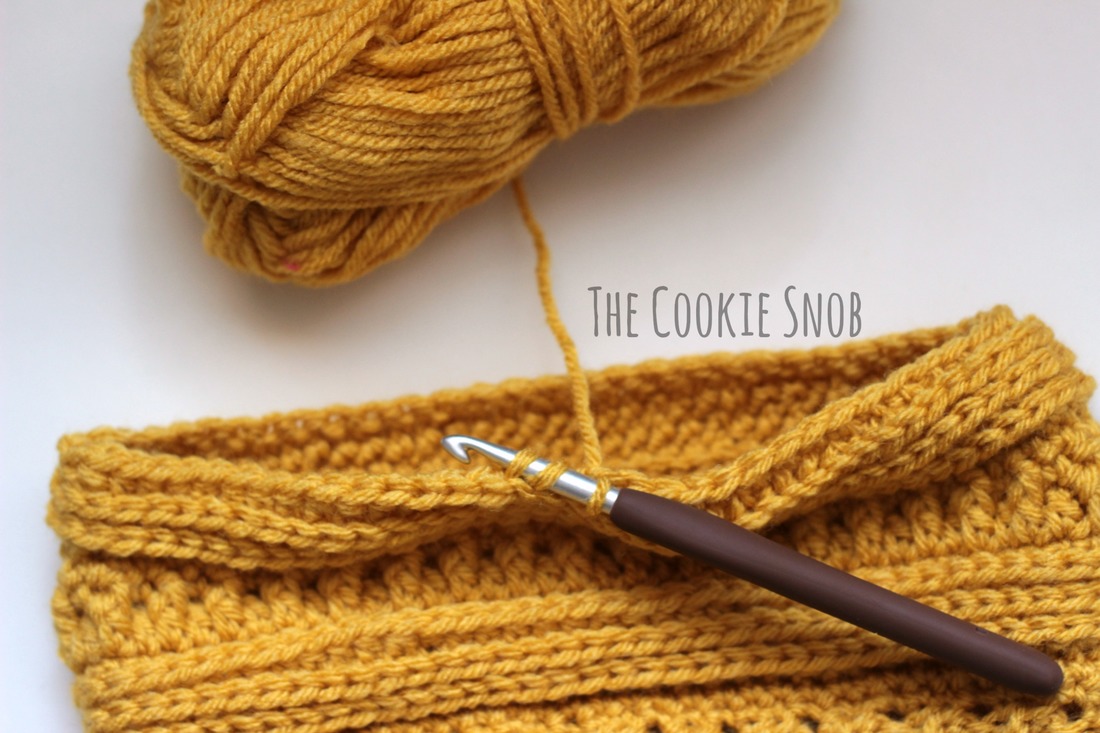 Now yarn over and pull the yarn through the first two loops on your hook. Yarn over again and pull the yarn through both loops on your hook. 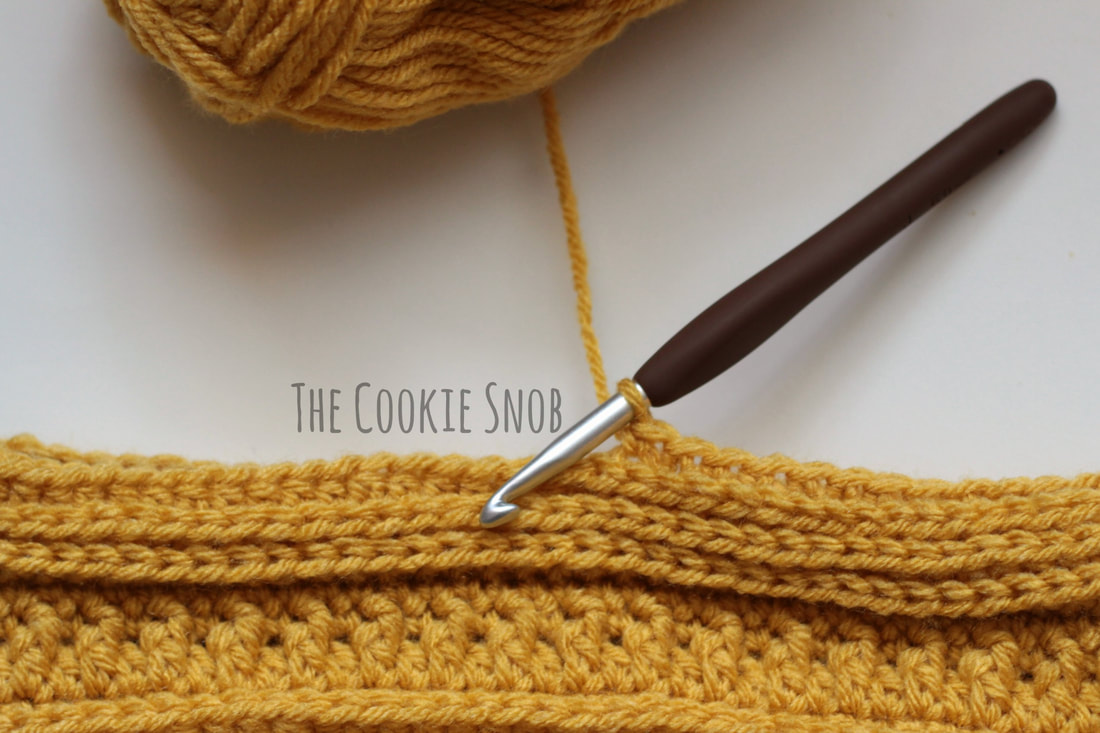 This creates a nice, neat stitch that looks the same as its surrounding stitches. If it's easier, you can just use a regular decrease, but it will be a bit bulkier looking. When you come across the decreases in round 16, you can follow the same procedure, inserting the hook into the flo rather than the 3rd loop. Round 13: ch 1, [sc in the next 2 sts, dec in the next st] around in 3rd loop, ss to join (57) Round 14: ch 2, dc until the last 2 sts, dc2tog (56) Round 15: ch 1, [sc, fpdc] around, ss to join (56) Round 16: ch 1, dec around, ss to join (28) 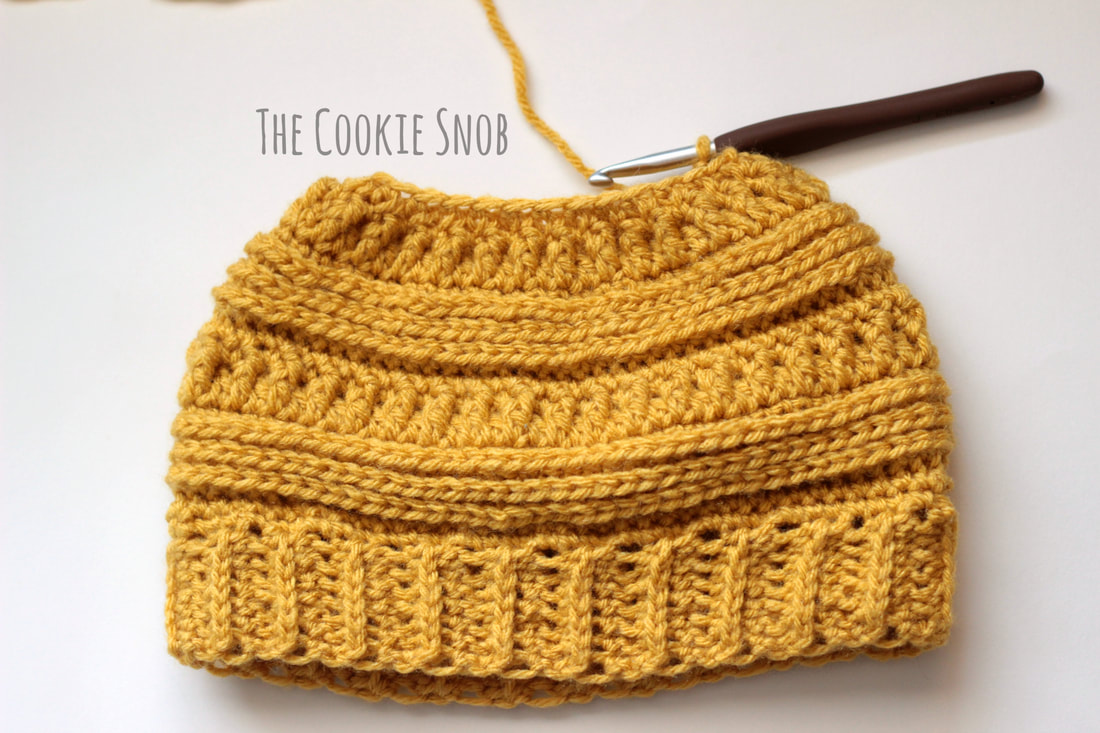 Round 17: ch 1, hdc across in flo, ss to join (28) Rounds 18-19: ch 1, hdc across in 3rd loop, ss to join (28) Round 20: ch 1, dec around in 3rd loop, ss to join (14) Note: If you want the hole to be larger, you can do fewer decreases in the last round; feel free to contact me if you have questions about how to do this. Fasten off. Weave in ends. 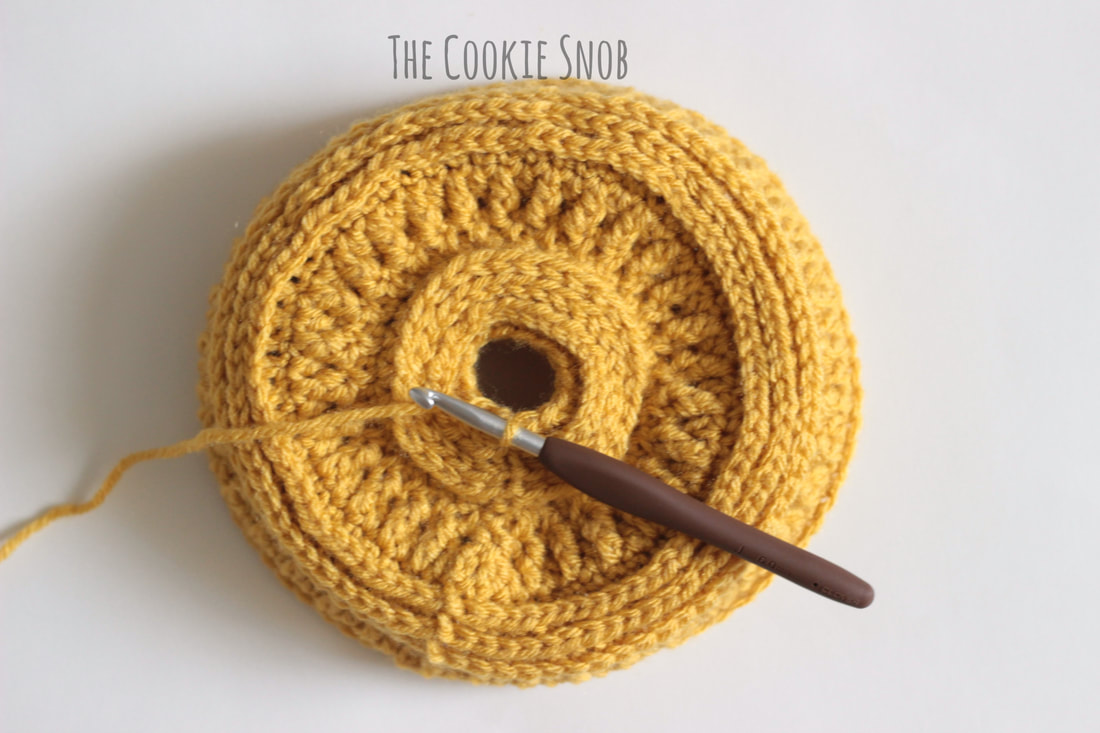 I hope that you enjoy your new messy bun hat! If you like this pattern, please consider supporting my blog by buying the printable PDF version on Craftsy, either by itself or bundled with the other 3 mL beanie versions; your support allows me to keep designing patterns for you all! If you have any questions or comments, you can reach me in the comments section below or on social media. And if you make a hat, I'd love to see it! Happy hooking! 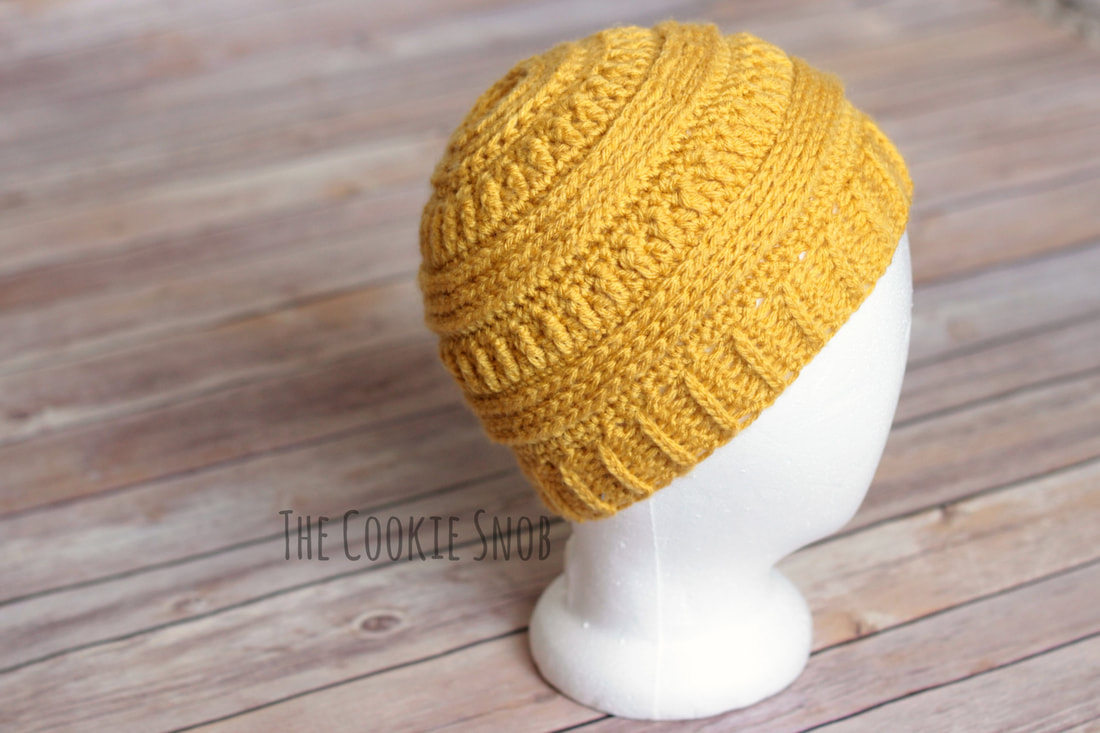 ***You're welcome to do whatever you'd like to with finished products made from this pattern but if you do sell them, I ask that you link back to my page. You may not copy this pattern, repost it anywhere (either altered or in its original form), or claim it as your own. You may not use any photos on this site for your own use. ***
11 Comments
9/10/2017 07:17:47 am
I am going to make these for an upcoming craft fair. Great design, thank you!!
annette kilwein
10/21/2017 02:30:24 pm
excellent instructions and pics thank you
Faith Holbrook
11/11/2017 11:34:56 pm
I was just wondering if you had a visible seam. I reread the pattern to make sure I wasn’t missing it but how did you sl st to join? In flo and 3rd loop only? Or did you sl st to the ch 1 spot? Mines looking a hot mess lol
Erin
11/13/2017 10:40:55 pm
I find that there is a small seam, but it doesn't usually bother me. I ss between the last st and the first st, skipping the ch 1. I also make sure that I start the first st of the round in the same st as the ch 1. That helps keep the seam a bit smaller, but I haven't found a way to get rid of it completely yet. Hopefully that helps a bit!
Crystal Arcand
1/17/2019 10:46:32 pm
Do you turn the work at each new round? As I am beginning round 4 I find that the third loop is on the back side of the stitches.
Erin
1/18/2019 09:10:11 am
Hi Crystal! Great question. No, you should not turn that hat at each round. In order to get the texture shown in the hat, the 3rd loop should stay on the "wrong side" of the hat. It's a little different from the brim where you turned each row and the 3rd loop always moved to the front, but we're going for a different look. Instead of the ribbed look of the brim, we want protruding stitches. So never fear, you're doing it right! :) Hopefully that answers your question. Let me know if it's still confusing.
Misi
8/10/2020 09:56:04 am
Hi! So it's a while later and I came across this because I found your slouch pattern. I'm looking for a pattern to felt. Have you tried that with this particular group of hats?
Erin
8/12/2020 10:24:21 pm
Sorry, but I haven't tried to felt these, so I have no idea how they would turn out. If you end up trying it, let me know how it goes :)
Deepika Raut
11/21/2020 04:04:43 am
hi..wht do u do increase or decrease the size of hat..i mean the first 76 stitches..in wht multiples do u increase or decrease
Bethany
7/3/2021 10:49:23 am
Hi, coming here really late but is there a way to make this into a slouchy version? Like a slouchy messy bun beanie if that makes sense. I've tried comparing the two patterns and I'm not too sure where I would be stopping and/or whether I should just finish off where the stitches end for the slouchy beanie and then just cinch it together instead of stitching it? Any guidance would be appreciated, thank you!
Erin
7/26/2021 04:09:42 pm
Hi Bethany! I've never tried making a slouchy bun version, but your plan sounds feasible. You could use the slouchy version and then cinch it off with some yarn, leaving an opening in the end. Let me know how it goes if you try it :) Leave a Reply. |
Welcome!Thank you for stopping by to visit my own personal corner of the web! Feel free to take a look around and check out what I've been crafting, crocheting, or baking. Hopefully you'll find something to inspire your own creativity!   
Archives
March 2024
|
 RSS Feed